Kubernetes Namespace
 Parth Sharma
What is namespace in Kubernetes?
In Kubernetes, Namespaces are used to organize resources. You can have multiple Namespaces in a Cluster And these Namespaces are kind of virtual Clusters of their own.
The official definition of Namespace says "In Kubernetes, namespace provide a mechanism for isolating groups of resources within a single cluster". Within a Kubernetes Namespace, resources must have unique names, but across different Namespaces, you can have resources with the same name. When you create a Kubernetes cluster, by default Kubernetes gives you 4 Namespaces out of the box:
default
kube-node-lease
kube-public
kube-system
default: Kubernetes includes this namespace so that you can start using your new cluster without first creating a namespace.
kube-node-lease: kube-node-lease Namespace is a new addition to Kubernetes. The purpose of this namespace is that it holds information about the heartbeats of Nodes. So each Node basically gets its own lease object in the Namespace. This object contains the information about that nodes availability.
kube-public: kube-public contains the publicly accessible data. It has a config map that contains the Cluster information which is accessible even without authentication.
kube-system: kube-system is the namespace that includes objects created by the Kubernetes system. The components that are deployed in this Namespace are the system processes - they are from Master managing processes or Kubectl etc. kube-system Namespace is not meant for our (developer's) use. so we do not have to create anything or modify anything in this namespace.
Advantages of Kubernetes Namespaces:
Isolation of Resources: Creates boundaries for applications, preventing interference between teams or projects.
Resource Quotas: Sets limits on CPU, memory, and storage usage within a namespace to ensure fair resource allocation.
Access Control: Allows for tailored permissions using Role-Based Access Control (RBAC) to manage who can access resources.
Efficient Management in Large Clusters: Simplifies organization and management of resources in multi-team environments.
Name Collision Avoidance: Prevents resource name conflicts by scoping names to individual namespaces.
Benefits of Kubernetes Namespaces:
Multi-Tenancy: Multiple teams or applications can operate within a single cluster while remaining isolated.
Cost Efficiency: Consolidating multiple applications or environments in a single cluster reduces infrastructure costs.
Improved Security: Access controls can be enforced per namespace, enhancing security and compliance.
Real-Time Commands for Working with Namespaces:
Here are some practical commands used for managing namespaces in Kubernetes:
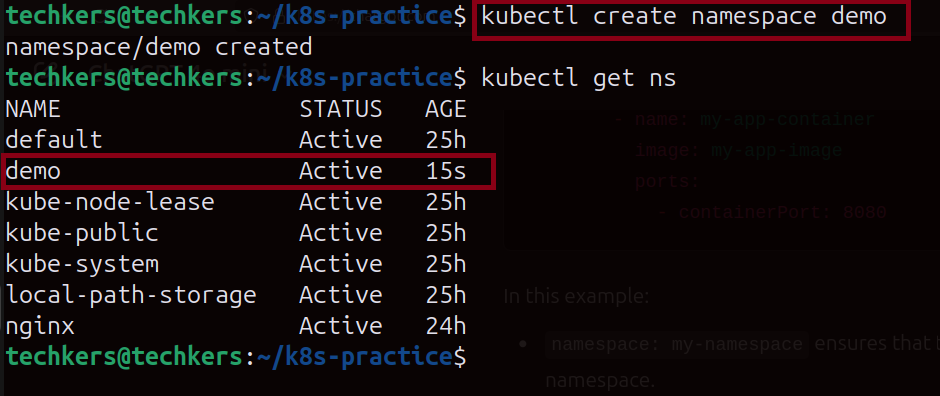
• List all namespaces: kubectl get namespace or kubectl get ns “ns is shortform.”

• Create a new namespace: By using .yml we can create namespace or
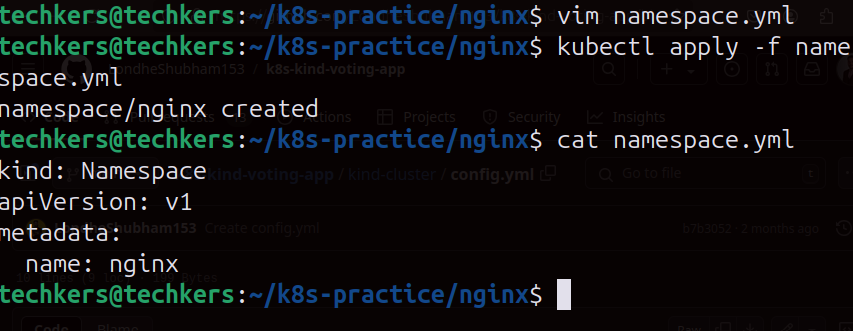
Using imperative command we can create namespace.
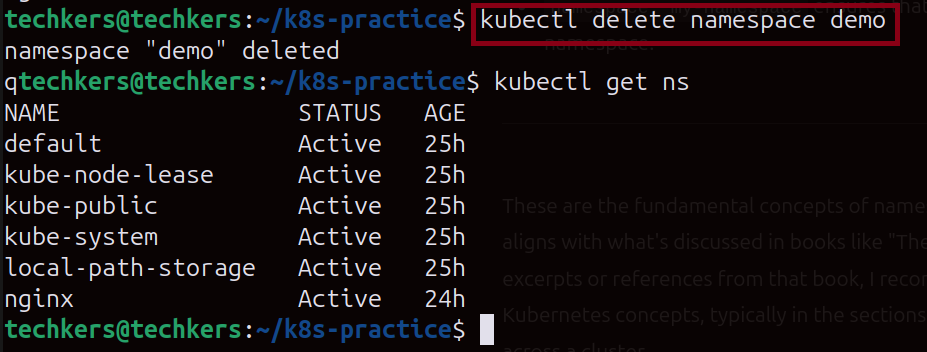
• Delete a namespace (and all resources within it):
Detailed Corporate Examples with Real-Time Scenarios
Example: FinTech Application with Multi-Environment Setup
Scenario: A FinTech company operates applications like account management, transaction processing, and fraud detection. Each application has separate environments for development, staging, and production, all within the same Kubernetes cluster.
Namespace Implementation:
• The organization creates namespaces per environment for each application:
- account-management-dev, account-management-prod
- transaction-processing-dev, transaction-processing-prod
- fraud-detection-dev, fraud-detection-prod
Benefits:
Isolation: By isolating each environment, developers can test changes without impacting production.
Resource Quotas: Production namespaces (account-management-prod, etc.) have higher CPU and memory quotas than development environments to handle live traffic.
RBAC Policies: Access to fraud-detection-prod is restricted to authorized personnel only, ensuring compliance with data security regulations.
Example Commands:
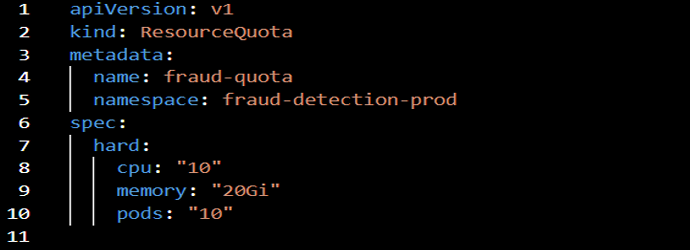
Setting up a resource quota in the fraud-detection-prod namespace:
Deploying resources within the account-management-prod namespace:
kubectl apply -f account-deployment.yaml -n account-management-prod
"I believe this article will be beneficial, allowing you to uncover fresh insights and gain enriching knowledge."
Happy Learning🙂
PARTH SHARMA
Subscribe to my newsletter
Read articles from Parth Sharma directly inside your inbox. Subscribe to the newsletter, and don't miss out.
Written by
