Understanding DaemonSets in Kubernetes
 Subbu Tech Tutorials
Introduction:
In this blog, we will explore the concept of DaemonSets in Kubernetes, a powerful feature that ensures a copy of a specific pod runs on all (or a subset of) nodes in a cluster.
DaemonSets are essential for deploying background services, monitoring agents, and other system-level applications that need to run on every node. We will discuss how DaemonSets work, their use cases, and how to create and manage them effectively.
What is a DaemonSet?
A DaemonSet defines Pods that provide node-local facilities. These might be fundamental to the operation of your cluster, such as a networking helper tool, or be part of an add-on.
A DaemonSet ensures that all (or some) Nodes run a copy of a Pod. As nodes are added to the cluster, Pods are added to them. As nodes are removed from the cluster, those Pods are garbage collected. Deleting a DaemonSet will clean up the Pods it created.
Some typical uses of a DaemonSet are:
running a cluster storage daemon on every node
running a logs collection daemon on every node
running a node monitoring daemon on every node

Example:

aws-node:
Purpose: Manages networking for AWS VPC CNI (Container Networking Interface) plugin.
Function: Ensures every node in the cluster has the
aws-nodepod running for handling pod networking and IP allocation within the VPC.Node Selector: None (runs on all nodes).
ebs-csi-node:
Purpose: Part of the AWS EBS CSI (Container Storage Interface) driver.
Function: Allows pods to use Amazon EBS volumes as persistent storage by managing volume attachment/detachment at the node level.
Node Selector:
kubernetes.io/os=linux(runs only on Linux nodes).
eks-pod-identity-agent:
Purpose: Manages IAM roles for service accounts (IRSA) in Amazon EKS.
Function: Ensures pods can access AWS resources securely using IAM roles associated with service accounts.
Node Selector: None (runs on all nodes).
kube-proxy:
Purpose: Handles Kubernetes networking at the node level.
Function: Ensures proper routing of network traffic between pods and services in the cluster.
Node Selector: None (runs on all nodes).
Let’s describe the aws-node DaemonSet to dive deeper into its details:
[ec2-user@ip-172-31-22-32 ~]$ kubectl describe ds aws-node -n kube-system
Name:           aws-node
Selector:       k8s-app=aws-node
Node-Selector:  <none>
Labels:         app.kubernetes.io/instance=aws-vpc-cni
                app.kubernetes.io/managed-by=Helm
                app.kubernetes.io/name=aws-node
                app.kubernetes.io/version=v1.18.1
                helm.sh/chart=aws-vpc-cni-1.18.1
                k8s-app=aws-node
Annotations:    deprecated.daemonset.template.generation: 1
Desired Number of Nodes Scheduled: 2
Current Number of Nodes Scheduled: 2
Number of Nodes Scheduled with Up-to-date Pods: 2
Number of Nodes Scheduled with Available Pods: 2
Number of Nodes Misscheduled: 0
Pods Status:  2 Running / 0 Waiting / 0 Succeeded / 0 Failed
Pod Template:
  Labels:           app.kubernetes.io/instance=aws-vpc-cni
                    app.kubernetes.io/name=aws-node
                    k8s-app=aws-node
  Service Account:  aws-node
  Init Containers:
   aws-vpc-cni-init:
    Image:      602401143452.dkr.ecr.ap-south-1.amazonaws.com/amazon-k8s-cni-init:v1.18.1-eksbuild.3
    Port:       <none>
    Host Port:  <none>
    Requests:
      cpu:  25m
    Environment:
      DISABLE_TCP_EARLY_DEMUX:  false
      ENABLE_IPv6:              false
    Mounts:
      /host/opt/cni/bin from cni-bin-dir (rw)
  Containers:
   aws-node:
    Image:      602401143452.dkr.ecr.ap-south-1.amazonaws.com/amazon-k8s-cni:v1.18.1-eksbuild.3
    Port:       61678/TCP
    Host Port:  0/TCP
    Requests:
      cpu:      25m
    Liveness:   exec [/app/grpc-health-probe -addr=:50051 -connect-timeout=5s -rpc-timeout=5s] delay=60s timeout=10s period=10s #success=1 #failure=3
    Readiness:  exec [/app/grpc-health-probe -addr=:50051 -connect-timeout=5s -rpc-timeout=5s] delay=1s timeout=10s period=10s #success=1 #failure=3
    Environment:
      ADDITIONAL_ENI_TAGS:                    {}
      ANNOTATE_POD_IP:                        false
      AWS_VPC_CNI_NODE_PORT_SUPPORT:          true
      AWS_VPC_ENI_MTU:                        9001
      AWS_VPC_K8S_CNI_CUSTOM_NETWORK_CFG:     false
      AWS_VPC_K8S_CNI_EXTERNALSNAT:           false
      AWS_VPC_K8S_CNI_LOGLEVEL:               DEBUG
      AWS_VPC_K8S_CNI_LOG_FILE:               /host/var/log/aws-routed-eni/ipamd.log
      AWS_VPC_K8S_CNI_RANDOMIZESNAT:          prng
      AWS_VPC_K8S_CNI_VETHPREFIX:             eni
      AWS_VPC_K8S_PLUGIN_LOG_FILE:            /var/log/aws-routed-eni/plugin.log
      AWS_VPC_K8S_PLUGIN_LOG_LEVEL:           DEBUG
      CLUSTER_ENDPOINT:                       https://B32EDD295D685C6959A7EE2DD658856D.sk1.ap-south-1.eks.amazonaws.com
      CLUSTER_NAME:                           devops-petclinicapp-dev-ap-south-1
      DISABLE_INTROSPECTION:                  false
      DISABLE_METRICS:                        false
      DISABLE_NETWORK_RESOURCE_PROVISIONING:  false
      ENABLE_IPv4:                            true
      ENABLE_IPv6:                            false
      ENABLE_POD_ENI:                         false
      ENABLE_PREFIX_DELEGATION:               false
      ENABLE_SUBNET_DISCOVERY:                true
      NETWORK_POLICY_ENFORCING_MODE:          standard
      VPC_CNI_VERSION:                        v1.18.1
      VPC_ID:                                 vpc-0946b7dc6467bb4f1
      WARM_ENI_TARGET:                        1
      WARM_PREFIX_TARGET:                     1
      MY_NODE_NAME:                            (v1:spec.nodeName)
      MY_POD_NAME:                             (v1:metadata.name)
    Mounts:
      /host/etc/cni/net.d from cni-net-dir (rw)
      /host/opt/cni/bin from cni-bin-dir (rw)
      /host/var/log/aws-routed-eni from log-dir (rw)
      /run/xtables.lock from xtables-lock (rw)
      /var/run/aws-node from run-dir (rw)
   aws-eks-nodeagent:
    Image:      602401143452.dkr.ecr.ap-south-1.amazonaws.com/amazon/aws-network-policy-agent:v1.1.1-eksbuild.2
    Port:       <none>
    Host Port:  <none>
    Args:
      --enable-ipv6=false
      --enable-network-policy=false
      --enable-cloudwatch-logs=false
      --enable-policy-event-logs=false
      --metrics-bind-addr=:8162
      --health-probe-bind-addr=:8163
      --conntrack-cache-cleanup-period=300
    Requests:
      cpu:  25m
    Environment:
      MY_NODE_NAME:   (v1:spec.nodeName)
    Mounts:
      /host/opt/cni/bin from cni-bin-dir (rw)
      /sys/fs/bpf from bpf-pin-path (rw)
      /var/log/aws-routed-eni from log-dir (rw)
      /var/run/aws-node from run-dir (rw)
  Volumes:
   bpf-pin-path:
    Type:          HostPath (bare host directory volume)
    Path:          /sys/fs/bpf
    HostPathType:
   cni-bin-dir:
    Type:          HostPath (bare host directory volume)
    Path:          /opt/cni/bin
    HostPathType:
   cni-net-dir:
    Type:          HostPath (bare host directory volume)
    Path:          /etc/cni/net.d
    HostPathType:
   log-dir:
    Type:          HostPath (bare host directory volume)
    Path:          /var/log/aws-routed-eni
    HostPathType:  DirectoryOrCreate
   run-dir:
    Type:          HostPath (bare host directory volume)
    Path:          /var/run/aws-node
    HostPathType:  DirectoryOrCreate
   xtables-lock:
    Type:               HostPath (bare host directory volume)
    Path:               /run/xtables.lock
    HostPathType:
  Priority Class Name:  system-node-critical
  Node-Selectors:       <none>
  Tolerations:          op=Exists
Events:                 <none>
Now, let’s explore the AWS Node in detail from the perspectives of what, why, and how:
The aws-node DaemonSet plays a critical role in Amazon EKS clusters by managing pod networking through the AWS VPC CNI plugin. Here's what you need to know:
What Does the aws-node DaemonSet Do?
It ensures every node in the cluster is equipped with networking capabilities, such as IP address allocation and routing.
It enables integration with the AWS VPC for seamless pod-to-pod and pod-to-service communication.
Key Components
- Init Container:
aws-vpc-cni-init
- Prepares the required binaries and configurations in
/opt/cni/binfor the network plugin.
2. Main Containers:
aws-node: Handles IP address management (IPAM) and networking for pods.aws-eks-nodeagent: Provides support for network policies and enhances monitoring.
Why Is It Important?
The aws-node DaemonSet is the backbone of pod networking in EKS. It ensures that each pod gets a unique IP address and that traffic flows efficiently within and outside the cluster. Without it, networking in your EKS cluster would simply not work.
How It Works?
The DaemonSet runs on all nodes in the cluster (
Node-Selector: none), ensuring consistent networking.It uses HostPath volumes like
/etc/cni/net.dand/var/log/aws-routed-enito interact with the node's filesystem for configuration and logging.
Key Environment Variables
ENABLE_IPv4=true: Ensures IPv4 networking is enabled.WARM_ENI_TARGET=1: Keeps one pre-warmed Elastic Network Interface (ENI) ready for faster pod startup.CLUSTER_NAME: Identifies the EKS cluster for configuration.VPC_ID: The VPC associated with the cluster.
Performance Optimization
The aws-node container is lightweight, requesting only minimal resources (25m CPU), making it efficient for all nodes.
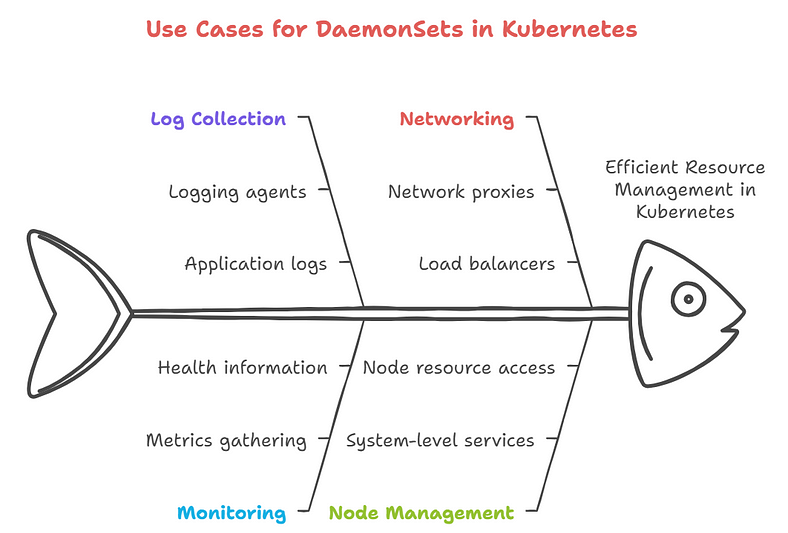
Use Cases for DaemonSets
DaemonSets are commonly used in the following scenarios:
Log Collection: Deploying a logging agent on every node to collect logs from applications running on those nodes.
Monitoring: Running monitoring agents to gather metrics and health information from all nodes in the cluster.
Networking: Implementing network proxies or load balancers that need to be present on each node.
Node Management: Running system-level services that require access to the node’s resources.

Creating a DaemonSet
To create a DaemonSet, you can use a YAML configuration file. Below is an example of a simple DaemonSet that runs a logging agent:
apiVersion: apps/v1
kind: DaemonSet
metadata:
  name: fluentd-logging
  labels:
    app: fluentd
spec:
  selector:
    matchLabels:
      app: fluentd
  template:
    metadata:
      labels:
        app: fluentd
    spec:
      containers:
      - name: fluentd
        image: fluent/fluentd:v1.11
        volumeMounts:
        - mountPath: /fluentd/etc
          name: config-volume
      volumes:
      - name: config-volume
        configMap:
          name: fluentd-config
In this example, the DaemonSet is created in the kube-system namespace, and it ensures that the logging-agent pod runs on every node.
Key Concepts:
Pod Template: Similar to a Deployment, you define a Pod template inside the DaemonSet specification, including the container image and other configurations.
Selector: The
selectorfield is used to ensure that the DaemonSet only manages Pods that match the specified label (app: fluentdin this case).Volume Mounts: If necessary, you can mount volumes into the Pods (e.g., for config files or logs).
Managing DaemonSets
You can manage DaemonSets using kubectl commands. Here are some common operations:
- Create a DaemonSet:
kubectl apply -f daemonset.yaml
- List DaemonSets:
kubectl get daemonsets
- Describe a DaemonSet:
kubectl describe daemonset fluentd-logging
- Delete a DaemonSet:
kubectl delete daemonset fluentd-logging
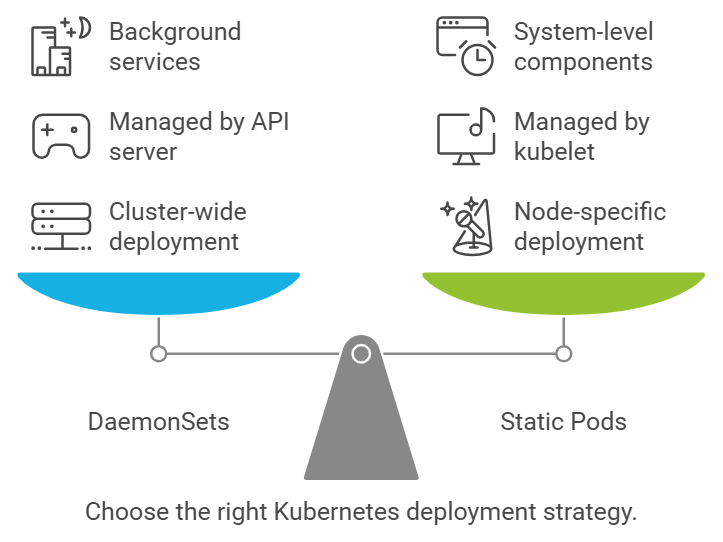
DaemonSets vs Static Pods:
- Functionality in Kubernetes:
Static Pods: Directly create and manage Pods on a specific node.
DaemonSets: Ensure that a specific Pod is running on every node in a cluster.
2. Use Case:
Static Pods: System-level components on a node.
DaemonSets: Background services on every node.
3. Deployment Scope:
Static Pods: Specific node.
DaemonSets: Across the entire cluster.
4. Management:
Static Pods: Managed by the kubelet on a specific node.
DaemonSets: Managed by the Kubernetes API server (DaemonSet controller).
5. kube-scheduler:
Static Pods: No effect on Static Pods.
DaemonSets: No effect on Pods managed by DaemonSets

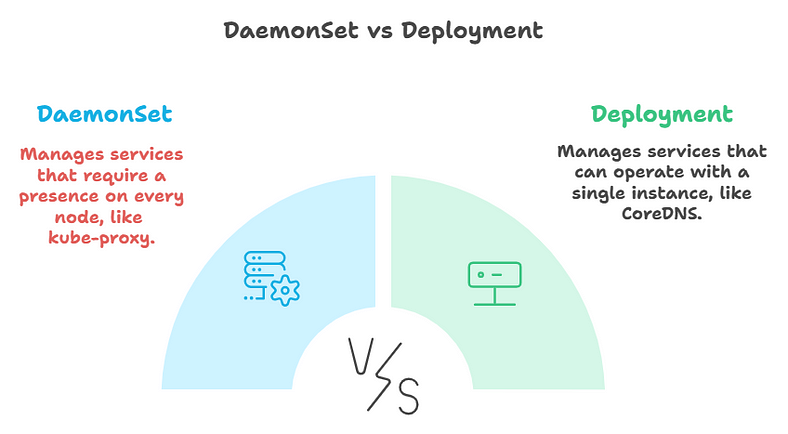
Deployments vs DaemonSets:
Kubernetes Deployments:
Purpose: Manage stateless services, ensuring a specified number of identical Pods are running and upgraded in a controlled way.
Replica Management: Define the number of replicas (Pods) for your app. Kubernetes distributes them across nodes, ensuring some nodes may run more than one replica.
Use Cases: Ideal for stateless applications like web servers, application backends, or horizontally scalable microservices.
DaemonSets:
Purpose: Manage replicated Pods adhering to a one-Pod-per-node model, ensuring Pods run across all or specific nodes in the cluster.
Replica Management: Ensure exactly one Pod per node. New nodes automatically get a Pod from the DaemonSet.
Use Cases: Best for background tasks or services that must run on every node, such as storage daemons, log collection daemons, or monitoring agents.
Examples: Fluentd (log collection), Collectd (monitoring), Ceph (storage).
Key Differences:
- Scope of Deployment*:*
Deployment: Pods run across the entire cluster with a specified number of replicas, but not necessarily one Pod per node.
DaemonSet: Ensures one Pod per node, guaranteeing that each node runs the service.
2. Pod Scheduling*:*
Deployment: Does not automatically spawn Pods when new nodes are added; scaling must be managed manually.
DaemonSet: Automatically schedules Pods on every node, adding new Pods when new nodes are added.

Example:

Use Case Examples:
CoreDNS (Deployment): One replica is sufficient to resolve service names to IPs across the cluster, so it’s managed via a Deployment.
Kube-proxy (DaemonSet): Needs to run on every node to manage IP tables for access to Pods, so it’s managed via a DaemonSet.

Conclusion
DaemonSets are a crucial component of Kubernetes that allow for the deployment of pods across all or specific nodes in a cluster. They are particularly useful for running system-level services that require consistent presence on each node.
By understanding how to create and manage DaemonSets, you can effectively ensure that your applications and services are running as intended across your Kubernetes environment.
If you found this article helpful, please consider giving it a clap and follow for more related articles. Your support is greatly appreciated!
@Medium: https://medium.com/@subbareddysangham
@Hashnode: https://hashnode.com/@SubbuTechTutorials
“Learning never exhausts the mind.” – Leonardo da Vinci
Thank you, happy learning
Subscribe to my newsletter
Read articles from Subbu Tech Tutorials directly inside your inbox. Subscribe to the newsletter, and don't miss out.
Written by
