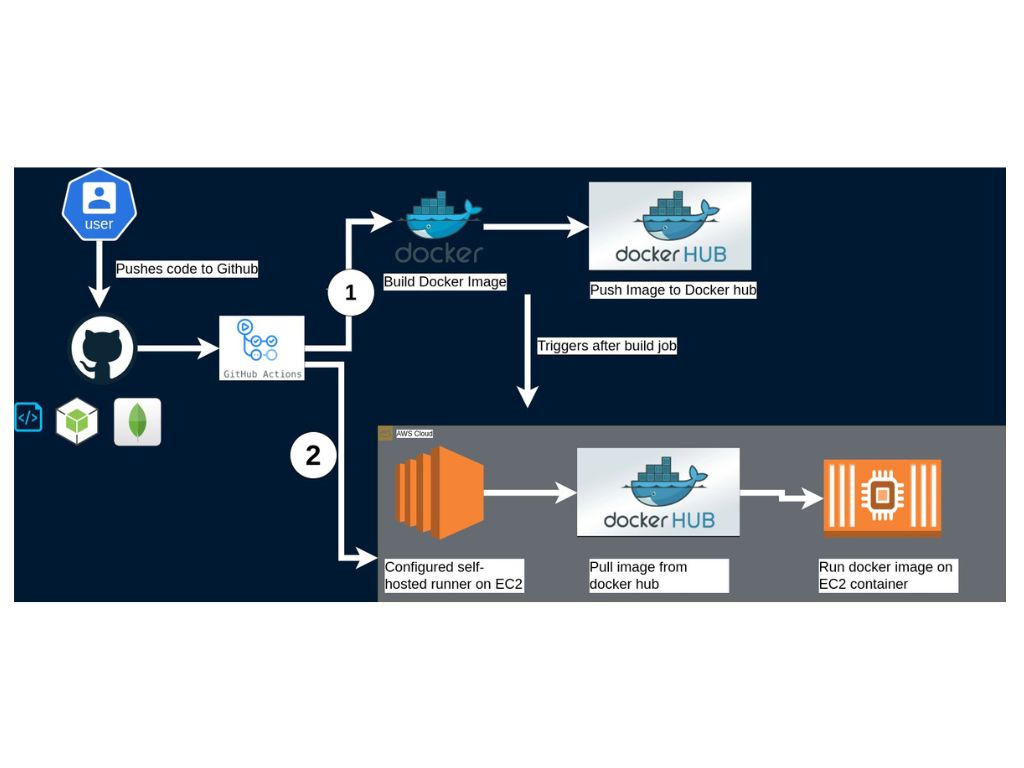
Setting Up CI/CD for a Node.js CRUD API with GitHub Actions, Docker, and AWS EC2
 Prathamesh Patil
Setting up CI/CD pipelines for deploying applications is crucial for delivering software efficiently and reliably. In this guide, we'll walk through how to create a CI/CD pipeline for a Node.js application with CRUD APIs. We'll use GitHub Actions, Docker, and an AWS EC2 instance with GitHub runners.
Prerequisites
Before we begin, ensure you have the following ready:
Node.js CRUD API: A simple Node.js application with basic CRUD APIs.
GitHub Repository: Your application is pushed to a GitHub repository.
Docker Hub Account: To store and manage your Docker images.
AWS EC2 Instance: Set up an Ubuntu-based EC2 instance.
MongoDB Instance: MongoDB should be accessible either locally or via a cloud service like MongoDB Atlas.
GitHub Secrets: Store sensitive credentials securely in GitHub Secrets:
DOCKER_USERNAMEandDOCKER_PASSWORD: Your Docker Hub credentials.MONGO_PASSWORD: MongoDB password.
Overview of Our Workflow
Build and Push Docker Image:
Package the Node.js app into a Docker image.
Push the image to Docker Hub.
Deploy on AWS EC2:
Pull the Docker image from Docker Hub.
Run the container on EC2 using GitHub self-hosted runners.
Step 1 : Create a Dockerfile
In your project root, create a Dockerfile to containerize your application:
# Use Node.js alpine3.18 image
FROM node:alpine3.18

# Set the working directory
WORKDIR /app

# Copy package.json and install dependencies
COPY package*.json ./
RUN npm install

# Copy the source code
COPY . .

# Expose the application port
EXPOSE 9000

# Start the application
CMD ["npm", "start"]
Step 2: Create the GitHub Actions Workflow
Add a GitHub Actions workflow file to automate the CI/CD process. Save it as .github/workflows/cicd.yml:
name: Deploy Node Application

on:
  push:
    branches:
      - mern-ec2-docker  # Trigger workflow on commits to this branch

jobs:
  build:
    runs-on: ubuntu-latest
    steps:
      - name: Checkout Source
        uses: actions/checkout@v4

      - name: Login to Docker Hub
        run: docker login -u ${{ secrets.DOCKER_USERNAME }} -p ${{ secrets.DOCKER_PASSWORD }}

      - name: Build Docker Image
        run: docker build -t patilprathamesh/nodejs-app .

      - name: Publish Image to Docker Hub
        run: docker push patilprathamesh/nodejs-app:latest

  deploy:
    needs: build
    runs-on: self-hosted  # Self-hosted runner on EC2
    steps:
      - name: Pull Image from Docker Hub
        run: docker pull patilprathamesh/nodejs-app:latest

      - name: Delete Old Container
        run: docker rm -f nodejs-app-container || true

      - name: Run Docker Container
        run: docker run -d -p 9000:9000 --name nodejs-app-container -e MONGO_PASSWORD=${{ secrets.MONGO_PASSWORD }} patilprathamesh/nodejs-app
Step 3: Configure the AWS EC2 Instance
Install Docker: SSH into your (Linux Ubuntu) EC2 instance and install Docker.
 sudo apt-get update
 sudo apt-get install docker.io -y
 sudo systemctl start docker
 sudo docker run hello-world
 sudo chmod 666 /var/run/docker.sock
 docker ps
 sudo systemctl enable docker
 docker --version
Install GitHub Runner: Follow the GitHub self-hosted runner setup guide to configure the runner on your EC2 instance.
Set Up MongoDB: Ensure MongoDB is available to your application. You can:
Use a locally installed MongoDB.
Use MongoDB Atlas or another cloud database provider.
Step 4: Debugging Common Issues
Here are some common issues you might encounter:
Port Mapping Issues:
- Ensure the port exposed in the
Dockerfilematches the one mapped on the EC2 instance (-p 9000:9000).
- Ensure the port exposed in the
Dockerfile Errors:
- Make sure your Dockerfile is correctly configured to install dependencies and expose the required ports.
Environment Variables in Docker:
- Use
-eflags in thedocker runcommand to pass secrets (e.g.,MONGO_PASSWORD).
- Use
GitHub Secrets:
- Verify that secrets are correctly added in the GitHub repository settings and referenced in the
cicd.ymlfile.
- Verify that secrets are correctly added in the GitHub repository settings and referenced in the
Self-Hosted Runner Connectivity:
- Ensure your self-hosted runner is online and properly linked to GitHub Actions.
Step 5: Verify Deployment
After pushing changes to your GitHub repository:
The CI/CD pipeline should build and push the Docker image to Docker Hub.
The deployment job should pull the image and run it on the EC2 instance.
You can verify the deployment by accessing your application at http://<EC2_PUBLIC_IP>:9000.
Conclusion
Setting up CI/CD for a Node.js application using GitHub Actions, Docker, and AWS EC2 is a powerful way to streamline your development process. While you might encounter challenges initially, they offer valuable learning opportunities and help you build a robust, automated deployment pipeline.
Now, your application is set up to automatically build, test, and deploy whenever you push changes to the mern-ec2-docker branch! 🎉
Let me know if you need help troubleshooting specific issues!
Stay Tuned for Updates!
In the coming days, I’ll be:
Designing the UI/UX for the React app.
Writing the
cicd.ymlfile for the frontend.Deploying the full-stack app and making it accessible to the world.
I’ll share my learnings, challenges, and solutions along the way. If you’re on a similar journey or curious about modern CI/CD workflows, join me as I build the complete Node.js + React.js full-stack app with fully automated deployments!
Next stop: A fully deployed full-stack project! 🚀
Subscribe to my newsletter
Read articles from Prathamesh Patil directly inside your inbox. Subscribe to the newsletter, and don't miss out.
Written by
