Day-15 | Ansible Zero to Hero
 DHRITI SALUJA
Getting Started with Ansible: A Practical Guide
Choosing Your Environment
If you’re new to Ansible, it’s recommended to start on a Linux environment for ease of configuration and compatibility. An Ubuntu EC2 instance on AWS is a convenient option, but any Linux distribution will work. If Linux is unavailable, Ansible can also be installed on Mac or Windows, though the setup may differ slightly.
Installing Ansible
The first step in using Ansible is to install it. There are various methods, but using the default package manager on your operating system is often the simplest approach. Here’s a breakdown:
Update Packages
Before installing Ansible, update your package list to ensure you’re installing the latest version:
(Note: Sudo is used to run commands with root privileges.)
Install Ansible
On Ubuntu, use the following command:
This installs Ansible along with any necessary dependencies.
aptis the packet manager for Ubuntu. For other distributions, use the respective package manager.
Alternative Installation Methods
You can also install Ansible via official documentation, which provides a cross-platform solution by using Python and pip. However, this may involve additional steps, such as manually adding Ansible to your system path.
Verifying the Installation
After installation, verify it by checking the version. This confirms that Ansible is correctly set up and ready to use:

This command will display the installed Ansible version, confirming it’s properly installed on your system.
Understanding Server Requirements
To start using Ansible for practical tasks, you need a minimum of two servers. Both servers can be of any compatible OS, but for simplicity, you can use Ubuntu on both.
Ansible Server: The main server where Ansible is installed. It will send instructions to the Target Server.
Target Server: The server that Ansible will configure and manage.
To make this work, Ansible requires passwordless authentication to the target server. This authentication enables Ansible to access and configure the server without manual password entry, which is essential for automation.
Setting Up Passwordless SSH Authentication
If both servers are on AWS (e.g., EC2 instances) and in the same Virtual Private Cloud (VPC), using the private IP address for secure, cost-effective communication is recommended.
Locate the Private IP:
In the AWS EC2 console, select your target instance.
Copy the private IP address displayed for the instance.
Testing the Connection:
On the Ansible server, try SSH-ing into the target server using the private IP address:


Here’s the output, you’ll get:

Reason: Our connection attempt failed because the target server only accepts authentication using a public key, and our key isn't authorized on the server.
Configuring Passwordless Authentication
To enable passwordless authentication, we’ll set up SSH keys on the Ansible server and transfer them to the target server. Here’s how:
Generate an SSH Key Pair (if you don’t already have one):
On the Ansible server, enter the following command:

ssh-keygencommand is used to generate, manage, and convert authentication keys for SSH. The-t rsaoption specifies the type of encryption algorithm to be used for generating the SSH key.When prompted, press Enter to accept the default file location and passphrase options.
Transfer the Public Key to the Target Server:
The easiest method for copying the key is
ssh-copy-id, which automatically configures passwordless SSH login. Run the below command on Ansible server:
If prompted, enter the password for the target server. Once complete, the target server will be set up to allow passwordless SSH access from the Ansible server.
Note: Some systems may not have the required permissions to use
ssh-copy-id. If that’s the case, you can manually copy the key as follows.
Manual Key Copy (if
ssh-copy-idfails):After generating the SSH key pair, both the public and private keys are saved in the
/home/ubuntu/.ssh/directory. To view these keys, along with other SSH-configuration files, use thelscommand to list the contents of this directory:
id_rsa: It is the private key used to login to this machine. Never share this key with anybody.
id_rsa.pub: Share public key for communication purposes.
Manually copy the public key of the Ansible server:

Add the Public Key to the Target Server:
Login to the target machine in a new tab and follow the below steps:
Generate the SSH Key Pair for the target machine:

To view the SSH configuration and key files, use the
lscommand:
Open the
authorized_keysfile and paste the copied public key of Ansible server into this file, save, and exit.
Test Passwordless Connection:
Go back to the Ansible server and attempt to SSH into the target server again:

If set up correctly, you should now be able to log in without a password prompt.
Extending Authentication to Additional Servers
For additional servers (e.g., a CentOS server):
Skip SSH Key Generation (if it’s already generated).
Simply repeat the Copy-Paste Process:
SSH into the additional server and open the
authorized_keysfile as before.Paste the public key from the Ansible server into
authorized_keysto enable passwordless access.
Understanding Ansible Playbooks and Ad-Hoc Commands
In Ansible, a playbook is a YAML file where you define automation tasks in a structured format. Playbooks are Ansible's way of running commands and configuring servers, similar to how you would use shell scripts for shell commands.
While playbooks are powerful and structured, you don’t always need to create a playbook for simple tasks—Ansible also supports running commands directly from the command line, known as ad hoc commands.
When to Use Playbooks Over Ad-Hoc Commands
Playbooks are better suited for:
Multi-step tasks that need to be run frequently.
Complex tasks involving multiple servers and configurations.
Tasks requiring a defined structure and repeatability.
In interviews, you may be asked about the difference between Ad-Hoc Commands and Playbooks:
Ad-Hoc Commands: Quick, one-off tasks.
Playbooks: Structured YAML files used for executing multi-step configurations across servers.
Running Ansible Ad Hoc Commands
Ad hoc commands are a quick way to execute simple tasks on remote servers without needing to write a playbook. This is especially useful for one-off or quick actions.
Example: Creating a File with an Ad Hoc Command
Create an Inventory File: The inventory file holds the IP addresses or hostnames of your target servers. It is often recommended to create a custom inventory file in the same directory as your project. Use the command
touch inventoryto create the file. Here’s an example with a single server:
Alternatively, you can specify multiple target servers in the inventory file, one per line.
Run an Ad Hoc Command: With the inventory file ready, let’s create a file on the target server remotely by running an ad hoc command on the Ansible server. The command format is as follows:

A yellow “changed” message typically means the command ran successfully.
Let’s break down the command:
ansible: The Ansible command.-i inventory: Specifies the inventory file where target IP addresses are listed.all: Targeting all servers in the inventory file (useful for when you have multiple servers).-m shell: Specifies the module to use, in this case, theshellmodule, which runs shell commands on the target server.-a "touch devopsclass": Specifies the argument (command) to execute on the target server—in this case,touch devopsclassto create a file.
Verify the Output: Go to the target server and check for the new file with
ls -ltr. You should seedevops_classcreated at the specified time.
Using Ansible Modules and Documentation
Ansible has a wide range of modules, each designed for specific tasks. Modules are like plugins that expand Ansible’s functionality, such as the shell, copy, and yum modules. Since new modules are frequently added, refer to the Ansible Modules Documentation to explore and understand available modules and examples.
For instance, if you need to copy files from the control server to a target server, you can use the copy module:

Executing Ansible Commands on Multiple Servers with Grouping
Ansible allows you to execute tasks on multiple servers simultaneously, making it efficient to manage large infrastructures. When managing multiple servers, it’s common to have specific tasks that need to be executed only on certain types of servers, such as database servers or web servers. In Ansible, you can achieve this by grouping servers in the inventory file.
Creating Server Groups in the Inventory File
To group servers in the inventory file, follow these steps:
Open the Inventory File:
vim inventoryDefine Server Groups: You can create groups by adding the group name in square brackets, followed by the IP addresses or hostnames of each server in that group. For example:
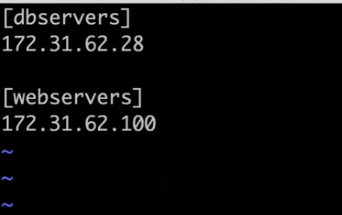
Executing Commands on Specific Groups
Once the groups are defined, you can target these groups with Ansible commands or playbooks, ensuring tasks are only executed on the relevant servers.
Using Ad-Hoc Commands: To execute a command only on a specific group, reference the group name in place of host group. Here’s an example of executing a command only on
web_servers:
In this command:
webserversrefers to the group defined in the inventory file.-m shellspecifies the shell module, which lets you run shell commands on the target servers.-a "df"provides the command to display disk usage on eachwebserver.
If you execute this command, Ansible will:
Locate the
webserversgroup in the inventory file.Run the specified command on every server in the
webserversgroup, whether it has one server or 100.
Common Interview Question
Question: How do you group servers in Ansible, and why is it beneficial?
Answer: In Ansible, servers are grouped by defining them in the inventory file using group names in square brackets (e.g., [web_servers]). This grouping allows tasks to be executed only on specific sets of servers, such as web servers or database servers, improving task efficiency and organization in large infrastructures.
Write Your First Ansible Playbook
Ansible Playbooks are powerful tools for automating multiple tasks across servers. Let’s walk through a simple example where we’ll install and start the Nginx service using an Ansible Playbook.
Create and open an Ansible Playbook:
Ansible Playbooks are written in YAML format, which is a simple, human-readable markup language.

Writing the Header
Start with the following lines:
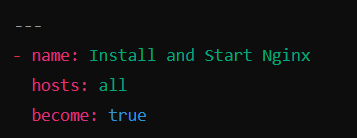
Begin with three hyphens (
---) to specify the YAML format.Single hyphen (
-) is used to denote the starting of a new playbook. We can have multiple playbooks in a same file.name: A descriptive name for the Playbook.hosts: Specifies the target servers (e.g.,allmeans all servers in the inventory file).become: Grants root privileges for tasks that require elevated permissions, like package installations.
Adding Tasks
Tasks are defined under the tasks section, each starting with a hyphen (-) to indicate a list item.
Task 1: Install Nginx
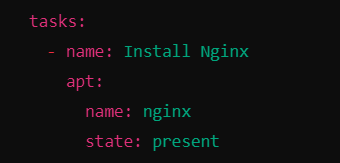
apt: The Ansible module to manage packages on Debian-based systems.name: Specifies the package name (nginx).state: present: Ensures that Nginx is installed.
Task 2: Start Nginx
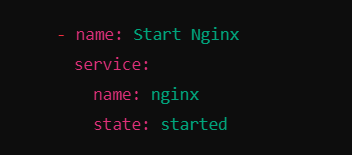
service: Manages system services.name: Specifies the service name (nginx).state: started: Ensures that the service is running.
Complete Playbook Example
Below is the final Playbook:
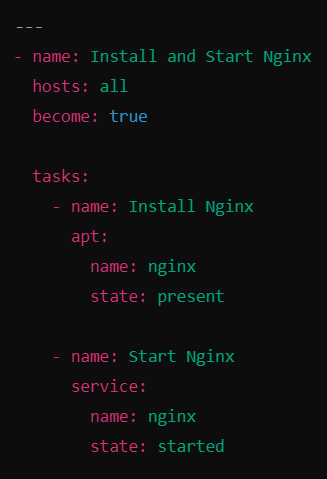
Now, save and exit the file.
Executing the Playbook
To run the Playbook, use the following command:

ansible-playbook: Command use to run ansible playbooks.-i inventory_file: Specifies the inventory file containing the target hosts.first-playbook.yml: Name of the playbook file to execute.
Verify Changes
Login to the target server and see if Nginx was installed and is running using below command:

Debugging with Verbosity
Verbose Option: Add -v, -vv, or -vvv to see detailed logs during playbook execution.
Syntax:

Verbosity Levels:
-v: Basic details.-vv: More insights into tasks.-vvv: Maximum debug logs for internal processes.
What Verbosity Shows
Establishing SSH connections to the target server.
Checking for Python dependencies (Ansible requires Python on the target server).
Debug logs for each task, including success or failure information.
JSON output of executed tasks, showing packages installed and configuration changes.
Using verbosity helps in understanding Ansible’s internal workflow and is especially useful when writing custom modules or troubleshooting.
Advanced Use Case of Playbooks: Setting Up a Kubernetes Cluster
With playbooks, you can tackle complex tasks like setting up a Kubernetes cluster.
Example Use Case
Set up a Kubernetes cluster with one master and two worker nodes:
Create three EC2 instances on AWS.
Configure:
One EC2 instance as the master.
Two other EC2 instances as worker nodes.
Preferred tools:
Instance Creation:
Use Terraform, which is optimized for infrastructure as code (IaC).
While tools like Ansible can also provision infrastructure, Terraform is more efficient and purpose-built for this task.
Instance Configuration:
- Use Ansible to configure the EC2 instances, as it excels at managing configurations and automating setup tasks.
Challenge Faced:
Configuring both the Kubernetes control plane (master node) and the data plane (worker nodes) involves a significant number of steps.
A complete setup typically requires 50–60 tasks, including:
Installing Kubernetes components.
Setting up networking and secrets.
Handling errors and dependencies.
Writing all these tasks in a single
playbook.ymlfile makes it:Difficult to read.
Hard to maintain and debug.
Cumbersome to manage variables, configuration files, and error handling.
Introduction to Ansible Roles
As playbooks grow in complexity, managing numerous tasks, variables, and configurations in a single file becomes difficult. Ansible roles provide a structured way to organize playbooks.
What Are Ansible Roles?
Roles are a way to break down large playbooks into reusable, modular components.
They help manage complex configurations with separate files and folders for tasks, variables, handlers, templates, and more.
How to Create a Role
Use the ansible-galaxy command to initialize a new role:

Example:

A directory structure is created:

Components of a Role
Each folder in the role serves a specific purpose:
tasks/:- Replaces the tasks section in the parent playbook for this specific role.
handlers/:- Defines actions triggered by events, such as starting or restarting a service upon file changes.
files/:Stores static files like configuration files (e.g.,
index.html, certificates).These can be copied to the target systems.
templates/:- Stores Jinja2 templates for dynamic file generation (e.g., templated config files).
**
vars/anddefaults/:vars/: Stores variables specific to the role, usually with higher precedence.defaults/: Stores default variable values, which can be overridden.
meta/:Contains metadata about the role, including dependencies and license information.
Useful when sharing roles on Ansible Galaxy.
tests/:- Provides test playbooks or scripts to validate the role's functionality.
README.md:- A documentation file describing the role's purpose, usage, and setup.
Example of Ansible Playbook utilizing Ansible Roles:
To set up JBoss Standalone on a server, we have a folder named jboss-standalone containing all the necessary files. Here's how the structure works:

Navigate into the jboss-standalone folder. You'll find a parent YAML file named site.yml.
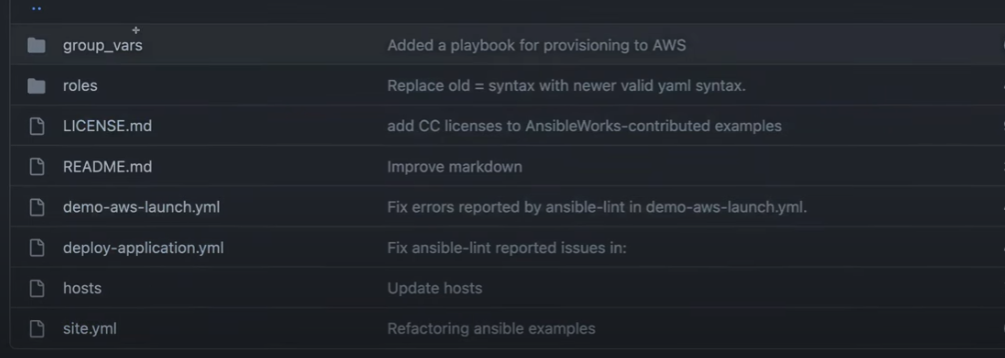
The site.yml file contains high-level details like the names of the hosts. It doesn't include specific tasks. All the detailed tasks and configurations are handled within the roles.

Inside the roles directory, you'll find a role named jboss-standalone.
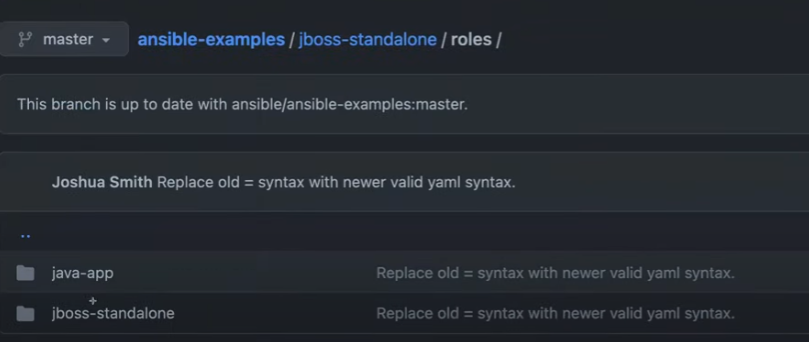
Navigate into the jboss-standalone role folder. Here, you'll see subfolders like:
files: Contains static files needed for the configuration.handlers: Defines actions triggered by tasks (e.g., restarting services).tasks: Includes YAML files defining all tasks for this role.templates: Holds Jinja2 template files used for configuration files.
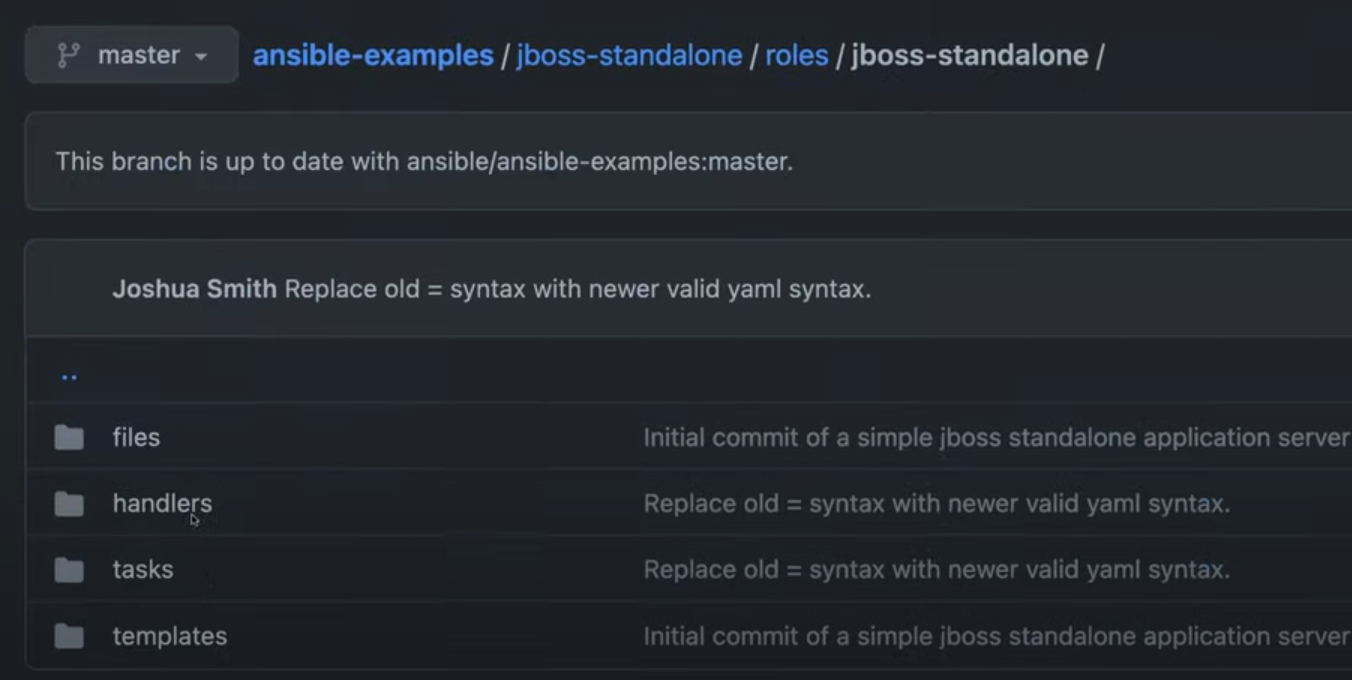
This is how roles helps segregate tasks and configurations, making the playbook easier to read, maintain, and reuse.
Roles enhance efficiency by organizing related tasks and files into a structured format.
Subscribe to my newsletter
Read articles from DHRITI SALUJA directly inside your inbox. Subscribe to the newsletter, and don't miss out.
Written by
