3: Kubernetes Essentials: From Nodes to Pods, Labels, and More
 Muhammad Hassan
Before diving into Kubernetes (K8s) concepts, a handy resource is the Kubernetes Kubectl Cheat Sheet. This guide provides you with essential kubectl commands to manage your cluster efficiently.
Auto-Complete for Kubectl
To make your experience seamless, especially in bash, you can enable auto-complete for kubectl using the script provided in the cheat sheet. This saves time and reduces errors in command entry.
Core Concepts in Kubernetes
1. Nodes and Describing Them
Nodes are the worker machines in a Kubernetes cluster. To inspect details about a specific node, use:
kubectl describe node <node-name>
For instance, to describe a node named "manager," the command would be:
kubectl describe node manager
This provides crucial information about the node's labels, status, capacity, and allocated resources.
2. Labels: The Backbone of Organization
Labels in Kubernetes are key-value pairs used to organize and identify objects. They play a critical role in:
Sorting resources
Taking specific actions, like selecting pods with a particular label for deployment
Labels are indexed in etcd, the Kubernetes backend datastore, ensuring efficient querying and management. Here's an example of a label:
labels:
  environment: production
  app: my-app

3. Annotations: Metadata for Humans
While labels are meant for Kubernetes to take action, annotations provide human-readable metadata. They can store information such as build details, release notes, or links to external resources. Unlike labels, annotations are not indexed in etcd.
Example of an annotation:
annotations:
  build-date: "2024-11-19"
  release-notes: "https://example.com/release-v1.2"

Capacity vs. Allocation
Understanding capacity and allocation is crucial for resource management:
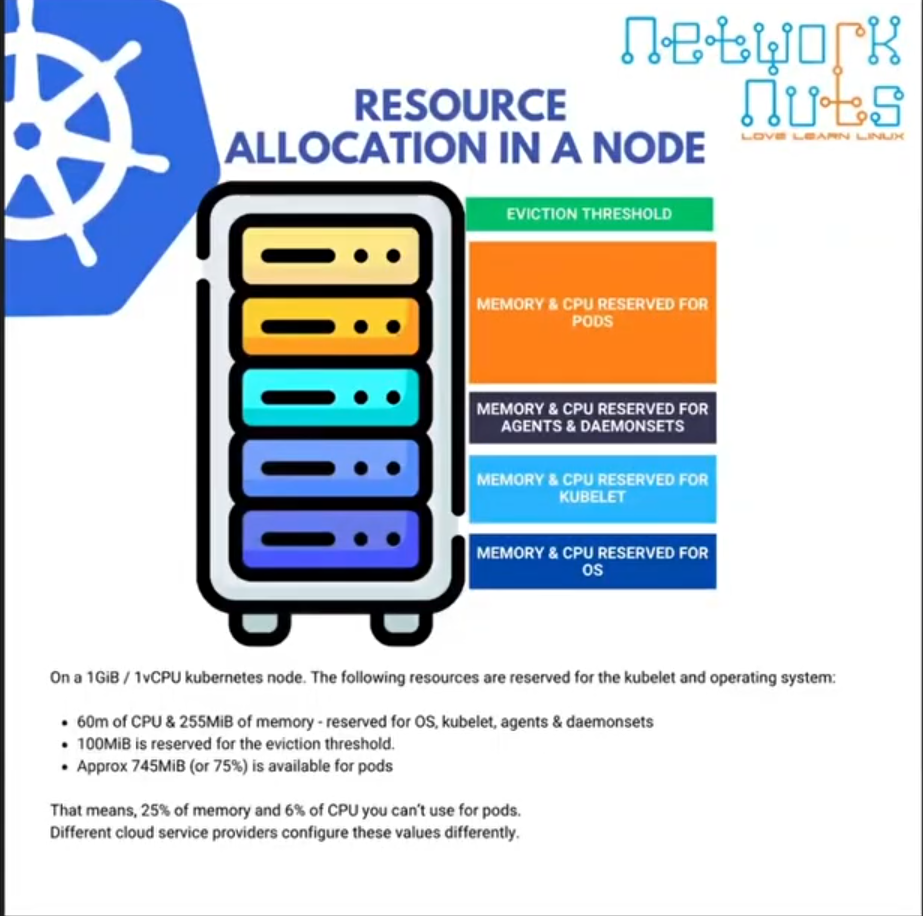
Capacity: The total resources (CPU, memory) available on a node for running applications.
Allocation: The portion of resources reserved for Kubernetes operations. This includes:
Operating System requirements
Reserved memory for system agents
Memory set aside for eviction thresholds
Example:
A node with 16 GB of memory might allocate:
2 GB for the OS
1 GB for agents
13 GB for pods and other workloads

Eviction Threshold: Managing Node Stress
When a node comes under stress (e.g., memory or CPU exhaustion), Kubernetes initiates eviction thresholds to maintain cluster stability. This process involves:
Identifying the most resource-hungry or less critical pods.
Transferring these pods to healthier nodes.
This ensures that high-priority applications continue running without disruption.

What Are Pods in Kubernetes?
In Kubernetes, pods are the smallest deployable units and represent a group of one or more containers that share:
Networking (IP address and ports)
Storage volumes
The term "pod" is inspired by a group of whales, reflecting how pods can host multiple containers. However, while pods can contain multiple containers, single-container pods are preferred for simplicity and scalability.
Pods vs. Containers
While containers are the actual execution environments for applications, pods act as a wrapper around one or more containers. This distinction brings several key points:
Networking and Volumes:
Pods are assigned an IP address and volumes, enabling communication and data sharing between containers within the same pod.
Individual containers within the pod are given CPU and memory allocations.
Port Conflicts:
- Containers in the same pod cannot run on the same port, as they share the pod's network namespace.
Pod Compute:
The compute capacity of a pod is roughly the sum of its containers’ resources (CPU and memory).
However, Kubernetes accounts for pod overhead, which includes metadata like the pod's IP and other information, consuming additional resources.
Why Avoid Multiple Containers in a Pod?
Although pods can host multiple containers, Kubernetes best practices recommend running each container in a separate pod. Here’s why:
1. Independent Scaling
If a pod contains both a frontend and a backend container, high frontend traffic could exhaust pod resources.
Scaling the frontend would require replicating the entire pod, including the backend, leading to unnecessary resource use.
2. Resource Isolation
- With separate pods, the frontend and backend containers can scale independently based on their resource demands.
3. Operational Simplicity
- Troubleshooting and managing single-container pods is much simpler than dealing with multi-container pods.
Resource Creation in Kubernetes
Kubernetes supports two approaches to create resources:
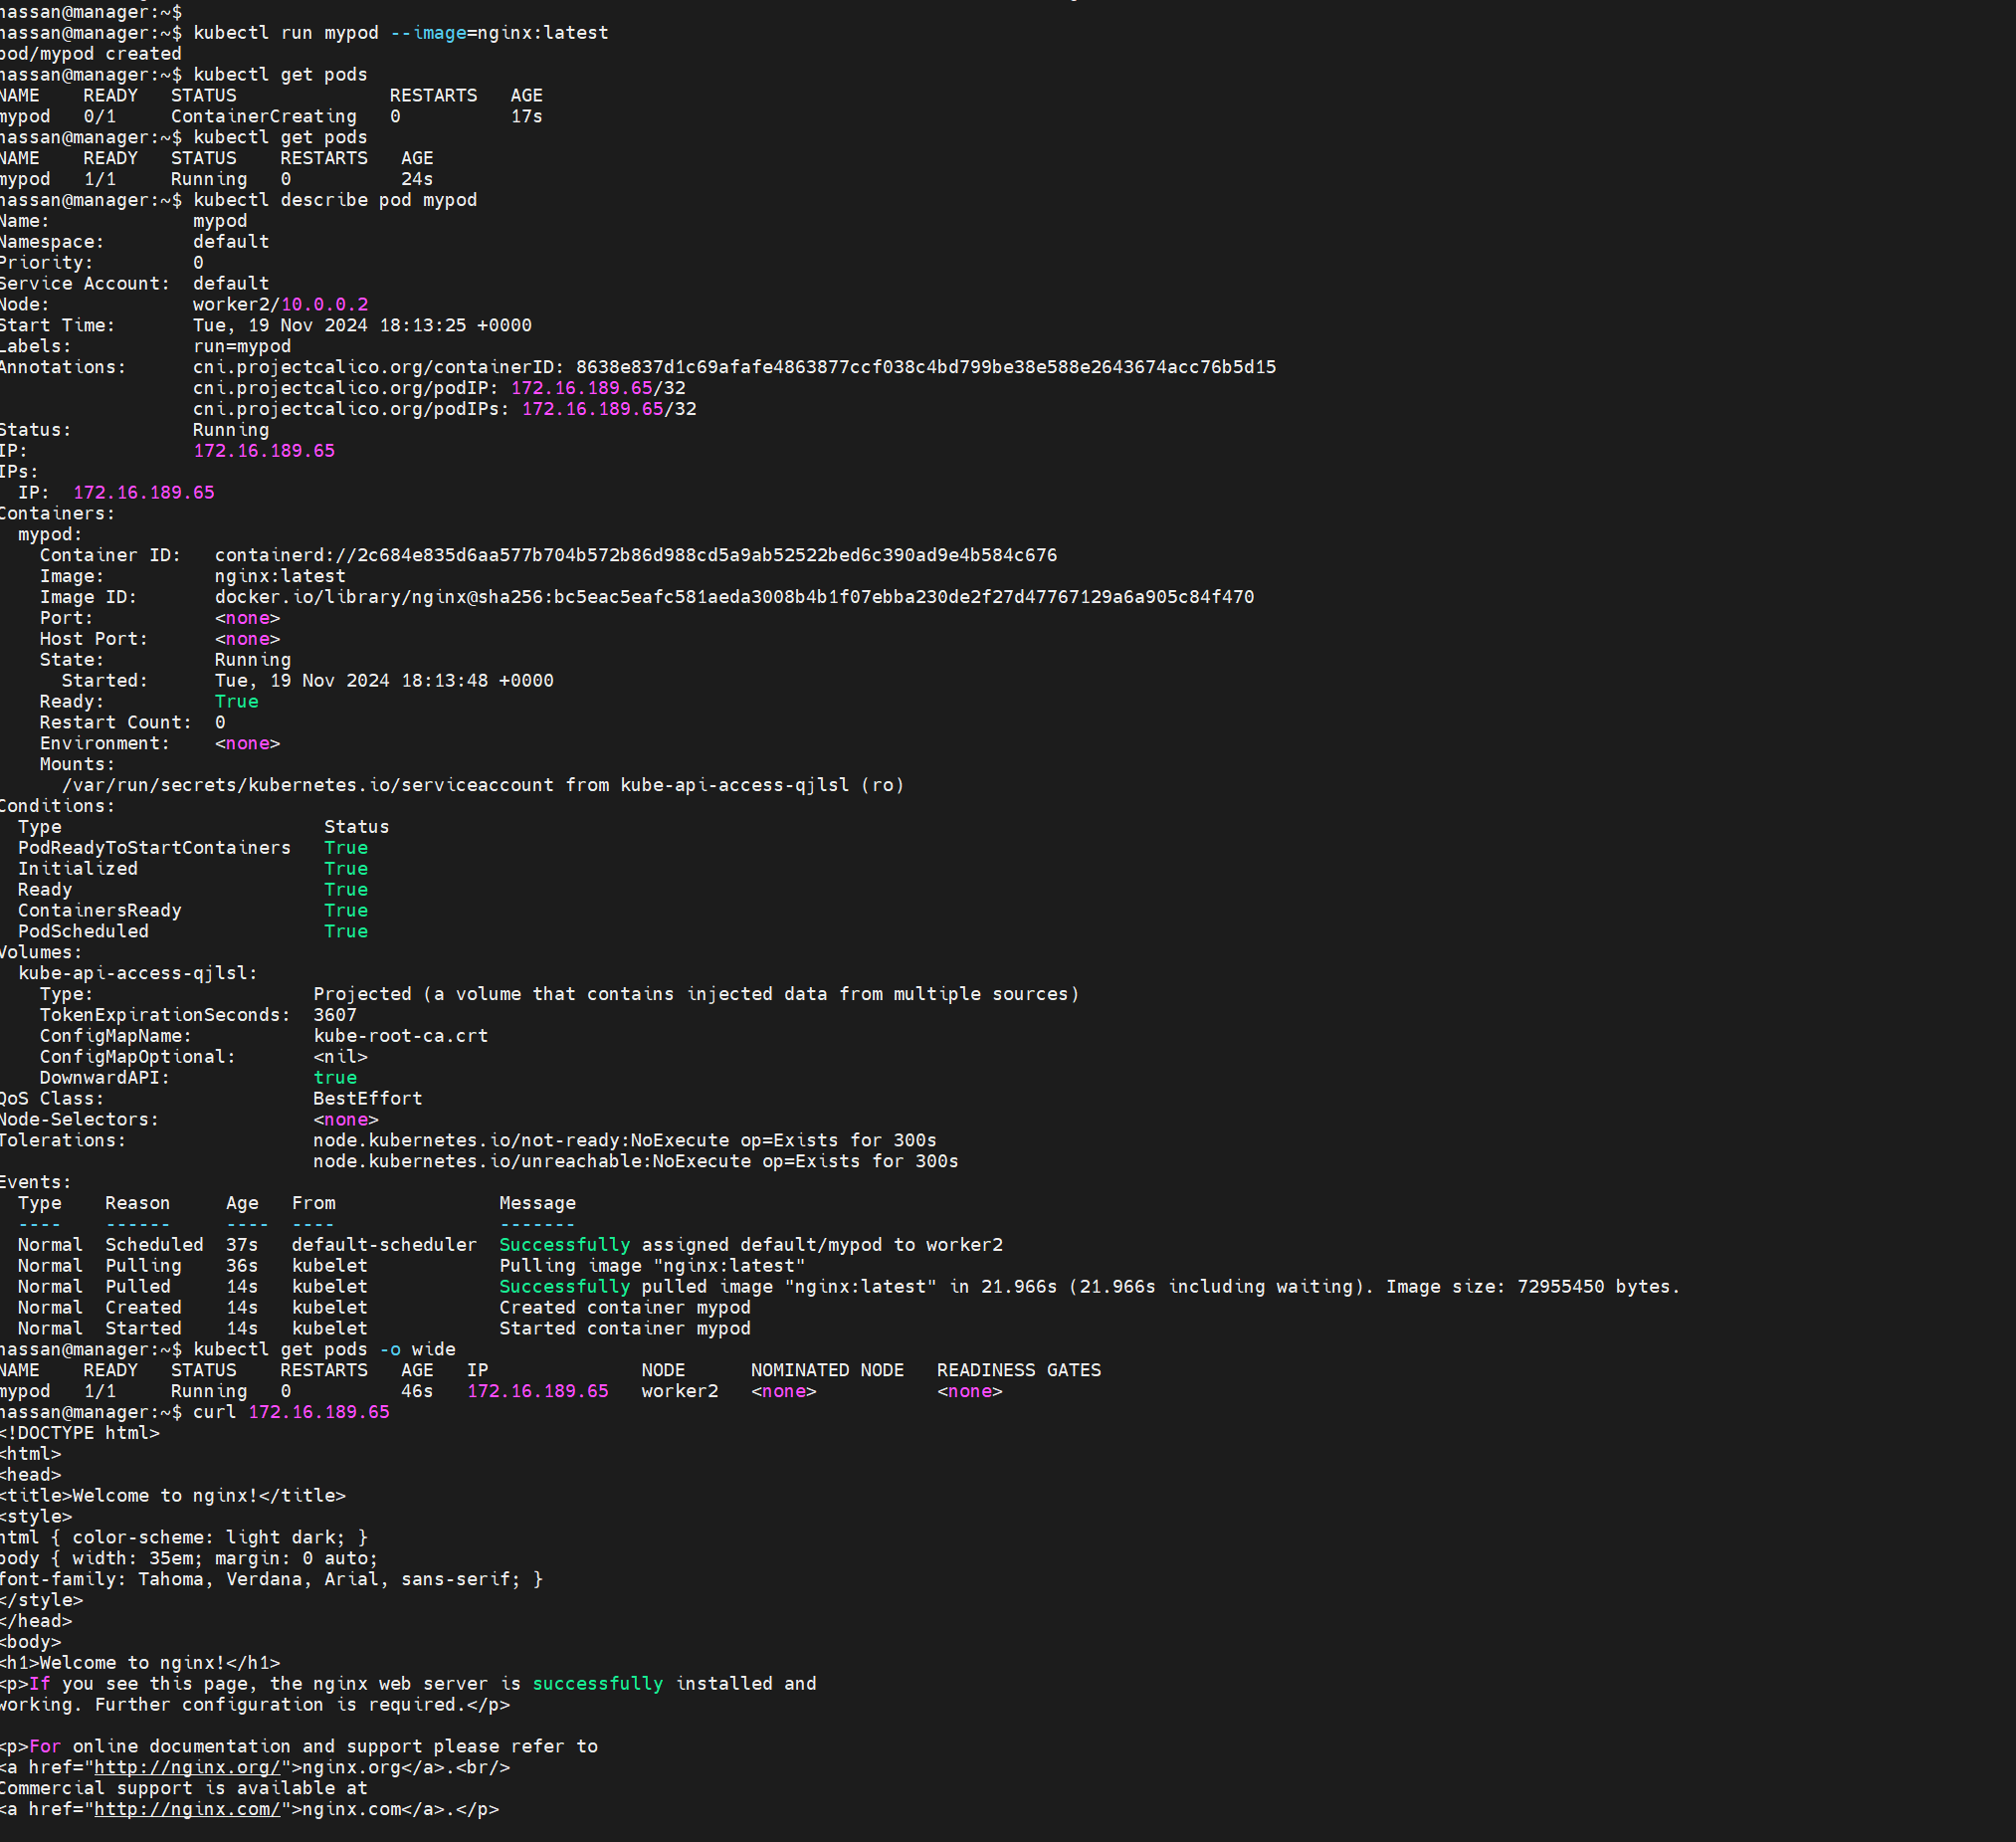
Imperative
Commands are executed directly to create resources.
Example:
  kubectl run mypod --image=nginx:latest
  kubectl get pods
  kubectl describe pod mypod
  kubectl get pods -o wide  # Fetch IP addresses and access the app
  kubectl delete pod mypod
Why It’s Not Recommended:
Commands are difficult to share or document.
They lack version control and are prone to being forgotten.
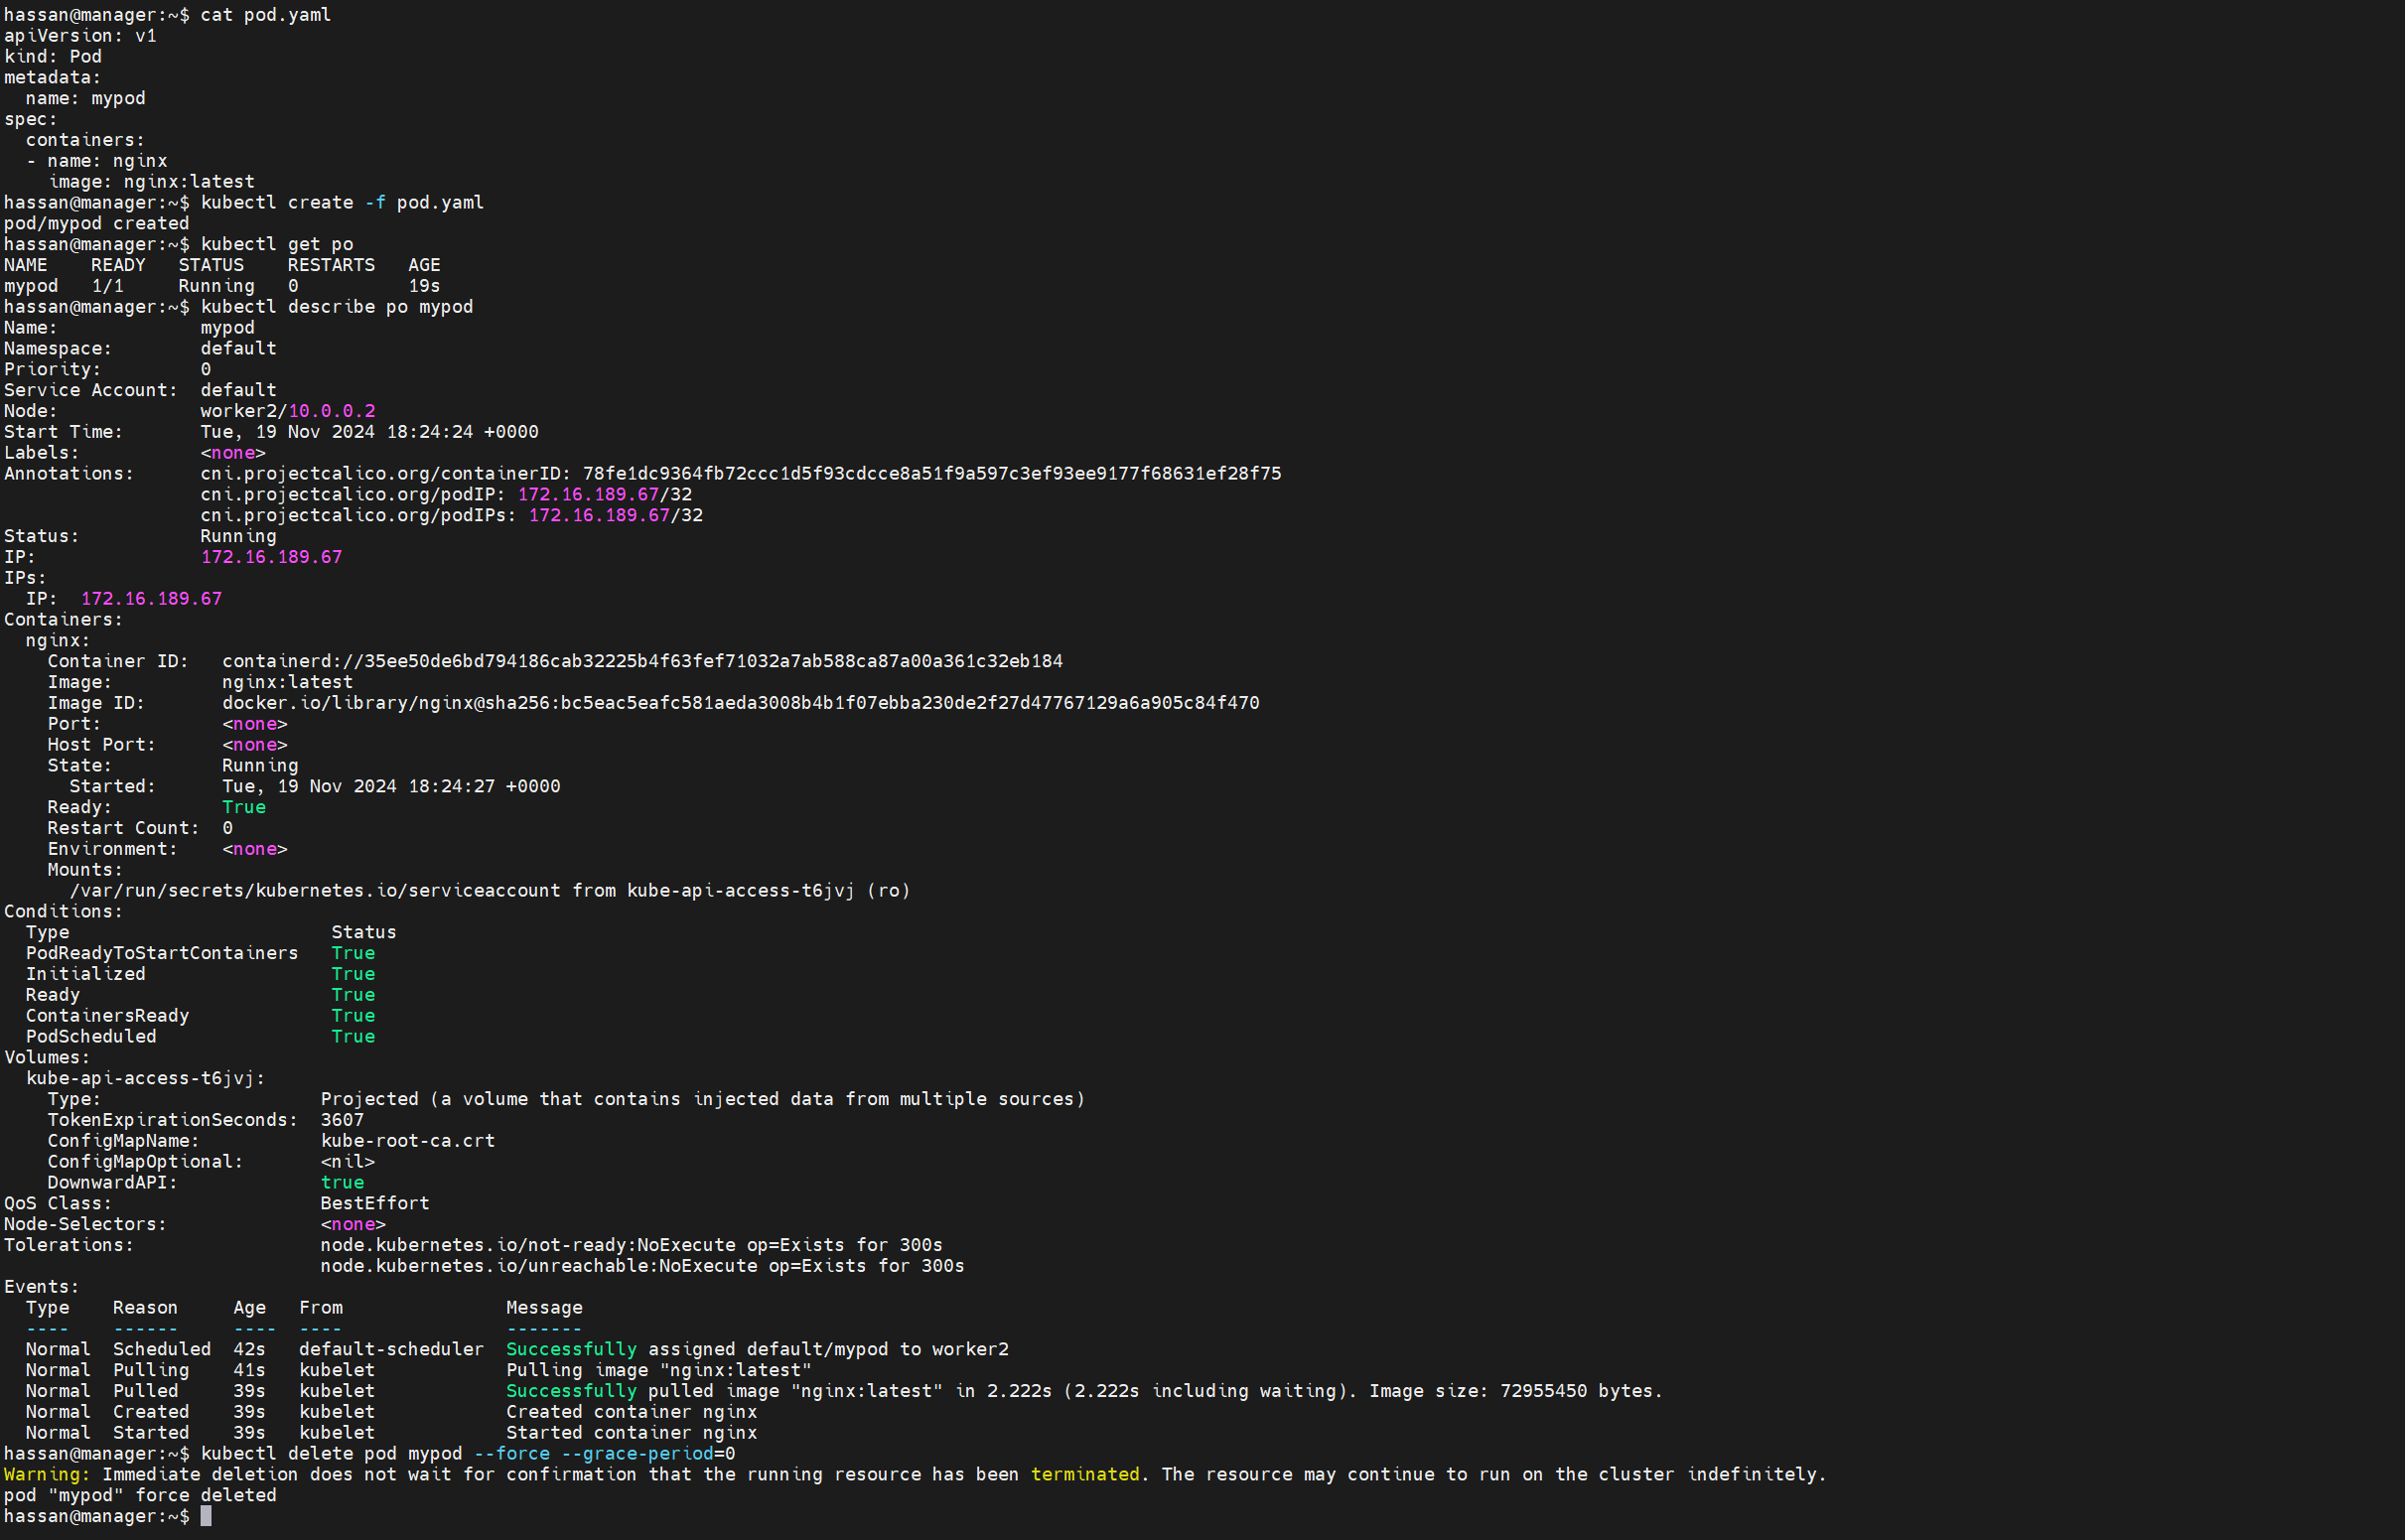
Declarative
Resources are defined in YAML or JSON files, ensuring:
Collaboration and sharing with teams.
Versioning and easy re-creation.
Example:
  apiVersion: v1
  kind: Pod
  metadata:
    name: mypod
  spec:
    containers:
    - name: nginx
      image: nginx:latest
Commands to manage declarative configurations:
  kubectl create -f firstpod.yaml
  kubectl get pods
  kubectl describe pod mypod
  kubectl delete -f firstpod.yaml
Using Events and Logs
1. Events in kubectl describe
The
kubectl describe podcommand reveals how Kubernetes manages a pod, including:Container image pull status
Resource allocation
Errors or issues
2. Logs for Container Performance
Use
kubectl logsto inspect container logs:kubectl logs <pod-name>For pods running multiple containers, specify the container:
kubectl logs <pod-name> -c <container-name>Example:
kubectl logs webapp -c boxtwo
Key Takeaways
Pods are a fundamental Kubernetes concept, enabling efficient deployment and management of containers.
While pods can host multiple containers, single-container pods are preferred for scalability and resource isolation.
Use imperative commands for quick experiments but adopt declarative configurations for production environments.
Always monitor pod events and container logs for effective troubleshooting and performance optimization.
Let me know if you'd like further refinements or additional topics to expand the blog!
Subscribe to my newsletter
Read articles from Muhammad Hassan directly inside your inbox. Subscribe to the newsletter, and don't miss out.
Written by

Muhammad Hassan
Muhammad Hassan
Hey there! I'm currently working as an Associate DevOps Engineer, and I'm diving into popular DevOps tools like Azure Devops,Linux, Docker, Kubernetes,Terraform and Ansible. I'm also on the learning track with AWS certifications to amp up my cloud game. If you're into tech collaborations and exploring new horizons, let's connect!