Automated Static Web Hosting with GitlabCI and S3
 Okesanya Samuel
Introduction
Static websites are simple applications, but they still need an efficient setup to handle requests and deliver content quickly to users. Hosting your static websites with a customized infrastructure offers scalability, cost savings, security, and high accessibility, while also allowing you to maintain full control over your deployment and data.
In this project, you'll learn how to create a cost-effective and highly available static web hosting solution using S3, CloudFront, and AWS Certificate Manager for a custom domain. You'll also set up a deployment pipeline using GitLab CI for smooth, automated deployments.
Architecture
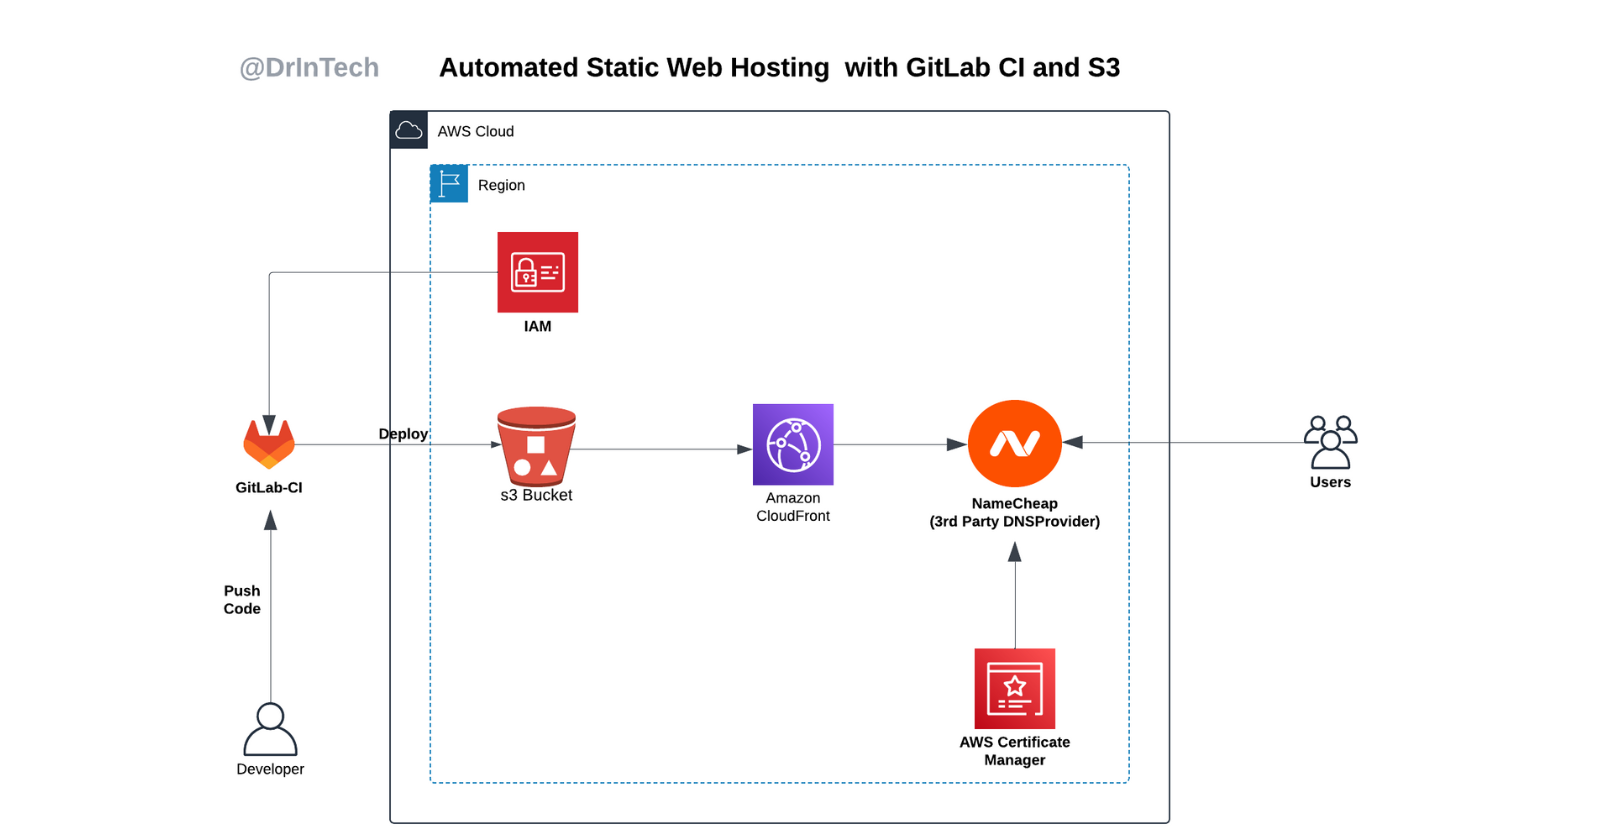
This project shows a highly efficient and cost-effective way to host static websites on AWS S3.
The project combines AWS services with GitLab CI/CD pipelines to automate the deployment of static files, boosting security, accessibility, and performance. This setup provides a highly scalable and secure static hosting solution served over HTTPS, with caching enabled for faster delivery.
Project Setup
S3 Bucket
In this project, the S3 bucket will be used as object storage for website files. To set up the S3 bucket, follow these steps:
Go to your console and create an S3 bucket.
Make sure public access is blocked, as content will be accessed through CloudFront.
You can choose the encryption key type as SSE-S3 or SSE-KMS.
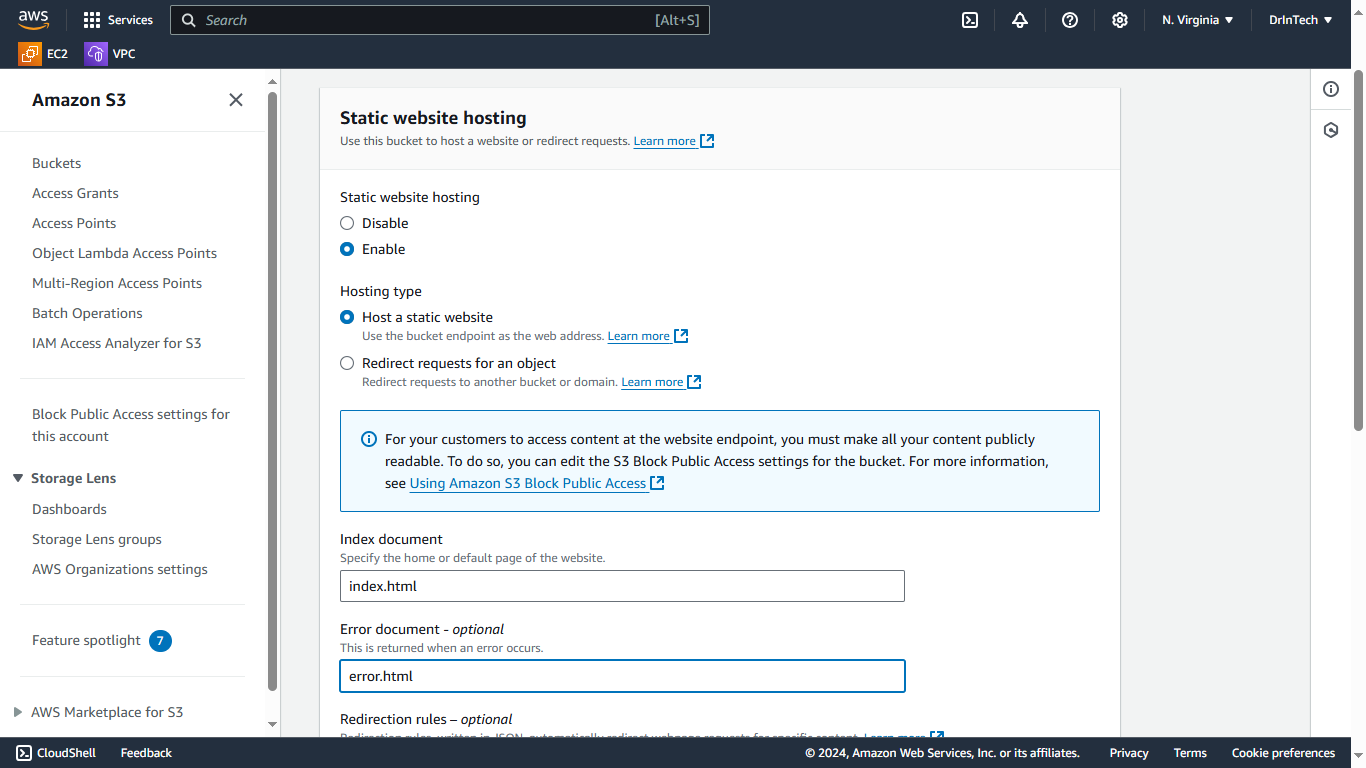
Go to the bucket properties tab, enable static website hosting, and specify your index document type (index.html and error.html).
AWS IAM
We will set up an IAM user to enable secure access for GitLab CI to the S3 bucket. This IAM user will have restricted access to only certain S3 actions, following the principle of least privilege. To set up the IAM user, follow these steps:
Create an IAM user.
Attach a custom IAM policy to the user, allowing only the following actions on the S3 bucket:
{
    "Version": "2012-10-17",
    "Statement": [
        {
            "Sid": "VisualEditor0",
            "Effect": "Allow",
            "Action": [
                "s3:PutObject",
                "s3:GetObject",
                "s3:ListBucket",
                "s3:DeleteObject"
            ],
            "Resource": [
                "arn:aws:s3:::s3websitebucket",
                "arn:aws:s3:::s3websitebucket/*"
            ]
        }
    ]
}
- Generate access keys for this IAM user. These keys will be used by GitLab CI/CD for programmatic access and secure deployment to the S3 bucket.
GitLab CI/CD Integration
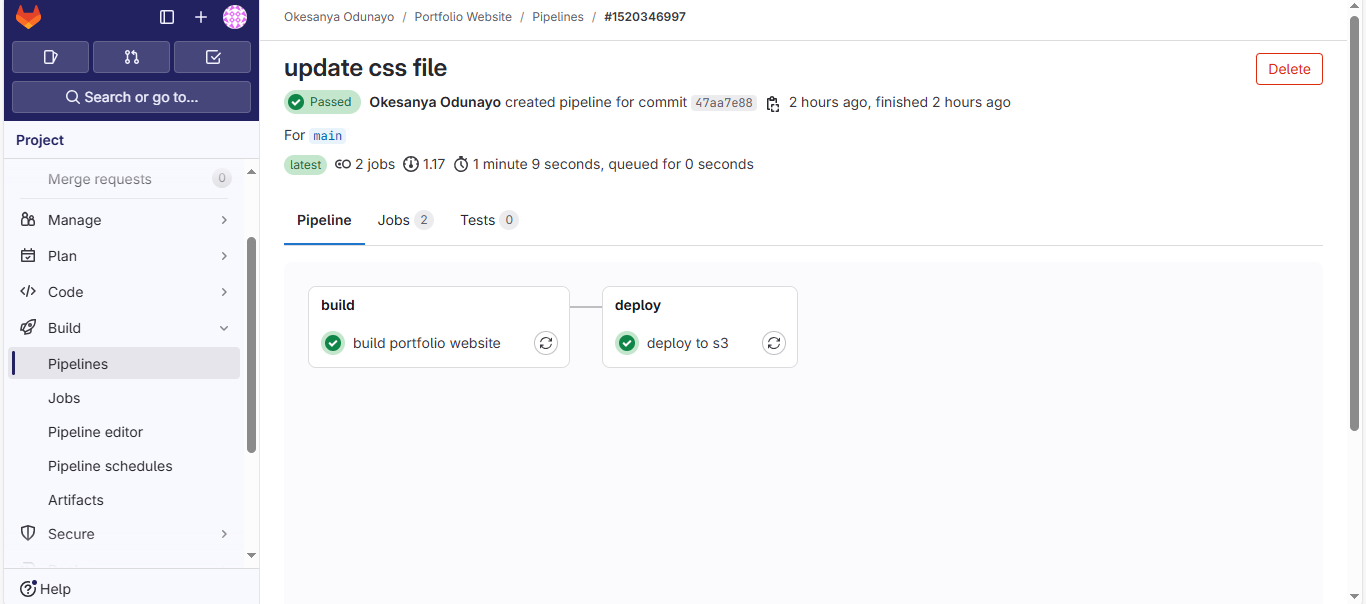
The deployment process is automated using GitLab CI/CD and is organized into two pipeline stages.
stages:
  - build
  - deploy
workflow:
    rules:
        - if:
          changes:
            - README.md
            #- .gitlab-ci.yml
          when: never
        - when: always

build portfolio website:
  stage: build
  image: node:14
  cache:
    key: "$CI_COMMIT_REF_SLUG"
    paths:
      - node_modules/
  script:
    - npm install
    - npm run build
  artifacts:
    paths:
      - dist/

deploy to s3:
  stage: deploy
  image:
    name: amazon/aws-cli
    entrypoint: [""]
  script:
    - aws --version
    - aws s3 rm s3://$S3_BUCKET --recursive
    - aws s3 cp dist s3://$S3_BUCKET --recursive
Build Stage: This stage builds and packages the application's static files. Caching is set up to make the build process faster.
Deploy Stage: This stage uploads the static files to the S3 bucket. Set the following environment variables as secrets in GitLab:
AWS_ACCESS_KEY_ID
AWS_SECRET_ACCESS_KEY
S3_BUCKET (name of the S3 bucket)
The workflow rules ensure that the deployment pipeline is not triggered when changes are made to the README.md file. Now, you can push your code to GitLab, and it will be automatically built and deployed to the S3 bucket.
CloudFront
AWS CloudFront is a content delivery network that delivers content securely with low delay and high speed.
Follow these steps to set up CloudFront Distribution to securely serve our static web content from the S3 bucket to our users.
Create a CloudFront Distribution
Set the origin domain to your endpoint URL.
Use Legacy for origin access to enable OAI (Origin Access Identity), which allows CloudFront to securely access your bucket.
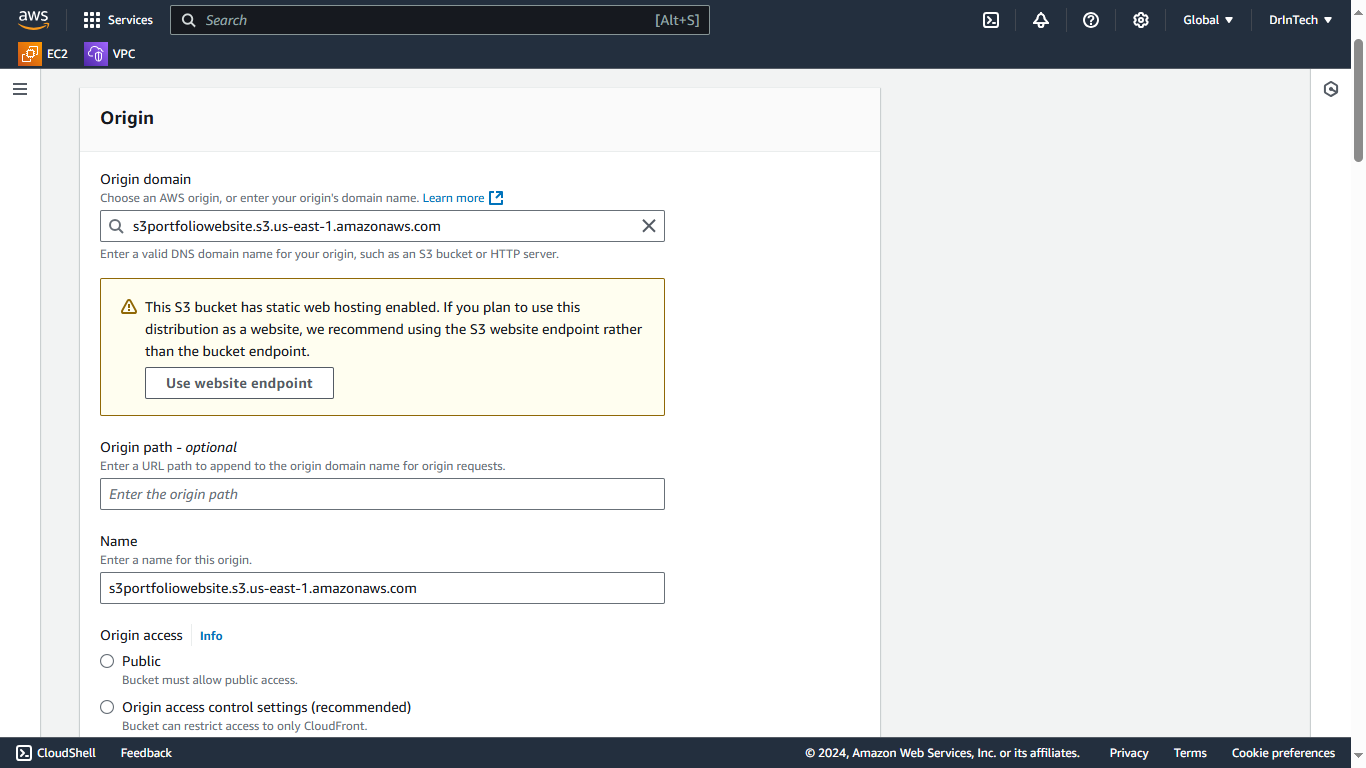
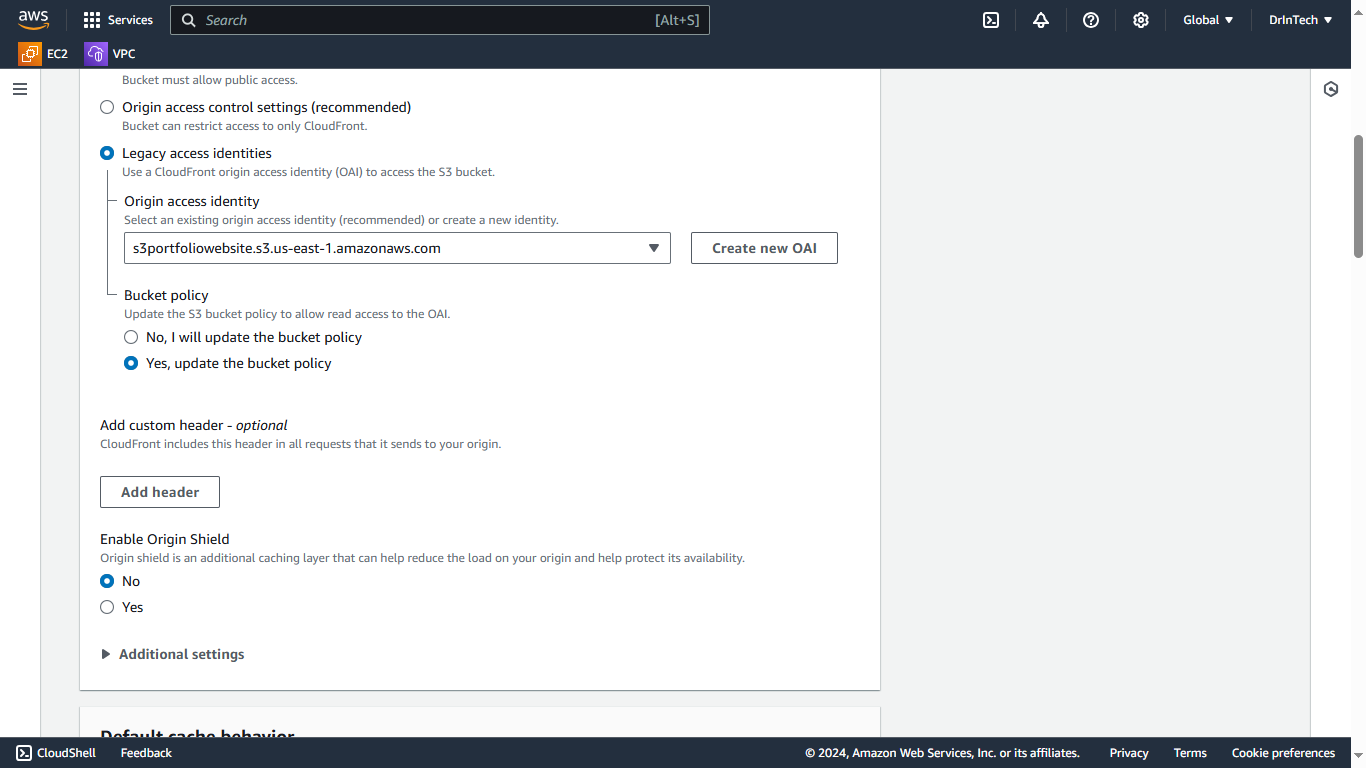
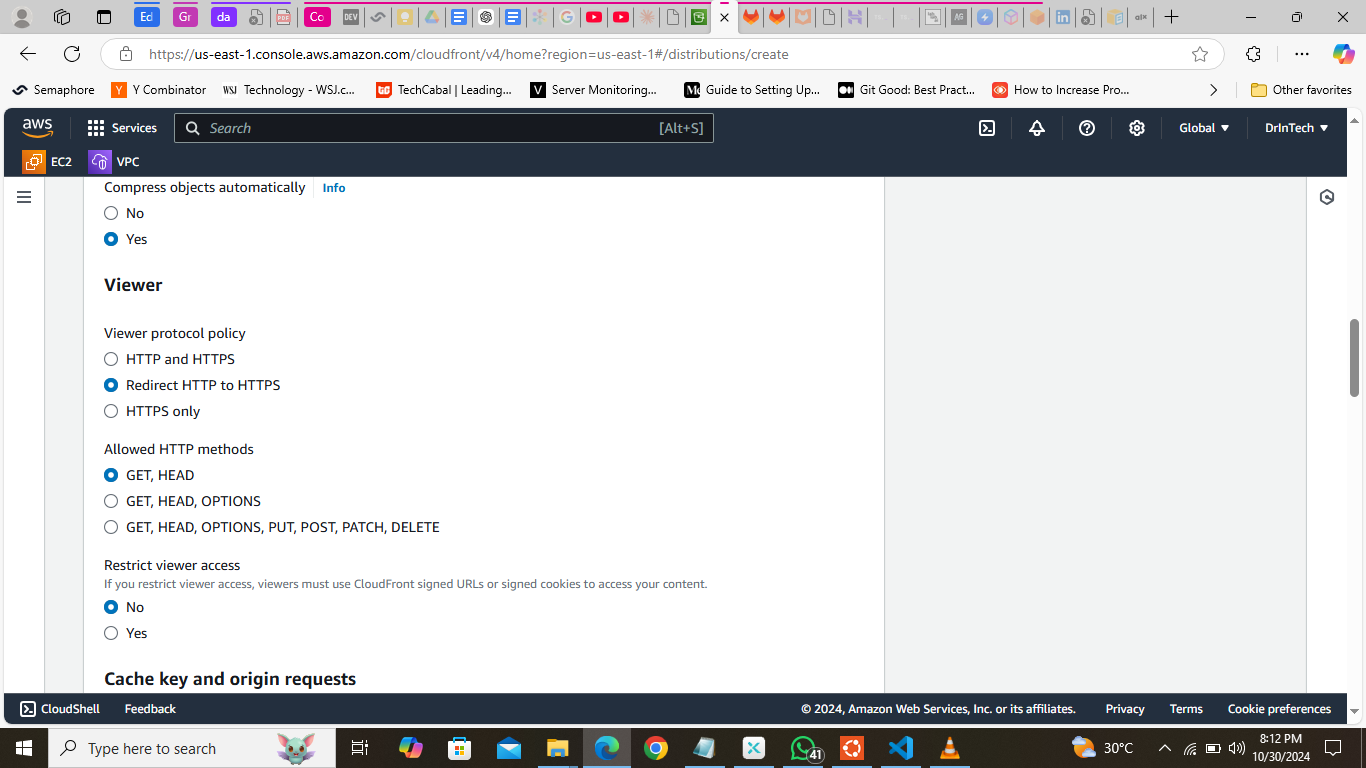
Security and HTTP Settings
Redirect HTTP to HTTPS for a secure connection and allow all HTTP methods.
Use the default caching settings.
Domain and Certificate Configuration
Add your custom domain name as alternate domain name (CNAME).
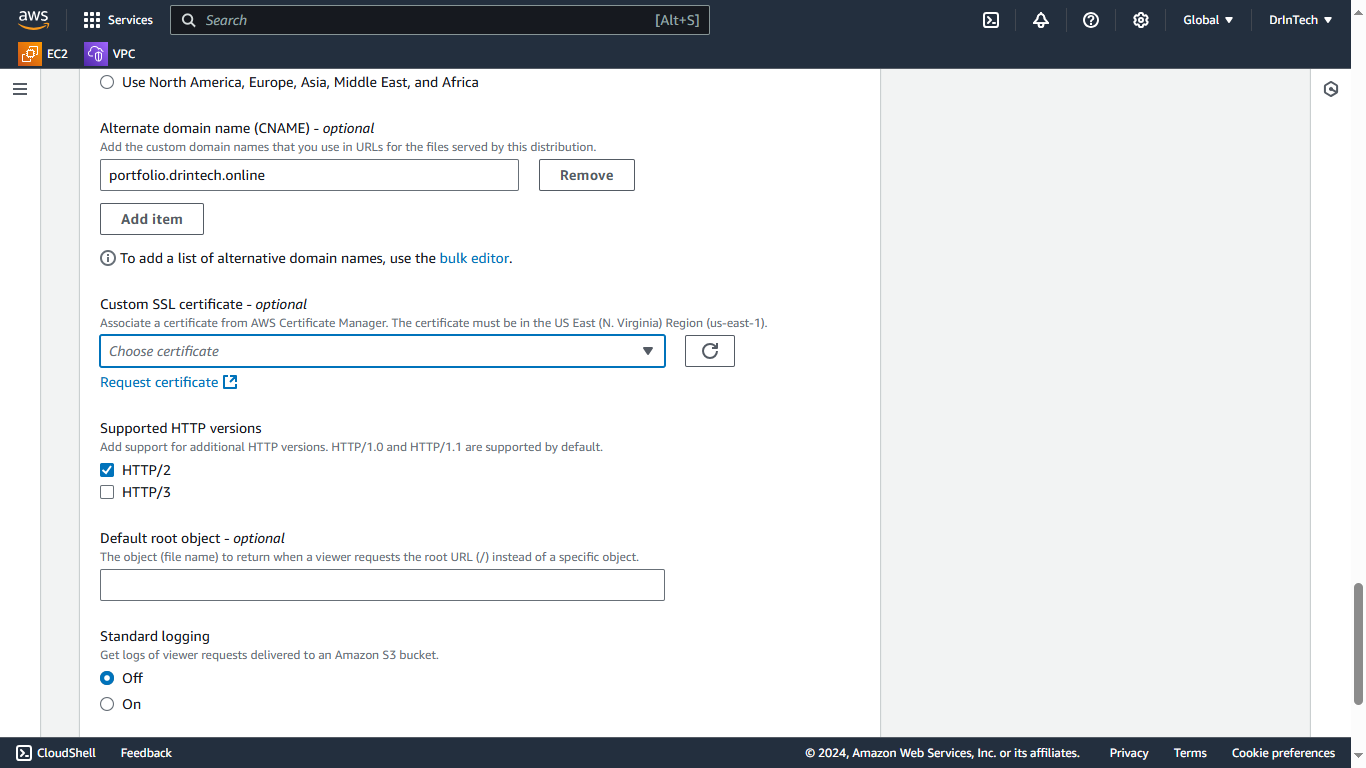
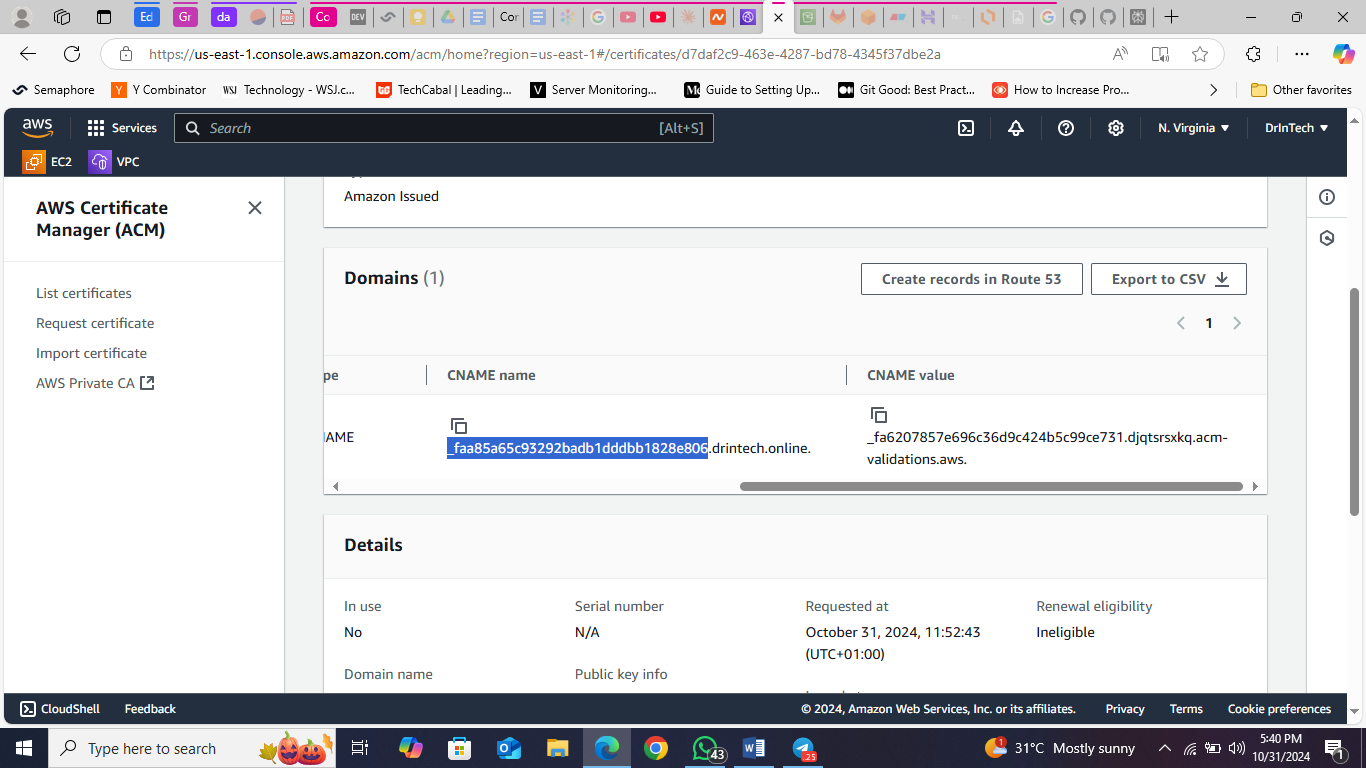
Open ACM in another tab, include your domain and request a certificate.
Validate the certificate through any provided option. For DNS validation, add the CNAME record with the name and value from the ACM certificate tab to your domain records on your DNS provider.

Final Configuration
Once validated, return to the CloudFront tab. Select your newly configured certificates.
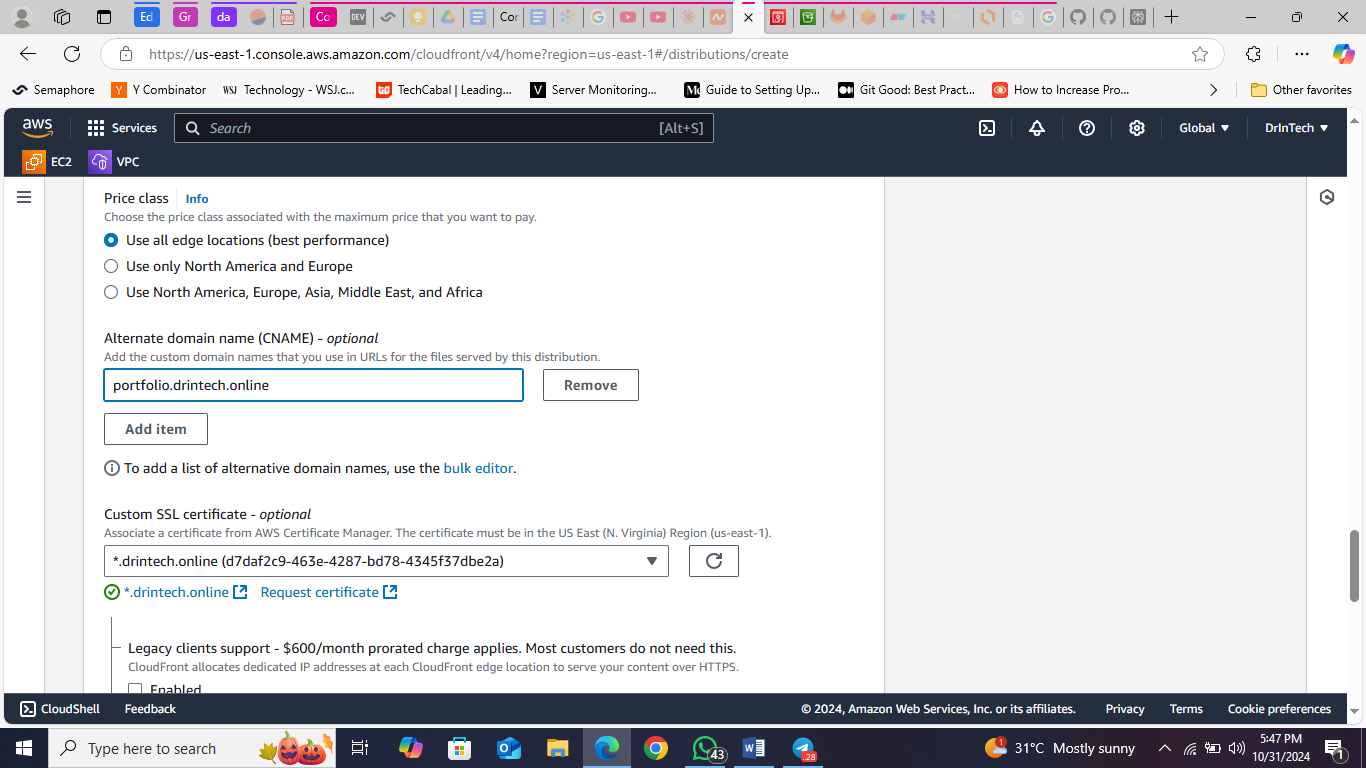
Complete the configuration by including your default root object, “index.html,” in the next step.
Finally, click “Create Distribution.”
You'll be asked if you want to automatically update your S3 bucket so CloudFront can access it using OAI. Click "Update." If you don't receive this prompt, go to your S3 bucket and update the bucket policy with the policy below:
{
        "Version": "2008-10-17",
        "Id": "PolicyForCloudFrontPrivateContent",
        "Statement": [
            {
                "Sid": "AllowCloudFrontServicePrincipal",
                "Effect": "Allow",
                "Principal": {
                    "Service": "cloudfront.amazonaws.com"
                },
                "Action": "s3:GetObject",
                "Resource": "arn:aws:s3:::s3-bucket-name/*",
                "Condition": {
                    "StringEquals": {
                      "AWS:SourceArn": "arn:aws:cloudfront::your-cloudfront-arn"
                    }
                }
            }
        ]
      }
This policy grants access to our S3 buckets to only the configured CloudFront distribution, enhancing security.

Create a CNAME record that points a subdomain to your CloudFront distribution domain. You should now be able to access your newly deployed static website through your custom domain.
Cost Analysis
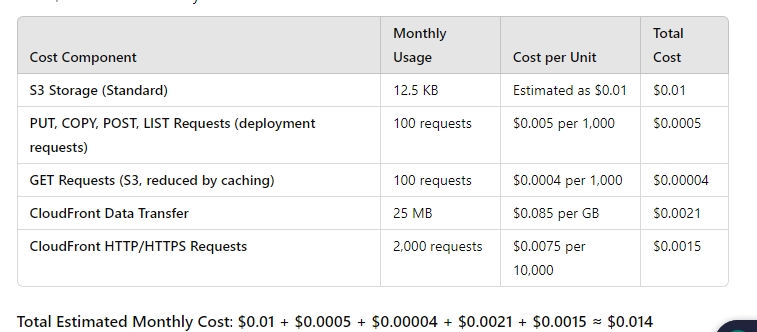
This current solution cost me approximately $0.014 though my portfolio website is still in its early stage of development.
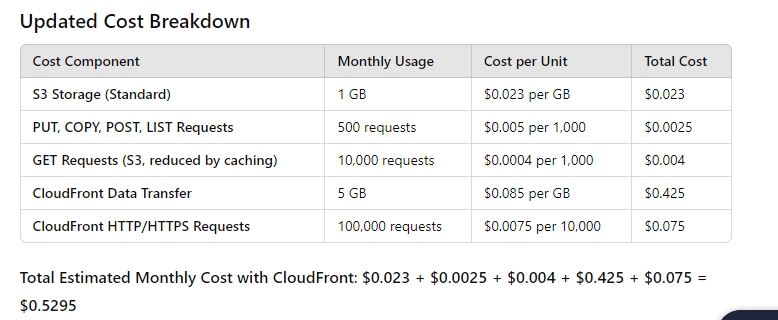
An active static website using this cost-effective setup, with an average of 10,000 requests per month, will incur a cost of about $0.50 per month. The breakdown is shown below.
Solution Benefits
Cost-Efficiency: S3 and CloudFront offer affordable pricing models, making this setup ideal for hosting static websites.
Automated Deployments: GitLab CI/CD streamlines deployments, reducing manual intervention and faster deployment through the use of dependencies caching.
Enhanced Security: By disabling public access to the S3 bucket and enforcing HTTPS through CloudFront, this setup implements security best practices.
High Performance: CloudFront’s global caching network reduces latency and ensures quick load times for users across different regions.
Subscribe to my newsletter
Read articles from Okesanya Samuel directly inside your inbox. Subscribe to the newsletter, and don't miss out.
Written by

Okesanya Samuel
Okesanya Samuel
Welcome to my blog! My name is Okesanya Odunayo, and I'm a passionate cloud practitioner, DevOps enthusiast, and health advocate. I believe that sharing knowledge and insights is essential for driving innovation and advancing the industry as a whole. So if you're looking to learn more about the exciting world of cloud computing and DevOps, you've come to the right place.