Building HAL: A Hardware Assistant that Learns
 TJ Gokken
In the world of AI and ML, we, application developers, now need to be able to mesh different languages and frameworks together and create an application that utilizes various technologies. We always did that in a way, but I believe it is even more imperative with the rise of AI services.
For example, C++ is making a comeback, but it’s now called Rust. Python remains the old new kid on the block. Meanwhile, C# watches from the sidelines, quietly building enterprise applications. However, integrating Python scripts into these applications is a whole other issue.
With the considerations above, I thought, why not build something that makes use of various technologies and going along with the theme of this blog, throw in some AI Services too.
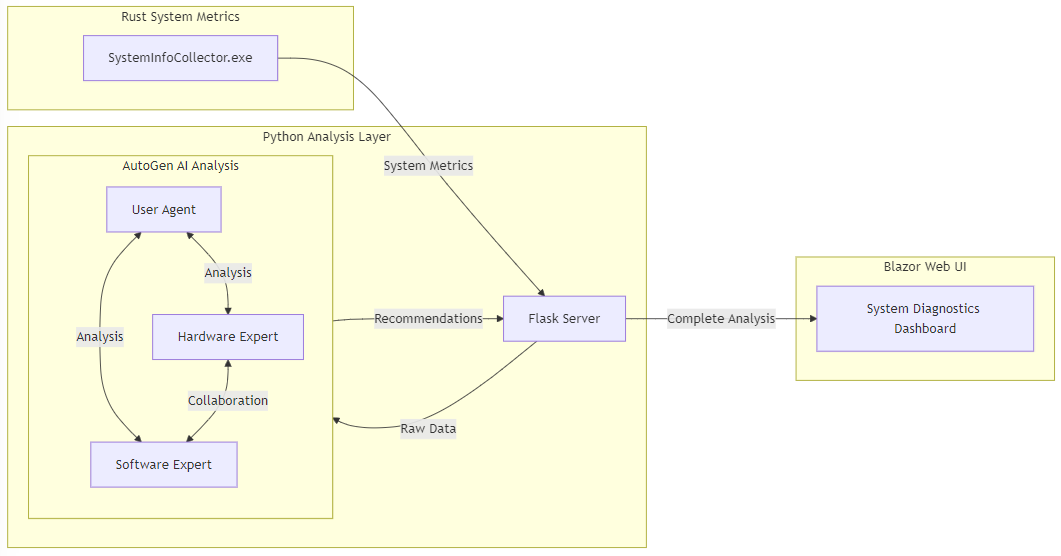
So, HAL was born. A modern system diagnostics tool that combines the power of Rust for system metrics collection, Python with AutoGen for AI-powered analysis, and Blazor for a clean, modern web interface.
I am new to Rust, so my Rust is a bit rusty. That means I will keep Rust code simple and straight forward.
Python is Python, but to make things interesting, we will make use of the OpenAI API for recommendations. We will also utilize AutoGen, a multi-agent framework from Microsoft, for those recommendations.
Finally, good old Blazor will bring all of these together. I could have easily used ASP.NET Core MVC or Razor Pages as the solution only has one page, however, you never know what will happen in the future as new ideas and technologies come along and the project needs to be updated. So, Blazor it is.
Project Overview
HAL consists of 3 projects:
SystemInfoCollector: A Rust applications which collects system metrics. I used JetBrains CLion.AutoGenSystem: Processes data received fromSystemInfoCollectorthrough an AI analysis pipeline using Python and AutoGen. I used JetBrains PyCharm.UniversalHardwareAssistant: Web Application that displays all this information fromAutoGenSystemusing Blazor. I used Visual Studio 2022 v.17.12 (with .NET 9).
Here is a high level system architecture:
SystemInfoCollector: System Metrics Collection with Rust
We use Rust for system metrics collection due to its performance, safety, and excellent system APIs. Also, I am new to Rust, so it provides the perfect opportunity to use it.
The implementation uses the sysinfo crate to gather CPU, memory, and storage information and provides a JSON output.
We first define the data structures for JSON serialization:
use sysinfo::{System, Disks};
use serde::Serialize;

#[derive(Serialize)]
struct CpuInfo {
    index: usize,
    usage: f32,
}

#[derive(Serialize)]
struct DiskInfo {
    mount_point: String,
    total_gb: f64,
    available_gb: f64,
    used_gb: f64,
}

#[derive(Serialize)]
struct SystemInfo {
    cpu_count: usize,
    cpus: Vec<CpuInfo>,
    total_memory_gb: f64,
    used_memory_gb: f64,
    available_memory_gb: f64,
    memory_usage_percentage: f64,
    disks: Vec<DiskInfo>,
}
If you look at the main function, you will see that it is pretty straight forward - as in we collect the information from the sysinfo library and put it in our data structs and make it available as JSON.
fn main() {
    // Create system instance
    let mut system = System::new_all();
    system.refresh_all();

    // Create Disks instance separately
    let disks = Disks::new_with_refreshed_list();

    // Collect CPU information
    let cpu_count = system.cpus().len();
    let cpus: Vec<CpuInfo> = system.cpus()
        .iter()
        .enumerate()
        .map(|(index, cpu)| CpuInfo {
            index,
            usage: cpu.cpu_usage(),
        })
        .collect();

    // Calculate memory values
    let total_memory_gb = system.total_memory() as f64 / 1_024.0 / 1_024.0 / 1_024.0;
    let used_memory_gb = system.used_memory() as f64 / 1_024.0 / 1_024.0 / 1_024.0;
    let available_memory_gb = total_memory_gb - used_memory_gb;
    let memory_usage_percentage = (used_memory_gb / total_memory_gb) * 100.0;

    // Collect disk information
    let disks: Vec<DiskInfo> = disks
        .iter()
        .map(|disk| {
            let total_gb = disk.total_space() as f64 / 1_000_000_000.0;
            let available_gb = disk.available_space() as f64 / 1_000_000_000.0;
            DiskInfo {
                mount_point: disk.mount_point().to_string_lossy().to_string(),
                total_gb,
                available_gb,
                used_gb: total_gb - available_gb,
            }
        })
        .collect();

    // Create the system info structure
    let system_info = SystemInfo {
        cpu_count,
        cpus,
        total_memory_gb,
        used_memory_gb,
        available_memory_gb,
        memory_usage_percentage,
        disks,
    };

    // Output as JSON
    match serde_json::to_string_pretty(&system_info) {
        Ok(json) => println!("{}", json),
        Err(e) => eprintln!("Error serializing to JSON: {}", e),
    }
}
In the code above, we needed to create the Disks instance separately because this information has been omitted from sysinfo and made available in a new library for modularity.
AutoGenSystem: AI Analysis with Python and AutoGen
This is the brain of the whole application as it runs the Rust executable, gets the data, then using AutoGen it provides intelligent analysis of these system metrics and makes all of this available in JSON format.
The project file and folder structure is as follows:
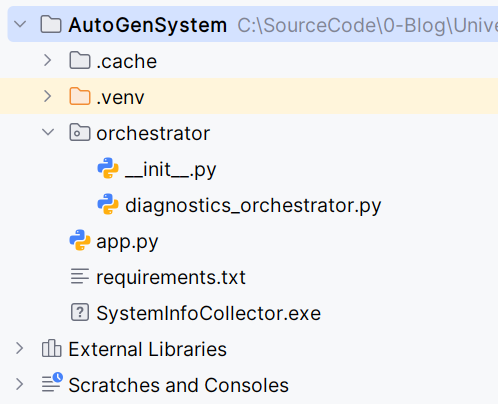
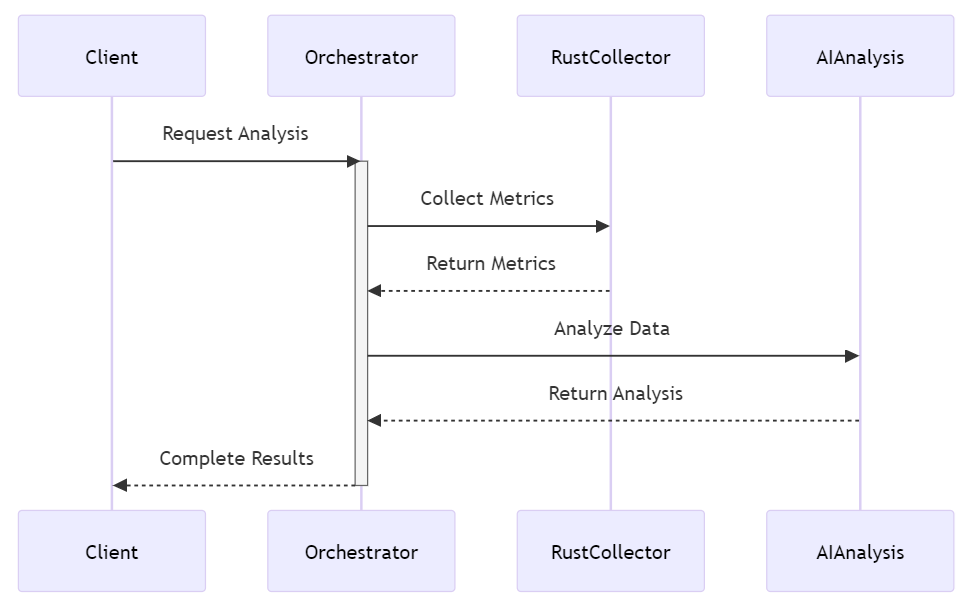
Our project makes use of the Orchestrator Pattern.
Here is the Orchestrator Sequence as implemented in HAL:
Let’s take a closer look at diagnostics_orchestrator.py:
For this code to work you need to install whatever is in the requirements.txt file. Once that is done, then we need to copy the executable from our Rust project to the root of the Python project because we are going to run that executable and consume its output.s
class SystemDiagnosticsOrchestrator:
    def __init__(self):
        # Get the path to the Rust executable
        self.rust_exe_path = Path(__file__).parent.parent / "SystemInfoCollector.exe"
        if not self.rust_exe_path.exists():
            raise FileNotFoundError(f"Rust executable not found at: {self.rust_exe_path}")

        # Configuration for GPT-3.5-turbo
        config_list = [
            {
                'model': 'gpt-3.5-turbo',
                'api_key': os.getenv('OPENAI_API_KEY')
            }
        ]
We are using GPT 3.5 Turbo and we are getting our Open AI API Key from the operating system’s environment variables.
The next part is setting up the agents. We have 3 agents:
User Proxy: Acts as coordinator
Hardware Expert: Focuses on physical components
Software Expert: Focuses on system optimization
We give each of the agents specific roles and instructions. Here is the User Proxy Agent:
 self.user_proxy = UserProxyAgent(
            name="User_Proxy",
            system_message="You are a diagnostic coordinator that processes "
                           "system information and coordinates with experts "
                           "for analysis.",
            human_input_mode="NEVER",
            code_execution_config={"use_docker": False}
        )
In the code above we specifically set the agent so it does not use Docker. AutoGen is designed to use Docker by default and we are not using Docker, therefore we need to set this variable to false.
We then setup a GroupChat where the agents can interact with each other. We limit the discussions to 5 rounds and our manager coordinates the discussion.
self.groupchat = GroupChat(
            agents=[self.user_proxy, self.hardware_expert, self.software_expert],
            messages=[],
            max_round=5
        )

self.manager = GroupChatManager(
            groupchat=self.groupchat,
            llm_config={"config_list": config_list}
        )
After we define our prompt for analysis, we move on to collecting system information. This piece of code executes the Rust binary and captures it JSON output.
    def collect_system_info(self):
        """Run the Rust executable to collect system information"""
        try:
            result = subprocess.run(
                [str(self.rust_exe_path)],
                capture_output=True,
                text=True,
                check=True
            )
            return json.loads(result.stdout)
        except subprocess.CalledProcessError as e:
            raise RuntimeError(f"Error running system diagnostics: {e.stderr}")
        except json.JSONDecodeError as e:
            raise RuntimeError(f"Error parsing system information: {e}")
The next block of code processes diagnostics and extracts the recommendations from the agents:
    def process_diagnostics(self):
        """Process system diagnostics and generate recommendations"""
        try:
            # Collect system information
            raw_system_info = self.collect_system_info()

            # Analyze the raw metrics first
            analyzed_metrics = {
                "cpu": {
                    "core_count": raw_system_info["cpu_count"],
                    "average_usage": sum(cpu["usage"] for cpu in raw_system_info["cpus"]) / raw_system_info[
                        "cpu_count"],
                    "usage_per_core": [cpu["usage"] for cpu in raw_system_info["cpus"]],
                    "high_usage_cores": [cpu["index"] for cpu in raw_system_info["cpus"] if cpu["usage"] > 80]
                },
                "memory": {
                    "total_gb": raw_system_info["total_memory_gb"],
                    "used_gb": raw_system_info["used_memory_gb"],
                    "available_gb": raw_system_info["available_memory_gb"],
                    "usage_percentage": raw_system_info["memory_usage_percentage"],
                    "pressure_level": "high" if raw_system_info["memory_usage_percentage"] > 80 else
                    "medium" if raw_system_info["memory_usage_percentage"] > 60 else "normal"
                },
                "storage": [
                    {
                        "mount_point": disk["mount_point"],
                        "total_gb": disk["total_gb"],
                        "available_gb": disk["available_gb"],
                        "used_gb": disk["used_gb"],
                        "usage_percentage": (disk["used_gb"] / disk["total_gb"] * 100) if disk["total_gb"] > 0 else 0,
                        "status": "critical" if disk["available_gb"] < 10 else
                        "warning" if disk["available_gb"] < 50 else "ok"
                    }
                    for disk in raw_system_info["disks"]
                ]
            }

            # Create analysis prompt
            diagnostic_prompt = self._create_analysis_prompt(analyzed_metrics)

            # Get AI analysis
            chat_result = self.manager.initiate_chat(
                self.user_proxy,
                message=diagnostic_prompt
            )

            # Extract recommendations
            recommendations = self._extract_recommendations(chat_result)

            return {
                "status": "success",
                "raw_metrics": raw_system_info,
                "analyzed_metrics": analyzed_metrics,
                "recommendations": recommendations
            }

        except Exception as e:
            print(f"Error in process_diagnostics: {str(e)}")  # for debugging
            return {
                "status": "error",
                "message": str(e)
            }
This is the AutoGen magic and at this point, it is worthwhile to deep dive into AutoGen and how it works in HAL.
AutoGen
On the surface, it looks very easy. This single line below triggers a complex multi-agent conversation.
chat_result = self.manager.initiate_chat(
    self.user_proxy,
    message=diagnostic_prompt
)
However, a lot if going on behind the scenes. When initiate_chat is called, here is what happens behind the scenes:
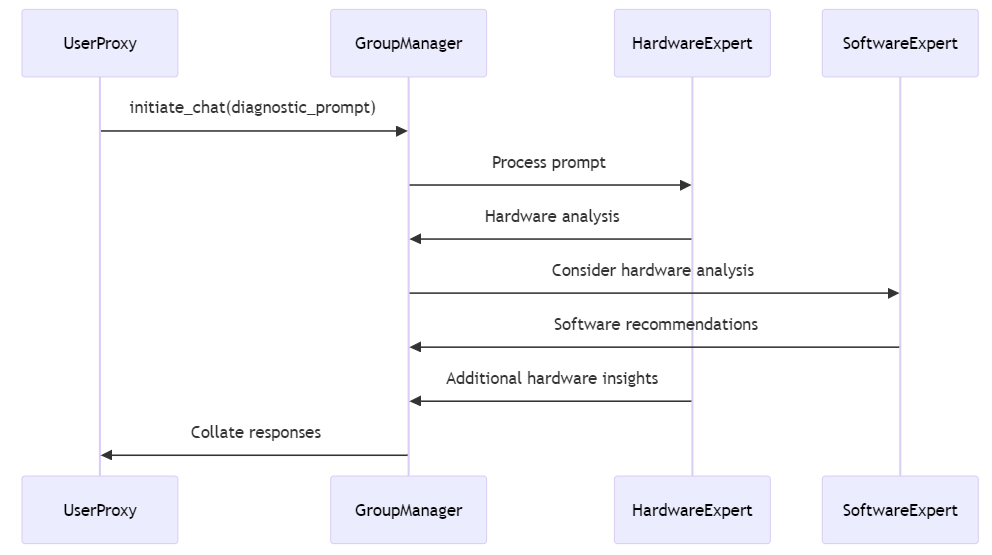
Let's break down what happens in that one line:
- Initial Message Processing:
initiate_chatis called
def initiate_chat(self, user_proxy, message):
    # 1. Send message to group chat
    self.groupchat.messages.append({
        "role": "user",
        "content": message
    })
- Agent Selection: AutoGen decides which agent should respond
next_agent = self.groupchat.select_speaker({
    "message": message,
    "agents": self.groupchat.agents
})
- Agent Response Generation: Each agent uses its system message and LLM to generate response
async def generate_response(self, message):
    # Use GPT model to generate response based on:
    # - Agent's system message
    # - Current message
    # - Conversation history
    response = await self.llm_client.generate(
        messages=[
            {"role": "system", "content": self.system_message},
            {"role": "user", "content": message}
        ]
    )
- Conversation Flow: Agents take turns until completion
while not self.groupchat.is_complete():
    # Get next speaker
    next_agent = self.groupchat.select_speaker()

    # Generate response
    response = next_agent.generate_response(last_message)

    # Add to conversation
    self.groupchat.messages.append({
        "role": "assistant",
        "name": next_agent.name,
        "content": response
    })
Here it is in plain English:
- User Proxy Initiates
# Initial prompt about system metrics is sent
"Please analyze these system metrics..."
- Hardware Expert Responds
# Hardware Expert analyzes CPU, memory, storage
"Based on the metrics:
1. CPU usage shows...
2. Memory pressure is..."
- Software Expert Contributes
# Software Expert considers hardware findings
"Given the hardware analysis:
1. Recommend optimizing...
2. Consider adjusting..."
- Hardware Expert Follows Up
# Hardware Expert adds to software recommendations
"Agree with software suggestions, also consider:
1. Memory upgrade might help...
2. Storage distribution could..."
The Group Manager ensures that conversation stays on topic, limits the number of exchanges and determines when enough information is gathered.
Using AutoGen, we make sure that we have autonomous agents with specific expertise, and that they can reference each other which leads to collaborative problem solving.
Pretty neat, isn’t it?
Blazor
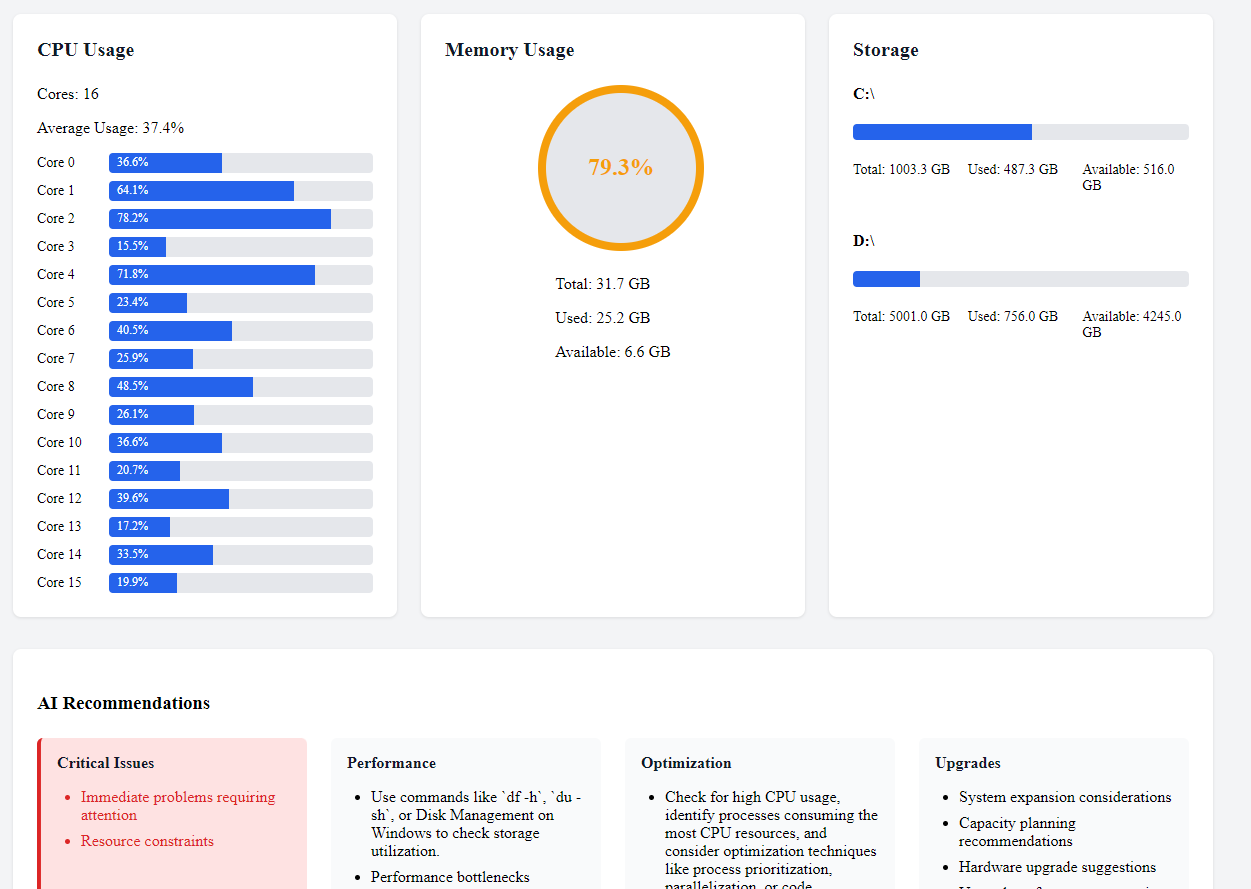
The Blazor interface provides a responsive, modern way to display system metrics and recommendations.
PythonIntegrationService calls our Python code which calls our Rust binary and the whole information is displayed in a user-friendly way.
public class PythonIntegrationService : IPythonIntegrationService
{
    private readonly string _apiUrl;
    private readonly HttpClient _httpClient;

    public PythonIntegrationService(IConfiguration configuration)
    {
        _httpClient = new HttpClient();
        _apiUrl = "http://localhost:5000/recommendations";
    }

    public async Task<DiagnosticsResult> GetDiagnosticsAnalysisAsync()
    {
        try
        {
            var response = await _httpClient.GetAsync(_apiUrl);
            response.EnsureSuccessStatusCode();

            var result = await response.Content.ReadFromJsonAsync<DiagnosticsResult>();
            return result ?? new DiagnosticsResult { Status = "error", ErrorMessage = "Failed to parse response" };
        }
        catch (Exception ex)
        {
            return new DiagnosticsResult
            {
                Status = "error",
                ErrorMessage = $"Failed to get diagnostics analysis: {ex.Message}"
            };
        }
    }
}
Putting It All Together: HAL
In order to see how this all comes together, we need to run our Python code first by clicking on app.py, and then hitting the run button in PyCharm:

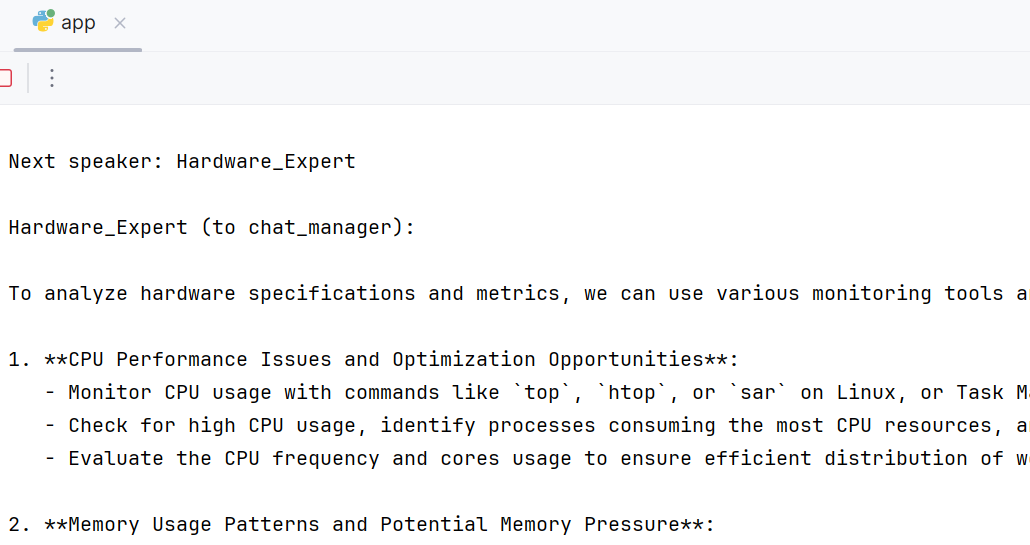
Once you do that, pay attention to the Run window that opens at the bottom of PyCharm:

If you go to that address in your browser and navigate to /recommendations, you will see the output in JSON format.
Next, we want to run our Blazor project so we can consume all this information and display it in a nice and user friendly way.
Once you run that Blazor App though, pay close attention to what happens in PyCharm as we see the agents talking to each other. It is very entertaining.
Finally, our Blazor screen:
Conclusion
This was a very fun project to work on and a great learning experience. It brought together 3 different frameworks and get them to work together which is a true real-world scenario.
Each tech stack brought its strengths to the table:
Rust: Performance and system access
Python/AutoGen: AI and analysis
Blazor: Modern web interface
The system metric and diagnosis can definitely be more advanced but the bare minimum served our purposes well.
Setting up AutoGen definitely proved to be tricky, however, once I figured out how to configure, it was a breeze.
I needed to make sure that JSON output from Python and Blazor Data Models were compatible. I made sure this is the case by defining the JSON Property Names on the models:
public class CpuAnalysis
{
    [JsonPropertyName("core_count")]
    public int CoreCount { get; set; }

    [JsonPropertyName("average_usage")]
    public double AverageUsage { get; set; }

    [JsonPropertyName("usage_per_core")]
    public List<double> UsagePerCore { get; set; } = [];

    [JsonPropertyName("high_usage_cores")]
    public List<int> HighUsageCores { get; set; } = [];
}
All in all, the different technologies complemented each other very well, and was a testament to how not to box oneself in one particular tech stack.
Source Code
Source Code is available here:
Subscribe to my newsletter
Read articles from TJ Gokken directly inside your inbox. Subscribe to the newsletter, and don't miss out.
Written by

TJ Gokken
TJ Gokken
TJ Gokken is an Enterprise AI/ML Integration Engineer with a passion for bridging the gap between technology and practical application. Specializing in .NET frameworks and machine learning, TJ helps software teams operationalize AI to drive innovation and efficiency. With over two decades of experience in programming and technology integration, he is a trusted advisor and thought leader in the AI community