AWS Basics: Load Balancers, Auto Scaling, and the 5 Core Pillars Explained
 Jay Kasundra
Elastic Load Balancer

Elastic Load Balancing distributes incoming application or network traffic across multiple targets, such as Amazon EC2 instances, containers, and IP addresses, in multiple Availability Zones
Elastic Load Balancing scales your load balancer as traffic to your application changes over time. It can automatically scale to the vast majority of workloads.
Benefits
A load balancer distributes workloads across multiple compute resources, such as virtual servers. Using a load balancer increases the availability and fault tolerance of your applications.
You can add and remove compute resources from your load balancer as your needs change, without disrupting the overall flow of requests to your applications.
You can configure health checks, which monitor the health of the compute resources, so that the load balancer sends requests only to the healthy ones
Needs
To distribute incoming application traffic
To achieve fault tolerant
To detect unhealthy instances
Enable ELB within single and multiple availability zone
Nodes features
When you enable an Availability Zone for your load balancer, Elastic Load Balancing creates a load balancer node in the Availability Zone.
Your load balancer is most effective when you ensure that each enabled Availability Zone has at least one registered target.
AWS recommend that you enable multiple Availability Zones.
This configuration helps ensure that the load balancer can continue to route traffic If one Availability Zone becomes unavailable or has no healthy targets, the load balancer can route traffic to the healthy targets in another Availability Zone.
Cross-Zone Load Balancing
The nodes for your load balancer distribute requests from clients to registered targets.
When cross-zone load balancing is enabled, each load balancer node distributes traffic across the registered targets in all enabled Availability Zones.
When cross-zone load balancing is disabled, each load balancer node distributes traffic only across the registered targets in its Availability Zone
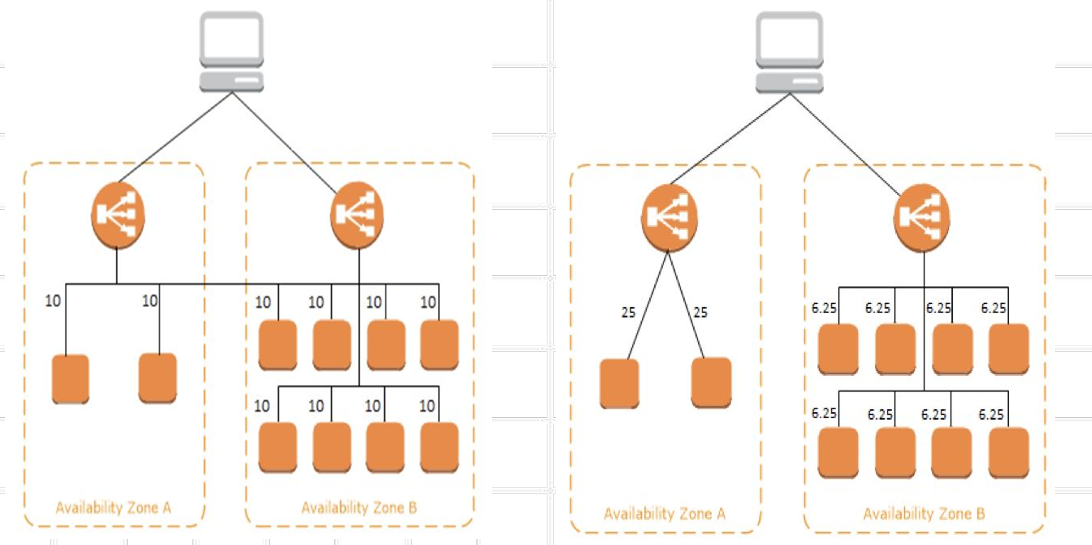
- In the image above, the left side shows Cross-Zone load balancing enabled, while the right side shows Cross-Zone load balancing disabled.
Internet and Internal Load Balancer
When you create a load balancer in a VPC, you must choose whether to make it an internal load balancer or an Internet-facing load balancer.
Internet Load Balancer
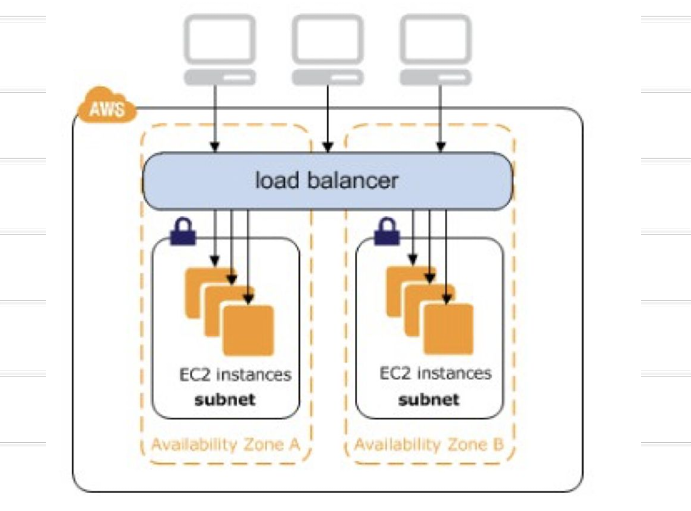
The nodes of an Internet-facing load balancer have public IP addresses.
The DNS name of an Internet-facing load balancer is publicly resolvable to the public IP addresses of the nodes. Therefore, Internet-facing load balancers can route requests from clients over the Internet
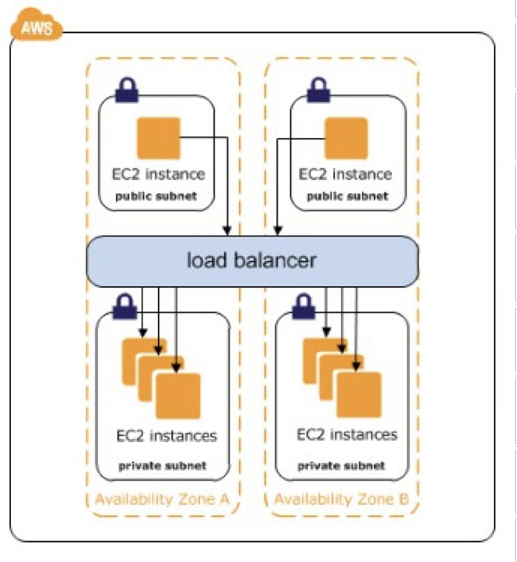
Internal Load Balancer
The nodes of an internal load balancer have only private IP addresses
Types of Elastic Load Balancer.
Application Load Balancers
Network Load Balancers
Classic Load Balancers
Gateway Load Balancer
Classic Load Balancer
Classic Load Balancer provides basic load balancing across multiple Amazon EC2 instances
Classic Load Balancer is intended for applications that were built within the EC2-Classic network
CLB send the requests directly to EC2 instances
AWS recommend Application Load Balancer for Layer 7 and Network Load Balancer for Layer 4 when using Virtual Private Cloud (VPC)
Creation of CLB
To create a Classic Load Balancer (CLB), open the Load Balancers section from the EC2 left navigation menu. Click on "Create load balancer."
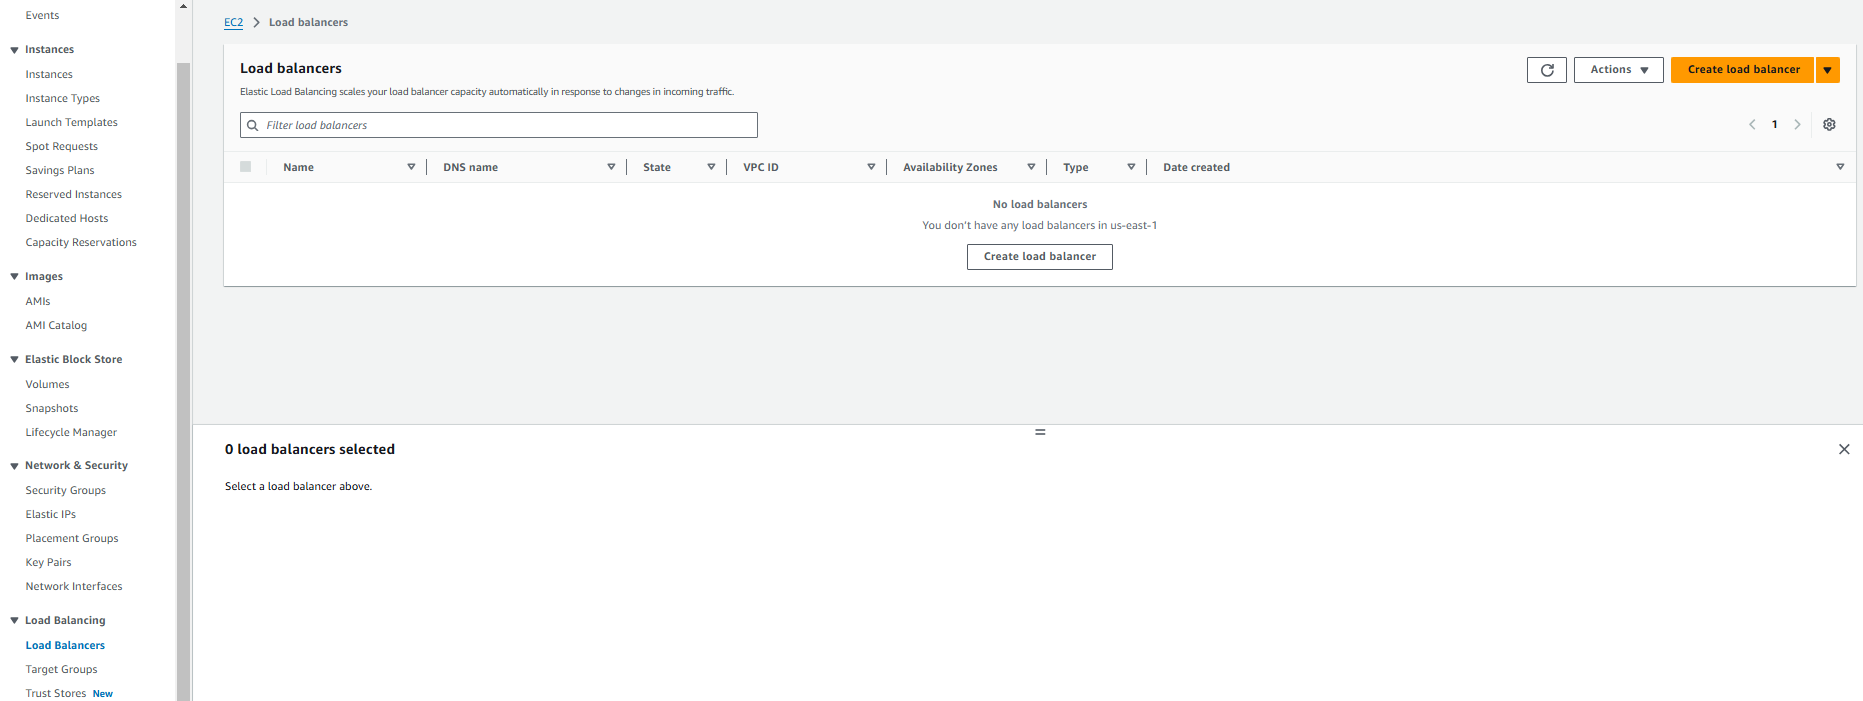
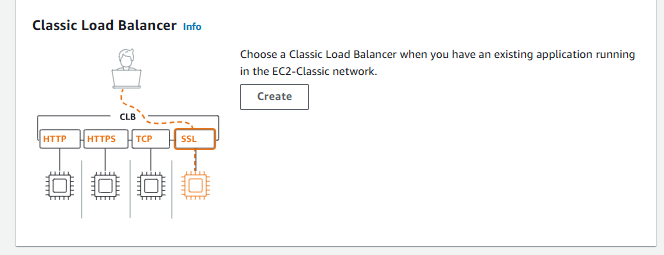
Select the CLB and Click on “Create”.
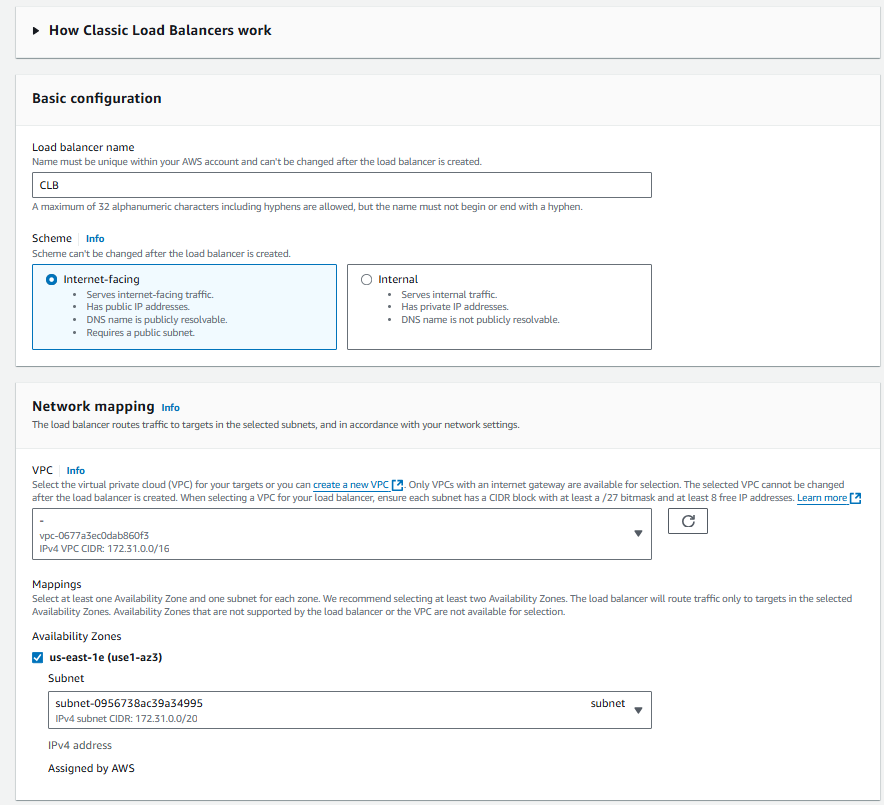
Name the CLB, choose the Scheme, and select the Availability Zones (AZs).
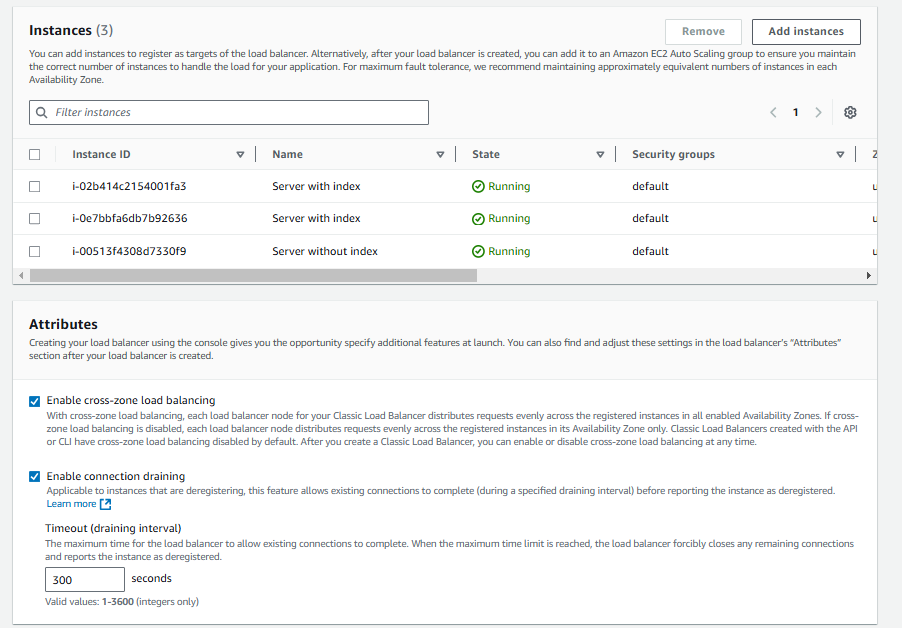
Add instances, enable cross-zone load balancing, and click on "Create load balancer."
Application Load Balancer
A load balancer serves as the single point of contact for clients.
A listener checks for connection requests from clients, using the protocol and port that you configure, and forwards requests to one or more target groups, based on the rules that you define
Each rule specifies a target group, condition, and priority. When the condition is met, the traffic is forwarded to the target group.
An Application Load Balancer functions at the application layer, the seventh layer of the Open Systems Interconnection (OSI) model
Features
Content based routing
Support for container based applications
Better metrics
Support for additional Protocols and Workloads
Creation of ALB
To create a Classic Load Balancer (CLB), open the Load Balancers section from the EC2 left navigation menu. Click on "Create load balancer."

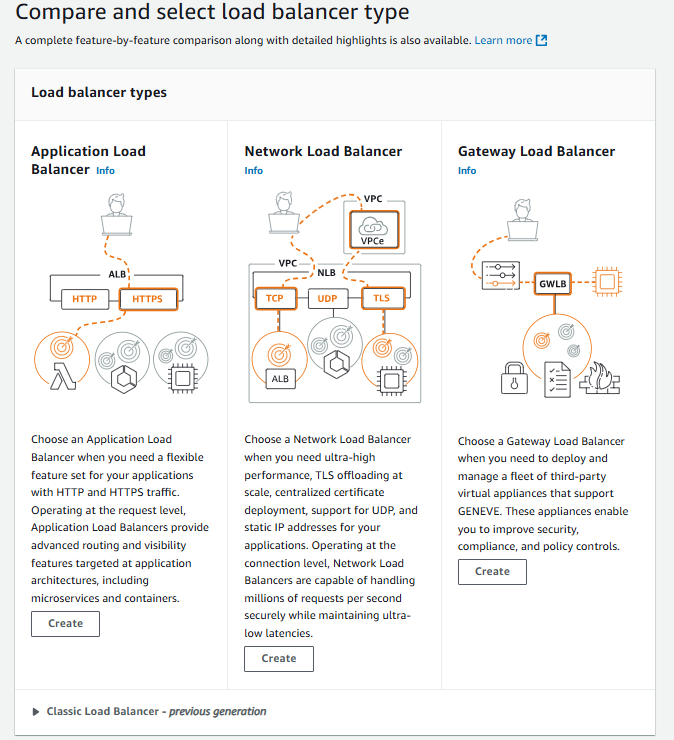
Click on "Create" from the Application Load Balancer section.
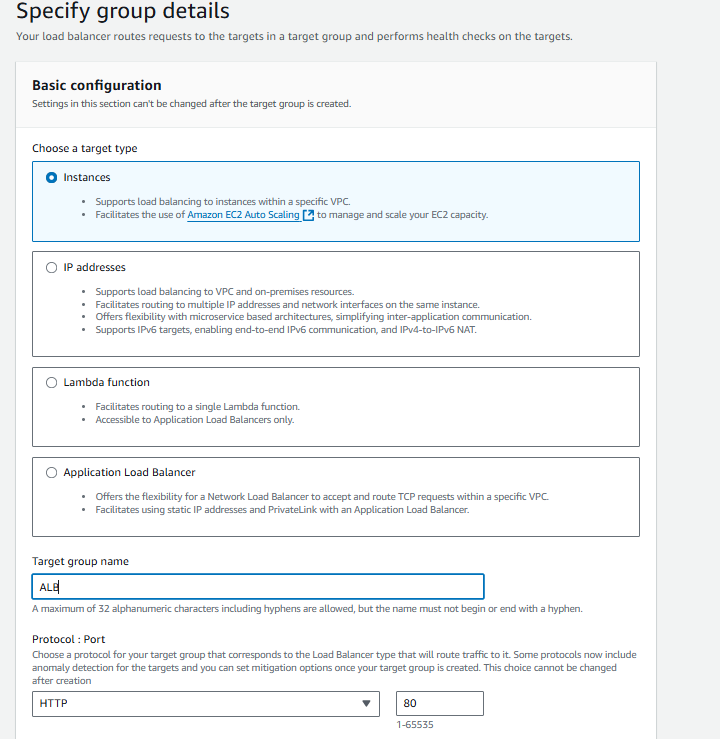
For ALB, We need to create target groups
To create target groups, select the Instances radio button and name the target group.
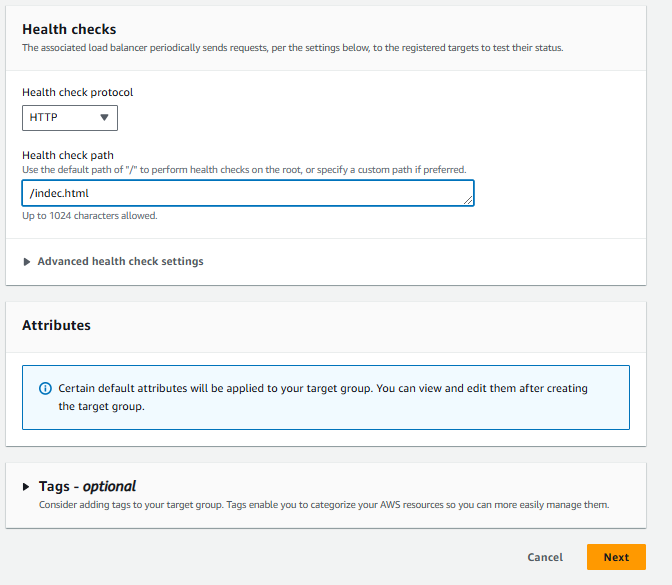
Provide the health check path, then click on Next.
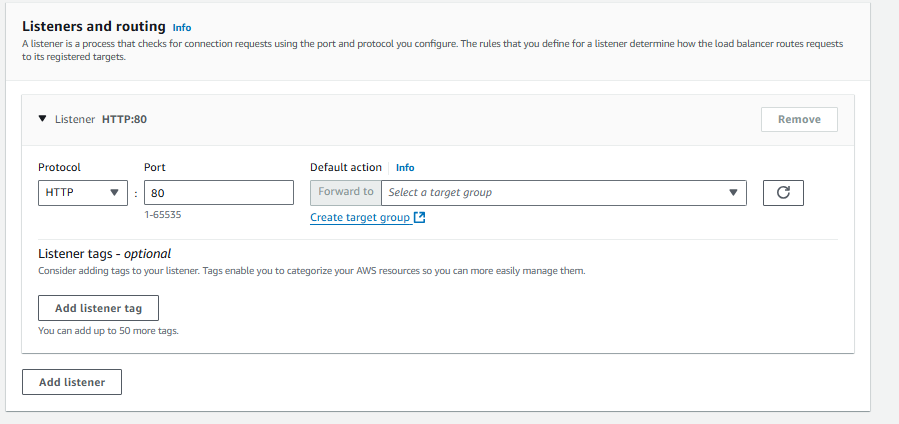
After selecting the created target group, click on "Create load balancer."

Network Load Balancer
It is designed to handle tens of millions of requests per second while maintaining high throughput at ultra low latency, with no effort on your part
A Network Load Balancer functions at the fourth layer of the Open Systems Interconnection (OSI) model
Long-running Connections – NLB handles connections with built-in fault tolerance, and can handle connections that are open for months or years, making them a great fit for IoT, gaming, and messaging applications.
Benefits
Ability to handle volatile workloads and scale to millions of requests per second
Support for containerized applications.
Support for monitoring the health of each service independently
Auto Scaling
Amazon EC2 Auto Scaling helps you ensure that you have the correct number of Amazon EC2 instances available to handle the load for your application.
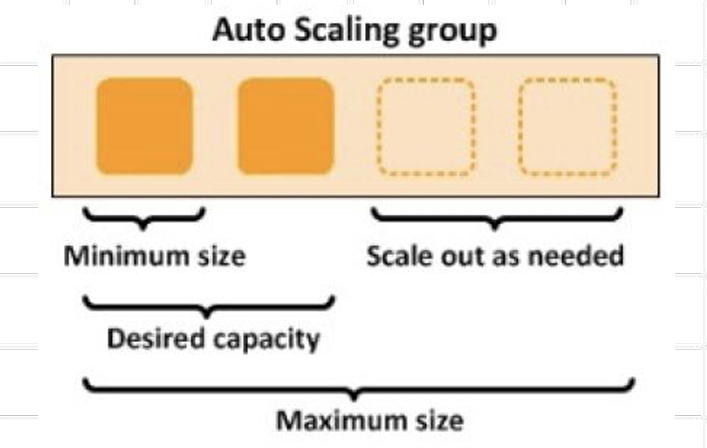
You create collections of EC2 instances, called Auto Scaling groups.
You can specify the minimum number of instances in each Auto Scaling group, and Amazon EC2 Auto Scaling ensures that your group never goes below this size.
You can specify the maximum number of instances in each Auto Scaling group, and Amazon EC2 Auto Scaling ensures that your group never goes above this size.
If you specify scaling policies, then Amazon EC2 Auto Scaling can launch or terminate instances as demand on your application increases or decreases
Benefits
Setup Scaling quickly
Make smart Scaling decisions
Automatically maintain performance
Pay only for what you need
Auto Scaling Techniques
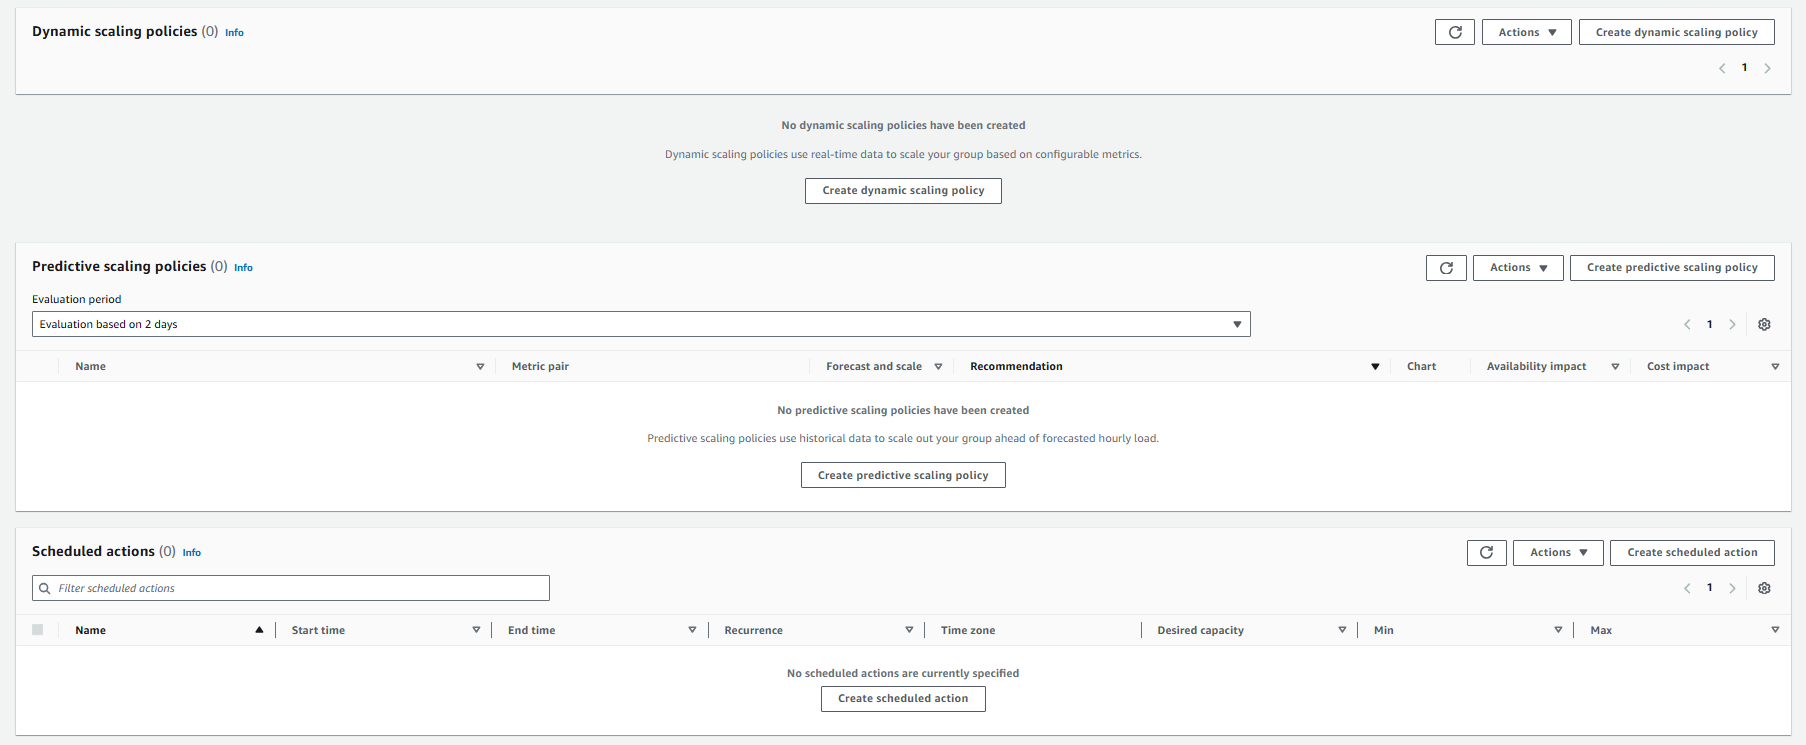
Dynamic Scaling: Adapts to changing environments and responds with the EC2 instances as per the demand. It helps the user to follow the demand curve for the application, which ultimately helps the maintainer/user to scale the instances ahead of time.
Predictive Scaling: Helps you to schedule the right number of EC2 instances based on the predicted demand. You can use both dynamic and predictive scaling approaches together for faster scaling of the application.
Scheduled Scaling: As the name suggests allows you to scale your application based on the scheduled time you set. For e.g. A coffee shop owner may employ more baristas on weekends because of the increased demand and frees them on weekdays because of reduced demand.
Launch Config/Template
A launch configuration is an instance configuration template that an Auto Scaling group uses to launch EC2 instances
When you create a launch configuration/template, you specify information for the instances which Include the ID of the Amazon Machine Image (AMI), the instance type, a key pair, one or more security groups, and a block device mapping
If you've launched an EC2 instance before, you specified the same information in order to launch the instance
You can specify your launch configuration with multiple Auto Scaling groups. However, you can only specify one launch configuration for an Auto Scaling group at a time, and you can't modify a launch configuration after you've created it
In launch template you can do make changes.
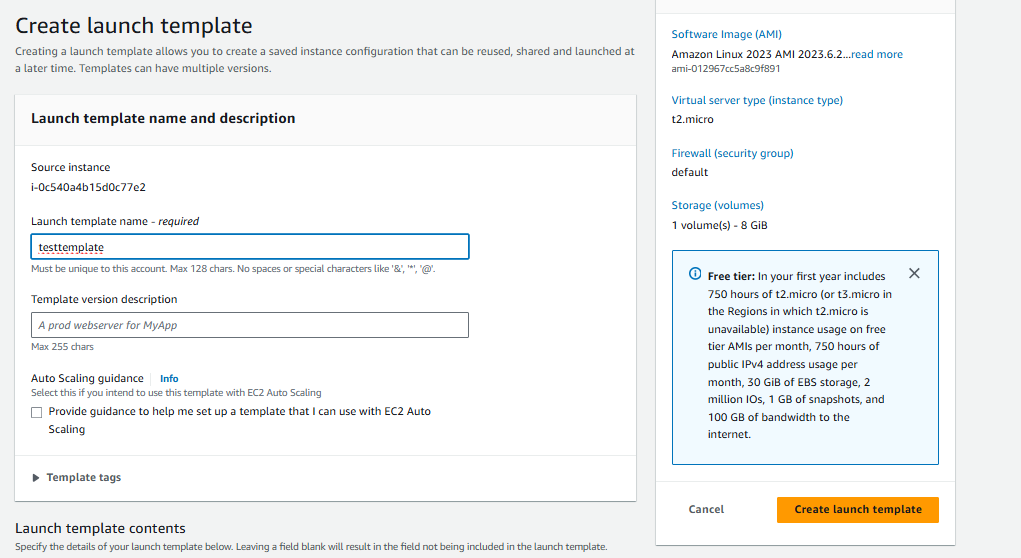
Creation of launch template
To create a launch template, go to the instances page, select an instance, click on "Actions," choose "Image and templates," and then click on "Create template from instance."

Provide a name and Click on Create launch template.
Creation of Auto Scaling groups
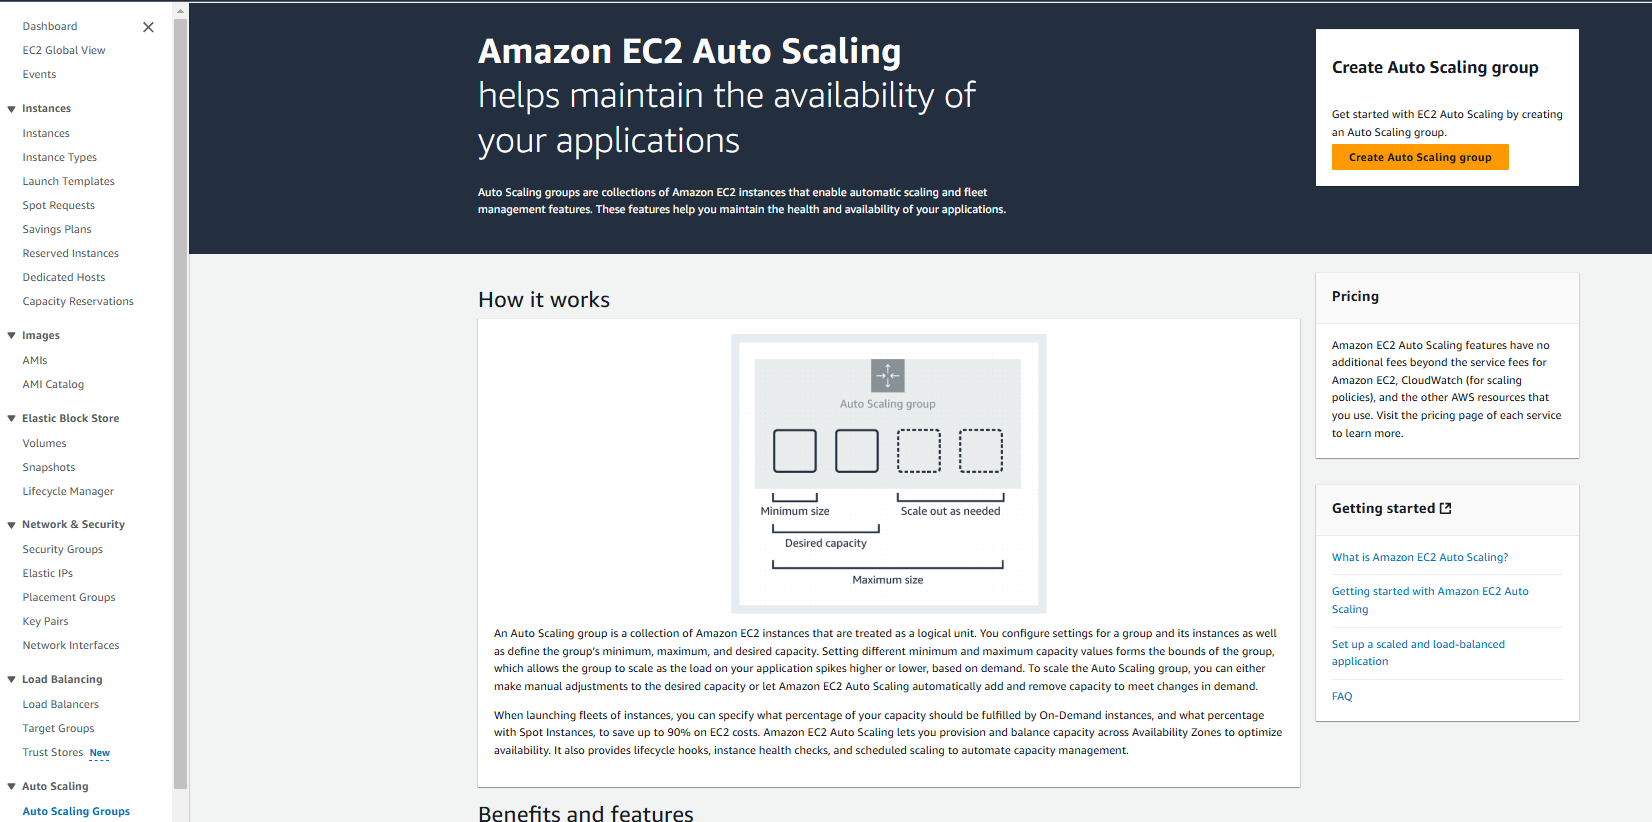
To create auto scaling groups, select "Auto Scaling Groups" from the EC2 left navigation menu. Click on "Create Auto Scaling Group."
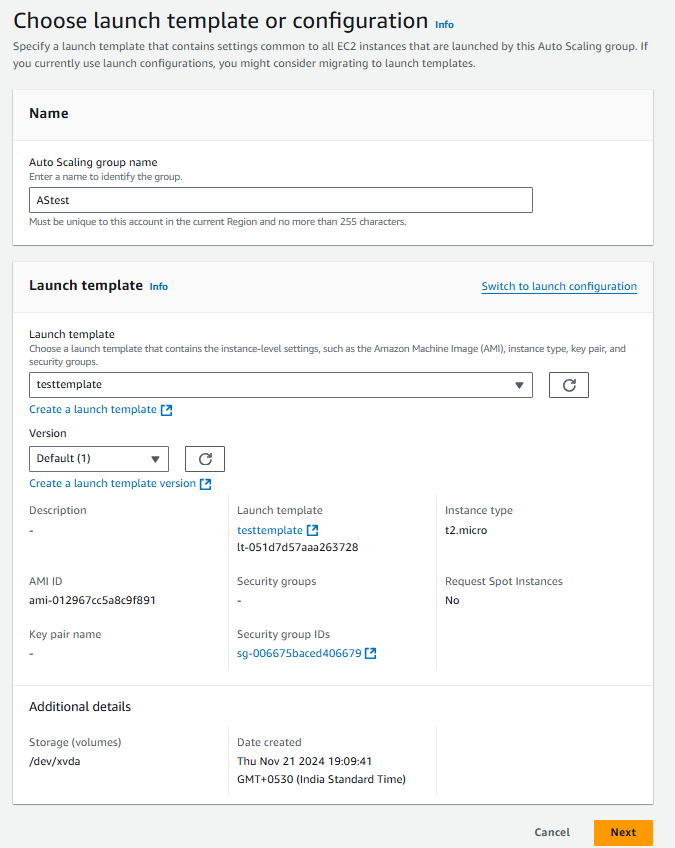
Provide the name and select the created launch template. Click on Next.
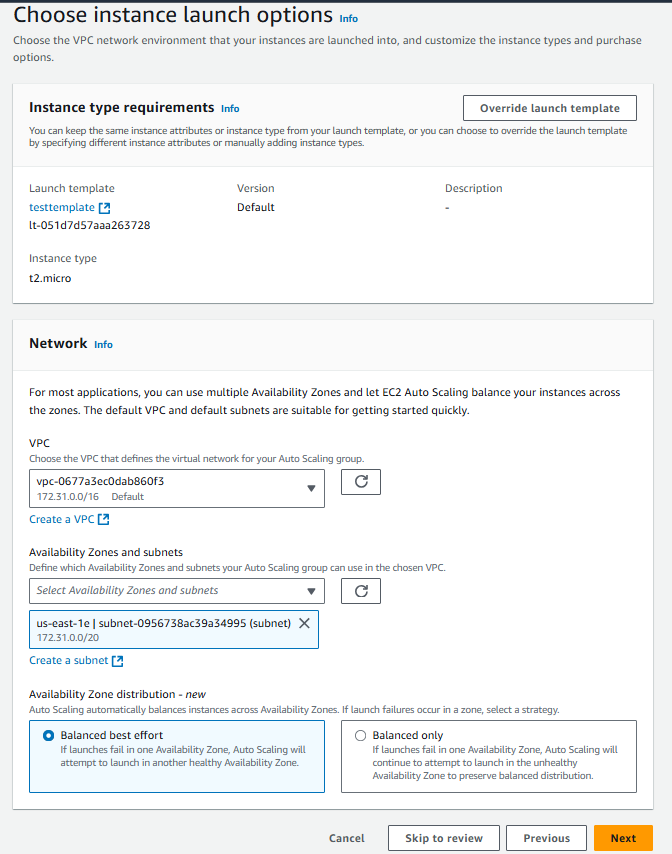
Review your instance launch options. Choose the subnet and select "Balanced Best Effort." Click on Next.
Configure the group size and scaling. Enter the desired capacity, and the minimum and maximum desired capacity. Click on Next.
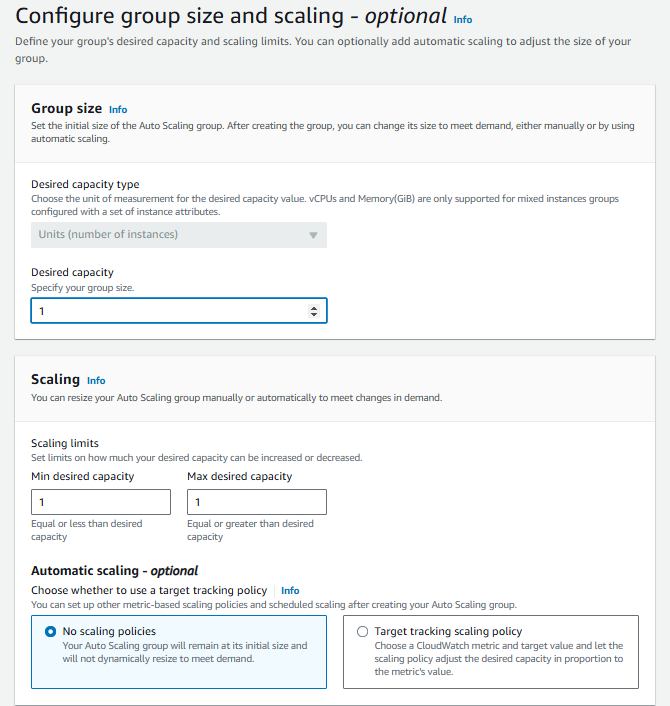
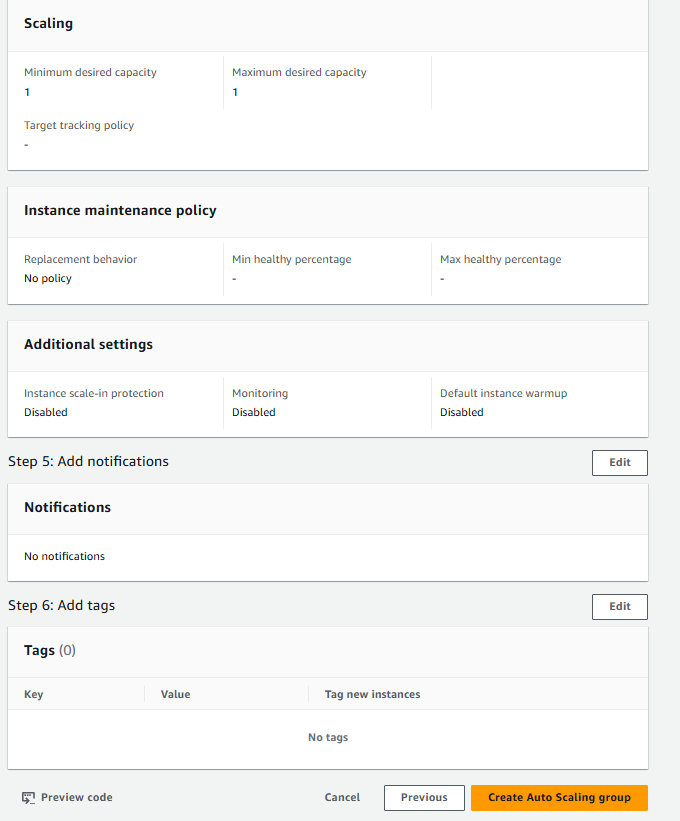
Review the provided data and click on Create Auto Scaling group.
After creating scaling group you can configure any of the scaling techniques.
The 5 Pillars of the Framework in AWS
Creating a software system is a lot like constructing a building. If the foundation is not solid, structural problems can undermine the integrity and function of the building.
When architecting technology solutions, if you neglect the five pillars of operational excellence, security, reliability, performance efficiency, and cost optimization it can become challenging to build a system that delivers on your expectations and requirements.
Incorporating these pillars into your architecture will help you produce stable and efficient systems.
Operational Excellence
The Operational Excellence pillar includes the ability to run and monitor systems to deliver business value and to continually improve supporting processes and procedures.
The design principles for operational excellence in the cloud
Perform operations as code
Annotate documentation
Make frequent, small, reversible changes
Refine operations procedures frequently
Anticipate failure
Learn from all operational failures
Security
The Security pillar includes the ability to protect information, systems, and assets while delivering business value through risk assessments and mitigation strategies.
The design principles for security in the cloud:
Enable traceability
Apply security at all layers
Automate security best practices
Protect data in transit and at rest
Prepare for security events
Reliability
The Reliability pillar includes the ability of a system to recover from infrastructure or service disruptions, dynamically acquire computing resources to meet demand, and mitigate disruptions such as misconfigurations or transient network issues.
The design principles for reliability in the cloud:
Automatically recover from failure
Scale horizontally to increase aggregate system availability
Manage change in automation
Performance Efficiency
The Performance Efficiency pillar includes the ability to use computing resources efficiently to meet system requirements, and to maintain that efficiency as demand changes and technologies evolve.
The design principles for performance efficiency in the cloud:
Democratize advanced technologies
Go global in minutes
Use serverless architectures
Experiment more often
Mechanical sympathy
Cost Optimization
The Cost Optimization pillar includes the ability to run systems to deliver business value at the lowest price point.
The design principles for cost optimization in the cloud:
Adopt a consumption model:
Measure overall efficiency
Stop spending money on data center operations
Analyze and attribute expenditure:
Use managed and application level services to reduce cost of ownership
Subscribe to my newsletter
Read articles from Jay Kasundra directly inside your inbox. Subscribe to the newsletter, and don't miss out.
Written by
