How to Build a Chatbot with Amazon Lex
 Ahmed Salau
Building a chatbot is an exciting way to enhance user engagement and automate tasks, and Amazon Lex provides the perfect platform to make this possible. Amazon Lex, powered by AWS, leverages natural language understanding (NLU) and automatic speech recognition (ASR) to create intelligent, conversational bots with ease. In this blog post, I’ll guide you through the process of creating a chatbot using Amazon Lex, from setting up the environment to designing and testing your bot. Let’s dive into the world of intelligent conversational solutions!
NextWork Student - community.nextwork.org/u/8a3e1ff8
| Prerequisite
- Have an AWS account. If you don’t have one, sign up here and enjoy the benefits of the Free-Tier Account
Project duration ⏰
The project took about 60 minutes.
Cost 💲
$0 - Please make sure to delete all AWS resources used for the project to avoid incurring expenses unless you are within the free tier limit.
😉PART 1 OF THIS PROJECT
You’ll learn how to:
Set up a basic intent (WelcomeIntent)
Create lists of utterances
Handle failures with FallbackIntent
Define a MessageGroup to send variations in your bot's responses
Build and test your bot using text and speech
Let’s begin this awesome journey into Amazon Lex and create a new bot from scratch on Amazon Lex.
In the AWS Management Console, Navigate to Amazon Lex (type Lex into the search bar of your Console). Click on Amazon Lex

Check the URL in your web browser to confirm it includes ...console.aws.amazon.com/lexv2/.... If it doesn’t, locate and click the Return to the new Lex V2 console link in the left-hand menu to access the updated interface.
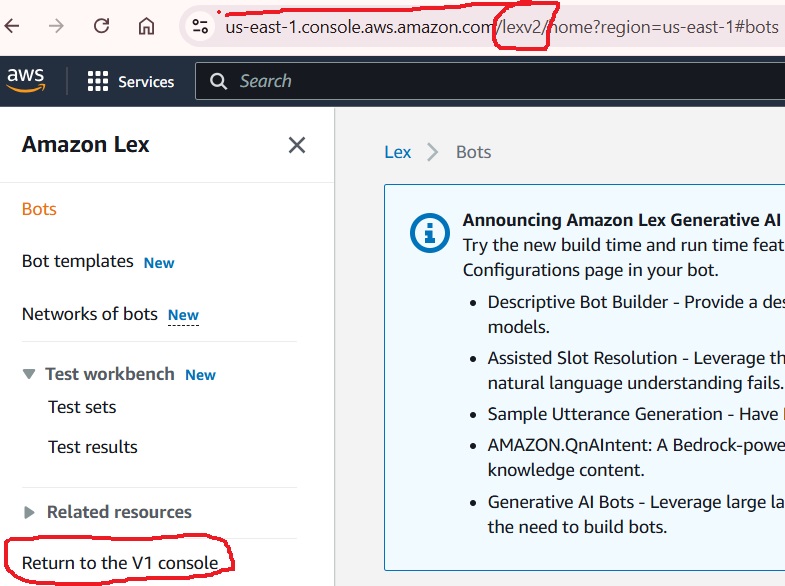
Select create bot

Then click create a blank bot.
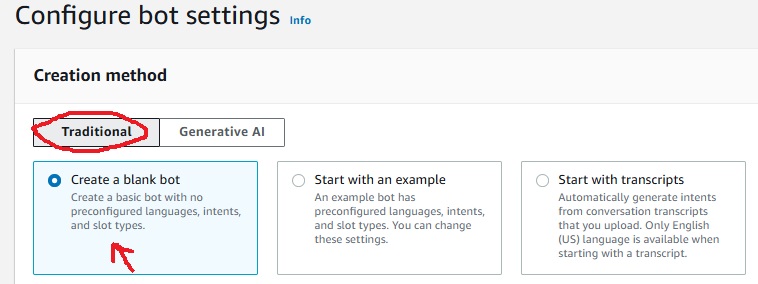
For Bot name, enter BankerBot.
For Description, enter Banker Bot to help customer check their balance and make transfers.
Under IAM permissions, select Create a role with basic Amazon Lex permissions.

💡 Why do we need Amazon Lex permissions ? Amazon Lex requires permissions to interact with other AWS services on your behalf. These permissions enable Lex to perform tasks such as storing data, accessing logs, and integrating with services like AWS Lambda. For instance, in this project, you’ll later connect Amazon Lex with Lambda to enhance your chatbot's functionality, such as processing user inputs and triggering specific actions. Granting these permissions ensures seamless service integration while maintaining security and control over the actions performed by your chatbot.
Under Children’s Online Privacy Protection Act (COPPA), select No.
Under Idle session timeout, keep the default of 5 minutes.
💡 Idle session timeout in Amazon Lex defines the maximum duration a session remains active when there is no user interaction. If a user does not provide input within the specified time (default is 5 minutes), the session automatically ends. This feature ensures that resources are efficiently managed and inactive sessions are terminated, maintaining optimal system performance and security. The timeout duration can be adjusted based on the needs of your chatbot's use case.
Select Next
To explore Amazon Lex's full features in this project, keep the language setting as English.
For voice interaction, click on the dropdown menu labeled Danielle. Browse through the available voice options and select your preferred one to personalize your chatbot's responses. This customization enhances the user experience by allowing you to choose the voice that best suits your application's tone and purpose. For the project I chose the voice labelled “Matthew”, please feel free to explore.

- For Intent classification confidence score threshold, keep the default value of 0.40. The intent classification confidence score threshold in Amazon Lex determines the minimum confidence level required for the chatbot to interpret a user's input correctly. For example, setting this threshold to 0.4 means the bot must be at least 40% confident in its understanding before responding. If the confidence score falls below the threshold (e.g., due to ambiguous input), the bot will generate an error or request clarification. This ensures more accurate responses and a better user experience.
Create your first intent
The basic structure of your bot is ready, and it’s time to bring it to life!
Train BankerBot to recognize and respond with a greeting, like "Hello!"
This involves setting up an intent, adding sample utterances (e.g., "Hi" or "Hello"), and defining the bot’s response.
💡 What are Intents ? Intents represent the goals users aim to achieve during their interaction with a chatbot, such as checking an account balance, booking a flight, or ordering food. In Amazon Lex, you build your chatbot by defining and categorizing these intents. By setting up multiple intents, a single chatbot can efficiently handle a variety of user requests, often within a related context, enabling a versatile and responsive user experience.
Let's change the name!
Under Intent details, enter Welcome_Intent for the Intent name.
Add the description “Welcoming a user when they say hello.”
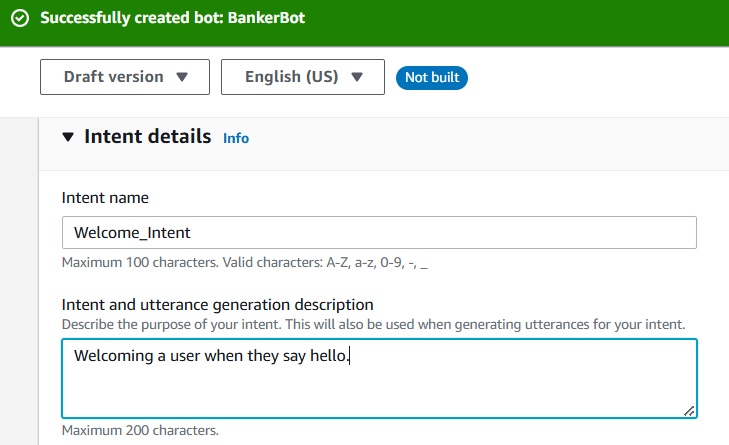
Scroll down to the Sample utterances panel.
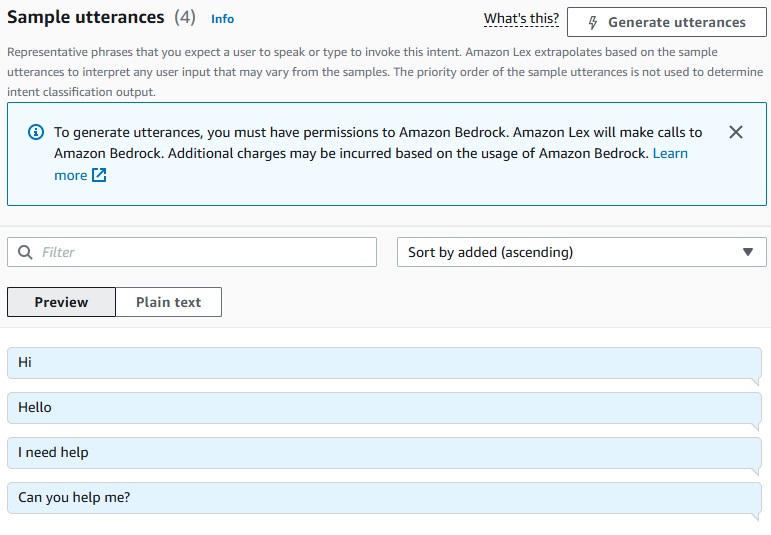
Click the Plain Text button

Hi
Hello
I need help
Can you help me?

- Click back to the Preview button to see these utterances in chat form just like below image.
Scroll down to Closing response, and expand the arrow for Response sent to the user after the intent is fulfilled.
In the Message field, enter the following message:
Hi! I'm BB, the Banking Bot. How can I help you today?

Choose Save intent.
Choose Build, which is close to the top of the screen.

- Wait few seconds, you’ll see a successfully built message like the below image.

- Click Test.
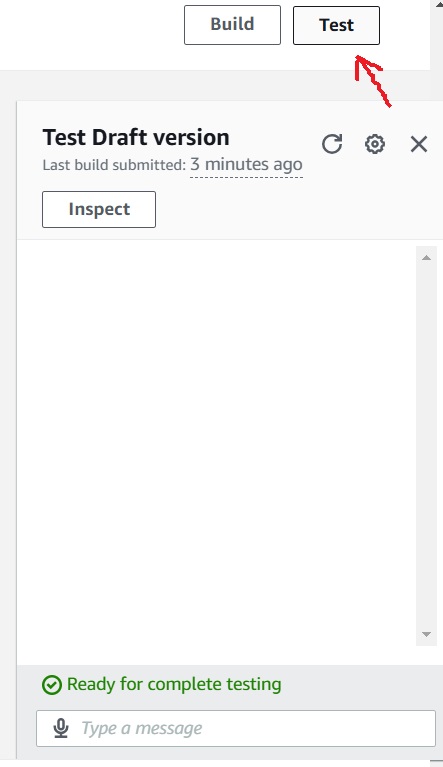
The following dialog will pop up, and you can interact with the bot by entering your opening message.
Try using various phrases to see how your bot responds! While the utterances you've defined will definitely work, the bot may also recognize similar phrases due to the intent classification confidence score of 0.40.
Testing with phrases like "Help me," "Hiya," "How are you," and "Good morning" could trigger the same intent, even if those exact phrases weren't defined. This allows the bot to better understand different ways users might phrase their requests while maintaining context.
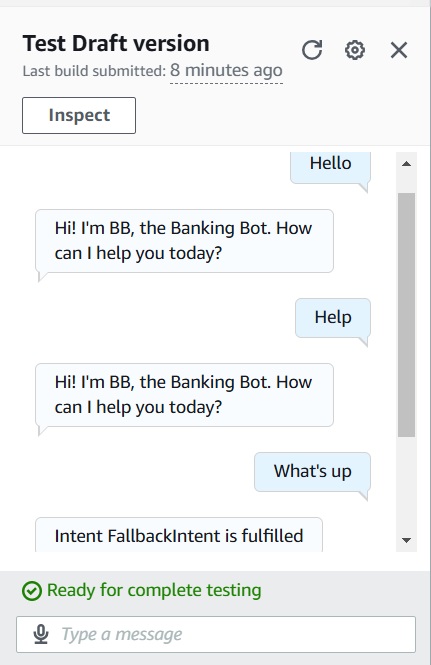
💡 How does my chatbot respond to these user inputs? From the above image, the first two inputs are successfully recognized but the last input wasnt recognized thereby returning an Intent FallbackIntent is fulfilled response.
When testing user inputs, Amazon Lex uses machine learning to match what users say with defined utterances. If Lex recognizes the phrase, it will trigger the corresponding intent. However, if the input doesn't match any predefined utterance closely enough, Lex activates a fallback intent, indicating that it couldn't understand the user's request clearly. This fallback mechanism ensures that your bot can handle unclear or unexpected inputs, providing an opportunity for further refinement and training.
We'll explore how to customize and manage fallback intents in the next steps.
Manage FallbackIntent
The FallbackIntent in Amazon Lex is triggered in our case when the chatbot's intent classification confidence score is too low (below the set threshold of 40%) to recognize the user's input.
💡FallbackIntent is a default intent in Amazon Lex that gets triggered when the bot doesn’t recognize the user’s input. It’s a safety mechanism for handling unrecognized or unclear phrases. If Lex can't match the user's utterance to any predefined intent, the FallbackIntent responds, letting you provide a default response or ask for clarification. This helps ensure the chatbot remains functional even when it encounters unfamiliar or ambiguous inputs. You can customize the FallbackIntent to improve user experience.
The default FallbackIntent message you saw just now ("Intent FallbackIntent is fulfilled") can be a little confusing.
Let's re-phrase that message so it's clearer to the user that your chatbot doesn't understand the user's request.
You can navigate to FallbackIntent using the below images
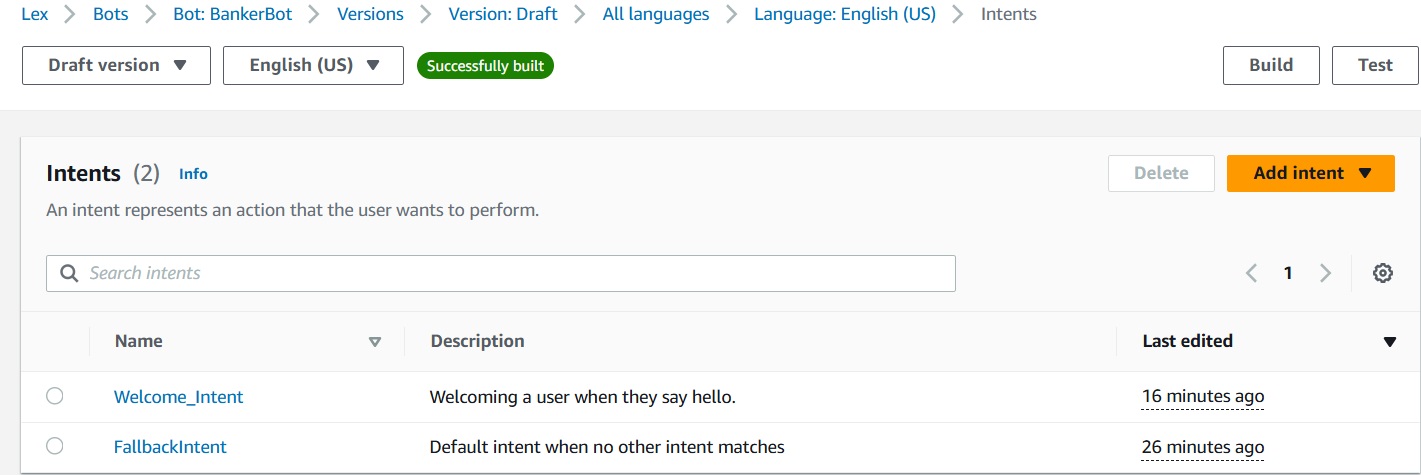

Scroll down to Closing responses.
Expand the arrow for Response sent to the user after the intent is fulfilled.. In the Message field, add the following text: Sorry I am having trouble understanding. Can you describe what you'd like to do in a few words? I can help you find your account balance, transfer funds and make a payment.

You'll notice another arrow next to the label Variations - optional.
Expand the arrow.
Enter the following text: Hmm could you try rephrasing that? I can help you find your account balance, transfer funds and make a payment.
💡 What are Variations ? Variations in Amazon Lex are different versions of the same message in the Message box. When the FallbackIntent is triggered, Lex will randomly select one of the variations to send as a response, adding variety to the chatbot's interactions. This feature helps make responses sound more natural and conversational, preventing the bot from sounding repetitive or robotic, even when dealing with unrecognized input.

Choose Save intent.
Choose Build
Choose Test.
Let's test 2-3 message that failed in your last try - what do you see now?

😉PART 2 OF THIS PROJECT
You’ll learn how to:
Define a custom slot type.
Associate custom and built-in slots to your intent.
Parse slot values from the initial utterance.
Create a custom slot for account types
To upgrade your BankerBot to check users' bank balances, you need to create a custom slot for account types. This will allow the bot to recognize different account types (e.g., checking, savings) when asking users for their bank account type and birthday for verification.
Slots in Amazon Lex define the specific pieces of information the bot needs from users, helping it capture the correct data for processing. By adding a custom slot for account types, you make the bot more dynamic and capable of handling diverse user inputs.
In this step, get ready to:
Create your first slot to store a user's bank account type.
Save different bank account types that Lex should know.
In the Amazon Lex console, choose Slot types in your left hand navigation panel.

💡What are Slots ? Slots in Amazon Lex are placeholders for the specific information a chatbot needs to complete a user's request. Think of them as fields in a form that must be filled out. For instance, if the intent is to book a restaurant table, the slots could capture details like the restaurant name, date, time, and number of people. Lex offers predefined slot types (e.g., date, time), and you can create custom slots to handle specialized data, such as bank account types, tailored to your use case.
Choose Add slot type.
From the dropdown, choose Add blank slot type.
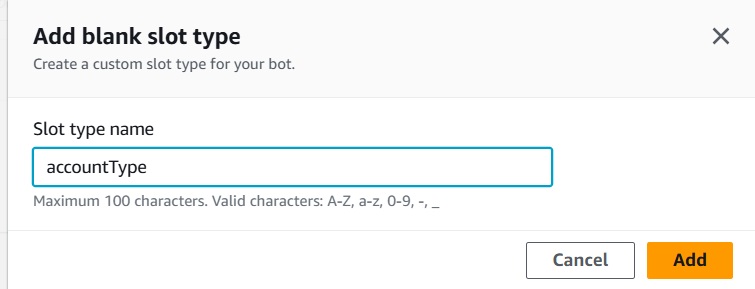
Enter accountType for the Slot type name.
Choose Add.

- In the Slot value resolution panel, choose Restrict to slot values.

💡Why are we using this selection ? Selecting Restrict to slot values ensures that only the specified account types (e.g., Checking, Savings, and Credit) are accepted as valid options. Without this setting, Amazon Lex might use machine learning to recognize other values it frequently encounters, which could result in users mentioning account types that your bank doesn't offer. To avoid confusion and keep the bot's responses relevant, restricting the slot ensures Lex only accepts the account types you explicitly define.
Now let's add the three account types!.
In the Values field, enter Checking.
Select Add value, or just press Enter on your keyboard.
Do the same for Savings.
Enter Credit, and add a few synonyms in the second field. Press ; on your keyboard after every time you add in a new one:
credit cardvisamastercardamexamerican express
Choose Add value to finish up your work for Credit.
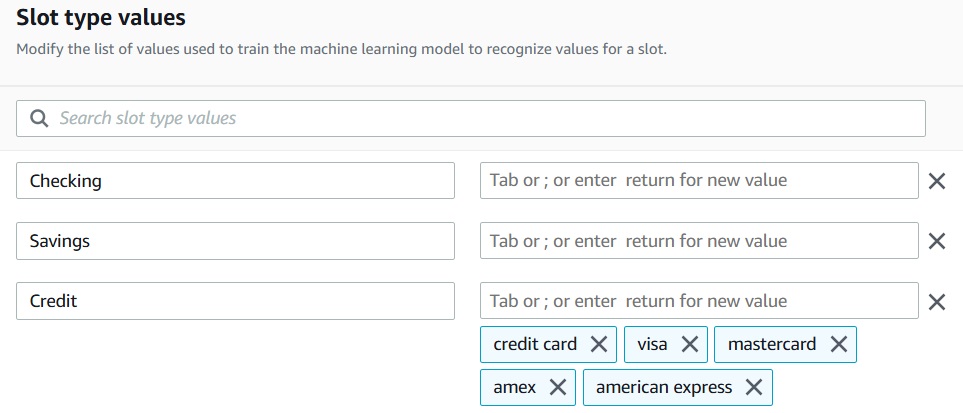
We create slot values to ensure that BankerBot only accepts the specific bank account types your organization offers, like Checking, Savings, and Credit. This avoids confusion, as it prevents the bot from recognizing or suggesting account types that aren't available. By defining these values, you guide the conversation flow and ensure users can only select valid options, streamlining the process and improving the user experience. You'll use these values when interacting with BankerBot later in the project.
- Choose Save slot type.
Create the CheckBalance intent
In this step, get ready to:
Set up a new intent for checking user's bank account balance.
Add slots in your intent, so Lex can store the user's bank account type and birthday.
In your left hand navigation panel, head back to Intents.
Choose Add intent, then Add empty intent.
Enter
CheckBalanceas your intent name.


Choose Add.
Enter the following description in the Intent details panel: Intent to check the balance in the specified account type.
Scroll down to Sample utterances.
Switch to Plain Text and paste in the following utterances:
What’s the balance in my account?
Check my account balance
What’s the balance in my {accountType} account?
How much do I have in {accountType} ?
I want to check the balance
Can you help me with account balance?
Balance in {accountType}

💡 Why do some of the utterances have the text {accountType}? The text {accountType} in some of the utterances indicates that Amazon Lex is looking for specific slot values from the user's input. If a word in the user's message matches the expected value for the accountType slot, Lex automatically fills in that information, without needing to prompt the user. This makes the conversation smoother and faster, as the bot can gather necessary information without additional questions.
Scroll down until you can see the Slots pane.
Choose Add slot button.
For slot's Name, enter accountType.
For the Slot type, choose your custom slot value accountType - which you created in Part 1 of this project!
Enter the following for Prompts: For which account would you like your balance?
Choose Add.
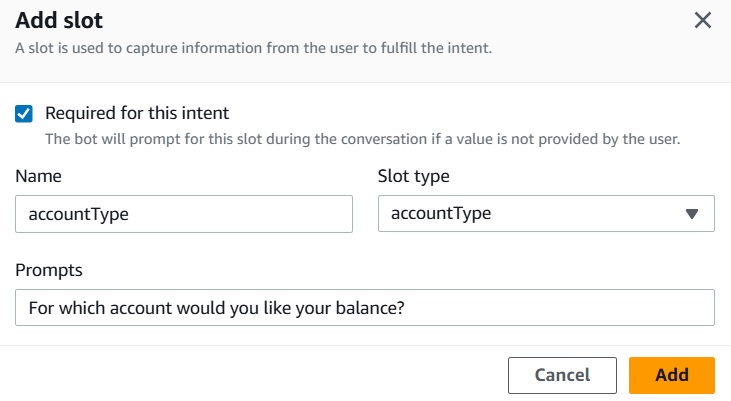
You might remember that we mentioned the CheckBalance intent should also check for the user's birthday. let's create a Slot for the birth date!
Choose Add slot.
Use these values for your next slot:
Name: dateOfBirth
Slot type: AMAZON.Date
Prompts: For verification purposes, what is your date of birth?

Choose Save intent.
Choose Build
Choose Test.
Now let's chat with the new chatbot.. Enter I want to check my balance please. Then, follow Amazon Lex's prompts and enter an account type and birth date.
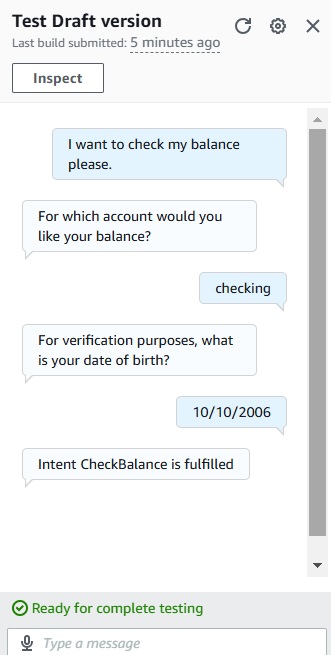
💡 Why does my bot say 'Intent CheckBalance fulfilled'? When your bot returns 'Intent CheckBalance fulfilled', it means that the bot has successfully collected the necessary user details, such as their account type and date of birth, using the defined slots. However, the bot has not yet been programmed to retrieve the actual bank balance. This message simply indicates that the intent was processed up to the data collection stage, and the bot is concluding the interaction until it learns how to retrieve and return the bank balance in the next step of the project.
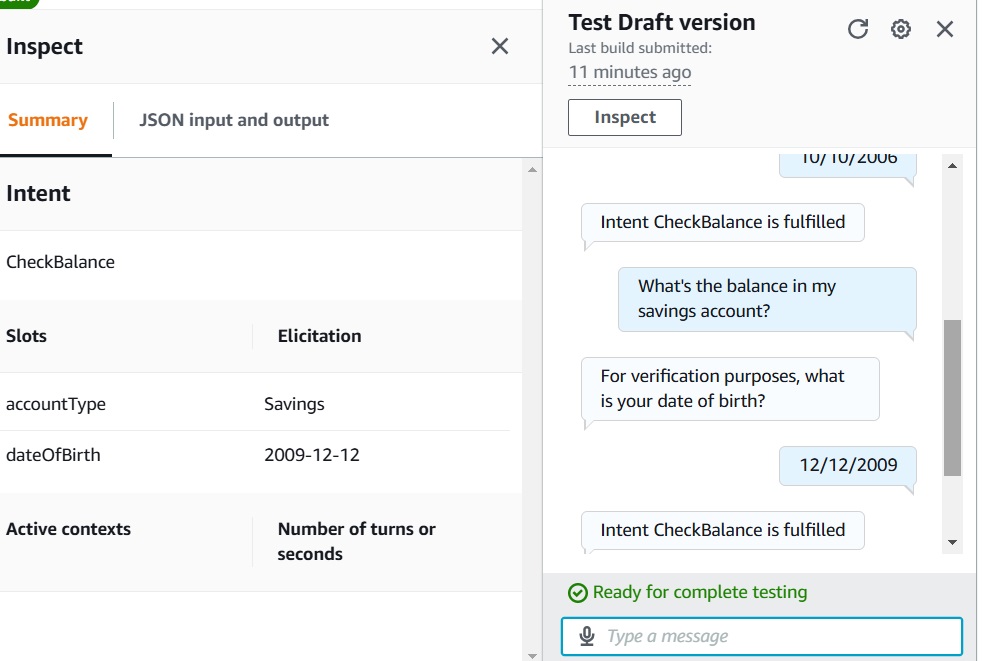
Now choose Inspect near the top of your chat window.
The chatbot has already filled both slots - accountType and dateOfBirth - with information it now knows about you.
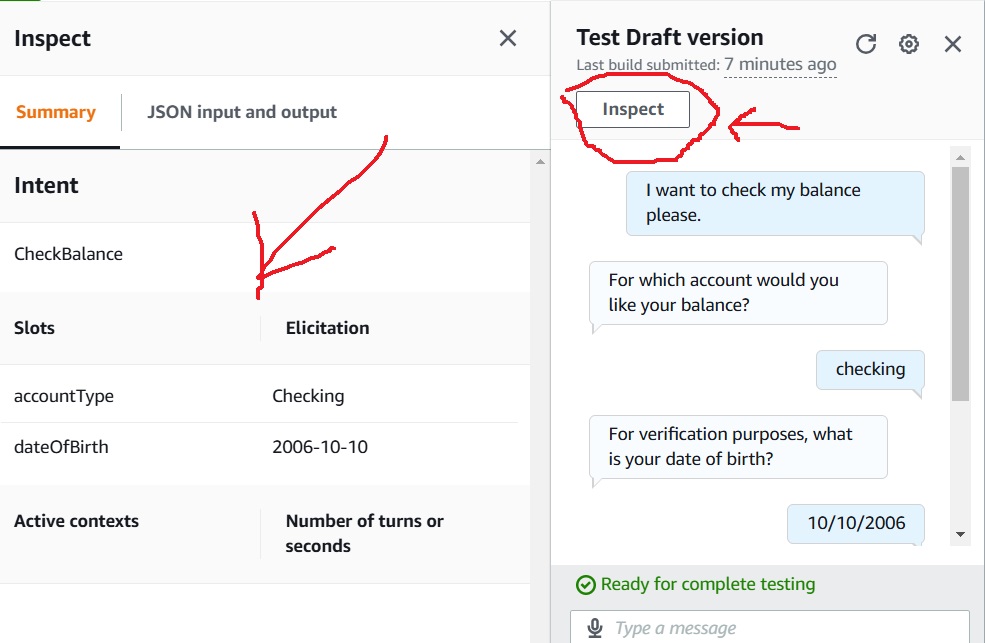
In your chat window, now enter What's the balance in my savings account?
This time, Amazon Lex will only prompt you for your date of birth, as it already knows that it should be the Savings account it checks.
Well done on the journey so far! 🙌
😉PART 3 OF THIS PROJECT
You’ll learn how to:
Define an AWS Lambda function that will get a user's balance.
Connect your AWS Lambda function with your Amazon Lex chatbot.
Connect your CheckBalance intent with your Lambda function. 🤝
Use code hooks to perform the final fulfilment step of the intent.
Create Your AWS Lambda Function
Now that BankerBot can collect user details, it's time to return a bank balance! While Amazon Lex doesn't have the capability to calculate balances, we can integrate it with AWS Lambda to handle this. Think of Lex as the user interface, and Lambda as the backend calculator. Lambda will generate a random bank balance whenever a user requests it, making the interaction feel real and dynamic. This approach leverages AWS services to work together and enhance the chatbot's functionality.
💡 What is AWS Lambda ? AWS Lambda is a cloud service that allows you to run code without managing servers. You only need to provide your code, and Lambda handles the rest, scaling automatically from a few requests per day to thousands per second. It runs your code only when needed, ensuring efficient use of resources while supporting multiple programming languages. This makes it ideal for serverless applications, where you don't need to worry about infrastructure management.
- In the AWS Management Console, type lambda

Choose Author from scratch.
Function name - BankingBotEnglish
Runtime - Python 3.12, or a later version of Python3 if v3.12 is not available.

Select Create function.
Scroll down to the Function code section.. Double-click on lambda_function.py on the left-hand file browser.
Download the following source code file: code file.py
What does the code file.py do ? This Python script integrates with your chatbot to simulate account balance retrieval. When a user asks for their balance, Amazon Lex calls the AWS Lambda function to run the code. The function generates a random number as a placeholder for the balance and sends it back to Lex. Lex then delivers this "balance" to the user through the chatbot, giving the illusion of a real-time bank balance check.
Once you've downloaded the code, copy it and paste it into your text editor, replacing any placeholder or example code that was previously there. This will ensure that your Lambda function is updated with the correct script to generate a random bank balance whenever requested by the user.
Click Deploy to finalize your Lambda function setup. This action ensures that your function is now active and ready to work with Amazon Lex. It will trigger the function whenever the user asks for their account balance, generating and returning a random number as the balance.

Connect AWS Lambda with Amazon Lex
Head back to your Amazon Lex console.
Select BankerBot.
On the left-hand menu, choose Aliases.

💡 What are aliases, why are we using them? In Amazon Lex, an alias acts as a pointer to a specific version of your bot. It allows external services and applications to connect to the alias instead of a specific version, making updates easier. When you update the bot version, you can simply update the alias to point to the new version, ensuring all connected applications automatically use the latest bot without requiring any changes, saving time and reducing the risk of errors for developers.
- Choose the default TestBotAlias.
💡 TestBotAlias is the default alias of your bot used for testing and development purposes. It allows you to run and test the bot in a controlled environment before deploying it to production. This alias helps ensure that everything works as expected without affecting the live version of your bot, serving as a testing "playground" where changes can be verified.
In the Languages panel, select English (US). This triggers the appearance of the Lambda function panel, allowing you to associate a Lambda function with the TestBotAlias version of your bot.
For the Source, select your Lambda function, BankingBotEnglish.
Leave the Lambda function version or alias field at the default setting, $LATEST. This setup ensures that your bot interacts with the correct Lambda function during testing.
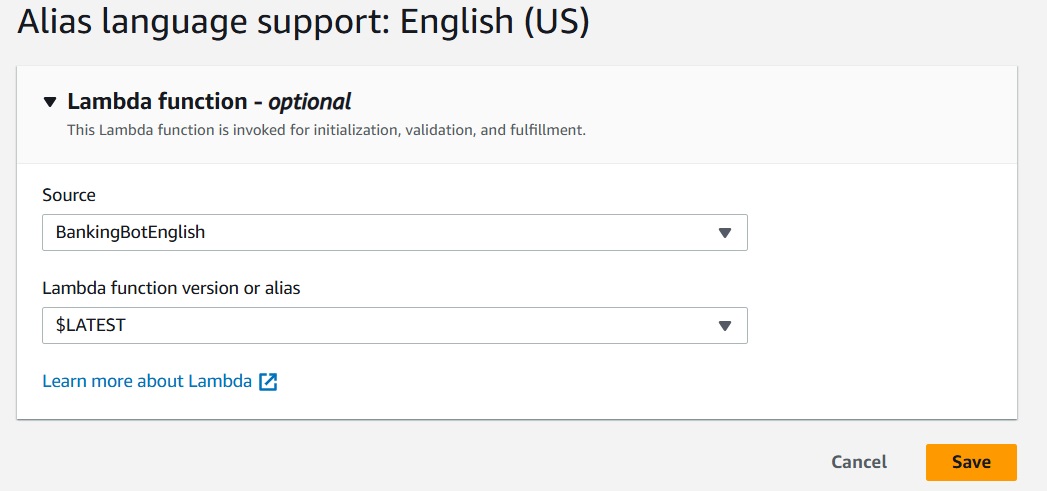
💡 $LATEST refers to the most recent version of your Lambda function. When you use this version, the alias is always directed to the latest code updates, allowing you to immediately test any modifications you make to your function without needing to specify a version number. This setup is convenient for continuous development and testing.
- Choose Save.
Connect your CheckBalance intent with your Lambda function
Now that the Lambda function is connected to your BankerBot, you need to specify which intent will use it. The CheckBalance intent is the one that should trigger the Lambda function. This step ensures that when the user asks for their account balance, the bot will correctly call the Lambda function to generate the balance. Make sure to link the CheckBalance intent with the Lambda function for it to work seamlessly.
Navigate to your CheckBalance intent.
Scroll down to Fulfilment panel.
What is fulfilment? In Amazon Lex, fulfillment refers to the process of completing an intent once all necessary information has been gathered from the user. For example, in the case of BankerBot, after the user provides their account type and birthday, the bot moves to fulfillment, where it calls the associated Lambda function to retrieve the account balance and delivers it back to the user. Essentially, it's the action taken to fulfill the user's request.
- Expand the On successful fulfilment bubble.

- Choose Advanced options.
- Under the Fulfilment Lambda code hook panel, check the checkbox next to Use a Lambda function for fulfilment.

💡 Code hooks are mechanisms that allow you to connect your Amazon Lex chatbot with custom Lambda functions for advanced tasks. They help extend the functionality of your bot by enabling it to perform actions like accessing external data or making decisions based on prior interactions. Code hooks enhance your chatbot's intelligence by letting it handle more complex scenarios seamlessly during conversations, making the bot more dynamic and responsive to user needs.
Choose Update options.
Choose Save intent.
Choose Build
Choose Test.
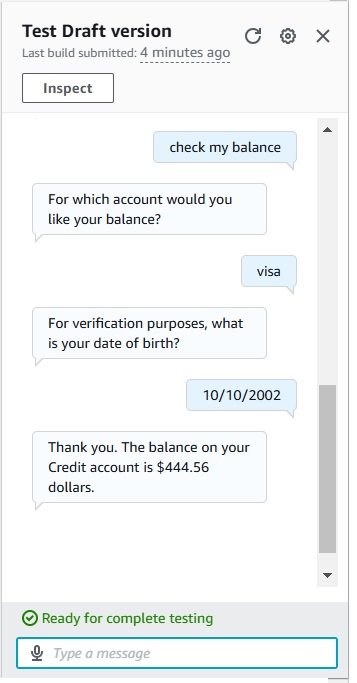
Now that you’ve set up your bot with the Lambda function, your chatbot should be able to return random bank balance figures when users ask for their balance. Simply ask the bot to check your balance, and it will provide a response, showcasing how the Lambda function interacts with the user's inputs to generate a balance figure. This brings your bot to life, giving it the ability to respond with dynamic, realistic data.
Test 1

Test 2
Well done on the journey so far! 🙌
To conclude, part 3 we’ve learned how to:
Set up a Lambda function to add more functionality to your chatbot.
Integrate the Lambda function with your bot’s alias to enable smooth interaction.
Use code hooks to handle the final step of fulfilling user requests, allowing your bot to deliver precise responses effectively.
With these steps, your bot is now capable of responding with dynamic bank balance information, powered by Lambda!
Now we move to Part 4 of the project. Hope you’re having fun so far 🤝
😉PART 4 OF THIS PROJECT
You’ll learn how to:
- Save information about a user in an output context tag.
Create a new intent called FollowupCheckBalance.
Carry information about the user from CheckBalance to FollowupCheckBalance.
💡 Remember information stored in CheckBalance
To improve user experience, it’s essential to avoid repeatedly asking for the same information, such as a user's birthday, during the same conversation. To handle this, Amazon Lex can store session attributes, allowing the chatbot to remember details like the birthday throughout the session. This eliminates the need for redundant questions, making interactions more seamless and efficient for users.
In your CheckBalance intent page, scroll down to the Contexts panel
Under the Output contexts drop-down, choose New context tag.
💡Context tags in Amazon Lex manage information flow within a conversation,they help save the user from having to repeat certain information
Output Context Tag: Stores details after completing an intent for reuse later in the chat. Example: Saving an account type from a BalanceCheck intent.
Input Context Tag: Ensures required information is available before triggering an intent. Example: Checking if a user's date of birth is already stored before activating FollowupCheckBalance.

Name your new context contextCheckBalance
Set up the timeout for 5 turns, or 90 seconds. We will keep this short so your chatbot doesn't remember a user's birthday for too long (which might become a security risk). Setting the timeout for 5 turns or 90 seconds ensures your chatbot forgets sensitive user information, such as their birthday, within a limited time frame. This approach enhances security by reducing the risk of sensitive data being unintentionally stored for too long.

Choose Add.
Choose Save intent.
Choose Build
Choose Test.
Check that the bot still operates the same as usual - i.e., no errors have popped from creating the context tag.
Create the FollowupCheckBalance intent
💡 Imagine a user interacts with BankerBot using the CheckBalance intent to get their account balance. Afterward, they ask a follow-up question, like "What about my other account's balance?" While BankerBot already knows the user's birthday from the initial interaction, the CheckBalance intent isn’t structured to handle such follow-ups effectively. Adding these types of queries to CheckBalance's utterances could confuse the bot. To resolve this, we’ll create a dedicated intent for follow-up questions, enabling BankerBot to handle them seamlessly without repeatedly asking for the user's birthday.
From your left hand navigation panel, head back to the Intents page.
Choose Add intent.
Choose Add empty intent.
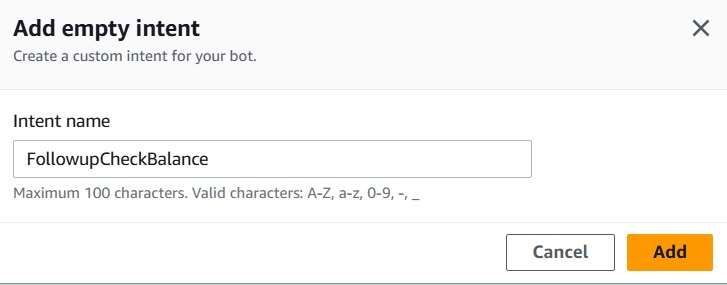
Use the following properties to set up your next intent:
Name:
FollowupCheckBalanceDescription:
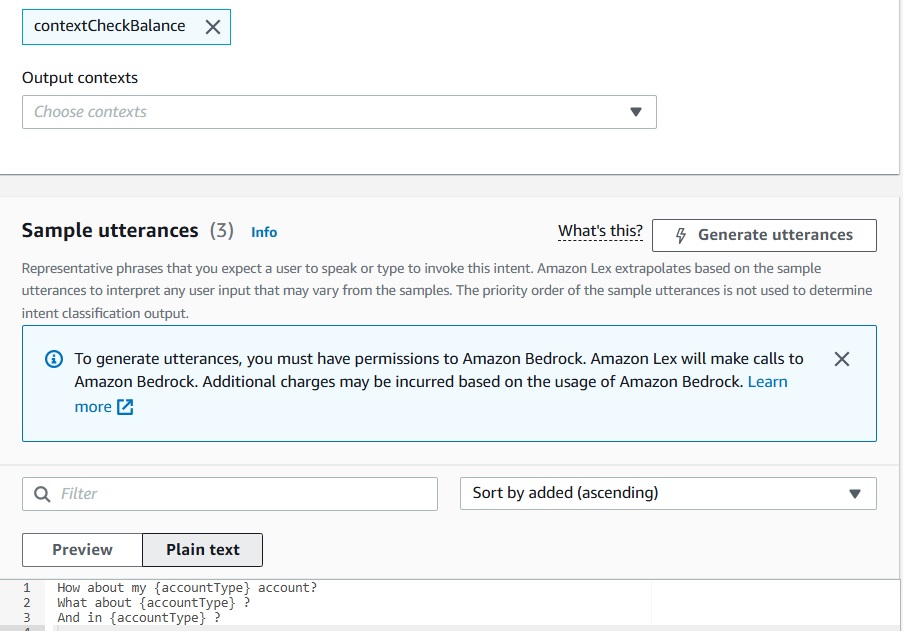
Intent to allow a follow-up balance check request without authenticationInput context:
contextCheckBalanceSample utterances:
How about my {accountType} account?
What about {accountType} ?
And in {accountType} ?
Add a new slot:
Name:
accountTypePrompt:
For which account would you like your balance?Slot type:
accountType
Add another slot:
Name:
dateOfBirthPrompt:
For verification purposes, what is your date of birth?Slot type: AMAZON.Date
Choose Save intent.
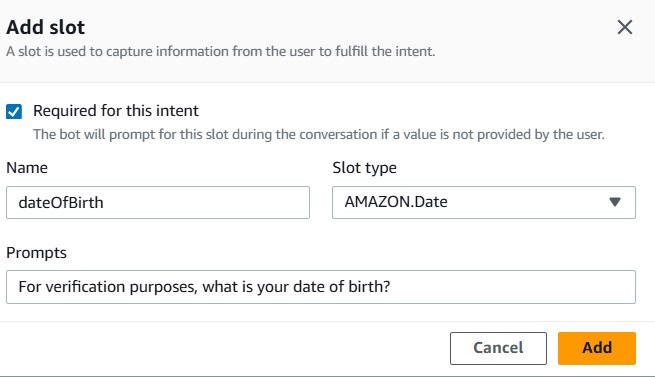
The FollowupCheckBalance intent includes an input context tag to identify and reuse relevant details, such as the user’s date of birth, during a follow-up conversation. However, for this to work effectively, the date of birth needs to be transferred from the CheckBalance intent. Without this step, the chatbot won't have access to the stored information, and the follow-up functionality won’t operate as intended. This highlights the importance of correctly managing and carrying over context between intents for a seamless user experience.
We need to set up FollowupCheckBalance's dateOfBirth slot to use saved information.
On the FollowupCheckBalance intent page, you can configure the dateOfBirth slot to automatically use the value stored in the CheckBalance intent. Here's how:
Expand the
dateOfBirthslot options.Select Advanced options to reveal more settings.
Scroll to the Default values section.
Enter
#contextCheckBalance.dateOfBirthas the default value.
This setup ensures that the user's date of birth, captured in the CheckBalance intent, is seamlessly reused in the FollowupCheckBalance intent, enhancing user experience.
The expression #contextCheckBalance.dateOfBirth in Amazon Lex is a reference to the value stored in the context tag contextCheckBalance. It specifically retrieves the dateOfBirth slot value captured during the CheckBalance intent. This mechanism allows you to reuse previously collected information in subsequent intents, streamlining the conversation and improving the user experience.
To complete the FollowupCheckBalance intent setup:
Add Default Value: Set the slot's default value to
#contextCheckBalance.dateOfBirthand update the slot.Ensure Fulfillment Setup: Go to the Fulfillment pane and verify that the Lambda function is linked to this intent for consistent behavior.
Enable Fulfillment Lambda:
Expand the On Successful Fulfillment section.
Enable the Fulfillment Lambda Code Hook by selecting the checkbox under Advanced Options.
This configuration ensures continuity in responses while maintaining functionality.

Choose Update options
Choose Save intent
Choose Build
Choose Test.
In your first test, try to trigger the new FollowupCheckBalance intent you've just created without triggering CheckBalance first.. e.g. ask your chatbot What about checking?

The FollowupCheckBalance intent isn't working, because its input context is missing. This happens because the FollowupCheckBalance intent relies on the contextCheckBalance to carry over the user’s dateOfBirth from the CheckBalance intent. Without this context, the intent doesn’t have the necessary information to proceed, resulting in an error response.
For the second test, initiate the CheckBalance intent first, asking for your account balance. This will trigger the carrying over of the user's date of birth to the FollowupCheckBalance intent, which will then allow the bot to process the follow-up request without asking for the user's birthday again. This step demonstrates how input contexts from previous intents are used to streamline conversations and avoid unnecessary prompts for repeated information.

As seen in the above image, the bot no longer asks for the user's date of birth during follow-up requests within the same session. This is because the information is retained through the input context, allowing the bot to streamline the conversation without needing to verify details again.
😉PART 5 OF THIS PROJECT
You’ll learn how to:
- Create an intent that lets you transfer money between accounts.
Create the new TransferFunds intent
💡 Our chatbot now allows users to check their account balances, but what if they want to transfer money between accounts? Setting up this feature will be particularly exciting because it introduces a new dynamic: handling two account types. This will require us to create slots for both the source account (where the money is coming from) and the destination account (where it's being sent), and another slot for (how uch is being sent) ensuring our bot can facilitate seamless and user-friendly transactions. Let’s dive in and make this happen!
Create a new empty intent with the following properties:
Name: TransferFunds
Description: Help user transfer funds between bank accounts

- Sample utterances:
Can I make a transfer?
I want to transfer funds
I'd like to transfer {transferAmount} from {sourceAccountType} to {targetAccountType}
Can I transfer {transferAmount} to my {targetAccountType}
Would you be able to help me with a transfer?
Need to make a transfer

Slots: add a new slot called sourceAccountType, with the prompt Which account would you like to transfer from? and the slot type accountType.
Slot: add another new slot called targetAccountType, with the prompt Which account are you transferring to? and the slot type accountType.
Slot: add another new slot called transferAmount, with the prompt How much money would you like to transfer? and the slot type AMAZON.Number.

💡 Two of my slots have the same slot type, why is that ?
Having two slots share the same slot type is entirely fine! It just requires distinct and meaningful slot names to ensure clarity in their purpose. For example, if both slots use the same accountType slot type, you should name them something descriptive, like sourceAccountType (for the account the money is coming from) and targetAccountType (for the account receiving the transfer). This naming convention helps you and your bot correctly differentiate and manage the data being collected in the conversation flow.
We now want to add ✨confirmation prompts✨
💡 What are confirmation prompts?
Confirmation prompts are used by chatbots to verify a user's request before proceeding with an action. They typically restate the user's intent, asking for confirmation, such as: "Are you sure you want to transfer $1000 to Account B?"
If the user confirms, the bot executes the action or fulfills the intent. If the user declines, the bot responds with a predefined decline message, ensuring no unintended actions are taken. This feature enhances user trust and reduces errors in chatbot interactions.
Scroll to the Confirmation panel.
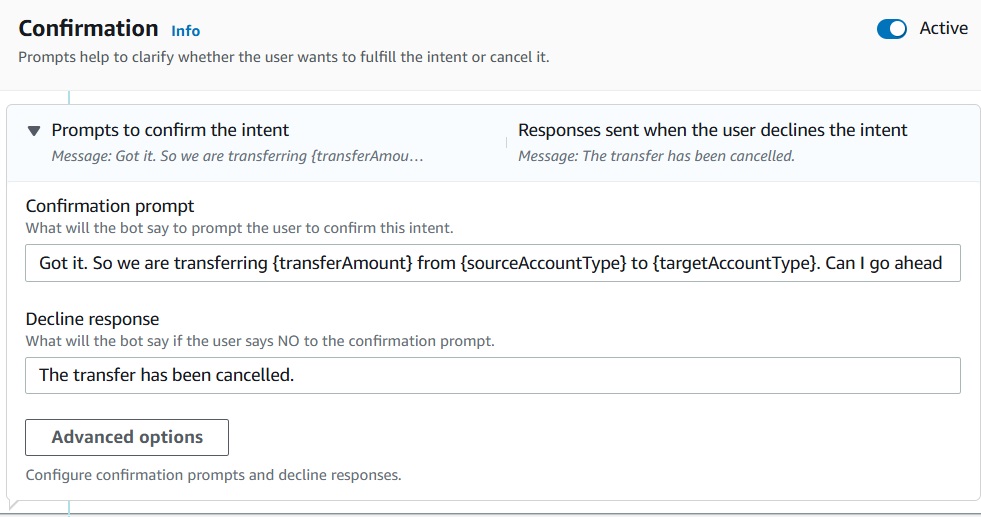
In the Confirmation prompt panel, enter the following:
Got it. So we are transferring {transferAmount} from {sourceAccountType} to {targetAccountType}. Can I go ahead with the transfer?
In Decline response, enter:
The transfer has been cancelled
Scroll to the Closing response pane, and add this to the Message field:
The transfer is complete. {transferAmount} should now be available in your {targetAccountType} account.

Now we're ready for testing! Choose Save intent.
Choose Build
Choose Test.
Now let's test out your chatbot!
Ask your chatbot: I'd like to transfer money.Complete the conversation with your bot!

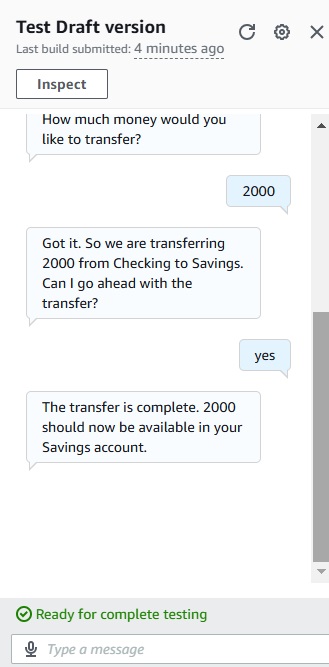
Congratulations 🎉on completing the TransferFunds intent—your final step in this chatbot series! Before wrapping up BankerBot, let’s explore two powerful features that can streamline building future Lex chatbots:
Conversation Flow: This feature allows you to map out and visualize the logical paths of your bot's interactions, making it easier to plan complex conversations.
Visual Builder: This intuitive drag-and-drop interface speeds up the chatbot creation process, letting you design intents, slots, and responses without delving into code.
These tools simplify development, boosting efficiency for future projects! 🚀
Let’s take a look at Conversation flow.
Scroll to the very top of this intent's page.
Head to the Conversation flow panel.
Expand the arrow to see an example conversation flow

💡 What's the conversation flow feature for?
The Conversation Flow feature in Amazon Lex visually represents the entire sequence of a conversation within an intent, step by step. It dynamically updates as you refine your intent setup and includes interactive elements, like clickable "ghost" responses that suggest enhancements to your chatbot’s design. Clicking these elements takes you to an edit screen for further customization. While you might skip these suggestions to keep things simple, the tool is invaluable when designing more complex chatbot interactions, making development smoother and more intuitive.
Let’s take a look at Visual Builder.
Now look at the bottom bar of your screen.
Select Visual builder.

- Now look at that! This is a visual representation of the intent you have just built.

In the future, the Visual Builder in Amazon Lex could be your go-to tool for designing chatbot intents entirely from scratch, not just for viewing conversation flows. This feature offers an intuitive, drag-and-drop interface to streamline intent creation, allowing you to easily configure responses, slots, prompts, and more. It eliminates the need for manual setups and provides a clear visual representation of your chatbot’s conversation logic, making development faster and more user-friendly.
🎉Wow, wonderful work! Hats off 🧢
Delete Your Resources
To avoid incurring charges, it's important to delete the resources you've created same day.
Delete your BankerBot
To delete your BankerBot in Amazon Lex, follow these steps:
Open the Amazon Lex Console.
In the left-hand sidebar, choose Bots.
Select the circle radio button next to BankerBot.
In the Action drop-down menu, choose Delete.
Confirm by choosing Delete again.
This will permanently remove your BankerBot from the Amazon Lex console.
Delete your Lambda function
To delete your Lambda function:
Go to the AWS Lambda Console.
In the left sidebar, select Functions.
Choose the circle radio button next to BankingBotEnglish.
From the Action drop-down menu, select Delete.
Confirm the deletion by selecting Delete again.
This will remove your Lambda function from the AWS Lambda console.
Delete your Lambda function log files
💡 What are Lambda function log files? Lambda function log files are records of events that occur when your AWS Lambda functions are executed. These logs capture important details, including errors, warnings, and information about function execution. They are stored in AWS CloudWatch, a service that allows you to monitor and manage logs from all AWS services. These logs are helpful for debugging, performance tracking, and gaining insights into the behavior of your Lambda functions during execution.
To delete your Lambda function log files:
Go to the CloudWatch in your AWS Console.
In the left sidebar, select Logs and then Log groups.
Check the box next to BankingBot.
In the Actions menu, select Delete log group(s).
Confirm by selecting Delete.
This will remove the log group associated with your Lambda function.
💡To summarize, we’ve learnt how to:
Configured multiple slots: You created source and target account slots using the same underlying
accountTypeslot to streamline data handling.Implemented confirmation prompt: You set up a confirmation prompt to repeat transaction details for user verification.
Explored Lex features: You learned how to use conversation flow and the visual builder to enhance future chatbot projects.
Thank you for reading! 😎
Subscribe to my newsletter
Read articles from Ahmed Salau directly inside your inbox. Subscribe to the newsletter, and don't miss out.
Written by
