Mastering Kubernetes: From Namespaces and POD Creation to Deployments, Auto-Healing, Rolling Updates, ReplicaSets, and StatefulSets
 Chetan Mohanrao Mohod
Table of contents

Namespaces
PODs
Deployments
ReplicaSets
StatefulSets
Please read this blog before continuing with this one: Click here
Steps to Setup Kind Clusters Using a Manifest File:
First we need to create a cluster using the manifest file (config.yml). Refer file from previous blog.
Execute below command to create a cluster:
kind create cluster --name=chetan-cluster --config=config.yml
- Now we will check with Kubernetes (API server → Controller Manager) to see if our Nodes are ready.
kubectl get nodes

Now the containers should be created. Check by running the docker ps command.

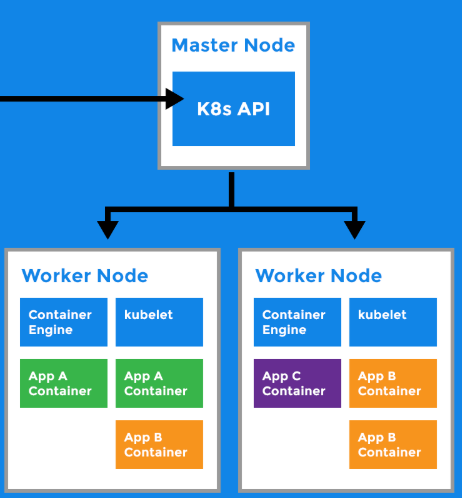
Three containers are running. We have created a cluster with one master node and the other nodes as workers.
This is how Kind clusters are set up.
Namespaces:
The master node assigns tasks to Worker Node1 to create an Nginx container, asks Node2 to create a MySQL container, and instructs Node3 to create another Nginx server. With two similar Nginx workers, there could be confusion. To avoid this, it's best to create groups or isolated environments, such as separate namespaces for Nginx, MySQL, etc.
A namespace essentially acts as a group or isolation of resources.
For instance, we can create a namespace called Production to run only production applications.

How to Create a Namespace?
You can refer to the official Kubernetes documentation: Click Here.
For anything you want to learn or code, just search for Kubernetes followed by the "Concept_name".
Example: Kubernetes Namespace Yaml
Steps to Create a Namespace:
- Connect to your EC2 instance and navigate to the
k8s-practicedirectory:
mkdir nginx        #create a directory for nginx where we create all the resource for it

cd nginx           #go to nginx

vim namespace.yml  #Mainfest File(What ever you want/desire you just need to write here)
#Add below code into the mainfest file
kind: Namespace  #Type
apiVersion: v1   #When we provide this file to the API server using kubectl, the version is specified here.
metadata:        #Namespace Information
  name: nginx    #Namespace Name
- Now, use
kubectlto apply these changes.
kubectl apply -f namespace.yml
Validate:

- How to delete Namespace:
kubectl delete -f namespace.yml
How to create POD?
Steps to Create a Pod:
- Create Manifest file for Pod
vim pod.yml:
kind: Pod             #Type
apiVersion: v1
metadata:
    name: nginx-pod   #POD name
    namespace: nginx  #Under which namespace
spec:                 #Specifications of POD
    containers:       #Inside POD's container will run
        - name: nginx         #Container name
          image: nginx:1.14.2       #Image will come from DockerHub
          ports:
            - containerPort: 80    #Generally Nginx application runs on Port 80
Always perform a dry-run test before executing:
It won't apply the changes; it's just a simulation that generates the output.
kubectl apply -f pod.yml --dry-run=client
- We will use kubectl to verify with the Controller Manager whether the pods for the nginx namespace have been created.
kubectl get pods -n nginx
It will display output like this because we only performed a dry-run test.

- Run the command below to create the pods:
kubectl apply -f pod.yml

This is how you can create Pods.
What is Deployment?
In Kubernetes, a Deployment is like a manager for your app: it keeps the right number of instances running, handles updates without downtime, and fixes any issues automatically. Just set your app’s desired state, and Kubernetes does the rest!
Whatever you need, you can specify in the deployment file. For example, if you want secret variables, environment variables, or 10 pods, you can include them in the deployment.
Why Do we need Deployment?
The reason we use Deployment is that a POD, which is the smallest unit, has a container running inside it.
Example: If you want to scale the deployment due to high traffic, you shouldn't rely on just one POD. You should have multiple PODs so your application can balance the load properly. In this case, you need to set the desired state, which is why we use Deployment.
Why do we use it?
- We use Deployment because we want our pod to function in a specific manner. We aim for our pod to be highly available and capable of automatic healing. This is important because it aligns with our desired state for the application.
Steps to implement a deployment:
Create
deployment.ymlfile:Add below code:
kind: Deployment
apiVersion: apps/v1        #API version only for deployment
metadata:
  name: nginx-deployment
  namespace: nginx
  labels:           #key: values pairs
    app: nginx
spec:
  replicas: 2
  selector:
    matchLabels:
      app: nginx
  template:            #template code is same like POD #Desired state applies to POD # Deployment applies to POD
    metadata:
      labels:
        app: nginx
    spec:
      containers:
      - name: nginx-container
        image: nginx:1.14.2
        ports:
        - containerPort: 80
apiVersion:
For deployments, the
apiVersionshould beapps/v1because a Deployment's label selector is immutable after it is created.The Deployment's job is to match labels with the node labels. If we want to create a node for MySQL, it will use the node with the MySQL label.
If you add labels and selectors in deployment.yml, you can't change them because they are immutable.
However, in other YAML files, they are mutable, and you can change them.
Note: The concept of Labels and Selectors is often asked in interviews. I’ll cover this concept in upcoming blog.
labels and selectors: Labels in Kubernetes categorize resources with key-value pairs, while selectors filter and manage these resources based on their labels for efficient orchestration.
template: In template you add POD definition(code). In Kubernetes, a deployment template defines the configuration for pods, specifying how they should be created and managed across replicas.
- Now delete the nginx pod we created earlier because we're going to create a new one.
kubectl delete -f pod.yml
- To apply this deployment to your Kubernetes cluster, execute the following command:
kubectl apply -f deployment.yml --dry-run=client  # First perform dry run

kubectl apply -f deployment.yml  #To apply deployment on cluster
- Now, let's validate the deployment:

Now, we have 3 NGINX pods running:

Interesting Auto-Healing Concept:
- If you delete the pod accidently, lets see what happens:
#Delete the exisiting pods

kubectl delete pod pod1_name pod2_name -n nginx

Even if you delete the pods, they will automatically recover, and you can see the age of the new pods. This is called Auto-Healing.
Your pod cannot be deleted, no matter how much traffic there is.
Deployment Scaling Replicas
- To adjust the number of pod replicas, you typically need to modify the Manifest file (deployment.yml) each time. However, there is a more efficient method to achieve this. Let's explore it.
kubectl scale deployment nginx-deployment -n nginx --replicas=5
You can observe the results of the scaling operation.

If you modify the
deployment.ymlfile to set the replicas to 3, these changes will be applied because it reflects our most recent configuration preference.You can increase the number of replicas using both methods.
Rolling Updates:
- Run
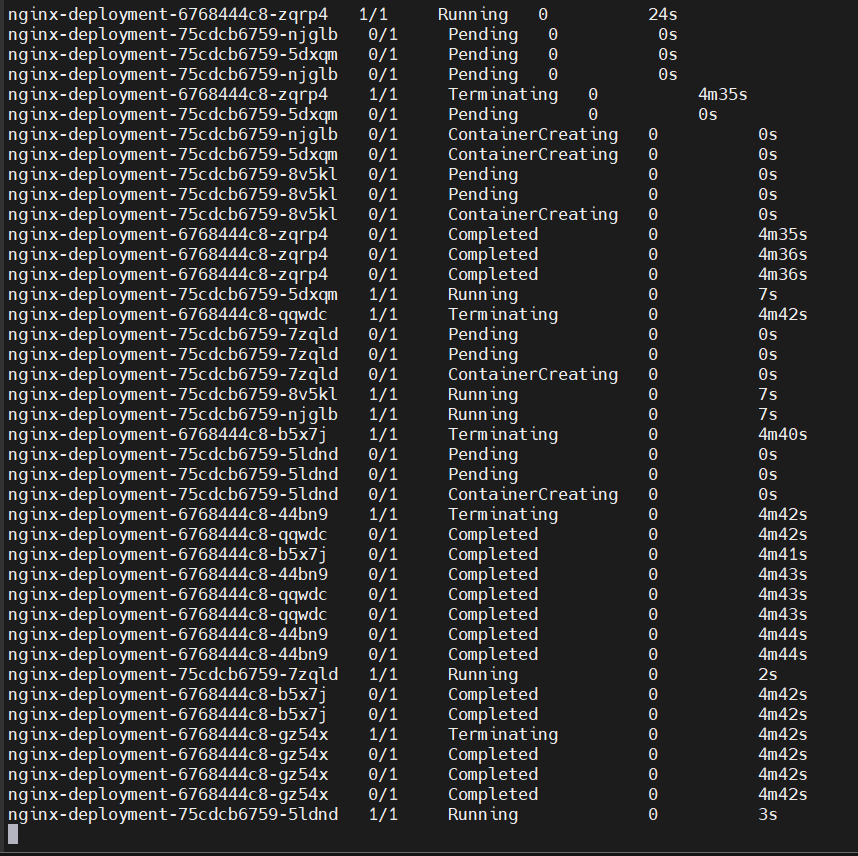
kubectl get pods -n nginx -wto continuously monitor the currently running pods, updating every 2 seconds.

- Now we can open another tab and change the nginx version.
kubectl set image deployment/nginx-deployment nginx-container=nginx:1.16.1 -n nginx
Now you can go back to the previous tab.
You will notice that it does not terminate and create all the pods simultaneously. Instead, the pods do not go down all at once; the process follows a Rolling Update strategy.

How to enter into a Container?
- List the pods for nginx.
kubectl get pods -n nginx #It will print pod_name
- Command to enter into a Container in Kubernetes:
kubectl exec --stdin --tty "replace_pod_name" -n nginx -- /bin/bash
--stdin --tty: These flags allow you to interact with the container. --stdin keeps the input open, and --tty creates a terminal like interface, making it feel like you’re working directly inside the container.
ReplicaSets:
ReplicaSets represent the desired state of having a specific number of replicas. The ability of ReplicaSets to create replicas from a template is utilized by a deployment. As a result, ReplicaSets are not commonly used on their own anymore. Instead, replicas are managed directly within the deployment.
A deployment manages ReplicaSets automatically
StatefulSets:
Lets take an example:
We have 3 MySQL pods, and we want to reduce the number to 2 using a Replicas. This means we need to delete 1 pod. The question arises: what happens to its data?
So, whenever a pod is deleted, its state should be assigned to another pod.
StatefulSets function similarly to deployments and replicas, but they maintain a state. This ensures that whenever your pods are deleted, their state is preserved.
Its basically ReplicaSets that maintain state.
This is just overview of StatefulSets, I’ll cover the hands-on in our next blog.
#K8s Tips & Tricks Click Here → Kubectl tips and trick
Interview Question for Experienced DevOps Engineer:
How do you update your deployment, What strategies you use to updating your deployment?
- We updated via Rolling updates.
What is Watch?
kubectl get pods -n nginx -wIn Kubernetes, Watch lets you keep an eye on resources in real time. Instead of having to keep checking for updates, Watch shows you any changes as soon as they happen. For example, if you’re watching Pods, you’ll see right away when a Pod is added, updated, or deleted. It’s super helpful for tracking things like deployments or catching issues as they come up.
Subscribe to my newsletter
Read articles from Chetan Mohanrao Mohod directly inside your inbox. Subscribe to the newsletter, and don't miss out.
Written by

Chetan Mohanrao Mohod
Chetan Mohanrao Mohod
DevOps Engineer focused on automating workflows, optimizing infrastructure, and building scalable efficient solutions.