Jenkins Mega Project
 Ali Iqbal
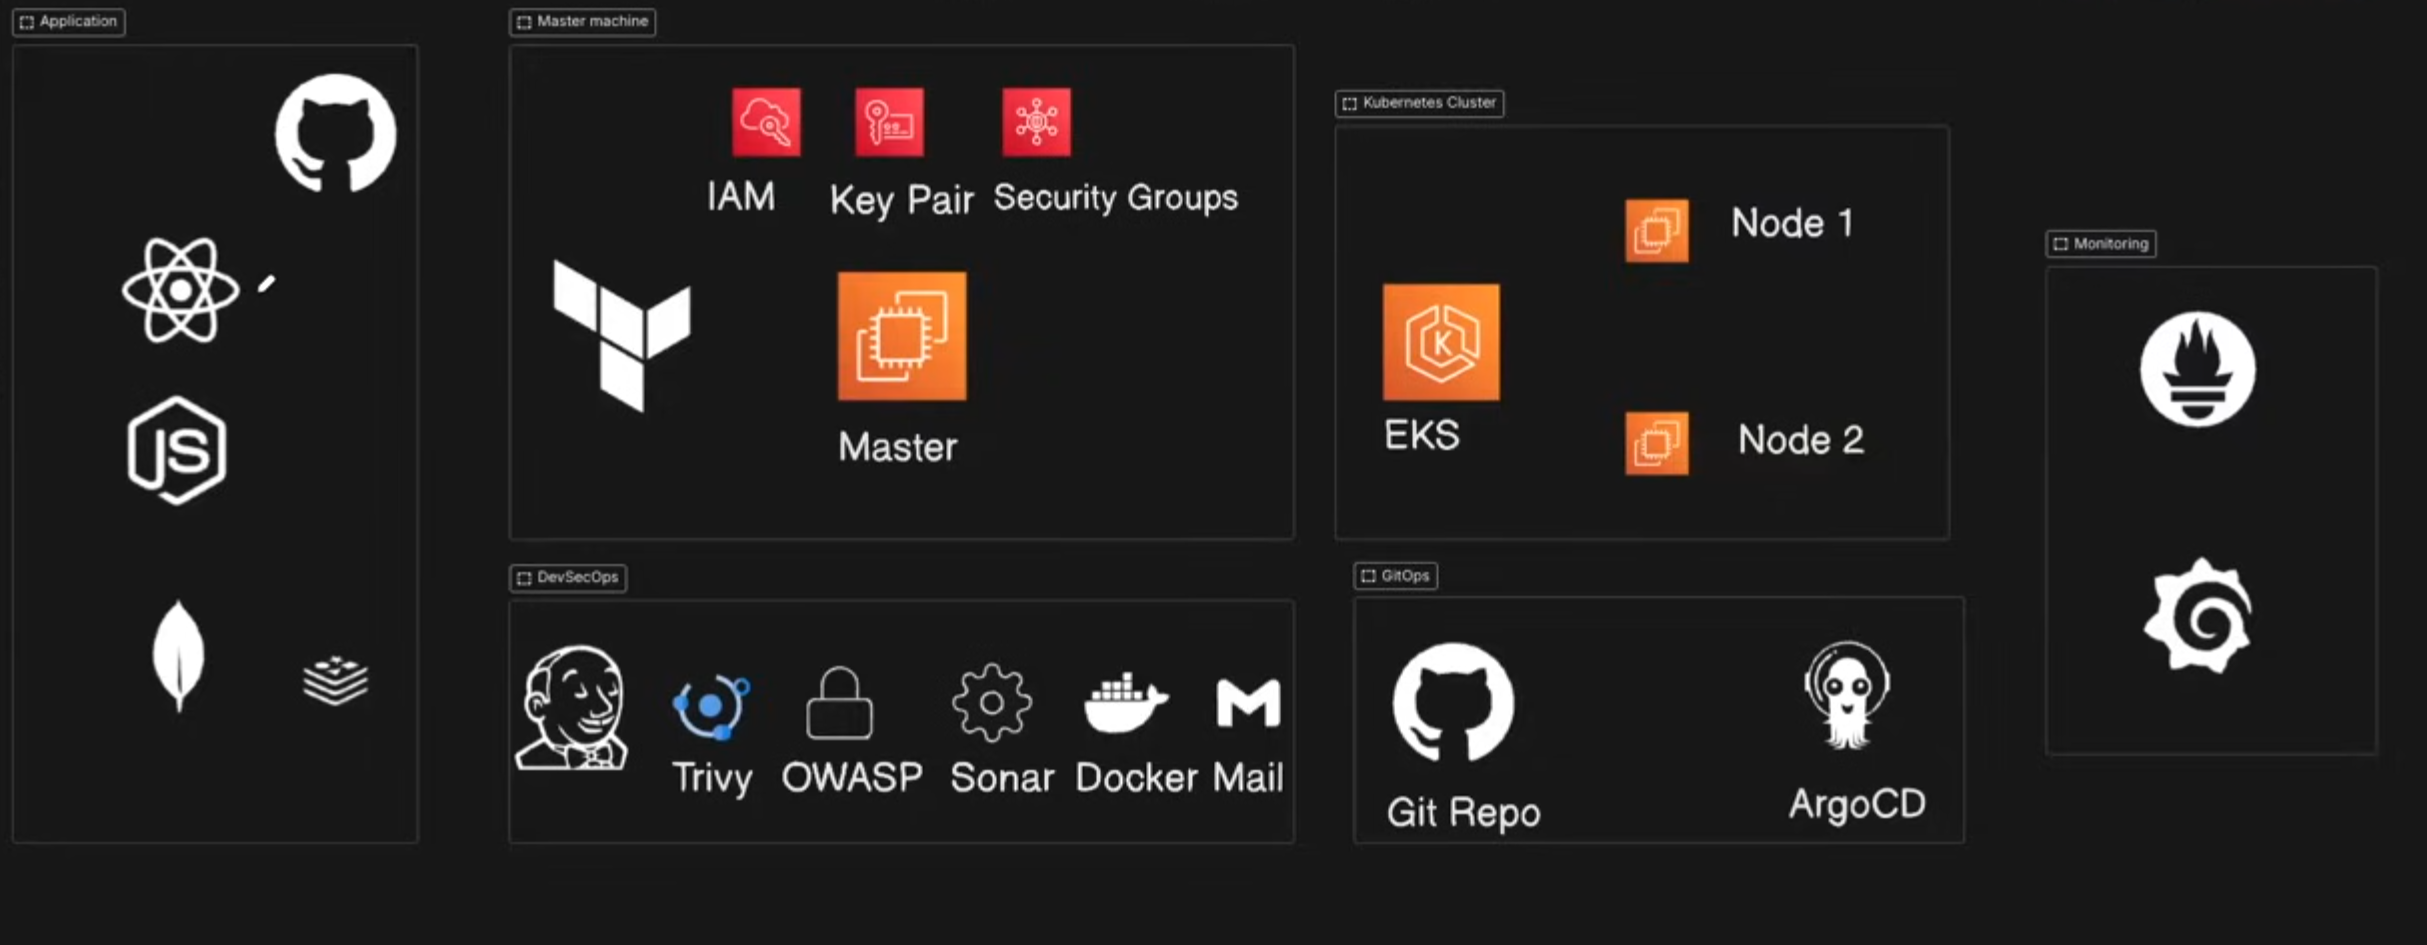
Building a project having state of art technologies with 6 different stages and code having more the 15 components.
Data Flow Diagram
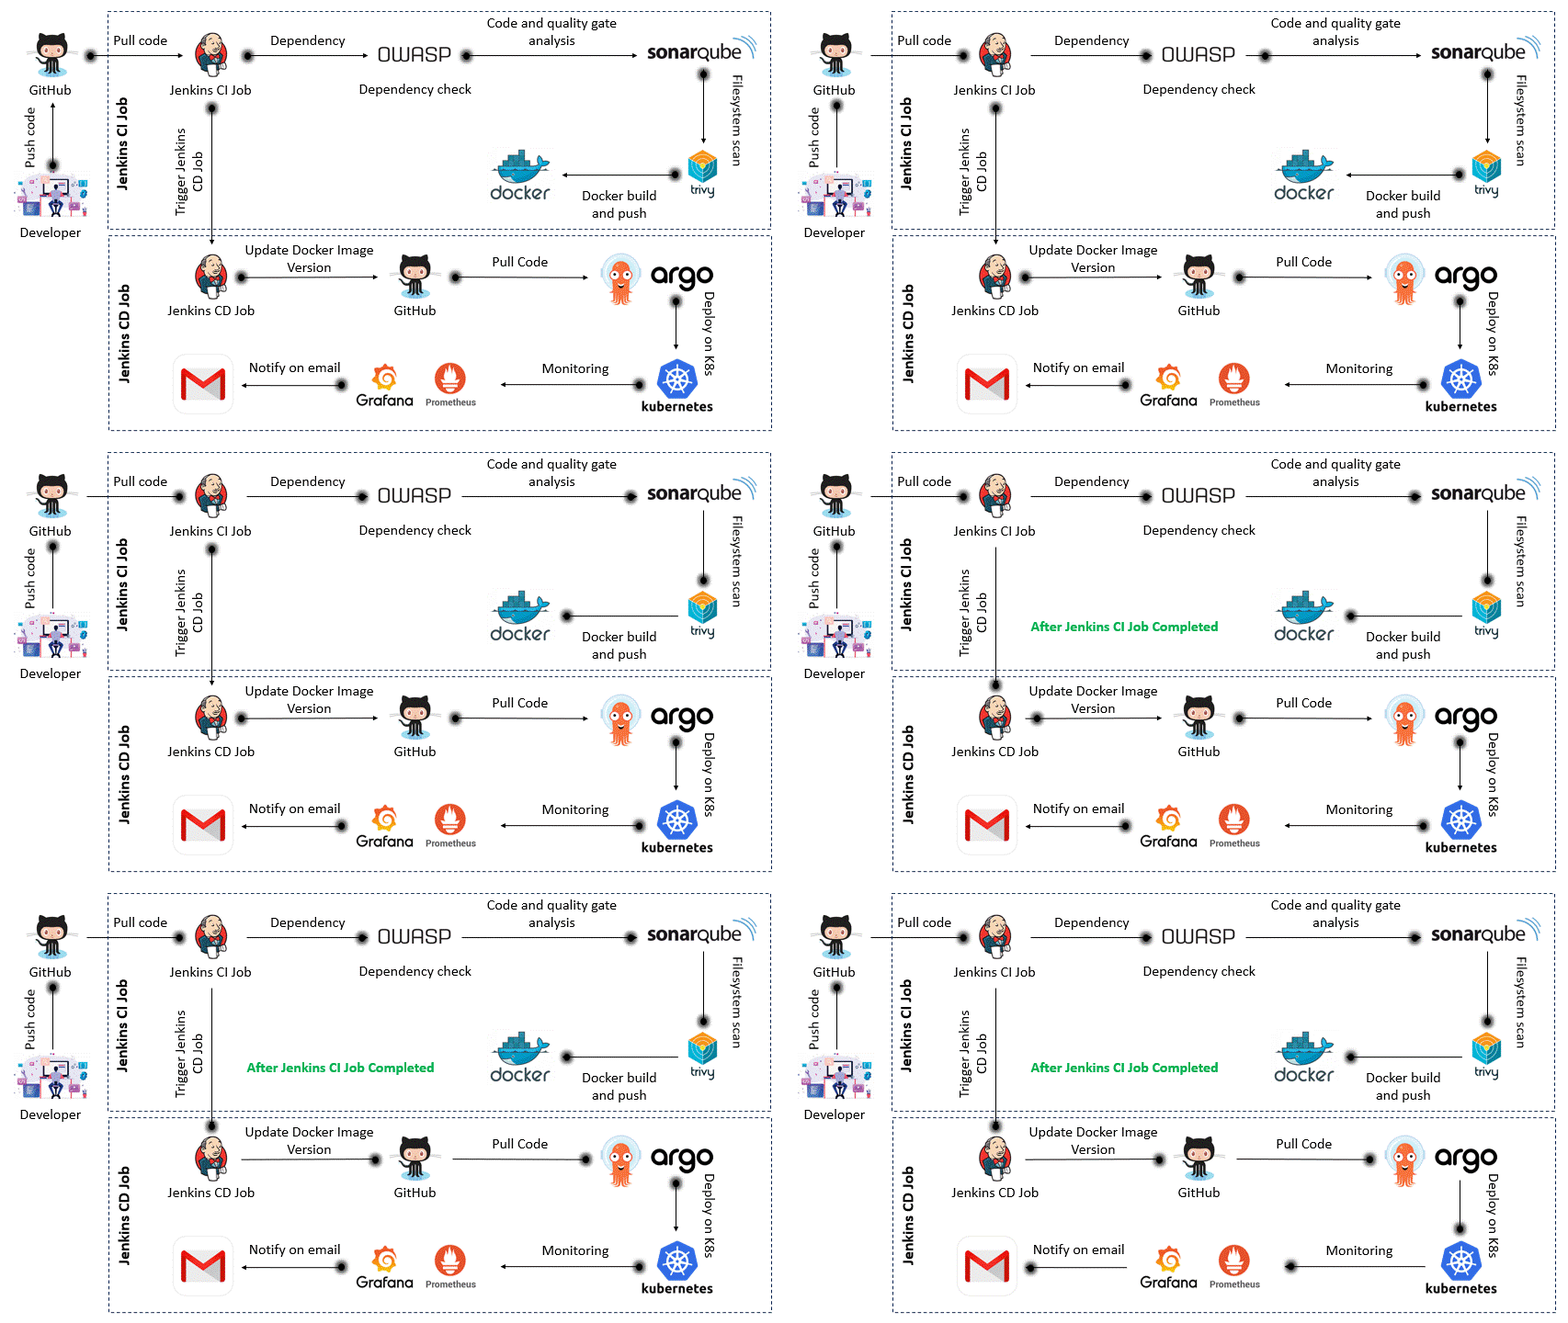
Tech stack used in this project:
GitHub (Code)
Docker (Containerization)
Jenkins (CI)
OWASP (Dependency check)
SonarQube (Quality)
Trivy (Filesystem Scan)
ArgoCD (CD)
Redis (Caching)
AWS EKS (Kubernetes)
Helm (Monitoring using grafana and prometheus)
Stage #1
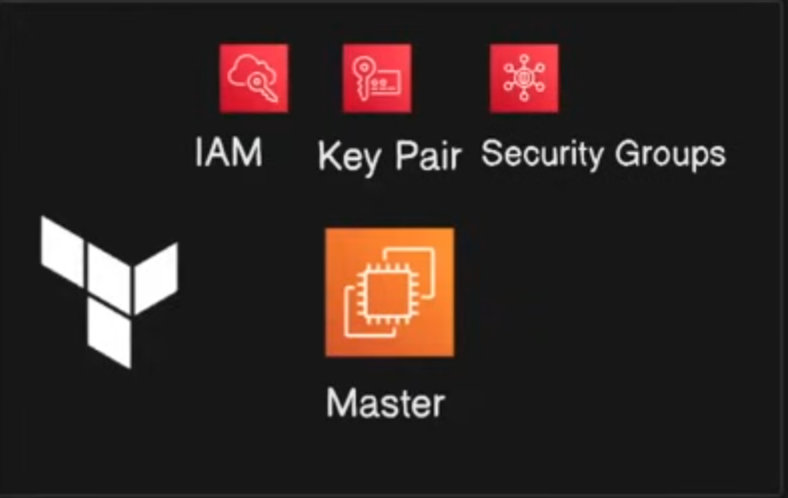
Build a master AWS EC2 instance with IAM role programmatic access. Also creating a Security Group and Key Pair for EC2 access management.
We have to create an IAM user and install awscli on our computer to connect with the AWS account.
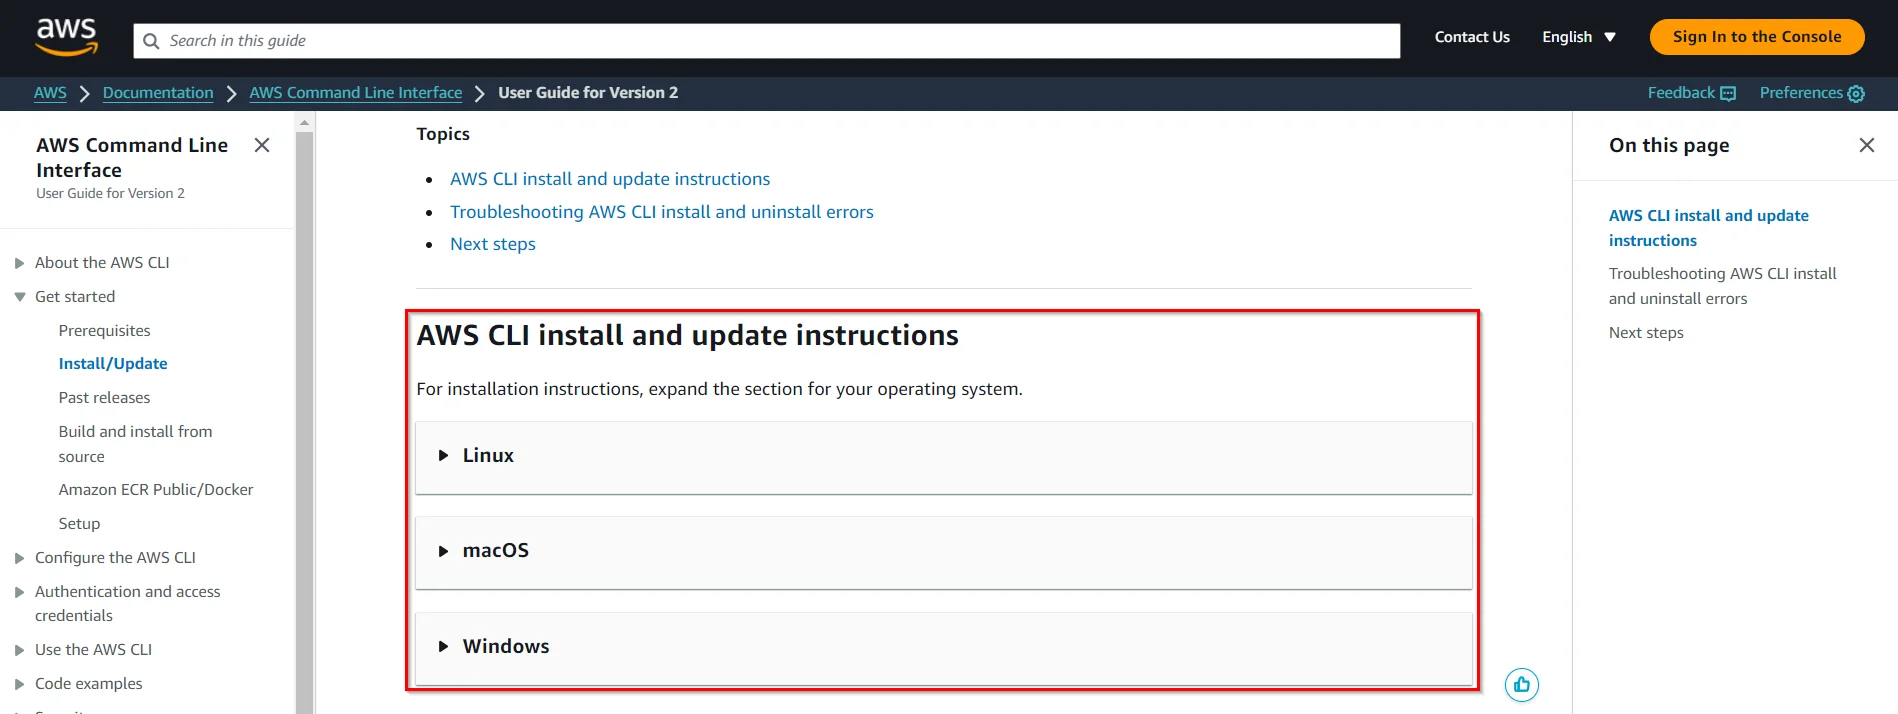
awscli installation
The command for installation of awscli in Linux.
sudo apt update && sudo apt upgrade -y
sudo apt install curl unzip -y
curl "https://awscli.amazonaws.com/awscli-exe-linux-x86_64.zip" -o "awscliv2.zip"
unzip awscliv2.zip
sudo apt install unzip -y
sudo ./aws/install
aws --version
aws-cli/2.x.x Python/3.x.x Linux/x86_64
awscli configuration
The command for aws configure.
aws configure
Generating aws_key_pair
Generating aws_key_pair
First of all, we have to create a provider for our terraform
terraform {
  required_providers {
    aws = {
      source  = "hashicorp/aws"
      version = "5.65.0"
    }
  }
}

provider "aws" {
  region = var.aws_region
}
Creating SSH key for us by running the command
ssh-keygen -t rsa -b 2048
Save this file in the current location.
The name of my key terra-key.pub
code snippet for aws_key_pair creation.
resource "aws_key_pair" "deployer" {
  key_name   = "terra-automate-key"
  public_key = file("terra-key.pub")
}
Code for VPC creation
In our case, we are using default vpc
resource "aws_default_vpc" "default" {

}
Code for security-group creation
  ingress {
    description = "port 80 allow"
    from_port   = 80
    to_port     = 80
    protocol    = "tcp"
    cidr_blocks = ["0.0.0.0/0"]
  }
  ingress {
    description = "port 30,000-32767 allow"
    from_port   = 30000
    to_port     = 32767
    protocol    = "tcp"
    cidr_blocks = ["0.0.0.0/0"]
  }
  ingress {
    description = "port 256 allow"
    from_port   = 256
    to_port     = 256
    protocol    = "tcp"
    cidr_blocks = ["0.0.0.0/0"]
  }
  ingress {
    description = "port 6379 allow"
    from_port   = 6379
    to_port     = 6379
    protocol    = "tcp"
    cidr_blocks = ["0.0.0.0/0"]
  }
  ingress {
    description = "port 256 allow"
    from_port   = 6443
    to_port     = 6443
    protocol    = "tcp"
    cidr_blocks = ["0.0.0.0/0"]
  }
  ingress {
    description = "port 443 allow"
    from_port   = 443
    to_port     = 443
    protocol    = "tcp"
    cidr_blocks = ["0.0.0.0/0"]
  }

  tags = {
    Name = "mysecurity"
  }
}
We can use for_each for the ingress ports to simplify code.
We have named it “mysecurity“.
It allows outgoing traffic for all the ports.
It only allows incoming traffic from port 443, 80, 22, 6379, 456, 3000-1000, 256 & 6443 for https, http, ssh, redis, smpts, ports, smpt & k8s respectively.
It is not best practice to allow a big range of incoming ports.
Code for EC2 instance creation
resource "aws_instance" "Automate" {
  ami             = var.ami_id
  instance_type   = var.instance_type
  key_name        = aws_key_pair.deployer.key_name
  security_groups = [aws_security_group.allow_user_to_connect.name]
  tags = {
    Name = "Automate"
  }
  root_block_device {
    volume_size = 30
    volume_type = "gp3"
  }
}
It is attached to a 30 GB general-purpose 3 SSD and the rest of the values are taken from a variable file.
The variables. tf file
variable "aws_region" {
  description = "AWS region where resources will be provisioned"
  default     = "ap-south-1"
}

variable "ami_id" {
  description = "AMI ID for the EC2 instance"
  default     = "ami-0dee22c13ea7a9a67"
}

variable "instance_type" {
  description = "Instance type for the EC2 instance"
  default     = "t2.large"
}
Terraform code for EC2 instance creation
resource "aws_key_pair" "deployer" {
  key_name   = "terra-automate-key"
  public_key = file("terra-key.pub")
}

resource "aws_default_vpc" "default" {

}

resource "aws_security_group" "allow_user_to_connect" {
  name        = "allow TLS"
  description = "Allow user to connect"
  vpc_id      = aws_default_vpc.default.id
  ingress {
    description = "port 22 allow"
    from_port   = 22
    to_port     = 22
    protocol    = "tcp"
    cidr_blocks = ["0.0.0.0/0"]
  }

  egress {
    description = " allow all outgoing traffic "
    from_port   = 0
    to_port     = 0
    protocol    = "-1"
    cidr_blocks = ["0.0.0.0/0"]
  }

  ingress {
    description = "port 80 allow"
    from_port   = 80
    to_port     = 80
    protocol    = "tcp"
    cidr_blocks = ["0.0.0.0/0"]
  }
  ingress {
    description = "port 30,000-32767 allow"
    from_port   = 30,000
    to_port     = 32767
    protocol    = "tcp"
    cidr_blocks = ["0.0.0.0/0"]
  }
  ingress {
    description = "port 256 allow"
    from_port   = 30,000
    to_port     = 32767
    protocol    = "tcp"
    cidr_blocks = ["0.0.0.0/0"]
  }
  ingress {
    description = "port 256 allow"
    from_port   = 256
    to_port     = 256
    protocol    = "tcp"
    cidr_blocks = ["0.0.0.0/0"]
  }
  ingress {
    description = "port 6379 allow"
    from_port   = 6379
    to_port     = 6379
    protocol    = "tcp"
    cidr_blocks = ["0.0.0.0/0"]
  }
  ingress {
    description = "port 256 allow"
    from_port   = 6443
    to_port     = 6443
    protocol    = "tcp"
    cidr_blocks = ["0.0.0.0/0"]
  }
  ingress {
    description = "port 443 allow"
    from_port   = 443
    to_port     = 443
    protocol    = "tcp"
    cidr_blocks = ["0.0.0.0/0"]
  }

  tags = {
    Name = "mysecurity"
  }
}

resource "aws_instance" "testinstance" {
  ami             = var.ami_id
  instance_type   = var.instance_type
  key_name        = aws_key_pair.deployer.key_name
  security_groups = [aws_security_group.allow_user_to_connect.name]
  tags = {
    Name = "Automate"
  }
  root_block_device {
    volume_size = 30
    volume_type = "gp3"
  }
}
Stage # 2
eksctl installation
eksctl installation command
curl --silent --location "https://github.com/weaveworks/eksctl/releases/latest/download/eksctl_$(uname -s)_amd64.tar.gz" | tar xz -C /tmp
sudo mv /tmp/eksctl /usr/local/bin
eksctl version
After that install kubectl for cli access to API SERVER of EKS.
curl -o kubectl https://amazon-eks.s3.us-west-2.amazonaws.com/1.19.6/2021-01-05/bin/linux/amd64/kubectl
chmod +x ./kubectl
sudo mv ./kubectl /usr/local/bin
kubectl version --short --client
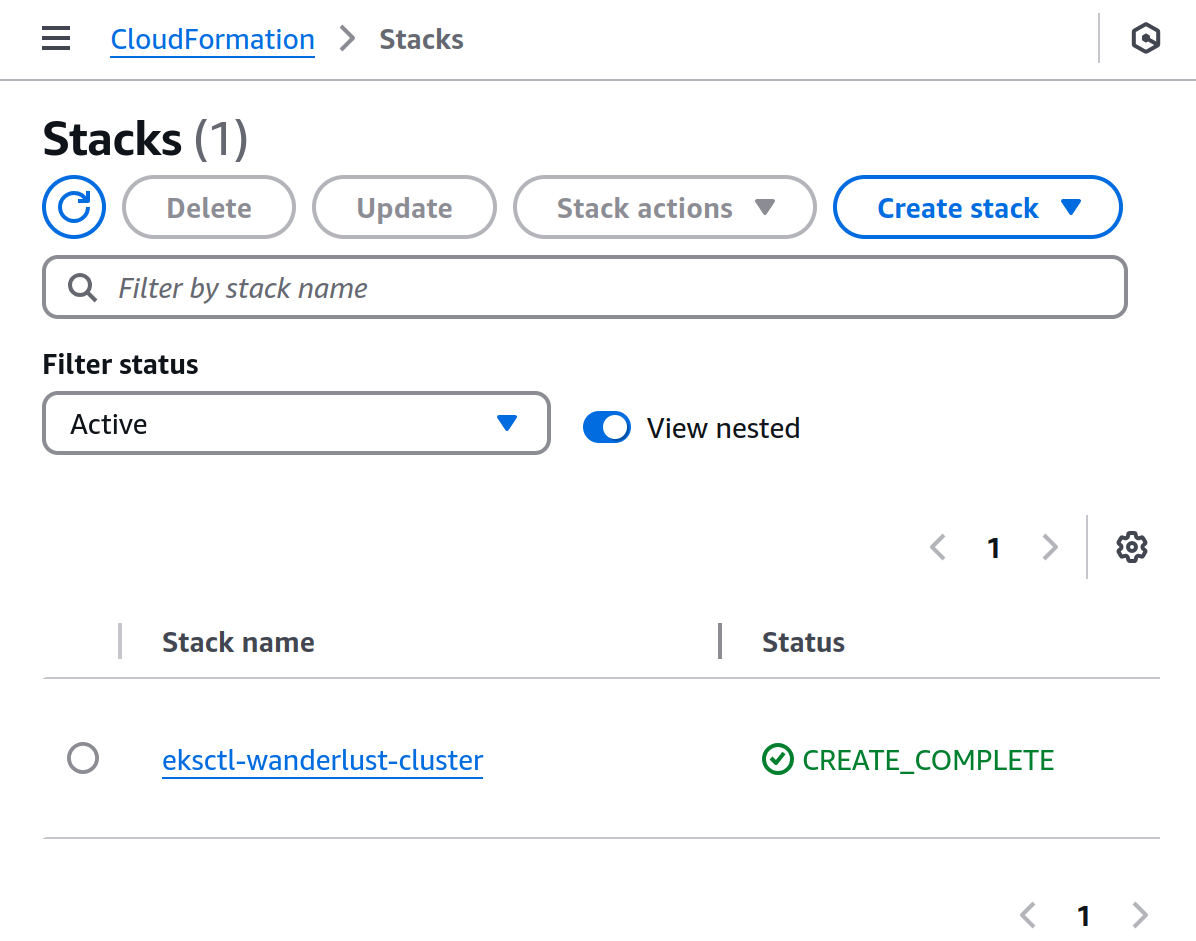
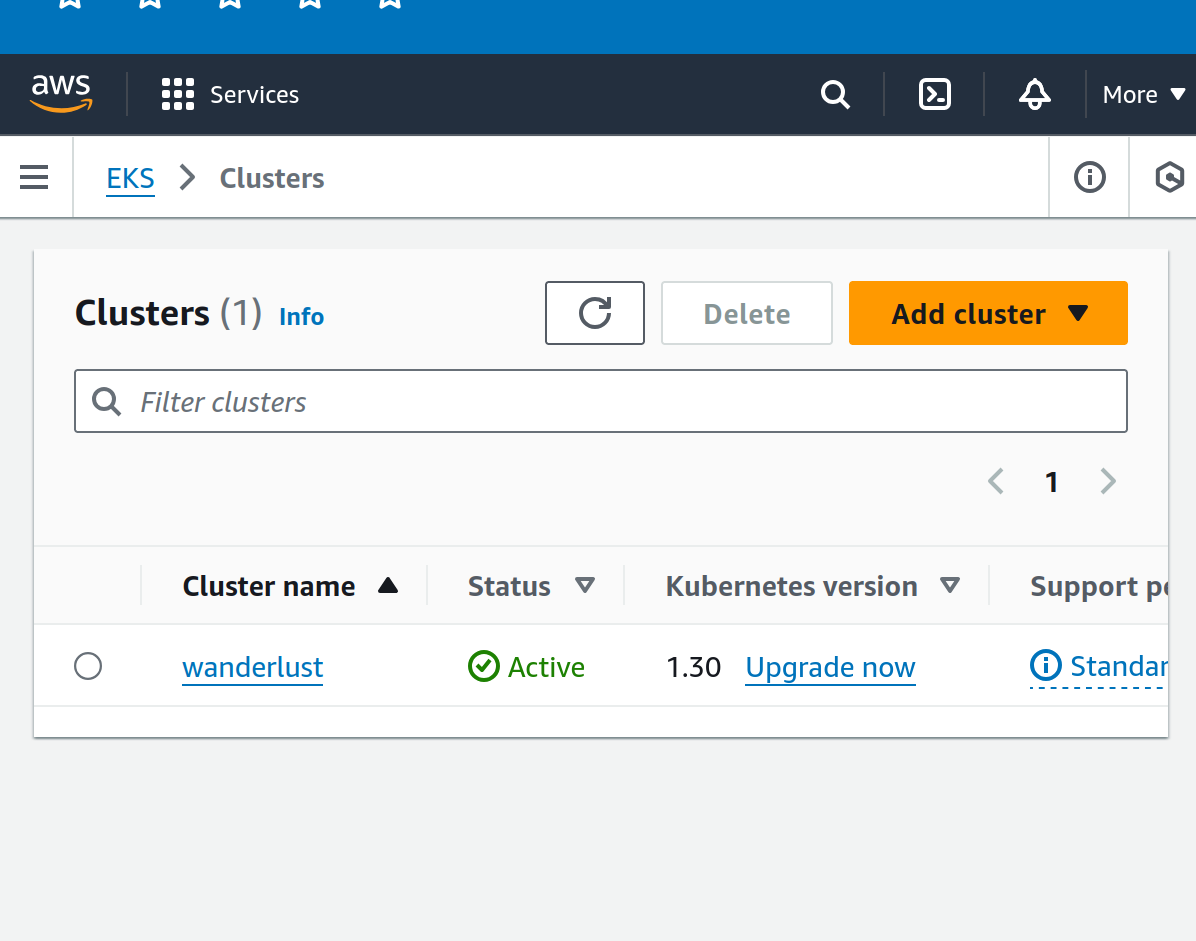
Creating the cluster in eks without any node.
eksctl create cluster --name=wanderlust \
                    --region=us-east-2 \
                    --version=1.30 \
                    --without-nodegroup

Associate IAM OIDC Provider (Master machine)
eksctl utils associate-iam-oidc-provider \
  --region us-east-2 \
  --cluster wanderlust \
  --approve
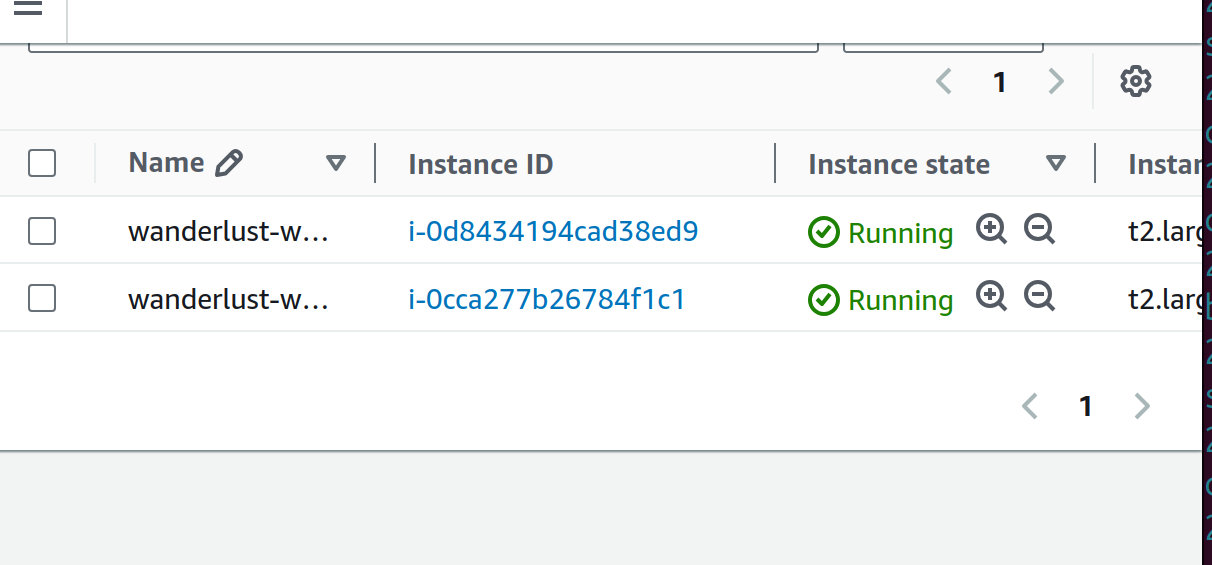
Create Nodegroup (Master machine)
eksctl create nodegroup --cluster=wanderlust \
                     --region=us-east-2 \
                     --name=wanderlust \
                     --node-type=t2.large \
                     --nodes=2 \
                     --nodes-min=2 \
                     --nodes-max=2 \
                     --node-volume-size=29 \
                     --ssh-access \
                     --ssh-public-key=eks-nodegroup-key

Stage # 3
Jenkins installation
ssh in the master server
Bash
ssh -i terra-key user@remote-server
Setting up the master server for pipeline creation
Bash
sudo apt-get update
Installing docker
Bash
sudo apt-get install docker.io
Installing docker-compose
Bash
sudo curl -L "https://github.com/docker/compose/releases/latest/download/docker-compose-$(uname -s)-$(uname -m)" -o /usr/local/bin/docker-compose
sudo chmod +x /usr/local/bin/docker-compose
docker-compose --version
Adding permissions for docker
Bash
sudo usermod -aG docker $USER && newgrp docker
Installing Jenkins on the master node but as a prerequisite we are installing Java first
sudo apt update
sudo apt install fontconfig openjdk-17-jre
java -version
sudo wget -O /usr/share/keyrings/jenkins-keyring.asc \
  https://pkg.jenkins.io/debian-stable/jenkins.io-2023.key
echo "deb [signed-by=/usr/share/keyrings/jenkins-keyring.asc]" \
  https://pkg.jenkins.io/debian-stable binary/ | sudo tee \
  /etc/apt/sources.list.d/jenkins.list > /dev/null
sudo apt-get update
sudo apt-get install jenkins
Access Jenkins from the browser
Bash
<IP of the master node>:8080
Unlock the Jenkins by reaching the file specified in the Jenkins and copy-paste the content of the key to Jenkins

After that, you can create the first user in the Jenkins console
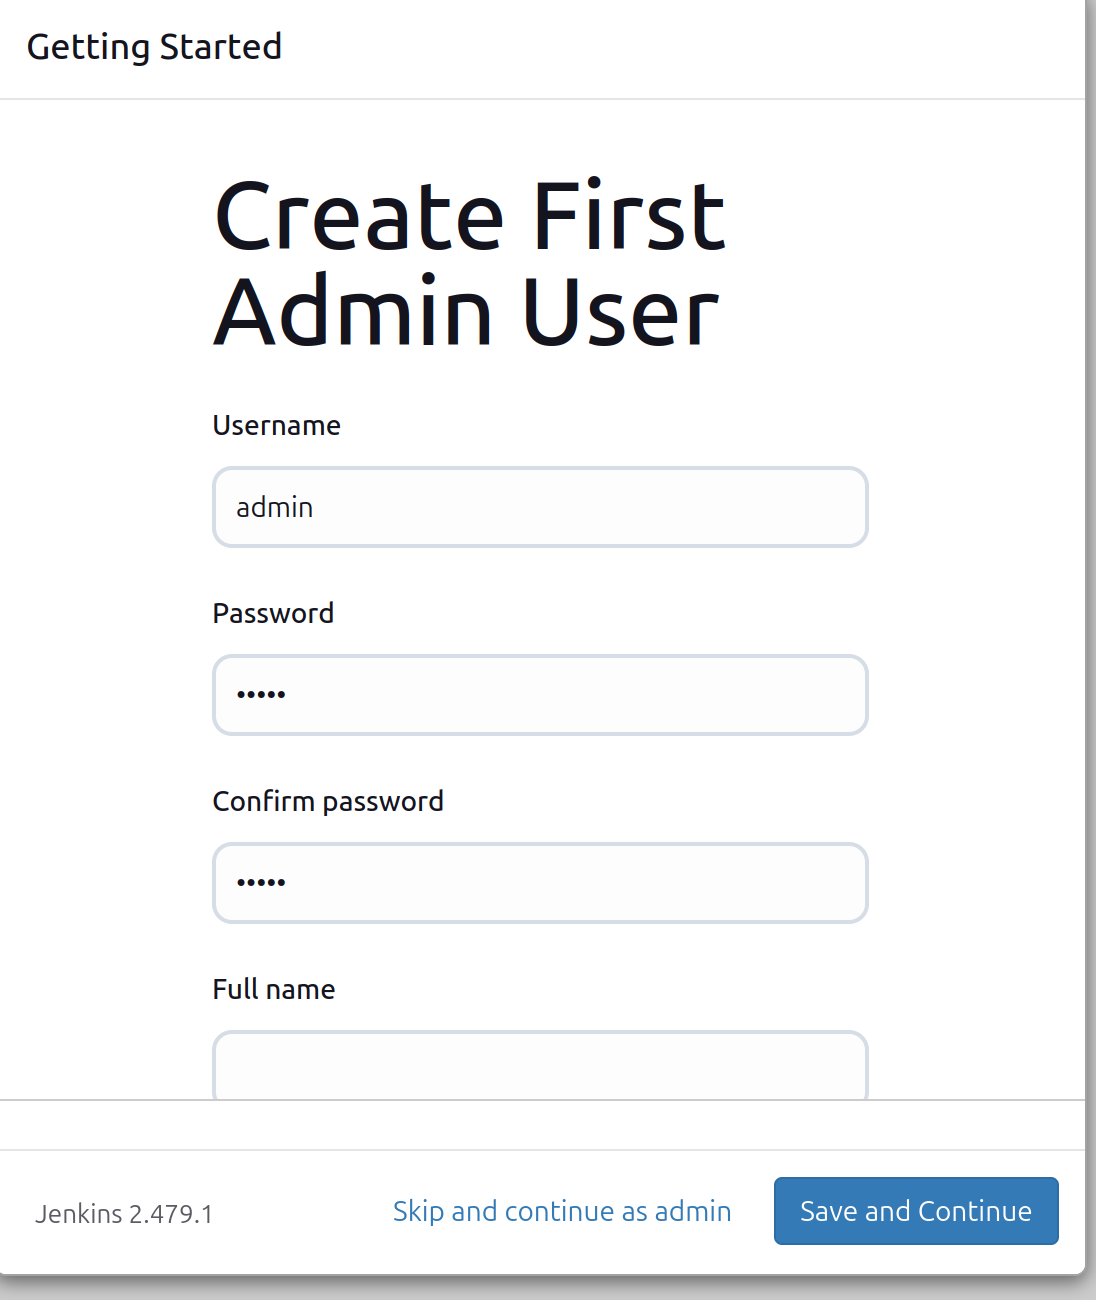
Meanwhile, we will configure Jenkins.
Install Trivy by copying the command on the terminal in another session of the master node.
sudo apt-get install wget apt-transport-https gnupg lsb-release -y
wget -qO - https://aquasecurity.github.io/trivy-repo/deb/public.key | sudo apt-key add -
echo deb https://aquasecurity.github.io/trivy-repo/deb $(lsb_release -sc) main | sudo tee -a /etc/apt/sources.list.d/trivy.list
sudo apt-get update -y
sudo apt-get install trivy -y
For the installation of the sonarqube use the following
docker run -itd --name SonarQube-Server -p 9000:9000 sonarqube:lts-community
Plugins for the Project:
OWASP Dependency-Check
SonarQube Scanner
Docker
Blue-Ocean
These plugins would be essential for the project requirements.
Integration of Gmail with Jenkins
After that, we have to set our prerequisites for email integration with Jenkins.
Go to your Gmail account
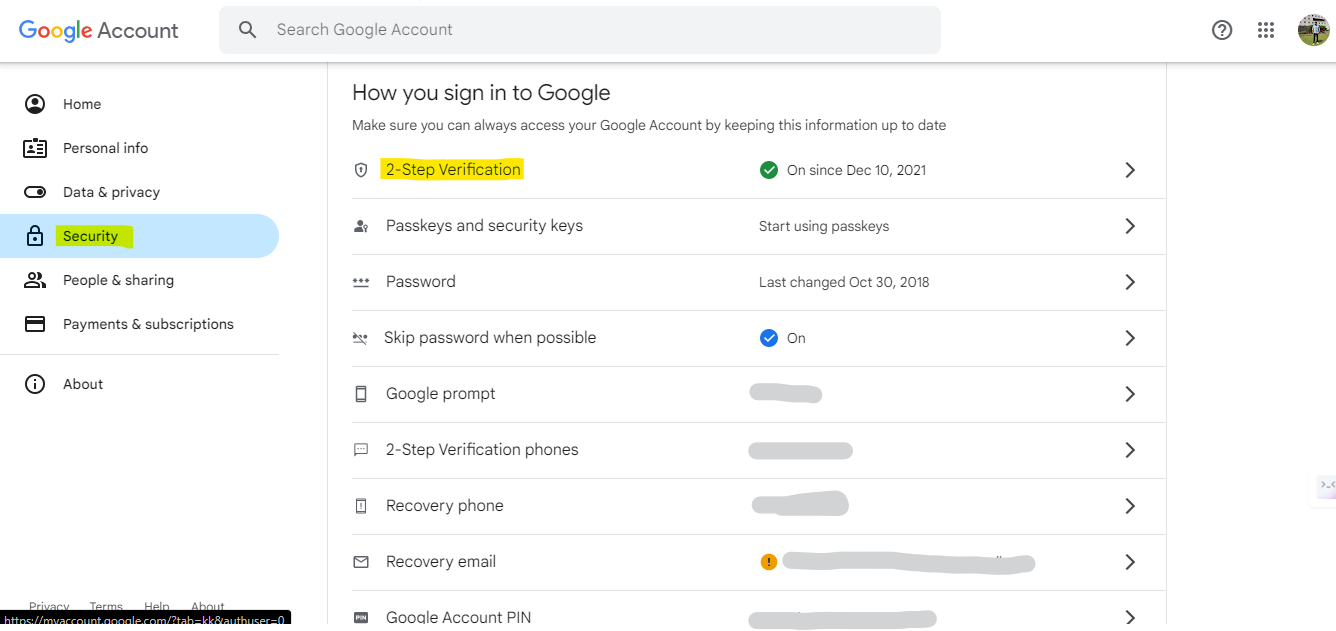
Make sure your MFA(Multi Factor Authentication) is enabled in your Gmail account
Manage Email —> Search[App password]
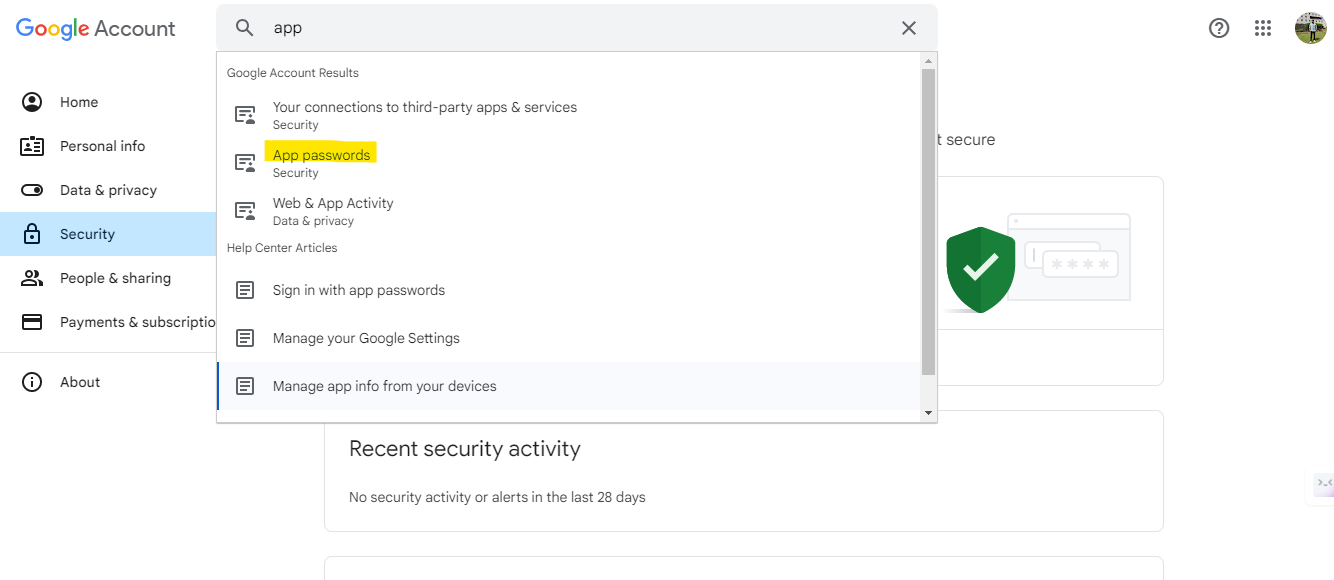
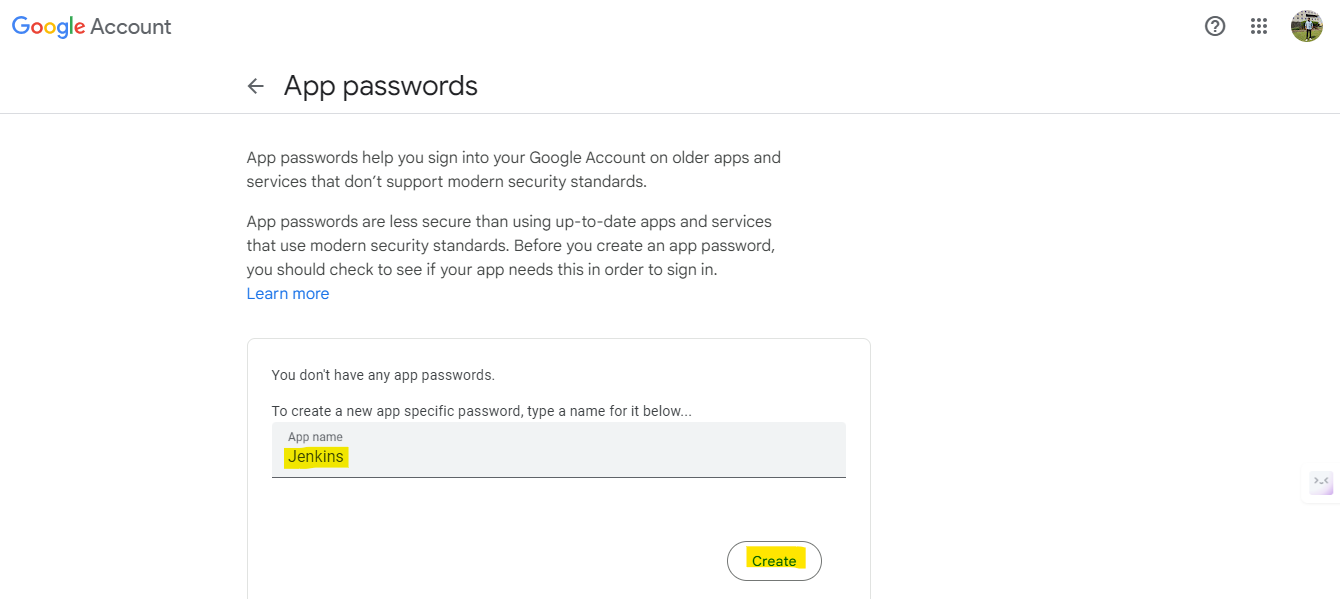
You can add a new account for the App and generate the password
Copy the password
After that put it in Jenkins credentials with “username” as email address and “password“and paste the Gmail App password.
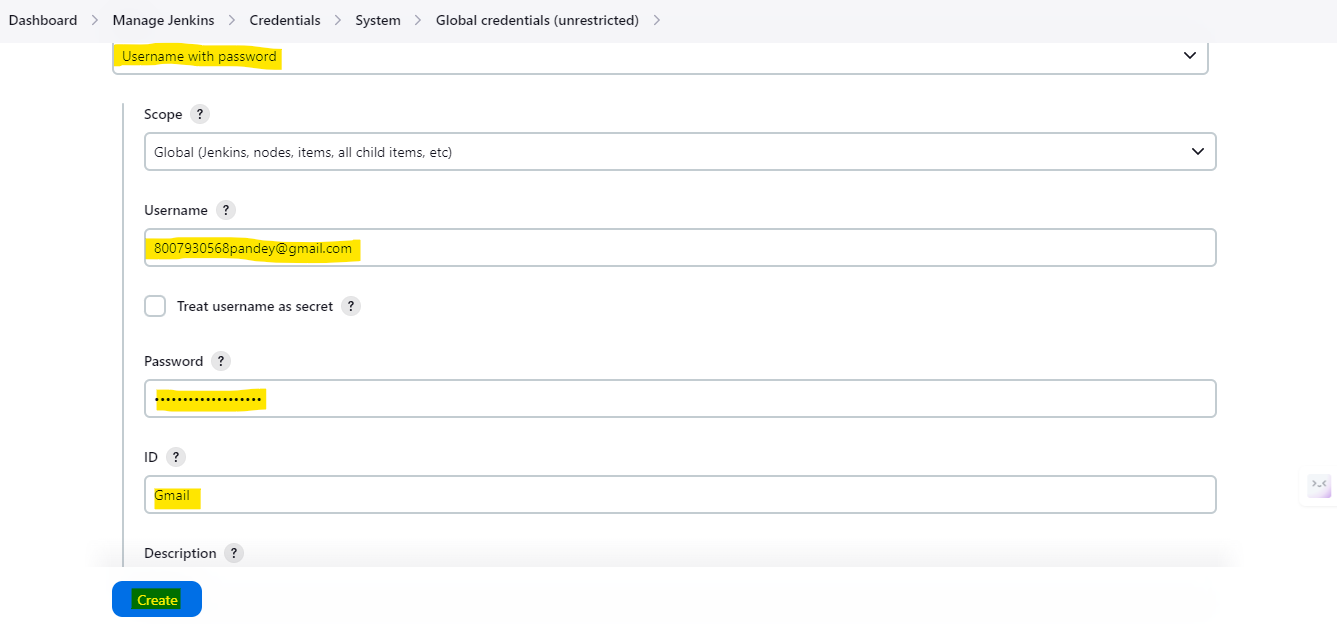
After that, you have to go to
Jenkins —> Manage-jenkins —> System —> Extended Email Notification.
Put the following in the form
SMTP server
smpt.gmail.com
port 465
Add credentials
Use SSL
The integration of Gmail with Jenkins is complete.
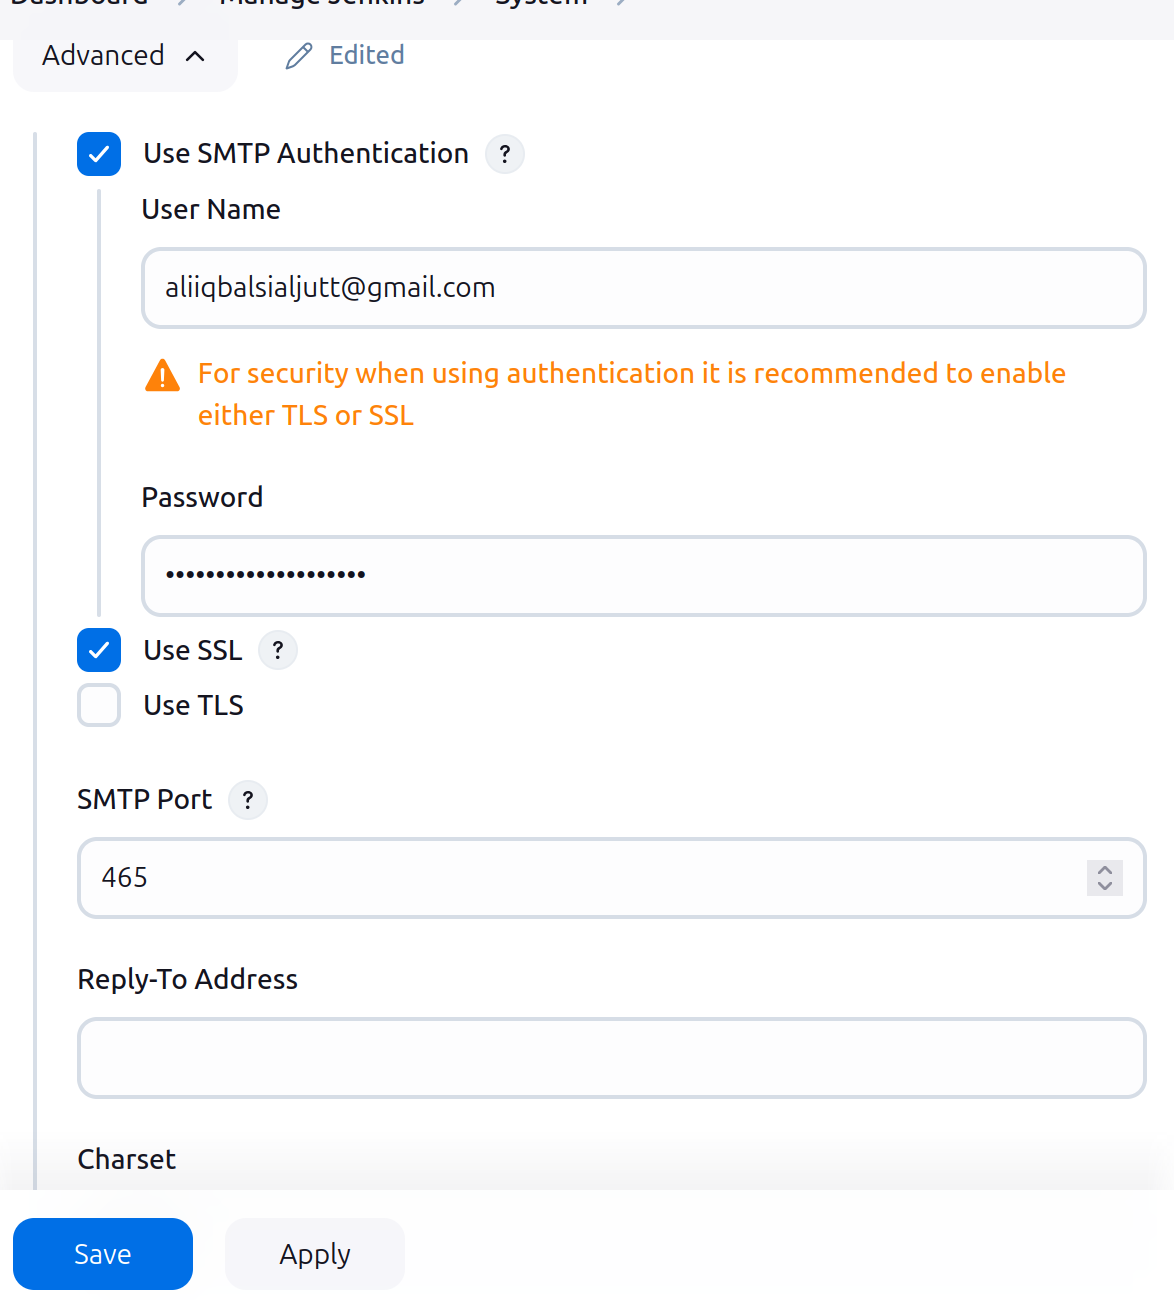
Integration of OWASP
Installation and integration of OWASP tool with Jenkins:-
Go to Jenkins —> Manage-jenkins —> tools —> Dependency-check installation.
Fill out the following form:-
Name : OWASP
Install automatically
Github
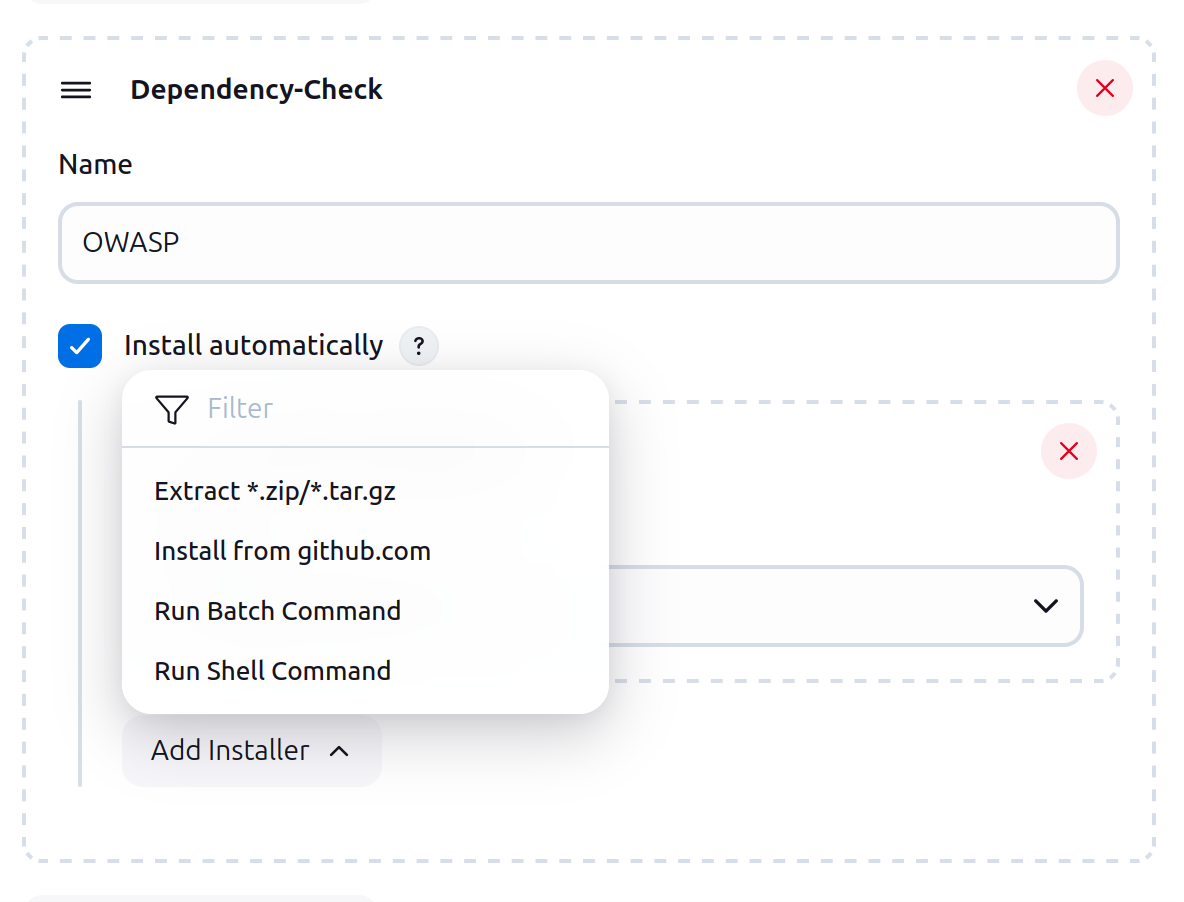
SonarQube integration with Jenkins
http://<Ip of your master instance>:9000
The above URL will open the SonarQube console.
On the SonarQube console open
Administration —> Security —> Users —> Click on the token.

This will generate the token for SonarQube integration.
After that open
Jenkins —> Manage-Jenkins —> Credentials
Add a token in the form of secret text in the credentials.
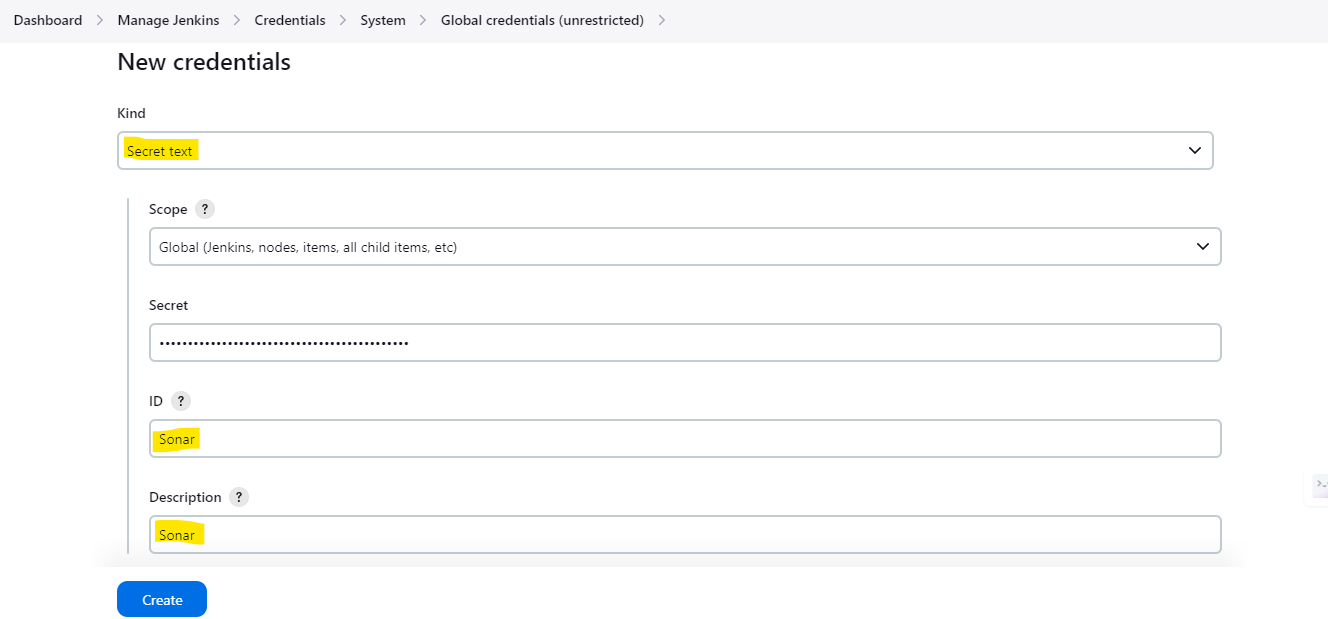
Now open
Jenkins —> manage-Jenkins —> system —> SoanQube installation
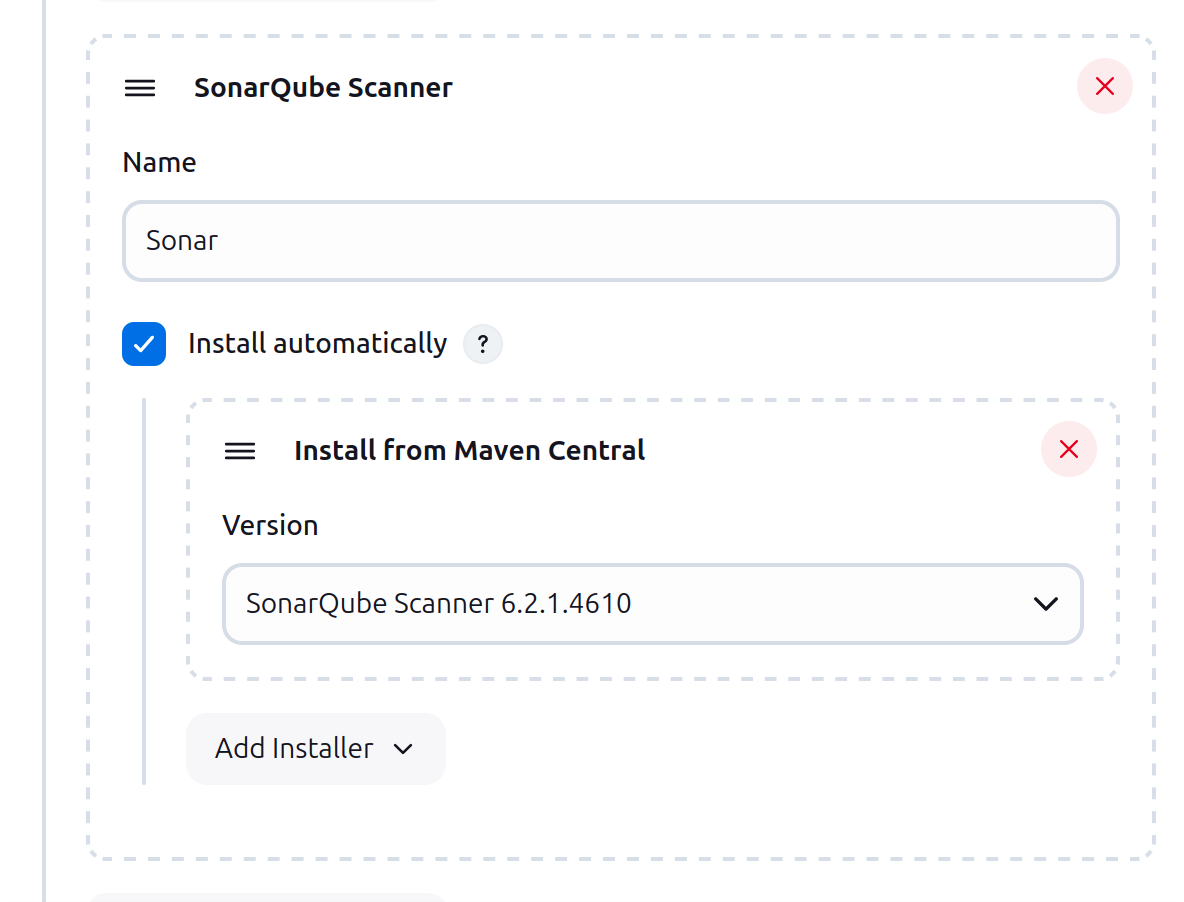
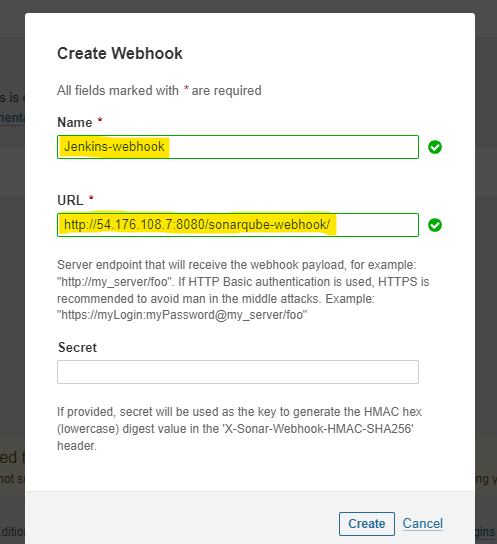
After that to grant SonarQube access to Jenkins we have to create a webhook for Jenkins in SonarQube.
Open SonarQube dashboard
Configuration —> Webhooks
create webhooks
Paste the following in the webhook
<IP of jenkins server>:sonarqube-webhook/
GitHub integration
Integration of GitHub with Jenkins
Integrate the GitHub where your source code is placed.
Open GitHub & go to
settings —> developer —> settings —> personal access token
Generate the personal access key
Now open Jenkins & go to
Jenkin —> manage-Jenkins —> credentials
Setup credentials
“username” : <username of github>
“Password“: <paste personal access key from github>
Now you can use it in the pipeline
Stage # 5
ArgoCD Installation
The following command is to be run in the Master Server Terminal
kubectl get namespace
kubectl create namespace argocd
kubectl apply -n argocd -f https://raw.githubusercontent.com/argoproj/argo-cd/stable/manifests/install.yaml
watch kubectl get pods -n argocd
sudo chmod +x /usr/local/bin/argocd
kubectl get svc -n argocd
kubectl patch svc argocd-server -n argocd -p '{"spec": {"type": "NodePort"}}'
kubectl get svc -n argocd
<public-ip-worker>:<port>
kubectl -n argocd get secret argocd-initial-admin-secret -o jsonpath="{.data.password}" | base64 -d; echo
You have to edit the inbound rules of the worker nodes of eks cluster to allow the admin to access the ArgoCD console.
You can check the ArgoCD ports by following commands in the master server
kubectl get namespaces
Verify that the ArgoCD namespace exits.
kubectl get svc -n argocd
To get ArgoCD services
NAME                  TYPE           CLUSTER-IP       EXTERNAL-IP   PORT(S)                      AGE
argocd-server         LoadBalancer   10.100.200.1     52.10.10.10   80:32000/TCP,443:32001/TCP   5h
argocd-repo-server    ClusterIP      10.100.200.2     <none>        8081/TCP                     5h
argocd-redis          ClusterIP      10.100.200.3     <none>        6379/TCP                     5h
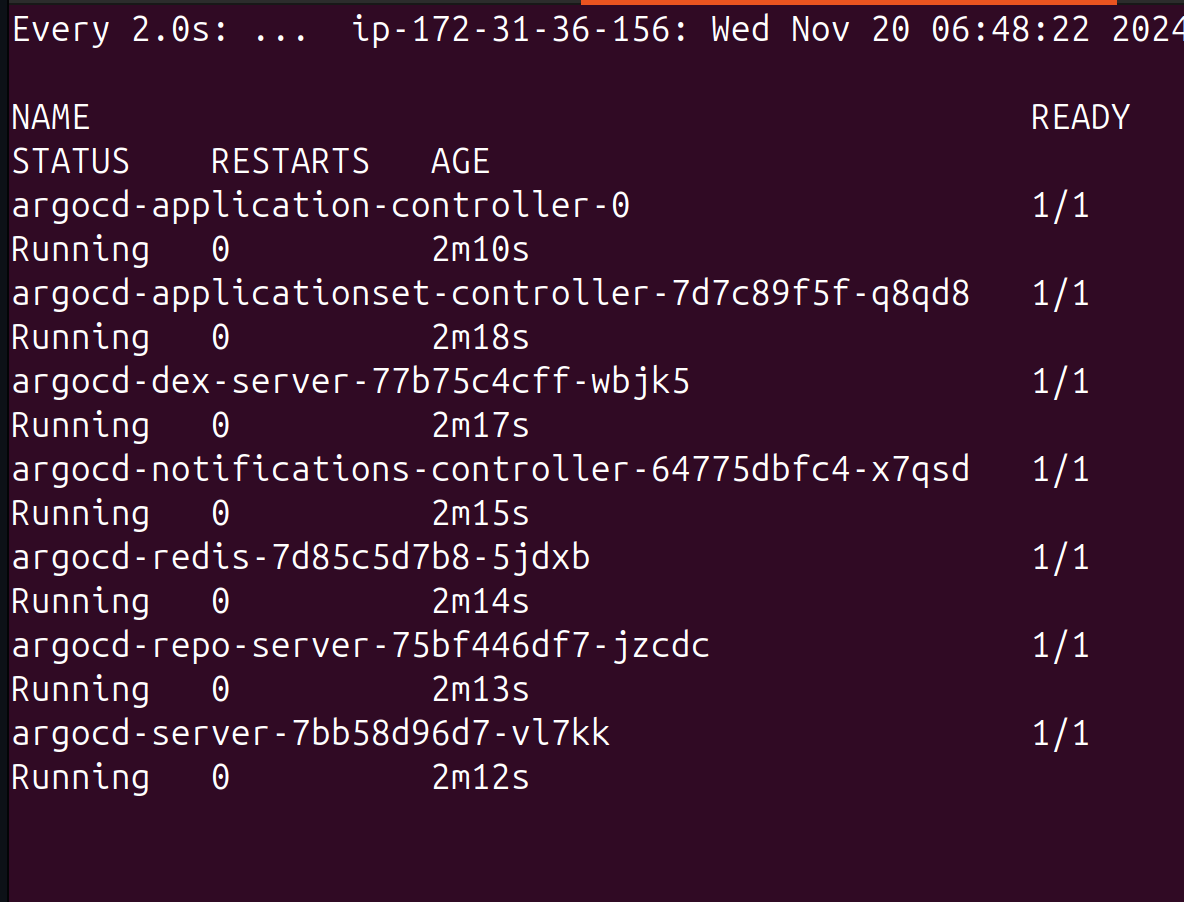
After confirming the port of ArgoCD, you have to edit the inbound rules of the worker nodes to allow access to the AgroCD console.
Now access the ArgoCD.
http://<Worker Node IP>:<Port of the ArgoCD>
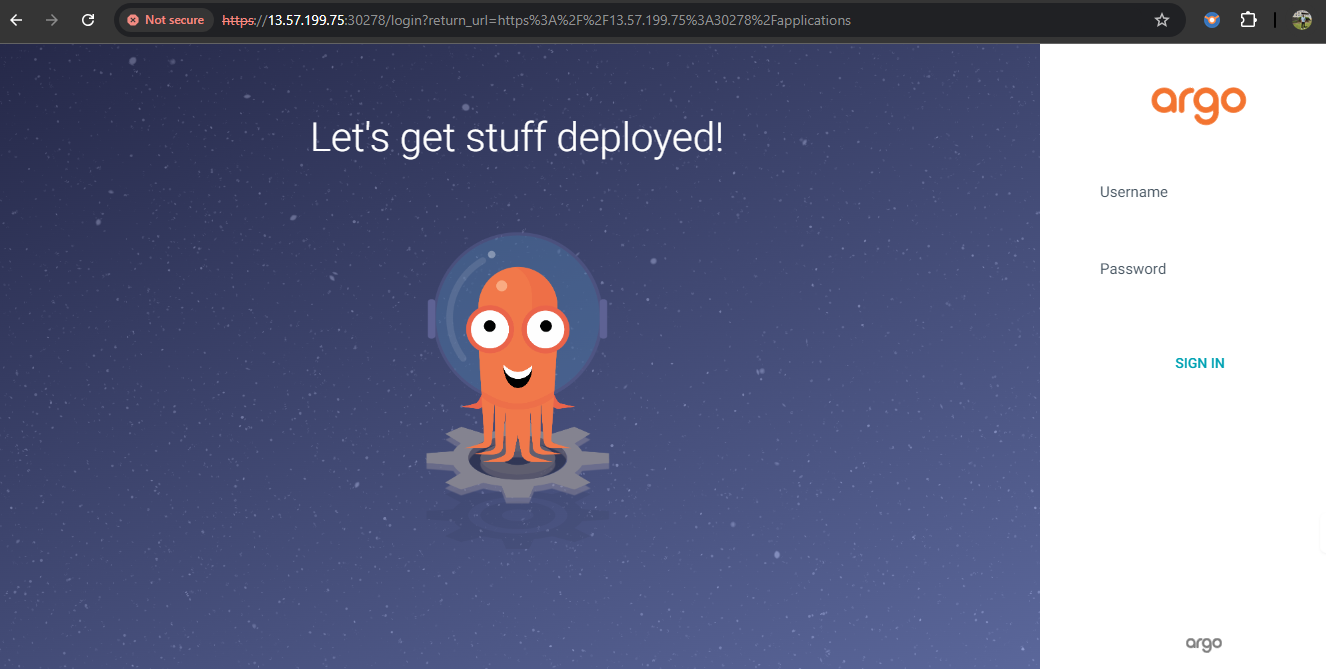
The file address will be shown on the screen of the ArgoCD and the access the address on the master server and copy the key to unlock ArgoCD.
After accessing it go to
userinfo —> update password
Configure ArgoCD with GitHub
To configure ArgoCD with the GitHub repo
Open
settings —> repo
Select:-
HTTP
default
Provide git URL and if it is private give username and access token.
Integration of OrgoCD with Kubernetes
The integration of orgoCD and Kubernetes can be done by following
orgocd login <IP Address of argocd> : port -- username <username of your orgocd>
To list all the clusters on the OrgoCD.
argocd cluster list
I will give you the name of your cluster.
kubectl config get context
Now add the application in OrgoCD.
argocd cluster add <Kubernetes user>@<domain name of the Kubernetes cluster> --name <custom name given to this cluste>
Now add the application in argocd.
By apps, we can deploy apps.
Adding Shared Libraries
To add Shared libraries open
Jenkins —> Manage-Jenkins —> system —> Search[ Global Trusted Pipeline Libraries]
Provide the URL of the remote repo on SCM.
Adding Dockerhub
Open Dockerhub console
Account-setting —> Personal Access token
Add this to Jenkins credentials as username and password. Put your username as your username and password as an Access token.
Jenkins pipeline code
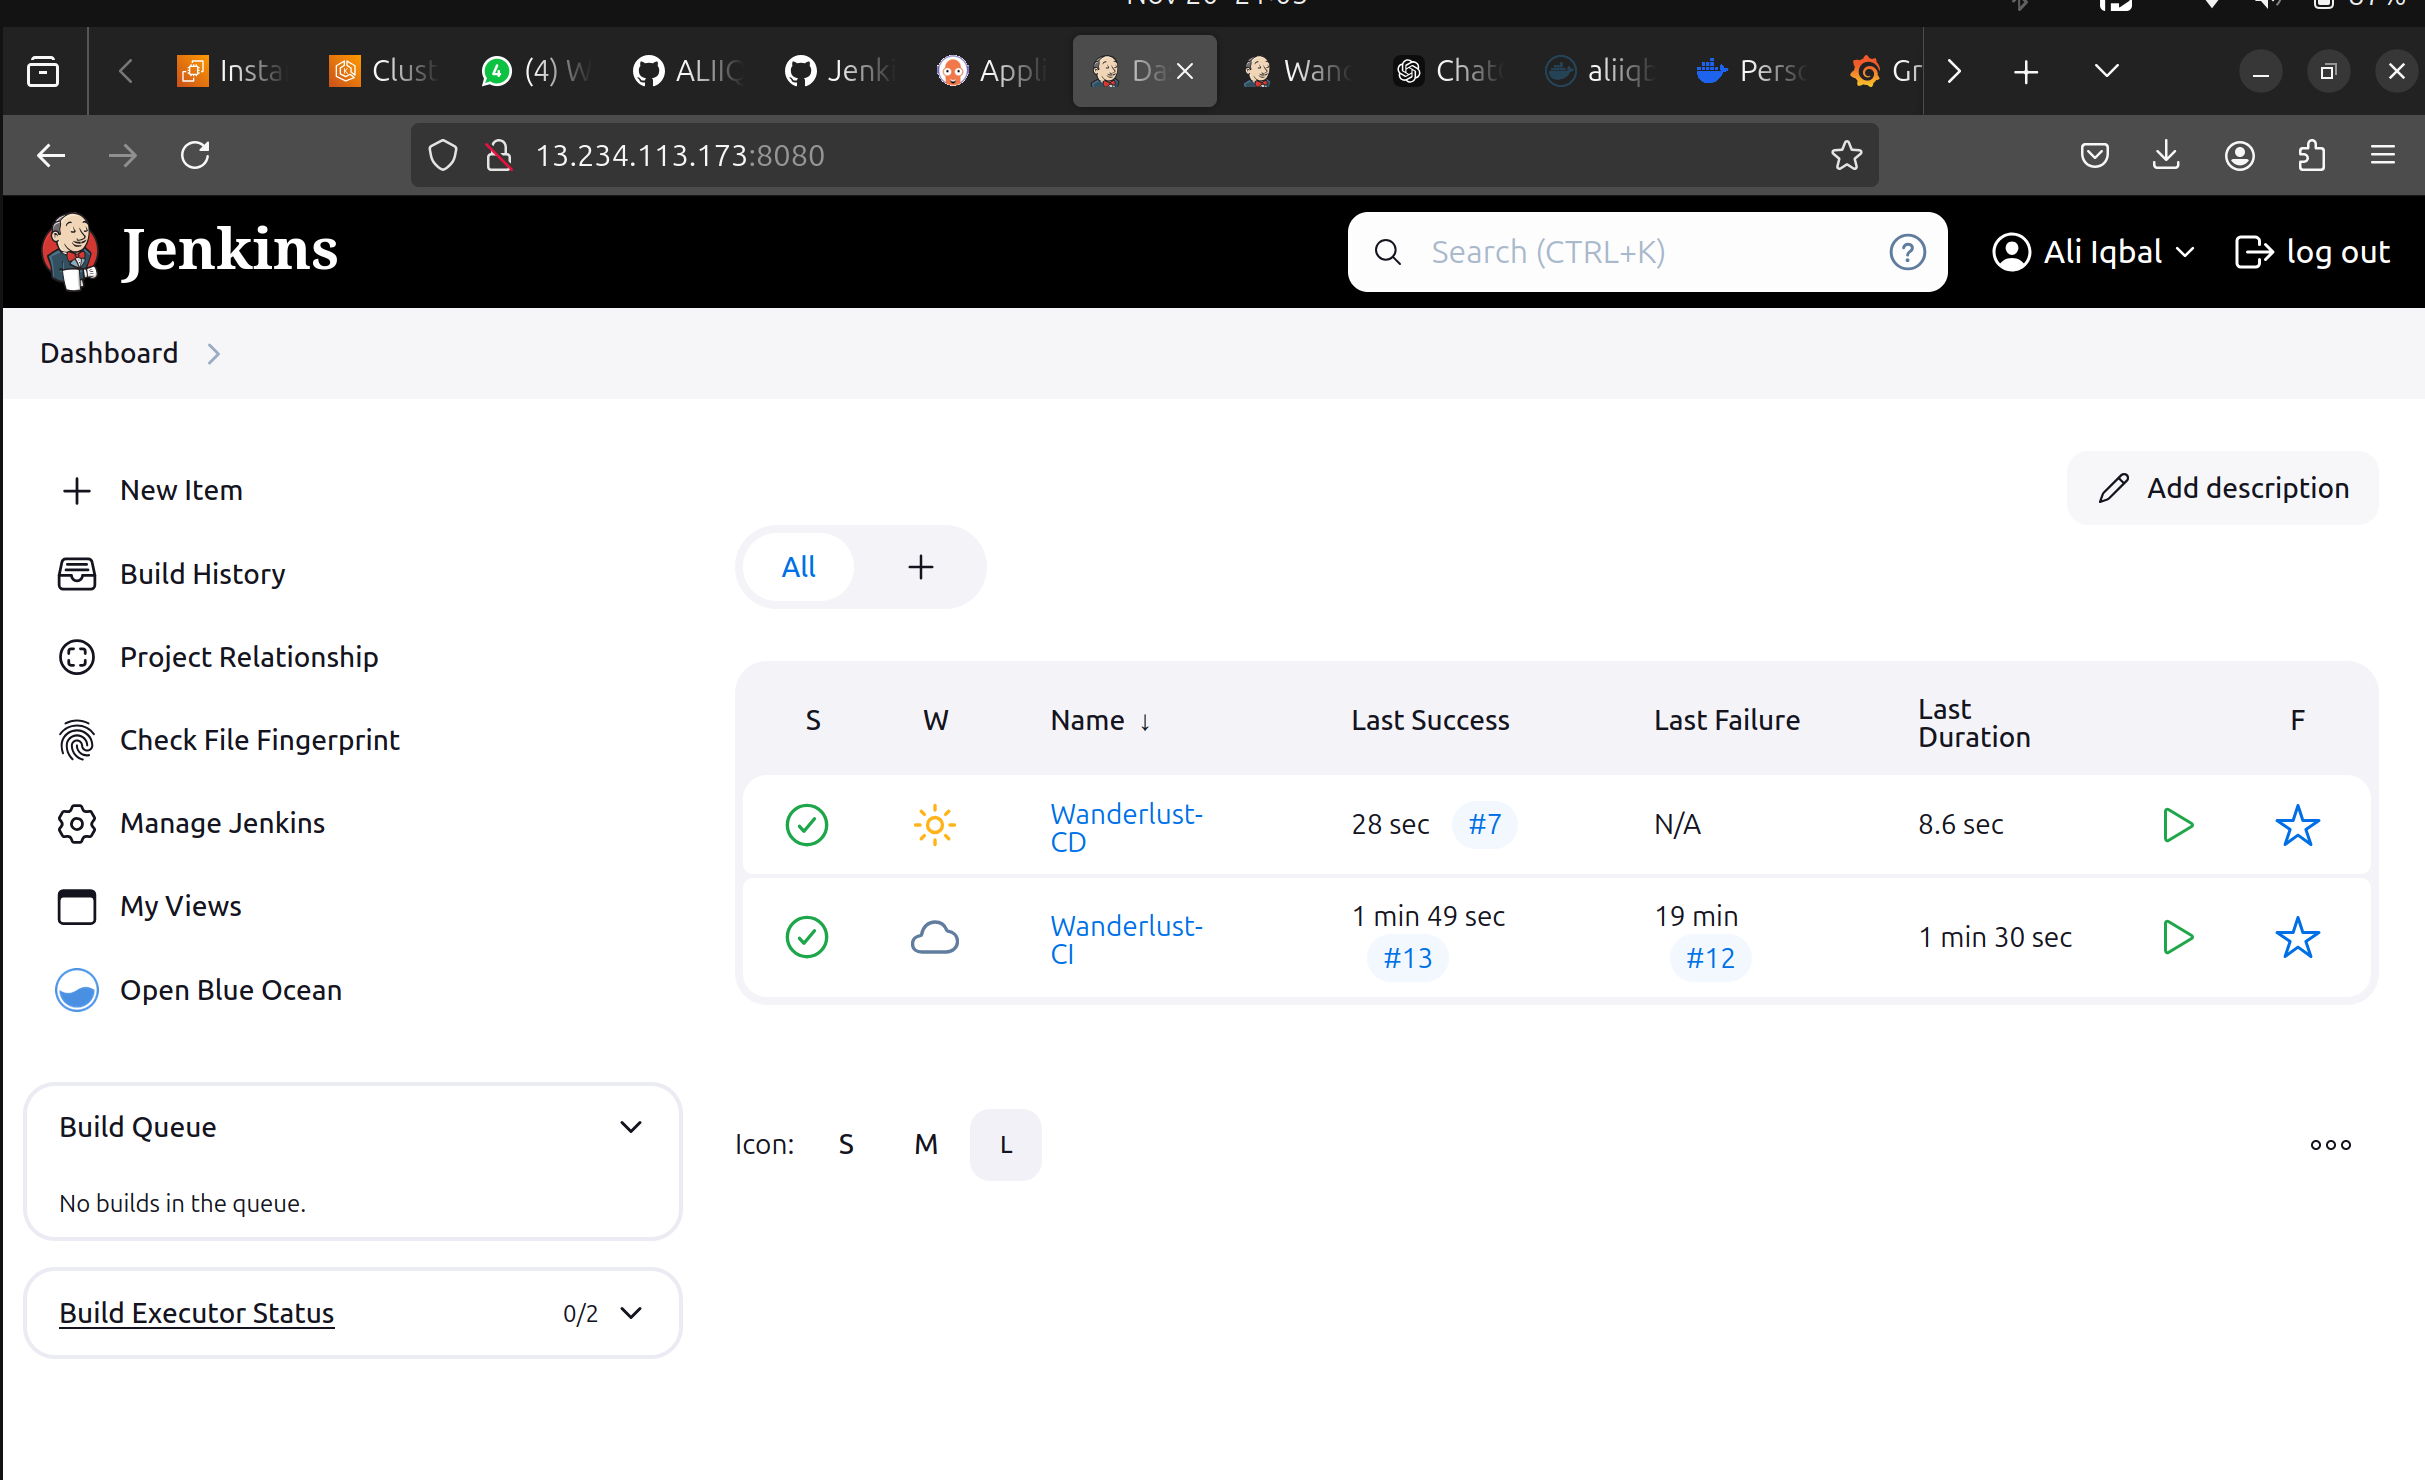
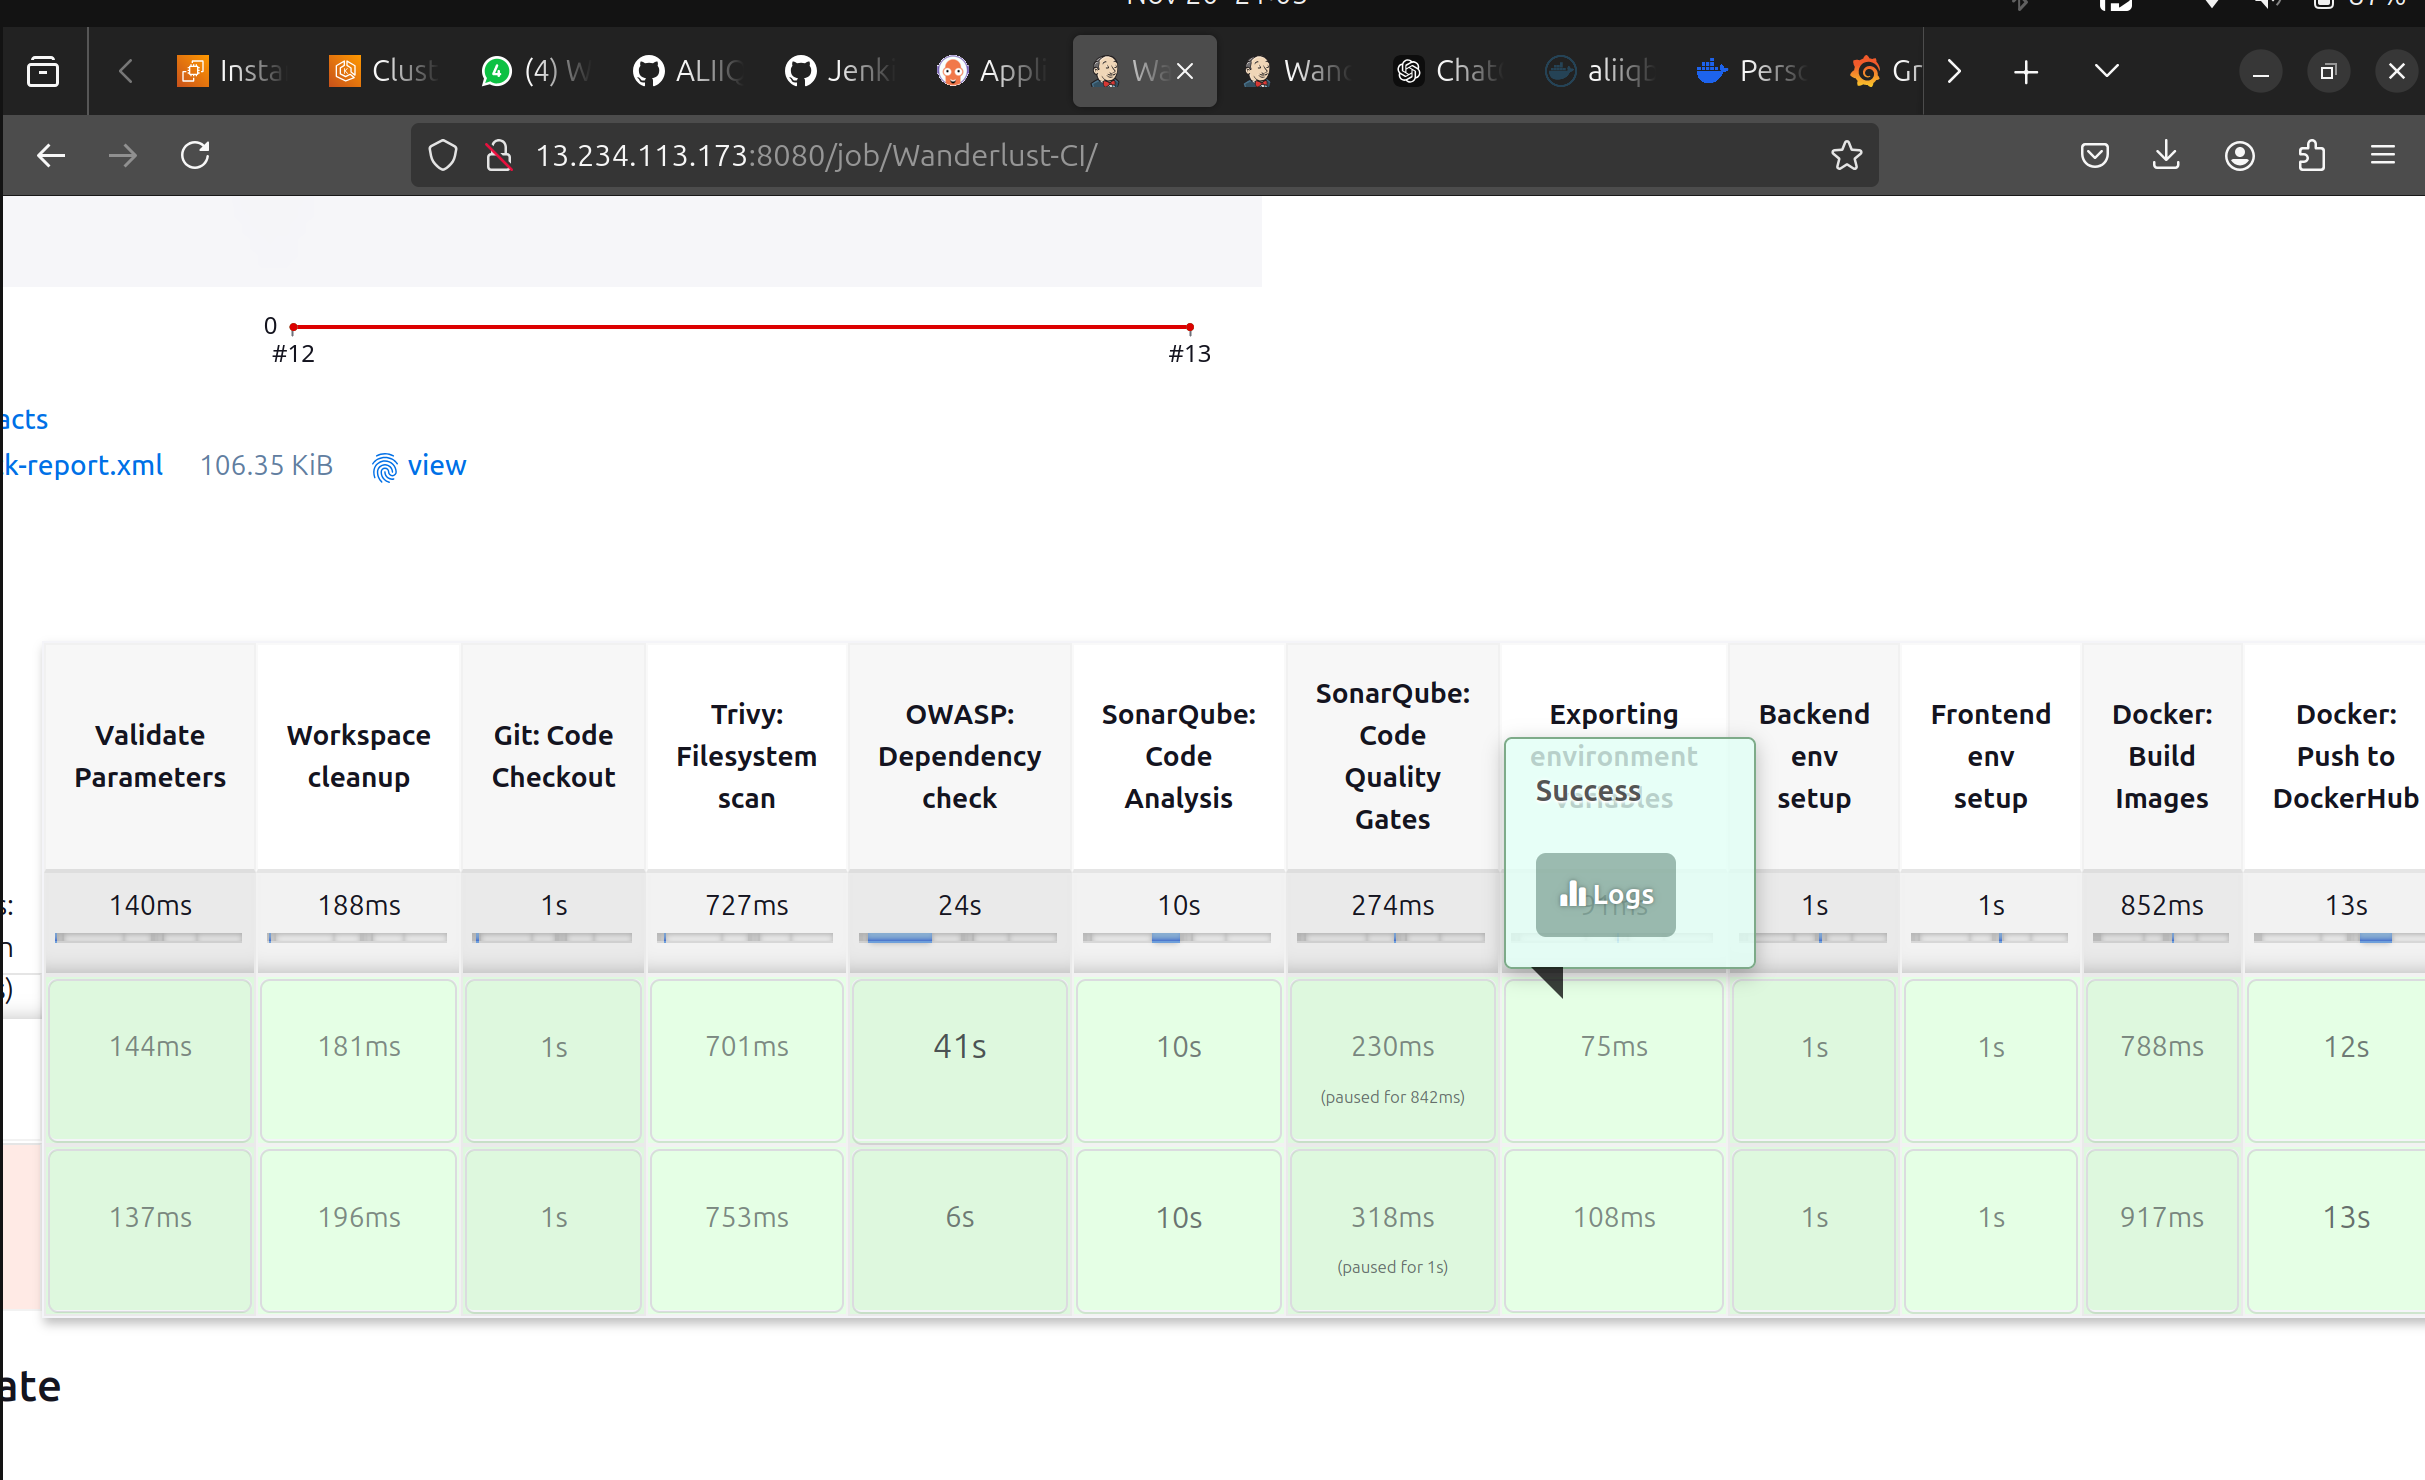
Create a Wanderlust-CI pipeline.
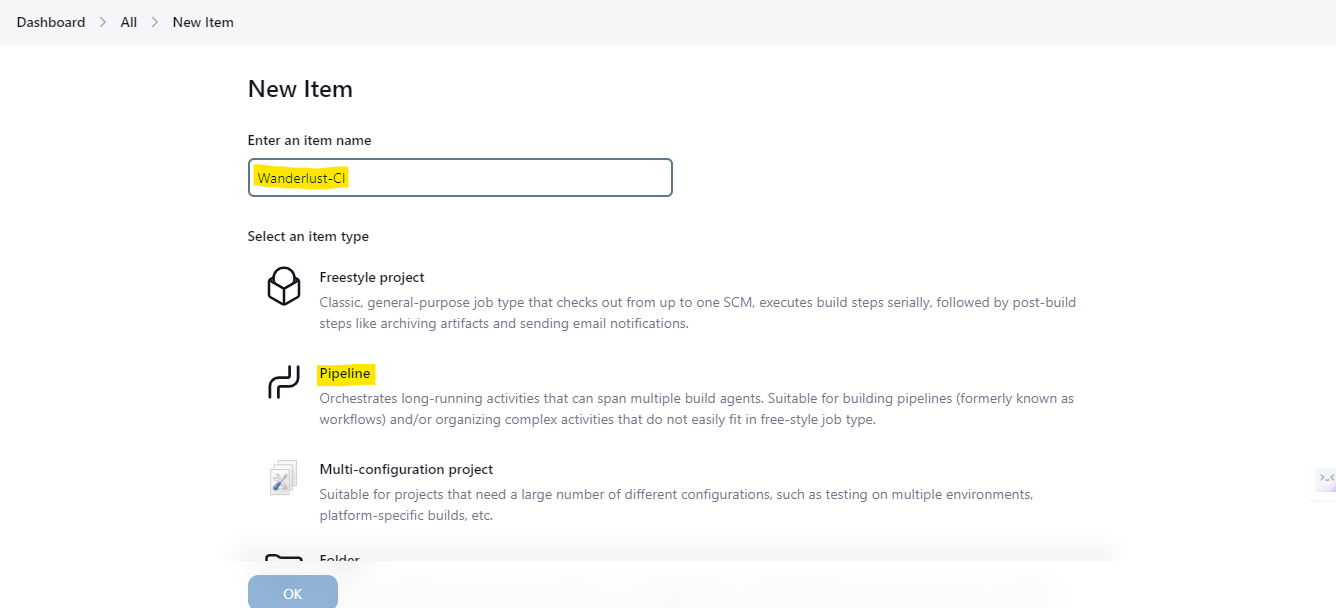
@Library('Shared') _
pipeline {
    agent {label 'Node'}

    environment{
        SONAR_HOME = tool "Sonar"
    }

    parameters {
        string(name: 'FRONTEND_DOCKER_TAG', defaultValue: '', description: 'Setting docker image for latest push')
        string(name: 'BACKEND_DOCKER_TAG', defaultValue: '', description: 'Setting docker image for latest push')
    }

    stages {
        stage("Validate Parameters") {
            steps {
                script {
                    if (params.FRONTEND_DOCKER_TAG == '' || params.BACKEND_DOCKER_TAG == '') {
                        error("FRONTEND_DOCKER_TAG and BACKEND_DOCKER_TAG must be provided.")
                    }
                }
            }
        }
        stage("Workspace cleanup"){
            steps{
                script{
                    cleanWs()
                }
            }
        }

        stage('Git: Code Checkout') {
            steps {
                script{
                    code_checkout("https://github.com/LondheShubham153/Wanderlust-Mega-Project.git","main")
                }
            }
        }

        stage("Trivy: Filesystem scan"){
            steps{
                script{
                    trivy_scan()
                }
            }
        }

        stage("OWASP: Dependency check"){
            steps{
                script{
                    owasp_dependency()
                }
            }
        }

        stage("SonarQube: Code Analysis"){
            steps{
                script{
                    sonarqube_analysis("Sonar","wanderlust","wanderlust")
                }
            }
        }

        stage("SonarQube: Code Quality Gates"){
            steps{
                script{
                    sonarqube_code_quality()
                }
            }
        }

        stage('Exporting environment variables') {
            parallel{
                stage("Backend env setup"){
                    steps {
                        script{
                            dir("Automations"){
                                sh "bash updatebackendnew.sh"
                            }
                        }
                    }
                }

                stage("Frontend env setup"){
                    steps {
                        script{
                            dir("Automations"){
                                sh "bash updatefrontendnew.sh"
                            }
                        }
                    }
                }
            }
        }

        stage("Docker: Build Images"){
            steps{
                script{
                        dir('backend'){
                            docker_build("wanderlust-backend-beta","${params.BACKEND_DOCKER_TAG}","trainwithshubham")
                        }

                        dir('frontend'){
                            docker_build("wanderlust-frontend-beta","${params.FRONTEND_DOCKER_TAG}","trainwithshubham")
                        }
                }
            }
        }

        stage("Docker: Push to DockerHub"){
            steps{
                script{
                    docker_push("wanderlust-backend-beta","${params.BACKEND_DOCKER_TAG}","trainwithshubham")
                    docker_push("wanderlust-frontend-beta","${params.FRONTEND_DOCKER_TAG}","trainwithshubham")
                }
            }
        }
    }
    post{
        success{
            archiveArtifacts artifacts: '*.xml', followSymlinks: false
            build job: "Wanderlust-CD", parameters: [
                string(name: 'FRONTEND_DOCKER_TAG', value: "${params.FRONTEND_DOCKER_TAG}"),
                string(name: 'BACKEND_DOCKER_TAG', value: "${params.BACKEND_DOCKER_TAG}")
            ]
        }
    }
}
Jenkins pipeline code for Kubernetes
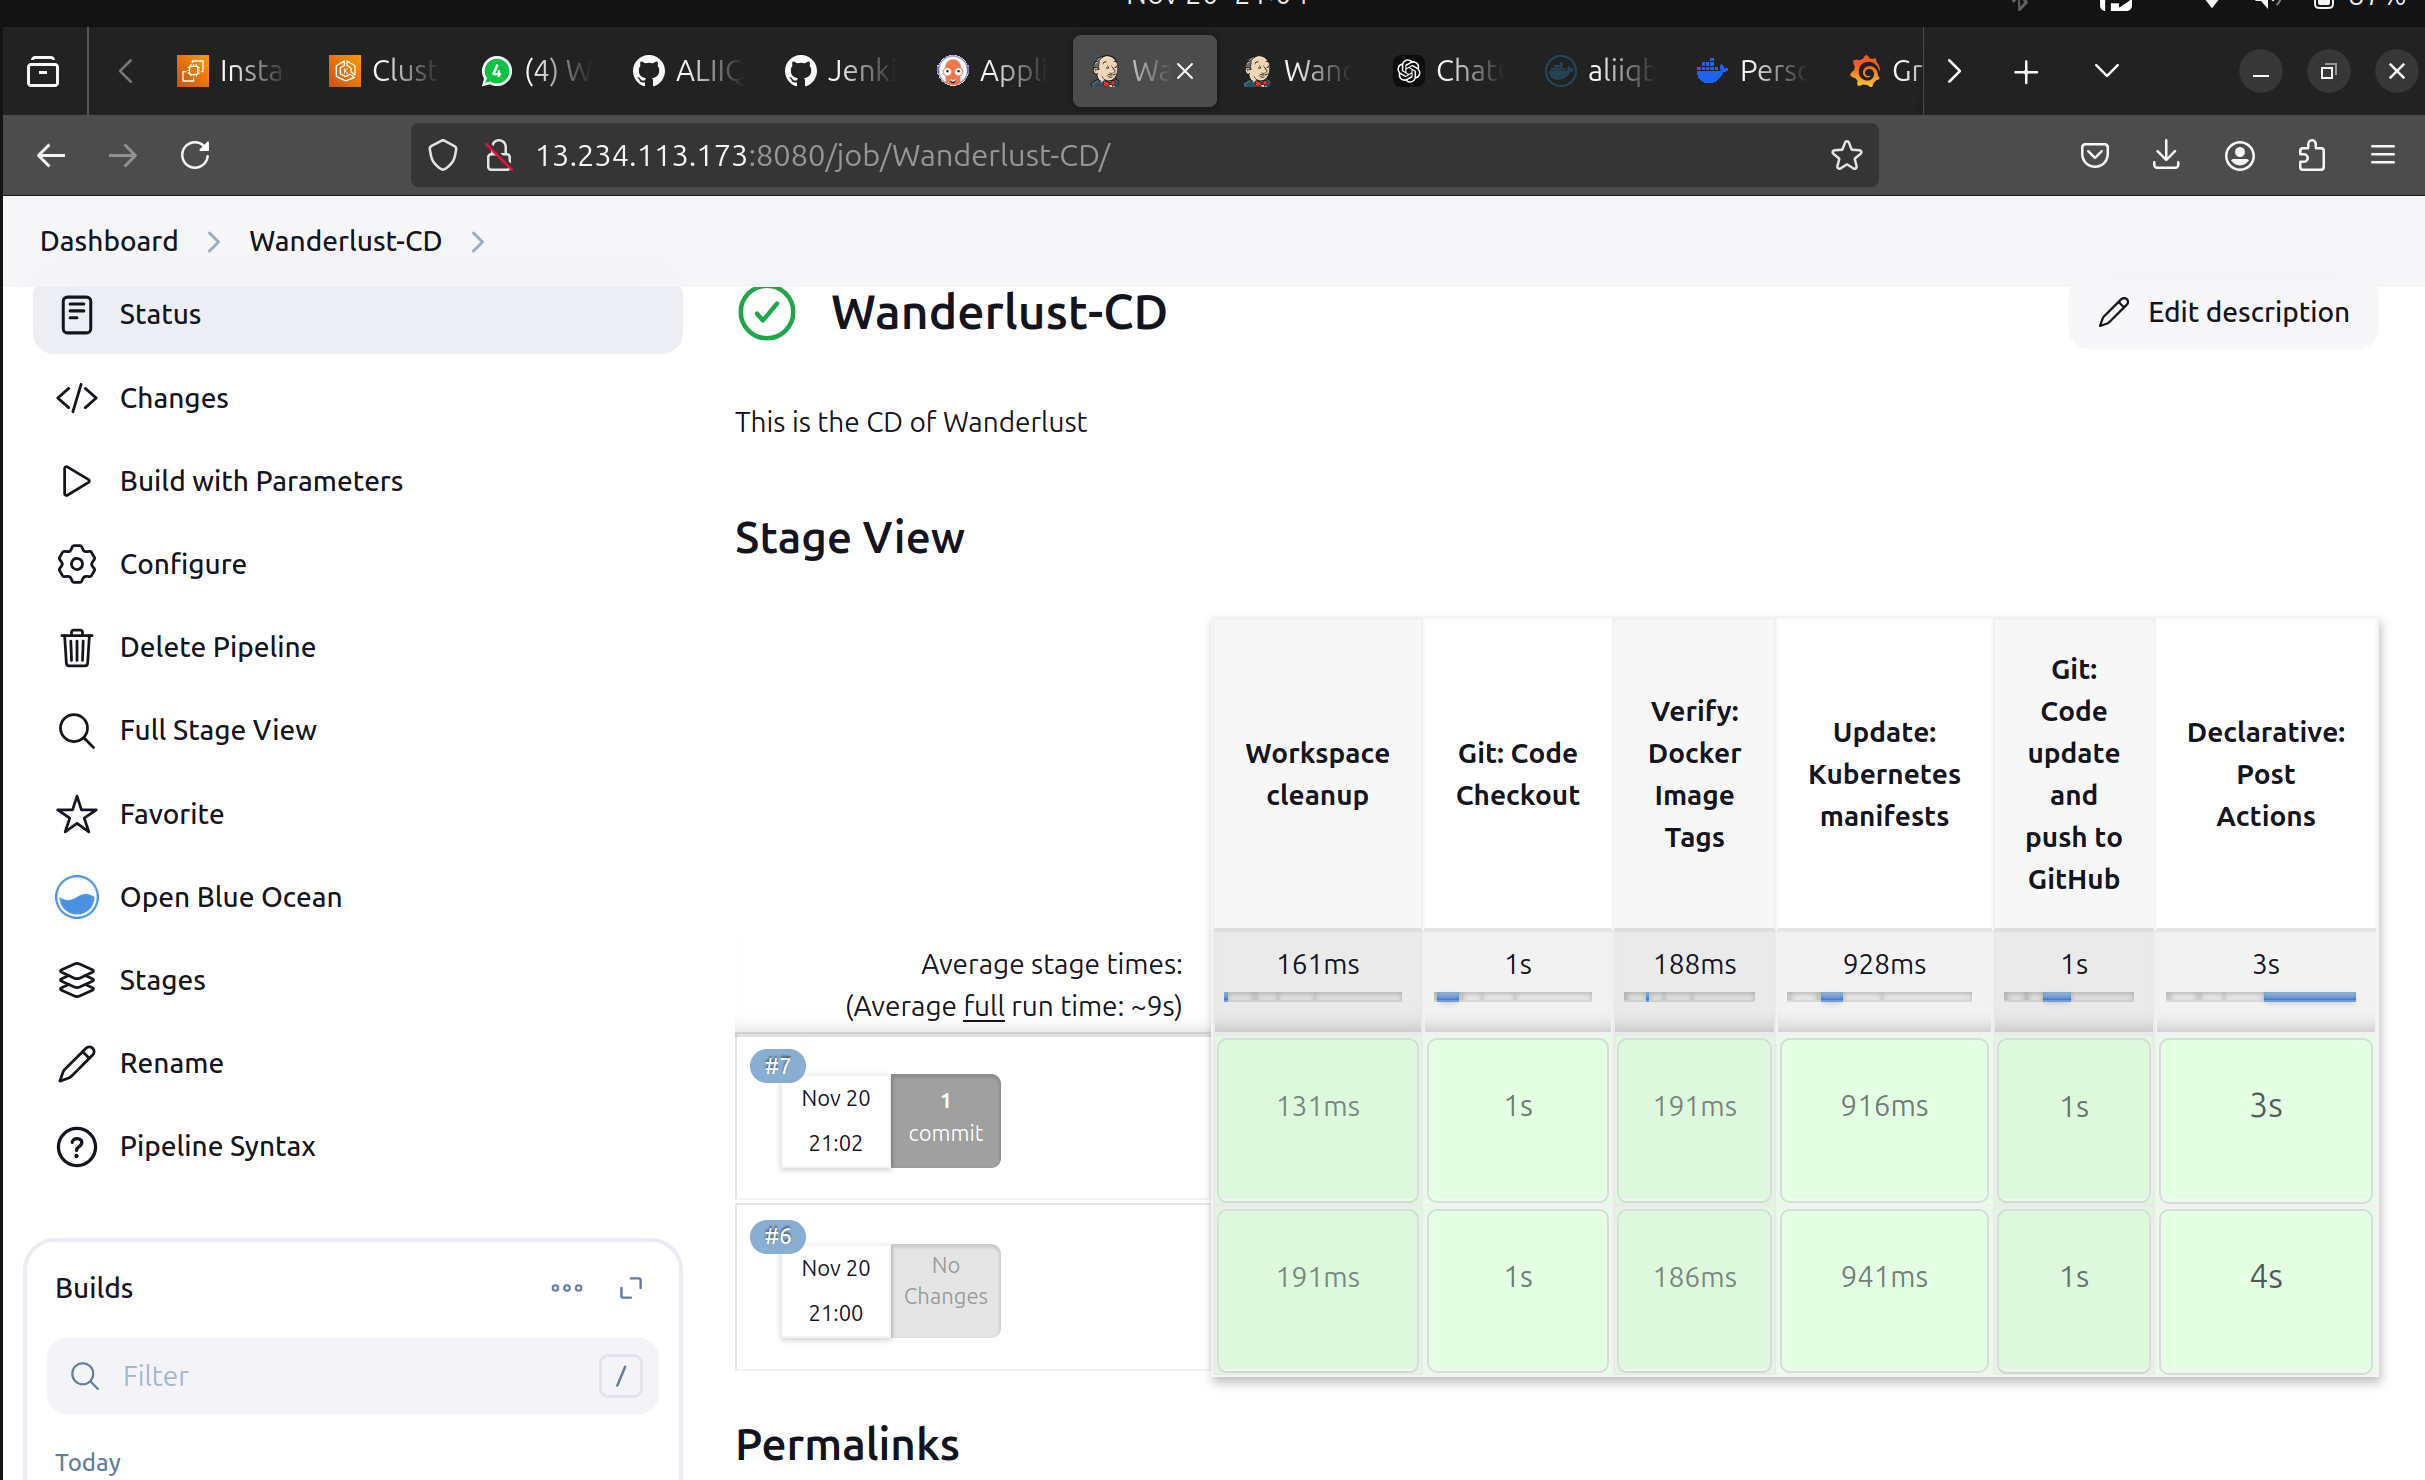
Create one more pipeline Wanderlust-CD.
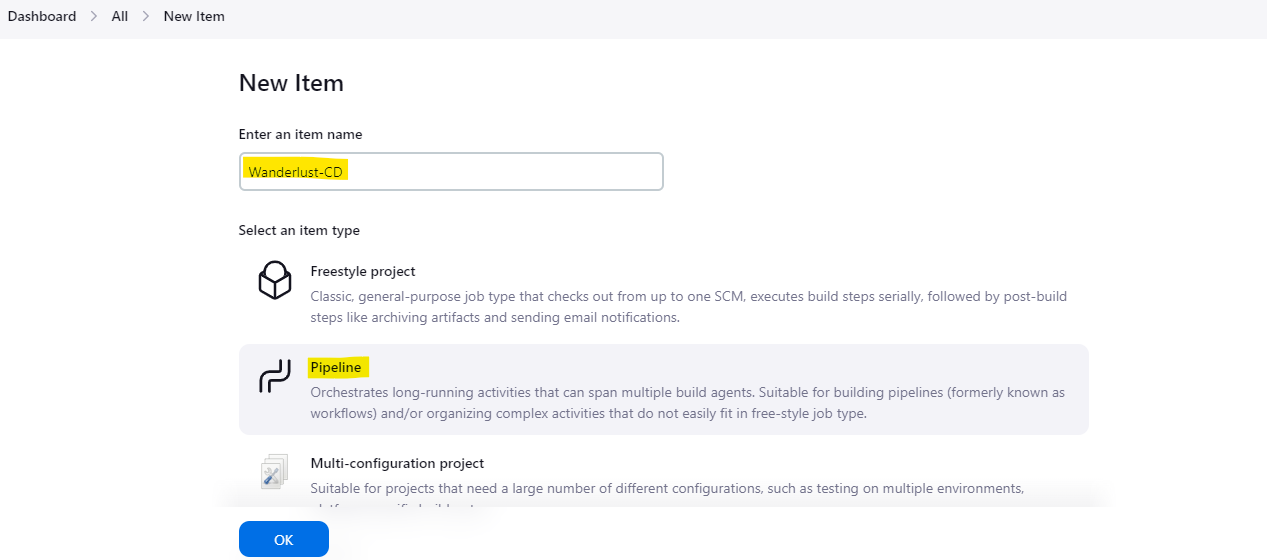
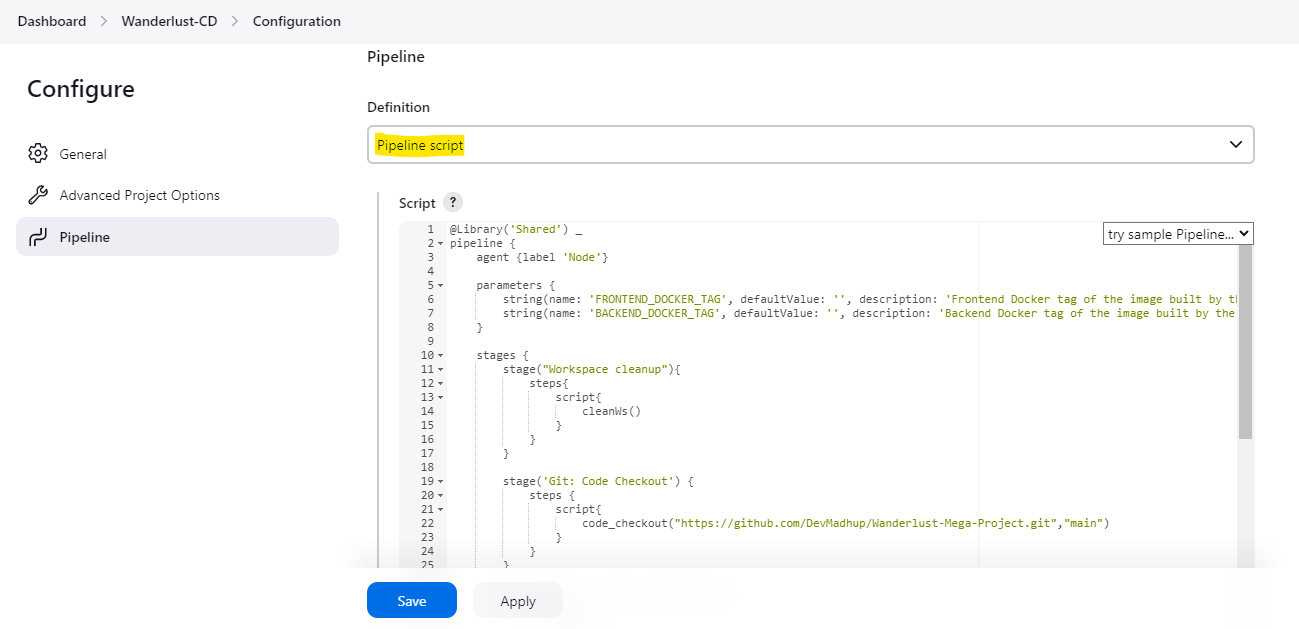
@Library('Shared') _
pipeline {
    agent {label 'Node'}

    parameters {
        string(name: 'FRONTEND_DOCKER_TAG', defaultValue: '', description: 'Frontend Docker tag of the image built by the CI job')
        string(name: 'BACKEND_DOCKER_TAG', defaultValue: '', description: 'Backend Docker tag of the image built by the CI job')
    }

    stages {
        stage("Workspace cleanup"){
            steps{
                script{
                    cleanWs()
                }
            }
        }

        stage('Git: Code Checkout') {
            steps {
                script{
                    code_checkout("https://github.com/LondheShubham153/Wanderlust-Mega-Project.git","main")
                }
            }
        }

        stage('Verify: Docker Image Tags') {
            steps {
                script{
                    echo "FRONTEND_DOCKER_TAG: ${params.FRONTEND_DOCKER_TAG}"
                    echo "BACKEND_DOCKER_TAG: ${params.BACKEND_DOCKER_TAG}"
                }
            }
        }


        stage("Update: Kubernetes manifests"){
            steps{
                script{
                    dir('kubernetes'){
                        sh """
                            sed -i -e s/wanderlust-backend-beta.*/wanderlust-backend-beta:${params.BACKEND_DOCKER_TAG}/g backend.yaml
                        """
                    }

                    dir('kubernetes'){
                        sh """
                            sed -i -e s/wanderlust-frontend-beta.*/wanderlust-frontend-beta:${params.FRONTEND_DOCKER_TAG}/g frontend.yaml
                        """
                    }

                }
            }
        }

        stage("Git: Code update and push to GitHub"){
            steps{
                script{
                    withCredentials([gitUsernamePassword(credentialsId: 'Github-cred', gitToolName: 'Default')]) {
                        sh '''
                        echo "Checking repository status: "
                        git status

                        echo "Adding changes to git: "
                        git add .

                        echo "Commiting changes: "
                        git commit -m "Updated environment variables"

                        echo "Pushing changes to github: "
                        git push https://github.com/LondheShubham153/Wanderlust-Mega-Project.git main
                    '''
                    }
                }
            }
        }
    }
  post {
        success {
            script {
                emailext attachLog: true,
                from: 'trainwithshubham@gmail.com',
                subject: "Wanderlust Application has been updated and deployed - '${currentBuild.result}'",
                body: """
                    <html>
                    <body>
                        <div style="background-color: #FFA07A; padding: 10px; margin-bottom: 10px;">
                            <p style="color: black; font-weight: bold;">Project: ${env.JOB_NAME}</p>
                        </div>
                        <div style="background-color: #90EE90; padding: 10px; margin-bottom: 10px;">
                            <p style="color: black; font-weight: bold;">Build Number: ${env.BUILD_NUMBER}</p>
                        </div>
                        <div style="background-color: #87CEEB; padding: 10px; margin-bottom: 10px;">
                            <p style="color: black; font-weight: bold;">URL: ${env.BUILD_URL}</p>
                        </div>
                    </body>
                    </html>
            """,
            to: 'trainwithshubham@gmail.com',
            mimeType: 'text/html'
            }
        }
      failure {
            script {
                emailext attachLog: true,
                from: 'trainwithshubham@gmail.com',
                subject: "Wanderlust Application build failed - '${currentBuild.result}'",
                body: """
                    <html>
                    <body>
                        <div style="background-color: #FFA07A; padding: 10px; margin-bottom: 10px;">
                            <p style="color: black; font-weight: bold;">Project: ${env.JOB_NAME}</p>
                        </div>
                        <div style="background-color: #90EE90; padding: 10px; margin-bottom: 10px;">
                            <p style="color: black; font-weight: bold;">Build Number: ${env.BUILD_NUMBER}</p>
                        </div>
                    </body>
                    </html>
            """,
            to: 'trainwithshubham@gmail.com',
            mimeType: 'text/html'
            }
        }
    }
}
Stage # 6
Helm chart
To monitor the EKS cluster, Kubernetes components, and workloads using Prometheus and Grafaana via HELM (on the Master machine)
Install Helm Chart
curl -fsSL -o get_helm.sh https://raw.githubusercontent.com/helm/helm/main/scripts/get-helm-3
chmod 700 get_helm.sh
./get_helm.sh
Add Helm Stable Charts for Your Local Client
helm repo add stable https://charts.helm.sh/stable
Add Prometheus Helm Repository
helm repo add prometheus-community https://prometheus-community.github.io/helm-charts
Create Prometheus Namespace
kubectl create namespace prometheus
kubectl get ns
Install Prometheus using Helm
helm install stable prometheus-community/kube-prometheus-stack -n prometheus
Verify prometheus installation
kubectl get pods -n prometheus
Check the services file (svc) of the Prometheus
kubectl get svc -n prometheus
Expose Prometheus and Grafana to the external world through Node Port
kubectl edit svc stable-kube-prometheus-sta-prometheus -n prometheus
Verify service
kubectl get svc -n prometheus
Now, let’s change the SVC file of the Grafana and expose it to the outer world.
kubectl edit svc stable-grafana -n prometheus
Check grafana service
kubectl get svc -n prometheus
Get a password for Grafana
kubectl get secret --namespace prometheus stable-grafana -o jsonpath="{.data.admin-password}" | base64 --decode ; echo
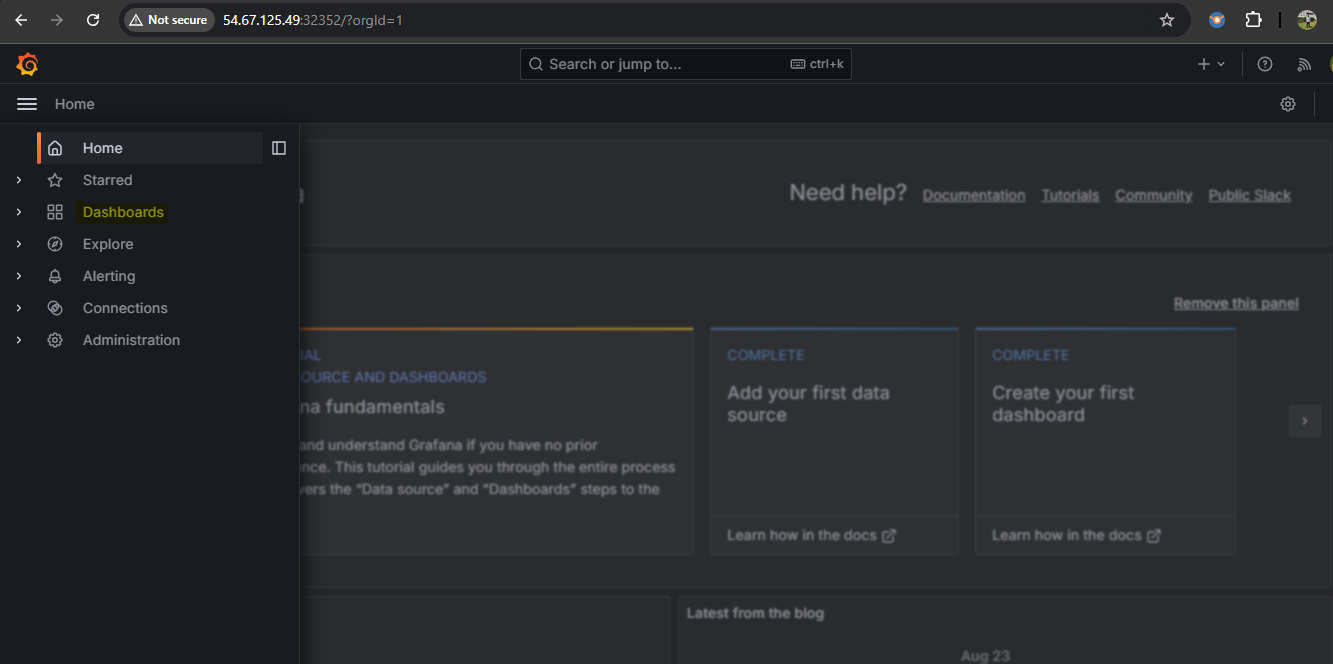
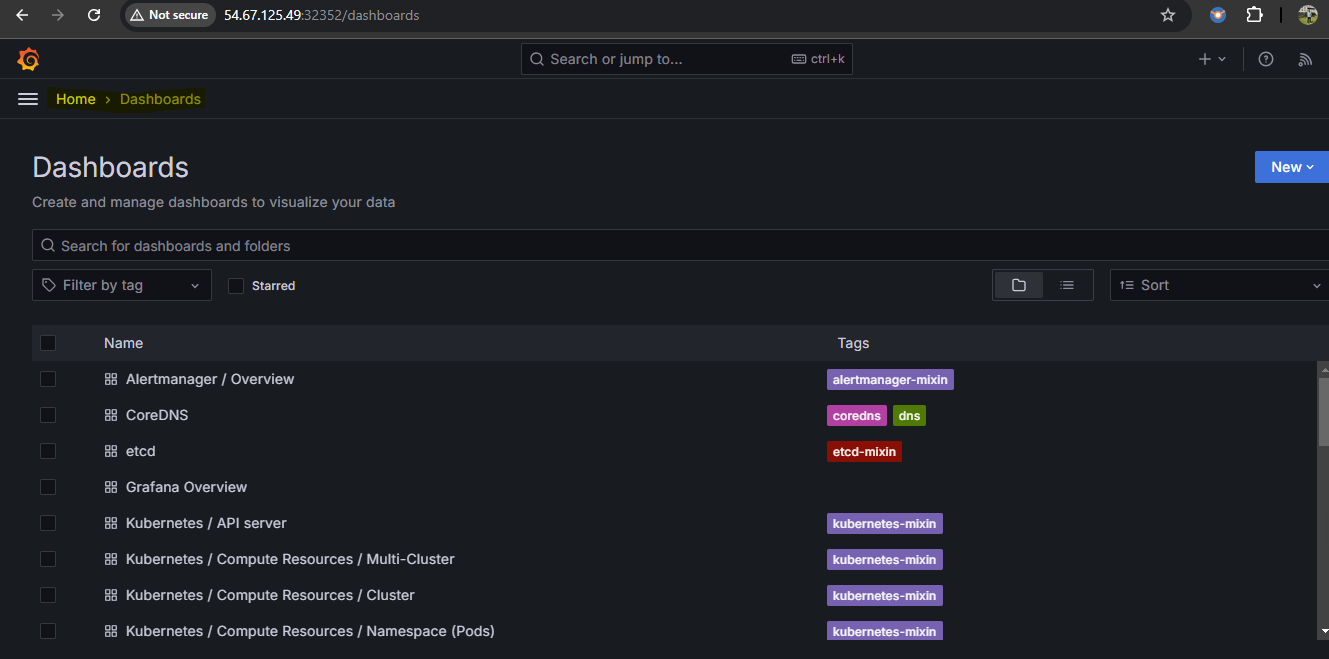
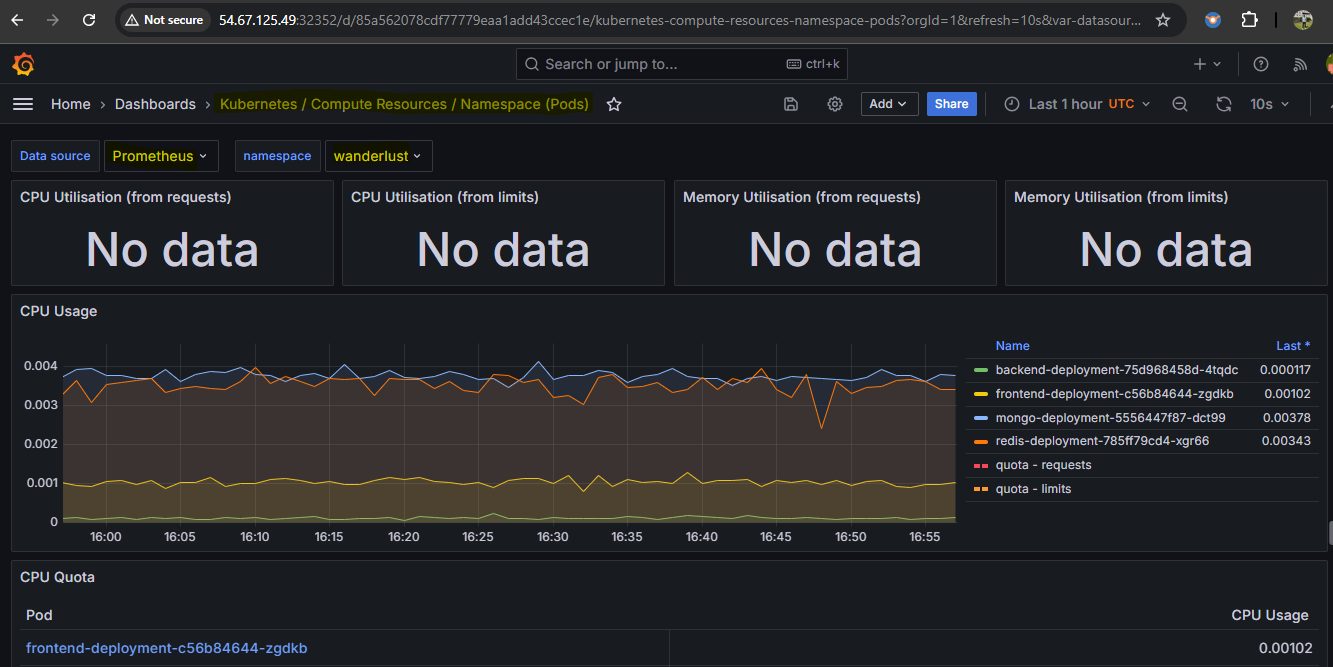
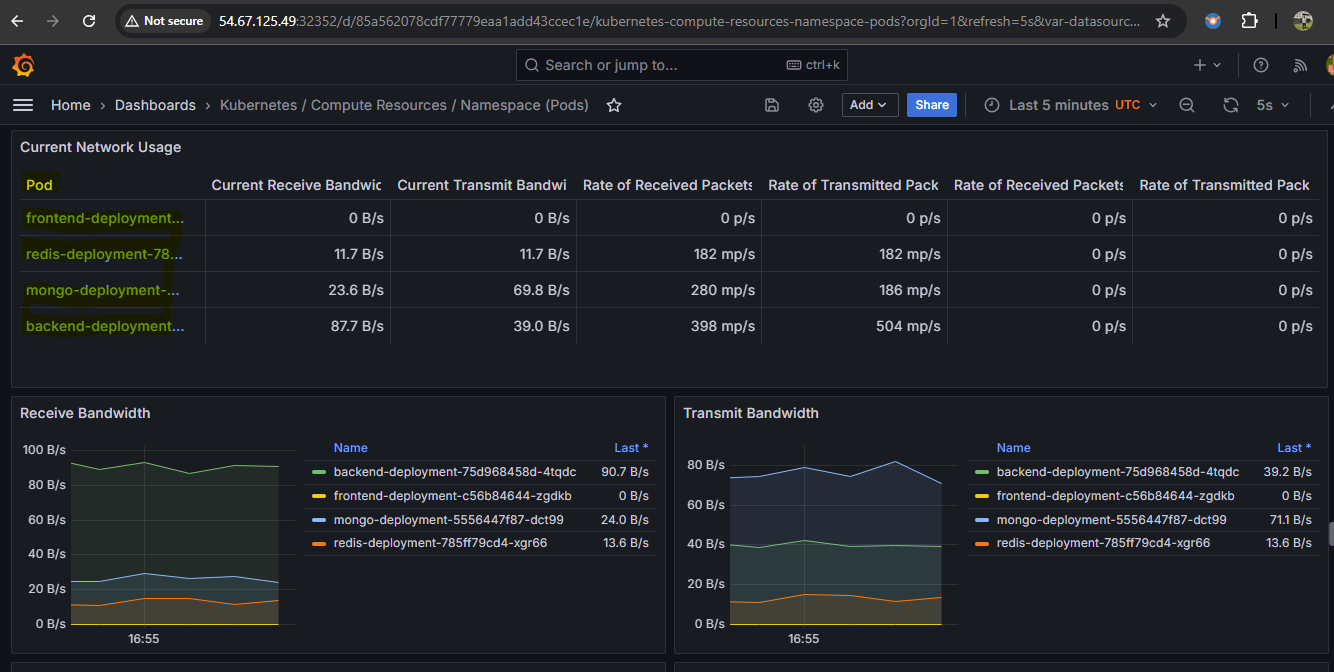
Now, view the Dashboard in Grafana
Subscribe to my newsletter
Read articles from Ali Iqbal directly inside your inbox. Subscribe to the newsletter, and don't miss out.
Written by
