Kubernetes Services: Understanding the Essentials + Deploy a Node.js App in Just 3 Minutes!
 Chetan Mohanrao Mohod
It is recommended to read this blog first: Click here before proceeding with this one, to avoid feeling overwhelmed.
What is Service?
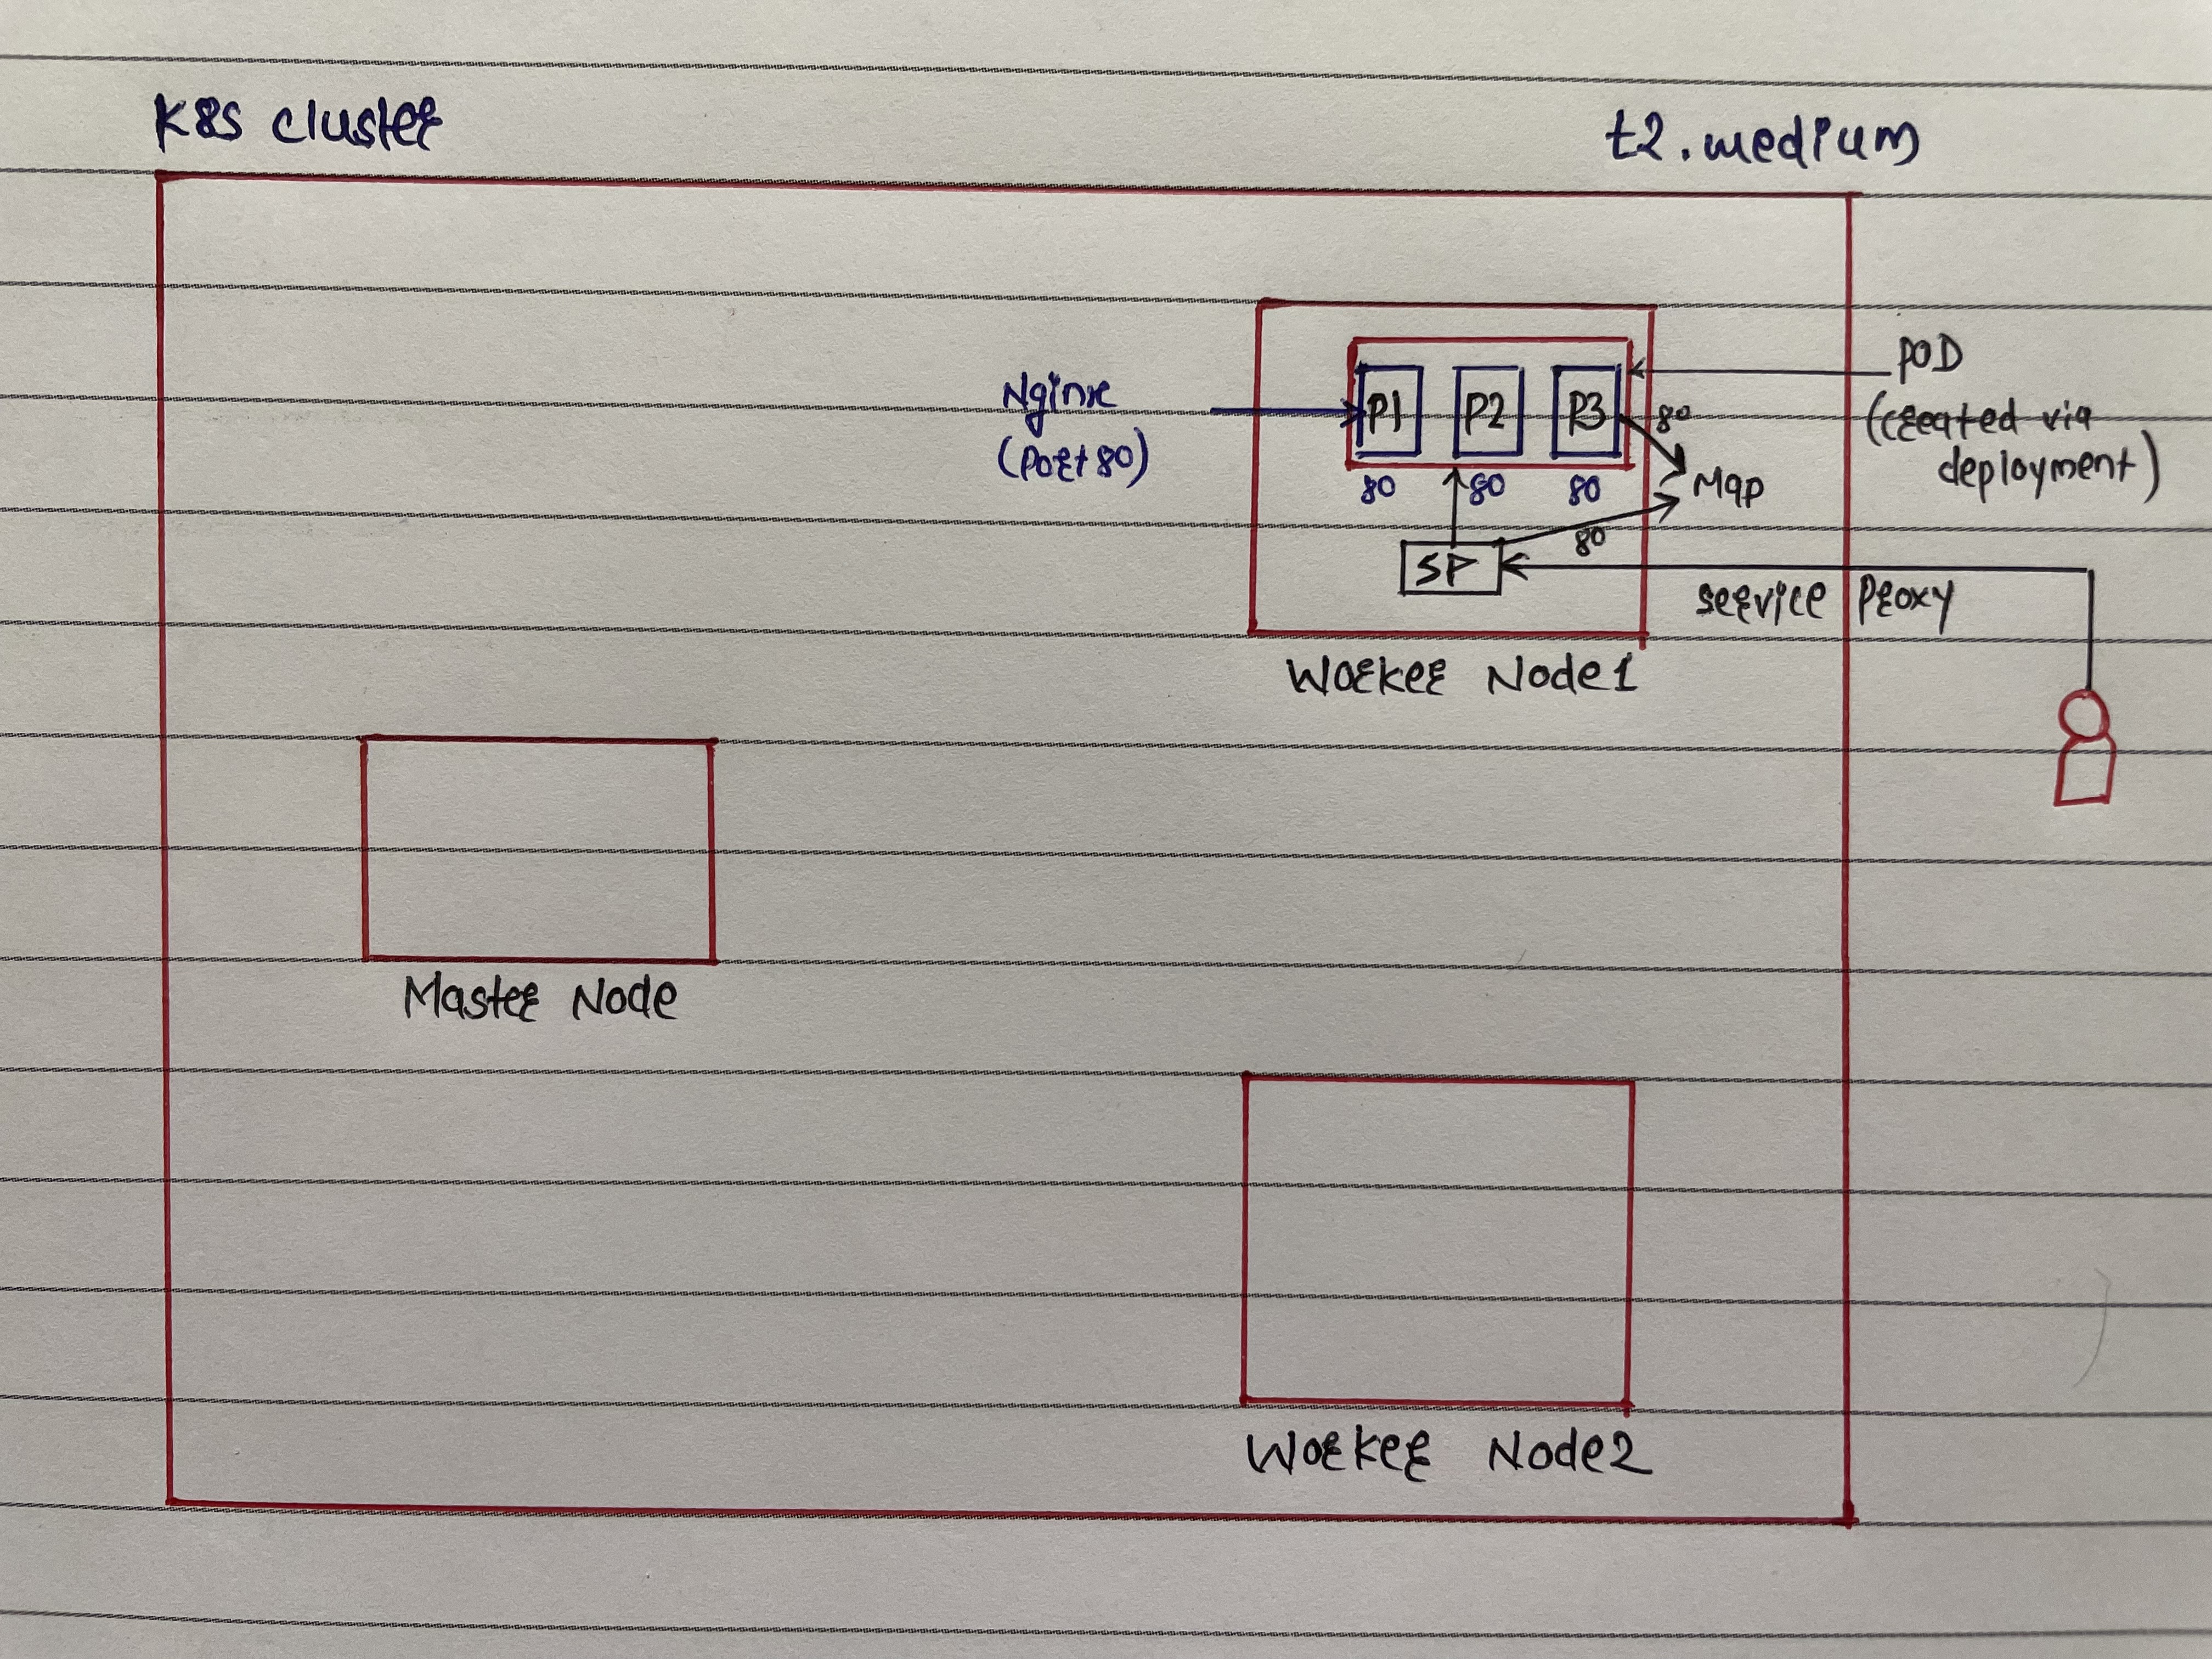
In a Kubernetes setup, we have three nodes: one Master and two Worker nodes, as illustrated in the diagram. When a user wants to access an nginx instance, they might wonder which specific instance they will connect to, given that there are three pods, each running nginx. The user always interacts with a Service proxy.

A Service is a resource that allows you to map the port number on your node to the port number on a container in your deployment.
A Service takes a port from an available pod and maps it through the service proxy, directing the user to that available pod.
Service Types: There are four types of services:
LoadBalancer: Typically used in cloud environments. Imagine a Load Balancer (LB) as a security guard at your office entrance. When you ask to meet someone (a pod named XYZ), the guard might say XYZ is not available because the LB doesn't know XYZ personally. This is why you need to map the deployment and service first.
NodePort: Generally used for local environments.
Cluster IP: The default type, used for internal communication within the cluster.
ExternalName: Maps a service to a DNS name.
If you don’t mention any service type, then it is called headless service.
How to create a service?
- To create a service, you need to start by creating a manifest file named
service.yml.
kind: Service
apiVersion: v1
metadata:
  name: nginx-service
  namespace: nginx

spec:
  selector:
    app: nginx
  ports:
    - protocol: TCP
      targetPort: 80     #It is POD port  (Port inside from POD ) (Service)
      port: 80           #Port which we want to map (Port in Service) (Host)
  type: NodePort         #Service Type (Because we're performing it on Local)
Why don't we use labels with selectors?
- This is because in
deployment.yml, we have already includedmatchLabels
- Now execute this
service.yml
kubectl apply -f service.yml
- List the services for our nginx
kubectl get service -n nginx

Why is our port 80 mapped to 31898?
When you want to get the
nodePortof a particular node, it falls within the range of 30000 to 32000. If you're running a cluster in Docker, it's fine not to specify a port, as it will automatically select a port from that range and map it to our port.If desired, you can specify the
nodePortin theservice.ymlfile as the third port and assign a value within the range of 30000 to 32000.
kind: Service
apiVersion: v1
metadata:
  name: nginx-service
  namespace: nginx

spec:
  selector:
    app: nginx
  ports:
    - protocol: TCP
      targetPort: 80 #It is POD port  (Port inside from POD )
      port: 80  #Port which we want to map (Port in Service)
      nodePort: 30001
  type: NodePort
- Now configure the file again and see the results:

Now if you want to go to the port on localhost, it won’t work because that port is running inside Docker, so it will work inside Docker.
Now we need to map a Docker container with an EC2 instance. We will use port-forwarding.
Port-Forwarding:
kubectl port-forward service/nginx-service -n nginx 80:80 --address=0.0.0.0 &
- If the above command does not forward our port, it may be due to a system permission issue. Use the following command to address system permissions:
sudo sysctl -w net.ipv4.ip_unprivileged_port_start=0
- This command will disable all ports set to 0. Port 80 is considered privileged, which is why it does not allow exposure by default. Since our EC2 instance is hosted on AWS, AWS restricts the mapping of privileged ports.
The output should appear as follows:

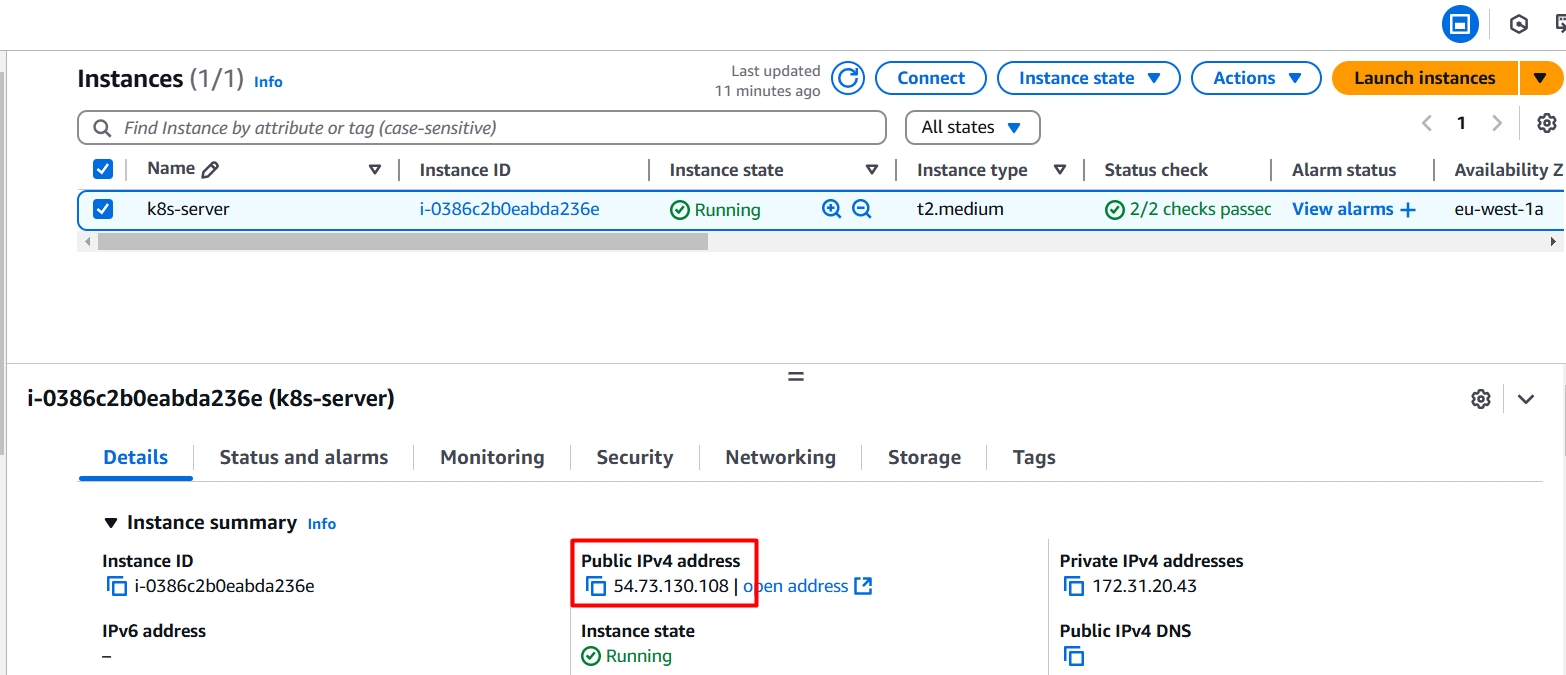
- Now you can take the public ip from your instance:

- And paste it into the browser : http://public_ip:80 and then below window will appear.

Deploy a Node.js app in just 3 minutes.
Steps
- Create a folder and copy the nginx directory into it:
mkdir nodejs && cp -r nginx/*.* nodejs
cd nodejs
- Now we are creating a Node.js app, so update the metadata in all the YAML files.
# vim namespace.yml
kind: Namespace
apiVersion: v1
metadata:
  name: nodejs
#vim pod.yml
kind: Pod
apiVersion: v1
metadata:
  name: nodejs-pod
  namespace: nodejs
  labels:
    app: nodejs
spec: #Spec inside the POD
  containers:
    - name: nodejs-container
      image: chetan0103/node-app:latest  #will be come from DockerHub
      ports:
        - containerPort: 8000
#vim deployment.yml
kind: Deployment
apiVersion: apps/v1
metadata:
  name: nodejs-deployment
  namespace: nodejs
  labels:
    app: nodejs
spec:
  replicas: 2
  selector:
    matchLabels:
      app: nodejs
  template:
    metadata:
      labels:
        app: nodejs

    spec:
      containers:
      - name: nodejs-container
        image: nodejs
        ports:
        - containerPort: 8000
#vim service.yml
kind: Service
apiVersion: v1
metadata:
  name: nodejs-service
  namespace: nodejs

spec:
  selector:
    app: nodejs
  ports:
    - protocol: TCP
      targetPort: 8000
      port: 8000
  type: NodePort
- Now execute all the components:
kubectl apply -f .

#Or use below command, because with deployment we can create a pod

kubectl apply -f namespace.yml -f deployment.yml -f service.yml
- To proceed, let's execute the port-forward command.
kubectl port-forward service/nodejs-service -n nodejs 8000:8000 --address=0.0.0.0
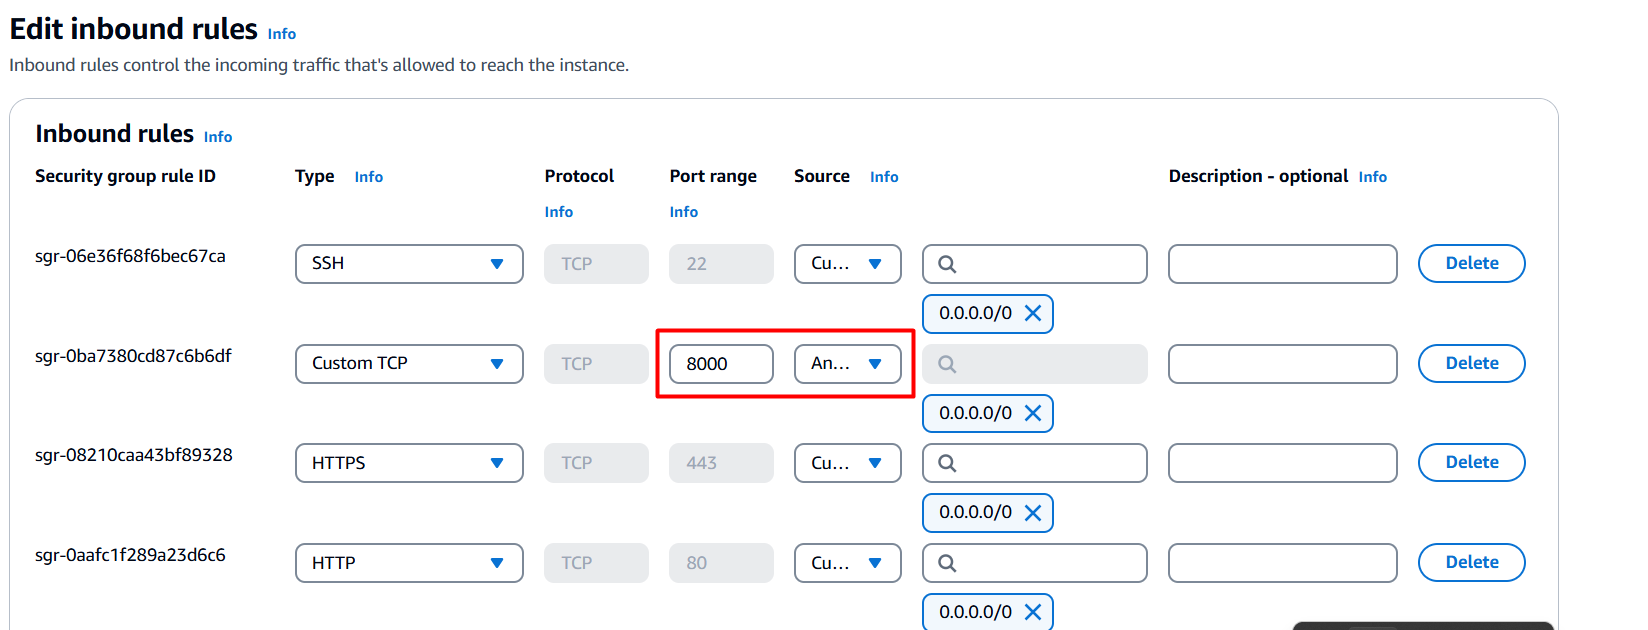
- Access the EC2 instance and update the inbound rules to allow traffic on port 8000.

- Now, take the public IP of the EC2 instance and enter it in your browser, using port 8000 (http://public_ip:8000).

Now you can deploy any application on Kubernetes by simply navigating to the deployment configuration and updating the image name. That's all it takes.
Deploy my-not-app
- set Image:
kubectl set image deployment/nodejs-deployment nodejs-container=chetan0103/my-not-app:latest -n nodejs
- run port forwarding command:
kubectl port-forward service/nodejs-service -n nodejs 8000:8000 --address=0.0.0.0
You can go to browser and see the results.

However, it is advisable not to use the set image command, as it can occasionally disrupt the port connection.
It is recommended to always use deployment.yml to update the image.
Happy Learning :)
Chetan Mohod
Subscribe to my newsletter
Read articles from Chetan Mohanrao Mohod directly inside your inbox. Subscribe to the newsletter, and don't miss out.
Written by

Chetan Mohanrao Mohod
Chetan Mohanrao Mohod
DevOps Engineer focused on automating workflows, optimizing infrastructure, and building scalable efficient solutions.