Protect, Test, Recover and Reverse: The HCX DR Playbook
 Mohammed Abdul Wakeel
VMware HCX (Hybrid Cloud Extension) is a game-changer for organizations seeking efficient disaster recovery (DR). With HCX, businesses can protect critical workloads, simulate recovery scenarios, and reverse replication for true operational continuity. In this blog, we’ll focus on the key processes of Protect, Test, Recover, and Reverse within HCX, offering a practical guide to mastering DR replication.
What is VMware HCX?
VMware HCX enables businesses to extend, migrate, and protect workloads across hybrid cloud environments with minimal downtime. Its capabilities are ideal for managing disaster recovery, reducing complexity, and ensuring operational continuity.
Advantages of HCX
Seamless Integration: Simplifies hybrid cloud operations by connecting on-premises and cloud environments.
Disaster Recovery Readiness: Offers automated VM protection and replication with consistent IP management during DR drills and actual recoveries.
Network Optimization: Provides WAN optimization, compression, and encryption to enhance network performance.
Flexibility: Supports multiple hypervisors, providing the ability to migrate VMs regardless of underlying infrastructure.
Consistency in IP Management: Retains the same IP for VMs across DR failovers and recoveries, eliminating reconfiguration efforts.
Ease of Management: Centralized management through HCX Manager and HCX Connector simplifies DR operations.
Prerequisites
Before proceeding, ensure the following:
Connection Established: The on-premises and DR sites must be connected via compute profiles, network profiles, and a service mesh.
HCX Updated: Ensure HCX is updated to the latest version to avoid potential issues.
Why HCX for Disaster Recovery?
HCX empowers organizations to maintain uptime and operational efficiency during disasters, providing the following benefits:
Simplified DR Replication: Enables automated protection and recovery of VMs with minimal configuration.
IP Retention: Ensures the same IPs are retained for VMs across both source and DR sites during failovers.
Network Optimization: Uses WAN optimization, compression, and encryption for secure and efficient replication.
Testing Without Impact: Simulates disaster scenarios with test recoveries, allowing seamless DR validation.
VMware HCX provides various operations for fine control and granularity in replication policies. Available Operations include:
Reverse – After a disaster occurs, reverse helps make Site B the source site and Site A, where the protected VM now lives.
Pause – Pause the current replication policy associated with the VM selected.
Resume - Resume the current replication policy associated with the VM selected.
Remove - Remove the current replication policy associated with the VM selected.
Sync Now – Out of bound sync source VM to the protected VM.
This guide covers the following replication scenarios:
Protect a VM or a group of VMs.
Complete a Test Recover of a VM or a group of VMs.
Recover a VM or a group of VMs.
Reverse Protection of a VM or a group of VMs.
Important
Although part of VMware HCX, VMware HCX Disaster Recovery (DR) is not recommended for large deployments. The disaster recovery orchestration is 100% manual, and Azure VMware Solution currently doesn't have runbooks or features to support manual VMware HCX DR failover. For enterprise-class disaster recovery, refer to VMware Site Recovery Manager (SRM) or VMware Business Continuity and Disaster Recovery (BCDR) solutions.
The Four Pillars of HCX DR: Protect, Test, Recover and Reverse
Step 1: Protect VMs
Protection is the first step in enabling DR for your VMs. Here's how to do it:
Log in to HCX Connector on the on-premises side and verify the Site Pairing is active.
Navigate to the Disaster Recovery section and click on Protect VMS.

Select the VM(s) you want to protect, then configure these options:

Compression: Reduces bandwidth usage during replication.
Quiescence: Ensures storage consistency by syncing data before replication.
RPO (Recovery Point Objective): Defines the time interval for acceptable data loss (e.g., 15 minutes).
Snapshot Interval & Count: Captures VM states at regular intervals and determines how many to retain.
Click Finish to initiate protection.
🟢 Tip: A green shield icon in HCX dashboards indicates successful protection, while a caution icon means the VM is protected but not tested yet.

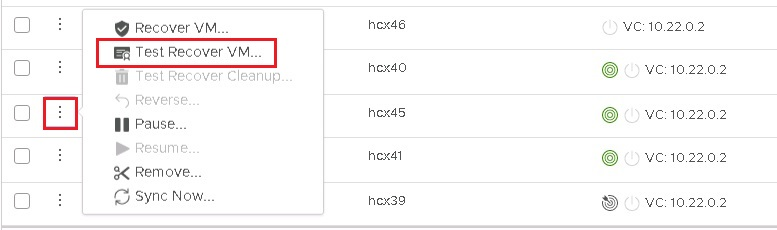
Step 2: Test Recover VMs
Testing Recoveries ensures readiness for a disaster scenario without impacting live workloads.
Log in to HCX Manager (DR) and perform a Test Recovery VM. This activates the VM at the DR site without affecting the on-premises VM.
Validate the DR VM functionality, then execute a Test Clean Up to roll back changes. This clears the caution icon, confirming the test was successful.

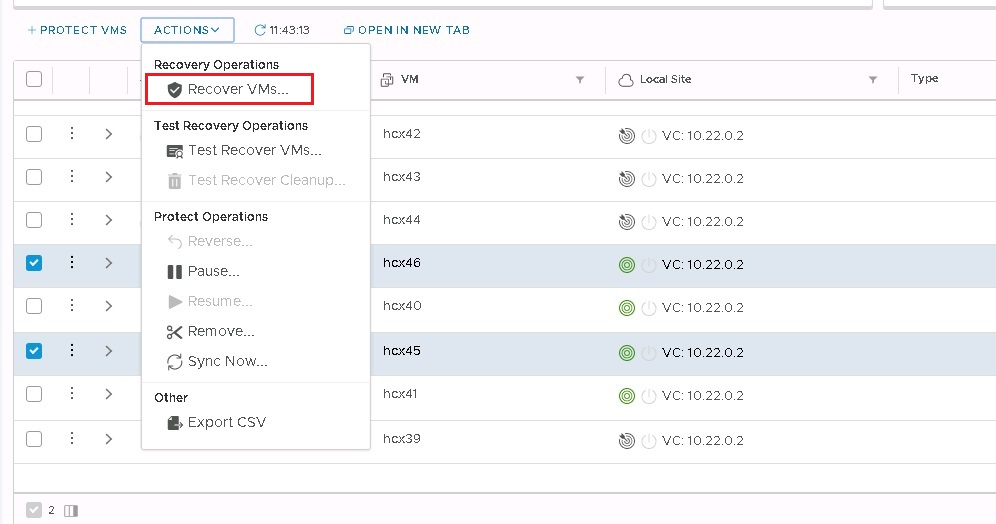
Step 3: Recovering VMs During Disaster:
If a disaster occurs, the VMs go down as expected on the on-premises site. If you doing a DR drill then simple shutdown the VM on the on-prem side.
In HCX Manager (DR), a red lightning icon will appear, signaling that the VM is ready for recovery.

Click the three dots next to the VM and select Recover VMs.
After recovery, check the VM in vCenter:
If the IP is missing, verify the network connection.
If required, configure the VM to assign IP using DHCP or assign it manually.
Step 4: Reverse VMs
Reverse replication is crucial for ensuring that the DR VM becomes the source for syncing changes back to the original site.
Post-recovery, click on the three dots in HCX Manager (DR) and select Reverse.

Note: Ensure the original VMs on the source site are powered off before you start the reverse replication. The operation fails if the VMs aren't powered off.
- This action designates the DR VM as the primary source, ensuring any changes made are replicated back to the on-premises VM when it is restored.
Step 5: Restore VMs Back to On-Premises
Once the on-premises site is operational, VMs must be restored to their original location.
Use HCX Connector to perform a Test Recovery, Test Clean Up, and Recovery back to the on-premises site.
Ensure the DR VM is turned off during recovery.
Post-recovery, click Reverse to set the on-premises VM as the source.
The HCX Edge in DR Scenarios
IP Retention Across Sites: HCX retains the same IP address for VMs during DR drills and failovers, reducing the need for reconfiguration.
Automated Syncing: Protects workloads and maintains consistent snapshots with minimal manual effort.
Non-Disruptive Testing: Test recoveries without impacting live workloads, ensuring preparedness for real disasters.
Flexible RPOs: Tailor recovery objectives to meet business needs while optimizing storage and performance.
Conclusion
With HCX, organizations can simplify and streamline disaster recovery processes, ensuring critical workloads are protected, recoverable, and resilient. Whether you’re performing a DR drill or responding to an actual disaster, HCX’s Protect, Test, Recover, and Reverse functionalities provide a robust foundation for maintaining operational continuity.
Subscribe to my newsletter
Read articles from Mohammed Abdul Wakeel directly inside your inbox. Subscribe to the newsletter, and don't miss out.
Written by