Scaling in Kubernetes: A Deep Dive into HPA and VPA
 Shaik Mustafa
AutoScaling in Deployment:
As you know, to run the application we need CPU and memory. Sometimes, there will be a chance where the CPU gets loaded, and this might fail the server or affect the application. Now, we can’t afford the downtime of the applications. To avoid this, we need to increase the number of servers or increase the capacity of servers.
Let’s understand with a real-time example:
Just take an example we have some OTT platforms like Netflix, Prime, Aha & Hotstar. If any web show or movie is coming on the platform the audience is eagerly waiting for that. Then, the OTT platform can’t handle the lot of users that might crash the application. This will lead to a loss of business and the OTT platform can’t afford this business loss. Now, they have two options to solve this.
First, The Platform knows that they need a particular amount of servers such as 100. So, they can buy those servers forever but in this situation, when the load decreases then the other servers will become unused. Now, if the server is unused, still they have paid for those servers which is not a cost-effective method.
Second, The Platform doesn’t know when the load will increase. So, they have one option which is autoscaling in which when the CPU utilization crosses a particular number, it creates new servers. So, the platform can handle loads easily which is very cost effective as well.
Types of Autoscaling
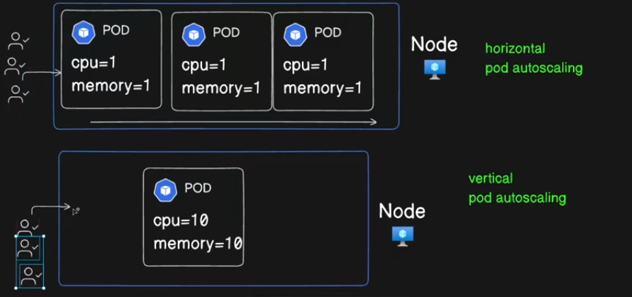
Horizontal Pod AutoScaling: In this type of scaling, the number of servers will increase according to CPU utilization. In this, you define the minimum number of servers, maximum number of servers, and CPU utilization. If the CPU utilization crosses more than 50% then, it will add the one server automatically.
Vertical Pod AutoScaling: In this type of scaling, the server will remain the same in numbers but the server’s configuration will increase such as from 4GB RAM to 8GM RAM, and the same with the other configurations. But this is not cost-effective and business-effective. So, we use Horizontal Pod AutoScaling.

Key Features of Horizontal Pod AutoScaler:
By default, Kubernetes does not provide AutoScaling. If you need AutoScaling, then you have to create hpa(Horizontal Pod AutoScaling) and vpa(Vertical Pod AutoScaling) objects.
Kubernetes supports the autoscaling of the pods based on Observed CPU Utilization.
Scaling only supports Scalable objects like Controller, deployment, or ReplicaSet.
HPA is implemented as a Kubernetes API resource and a controller.
The Controller periodically adjusts the number of replicas in a replication controller or deployment to match the observed average CPU utilization to the target specified in the manifest file or command.
IMPLEMENTING HPA (Horizontal Pod Autoscaler):
ONCE CLUSTER IS READY, INSTALL METRIC SERVER
kubectl apply -f https://github.com/kubernetes-sigs/metrics-server/releases/latest/download/components.yaml
Verify that metrics-server is running:
kubectl get deployment metrics-server -n kube-system
Deployment file:
apiVersion: apps/v1
kind: Deployment
metadata:
  name: nginx-deployment
spec:
  replicas: 1
  selector:
    matchLabels:
      app: nginx
  template:
    metadata:
      labels:
        app: nginx
    spec:
      containers:
      - name: nginx
        image: shaikmustafa/netflix
        ports:
        - containerPort: 80
        resources:
          requests:
            cpu: "100m"
          limits:
            cpu: "500m"
Apply the file:
kubectl create -f deployment.yml
HPA file:
apiVersion: autoscaling/v2
kind: HorizontalPodAutoscaler
metadata:
  name: nginx-hpa
spec:
  scaleTargetRef:
    apiVersion: apps/v1
    kind: Deployment
    name: nginx-deployment
  minReplicas: 1
  maxReplicas: 5
  metrics:
  - type: Resource
    resource:
      name: cpu
      target:
        type: Utilization
        averageUtilization: 50  # Target 50% CPU utilization
Apply the file:
kubectl apply -f my-hpa.yml
To see the HPA:
kubectl get hpa
TEST HPA:
kubectl exec -it <nginx-pod-name> -- bash
Install stress package on pod:
apt-get update && apt-get install stress -y
command to increase load on pods:
stress --cpu 2 --timeout 300
OPEN ANOTHER TERMINAL and perform to get the logs:
kubectl get hpa -w
Detailed information about a specific HPA:
kubectl describe hpa nginx-app
Modify the scaling range or target:
kubectl edit hpa nginx-app
Remove a specific HPA:
kubectl delete hpa nginx-app
Delete all HPAs in the namespace:
kubectl delete hpa --all
Check HPA scaling events:
kubectl get events --namespace <namespace>
IMPLEMENTING VPA (Vertical Pod Autoscaler):
Vertical Pod Autoscaling adjusts the resource requests and limits of a pod based on its current usage. Unlike HPA, which scales the number of pods, VPA resizes the resources allocated to a single pod.
Example: Imagine a pod initially configured with 1 CPU and 1GB of memory. If it starts using significantly more resources due to increased demand, VPA will adjust the pod’s resource allocation to 2 CPUs and 4GB of memory. The pod will be restarted with these new settings to accommodate the increased load.
1. Purpose:
- VPA adjusts the CPU and memory resources allocated to individual pods based on their usage patterns, without changing the number of pod replicas.
2. How It Works:
Resource Monitoring: VPA monitors resource usage of pods over time and makes recommendations or applies changes to the pod resource requests and limits.
Scaling Algorithm: It uses historical data to predict future resource needs and adjusts the pod’s resource requests and limits accordingly.
3. Configuration:
Target Resource Usage: Define resource utilization targets for CPU and memory.
Update Policy: Configure whether VPA should automatically apply resource recommendations or only provide suggestions.
VPA YAML FILE:
apiVersion: autoscaling.k8s.io/v1
kind: VerticalPodAutoscaler
metadata:
  name: my-vpa
spec:
  targetRef:
    apiVersion: apps/v1
    kind: Deployment
    name: my-deployment
  updatePolicy:
    updateMode: "Auto" # or "Off" to only get recommendations
Horizontal vs. Vertical Auto-Scaling
Horizontal Auto-Scaling: Adds or removes pod replicas based on load. It’s useful when you need to handle increased traffic by scaling out your application.
Vertical Auto-Scaling: Adjusts the resources of existing pods. It’s beneficial when the resource needs of a pod change over time but doesn’t require adding more replicas.
Additional Auto-Scaling Concepts:
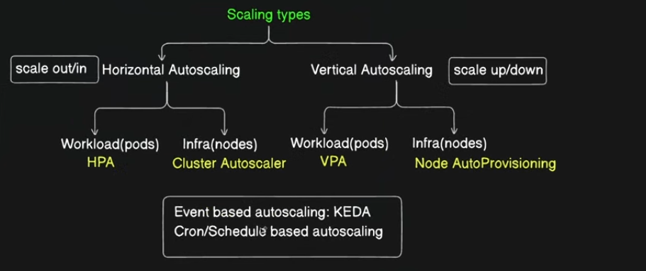
Cluster Autoscaler
The Cluster Autoscaler helps adjust the number of nodes in a Kubernetes cluster based on the needs of your workloads. If your workloads need more resources, it adds more nodes, and if resources are underused, it removes nodes. It works together with HPA and VPA to ensure your cluster has the right resources.
Event-Based Autoscaling
Event-based autoscaling reacts to specific events or conditions, like a spike in errors. Tools such as KEDA (Kubernetes Event-driven Autoscaler) can be used to automatically adjust resources based on these events.
Scheduled Autoscaling
With scheduled autoscaling, you can set up scaling actions based on time. For example, you can increase resources during busy hours and reduce them when demand is lower, helping to save resources during off-peak times.
Conclusion
Using autoscaling tools like HPA and VPA in Kubernetes can improve your application’s performance and help you use resources more efficiently. In addition to HPA and VPA, tools like the Cluster Autoscaler and event-based autoscaling can further help optimize your cluster. By understanding and using these tools, you can better manage your Kubernetes environment and ensure your applications run smoothly.
If you enjoy stories that help you learn, live, and work better, consider subscribing. If this article provided you with value, please support my work — only if you can afford it. You can also connect with me on Linkedin. Thank you!
Subscribe to my newsletter
Read articles from Shaik Mustafa directly inside your inbox. Subscribe to the newsletter, and don't miss out.
Written by