How to set up a self-hosted Linux server from scratch?
 Kevin Naidoo
I often come across people on Reddit and other places complaining about Vercel overcharging them for spikes in traffic and worried about the cost of scaling.
Vercel is a great platform, it works and is convenient. Most developers hate dealing with servers and are sometimes scared of touching Linux, so it makes sense to outsource this aspect to DevOps specialists and just focus on coding.
This approach works well initially, but as you grow, costs can escalate, sometimes exponentially! So why not just roll out your own servers? It might be a few hours of work SSH hardening and setting up, but once it’s running, these servers can go for years without the need for any additional maintenance.
If you want to go down the self-hosted route but don’t know where to start, then this article is perfect for you. I will go through it step-by-step.
Note: This tutorial assumes you using Ubuntu Server for your instances. Debian might work as well.
Understanding the costs
Before we even think about setting up a server, let’s talk about the costs. When you host with PaaS providers like Vercel, they usually charge you for storage and compute separately.
You, therefore, will pay for how much memory your application consumes, and how long it runs for, plus any storage you use. For a low-traffic site, this can be really affordable because when you have little to no requests, your costs are relatively negligible.
A VPS/dedicated server on the other hand tends to come with a fixed cost, I use Hetzner, thus I will base my figures on their current pricing but should be similar to other hosting companies such as Digital Ocean or AWS.
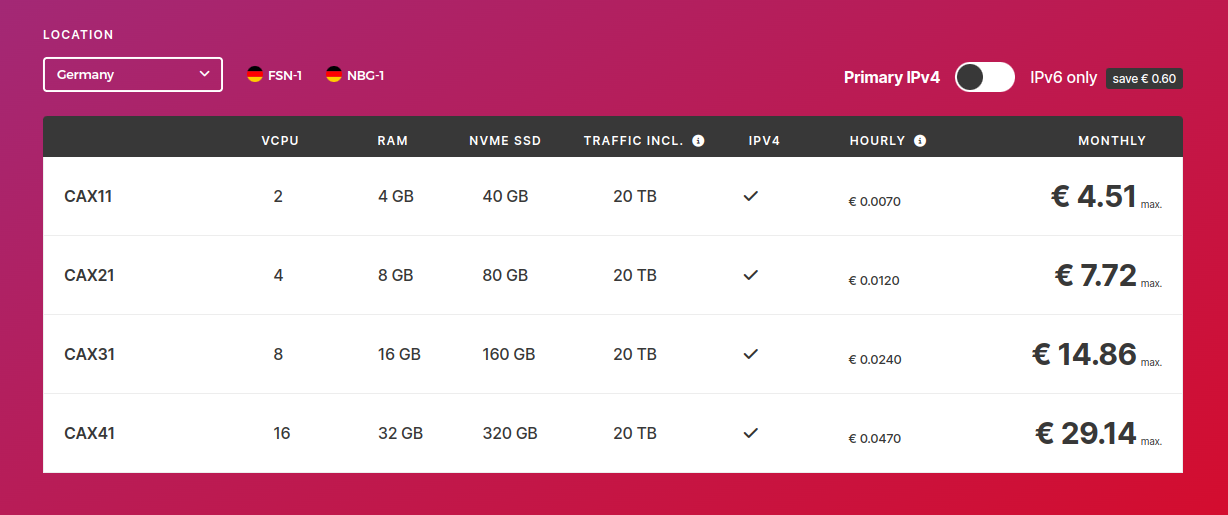
On Hetzner, you can get decently sized VPS servers for (Not sponsored, I use them personally for my sites):

With a VPS instance, you get everything you need including network traffic, disk space, and usually better RAM and CPU allocations. In addition, you have full control of your instance and can run anything you desire.
The only caveat is that VPS providers do limit your traffic allocation per month, so if you exceed 20TB in one month (in the Hetzner case above), you’ll pay per GIG for the extra usage.
Realistically though, if you are getting more than 20 TBs of traffic, these VPS servers are still going to be way cheaper than something like Vercel.
Let’s learn some basic Nano
I am sorry, that this may seem oddly misplaced in the context of this article, but I wanted to get it out the gate as quickly as possible. Linux uses config files for nearly every application, so a basic understanding of terminal-based text editors is essential. If you are already familiar with Nano, Vi, VIM, etc.… you can safely skip this section.
I can’t remember if it comes pre-installed with Ubuntu, but if not simply run:
apt update
apt install nano
Nano commands:
nano file_name - This will open the specified file path in the editor.
Arrow keys to move up or down, or left or right in the editor.
“ctrl+o” to save any changes.
“ctrl+x” to exit.
“ctrl+/” go to any line number e.g. 10
“ctrl+c” cancels an operation.
“ctrl+w” search through the file.
if you use: “nano +5 file_name”, it’ll open the file and move the cursor to the 5th line.
There you go, simple, right? At a bare minimum, you only need to know “ctrl+o” and “ctrl+x” to edit, save, and exit.
Initial setup
The first thing you want to do is to generate SSH keys, this is a much more secure way of accessing your server compared to regular passwords. On most terminals, you can run:
ℹ️ SSH Keys are a pair of long encrypted "secret codes" i.e. a private key and public key. These are much more secure and harder to crack compared to regular old passwords. The server will keep a copy of your public key, and match that against the private key you send when trying to SSH into the server, if there are any discrepancies, that connection will be automatically denied.
ssh-keygen -t rsa -b 4096
The above command will generate a private and public key pair. You will need to copy the “.pub” file’s contents and paste it into the server’s “~/.ssh/authorized_keys” file, most providers offer a simple GUI to do this.
ℹ️ ~/ is just a shortcut for /home/username or the home folder for the currently logged in user on the Linux terminal.
On Hetzner, you can upload this key under this section when creating a server (I blurbed out my key names for privacy):

Finally, once the server has been created, you will get a public IP. To access the machine, just SSH in:
ssh root@192.x.y.z
This should automatically pick up the key you created and log you in, if you do encounter issues, try the following:
ssh -o IdentitiesOnly=yes -i /path/to/your/private/key root@192.x.y.z
You may also see the error below with a new server, the warning is a bit “dramatic” to say the least. You should verify that you are using the correct IP and the key is correct but usually, this is just a sanity check by the SSH daemon: “I am seeing this server IP for the first time, and I don’t know if I can trust it, so I will refuse and print a scary message!?”
@@@@@@@@@@@@@@@@@@@@@@@@@@@@@@@@@@@@@@@@@@@@@@@@@@@@@@@@@@@
@    WARNING: REMOTE HOST IDENTIFICATION HAS CHANGED!     @
@@@@@@@@@@@@@@@@@@@@@@@@@@@@@@@@@@@@@@@@@@@@@@@@@@@@@@@@@@@
IT IS POSSIBLE THAT SOMEONE IS DOING SOMETHING NASTY!
Someone could be eavesdropping on you right now (man-in-the-middle attack)!
It is also possible that a host key has just been changed.
The fingerprint for the ED25519 key sent by the remote host is
SHA256:g8DZMXxNy8a7fM4/Xyz.
To fix this, simply run the following to trust this new server:
ssh-keygen -f "/home/$USER/.ssh/known_hosts" -R "x.y.z"
Securing the server
When it comes to VPS servers you should use the following security best practices:
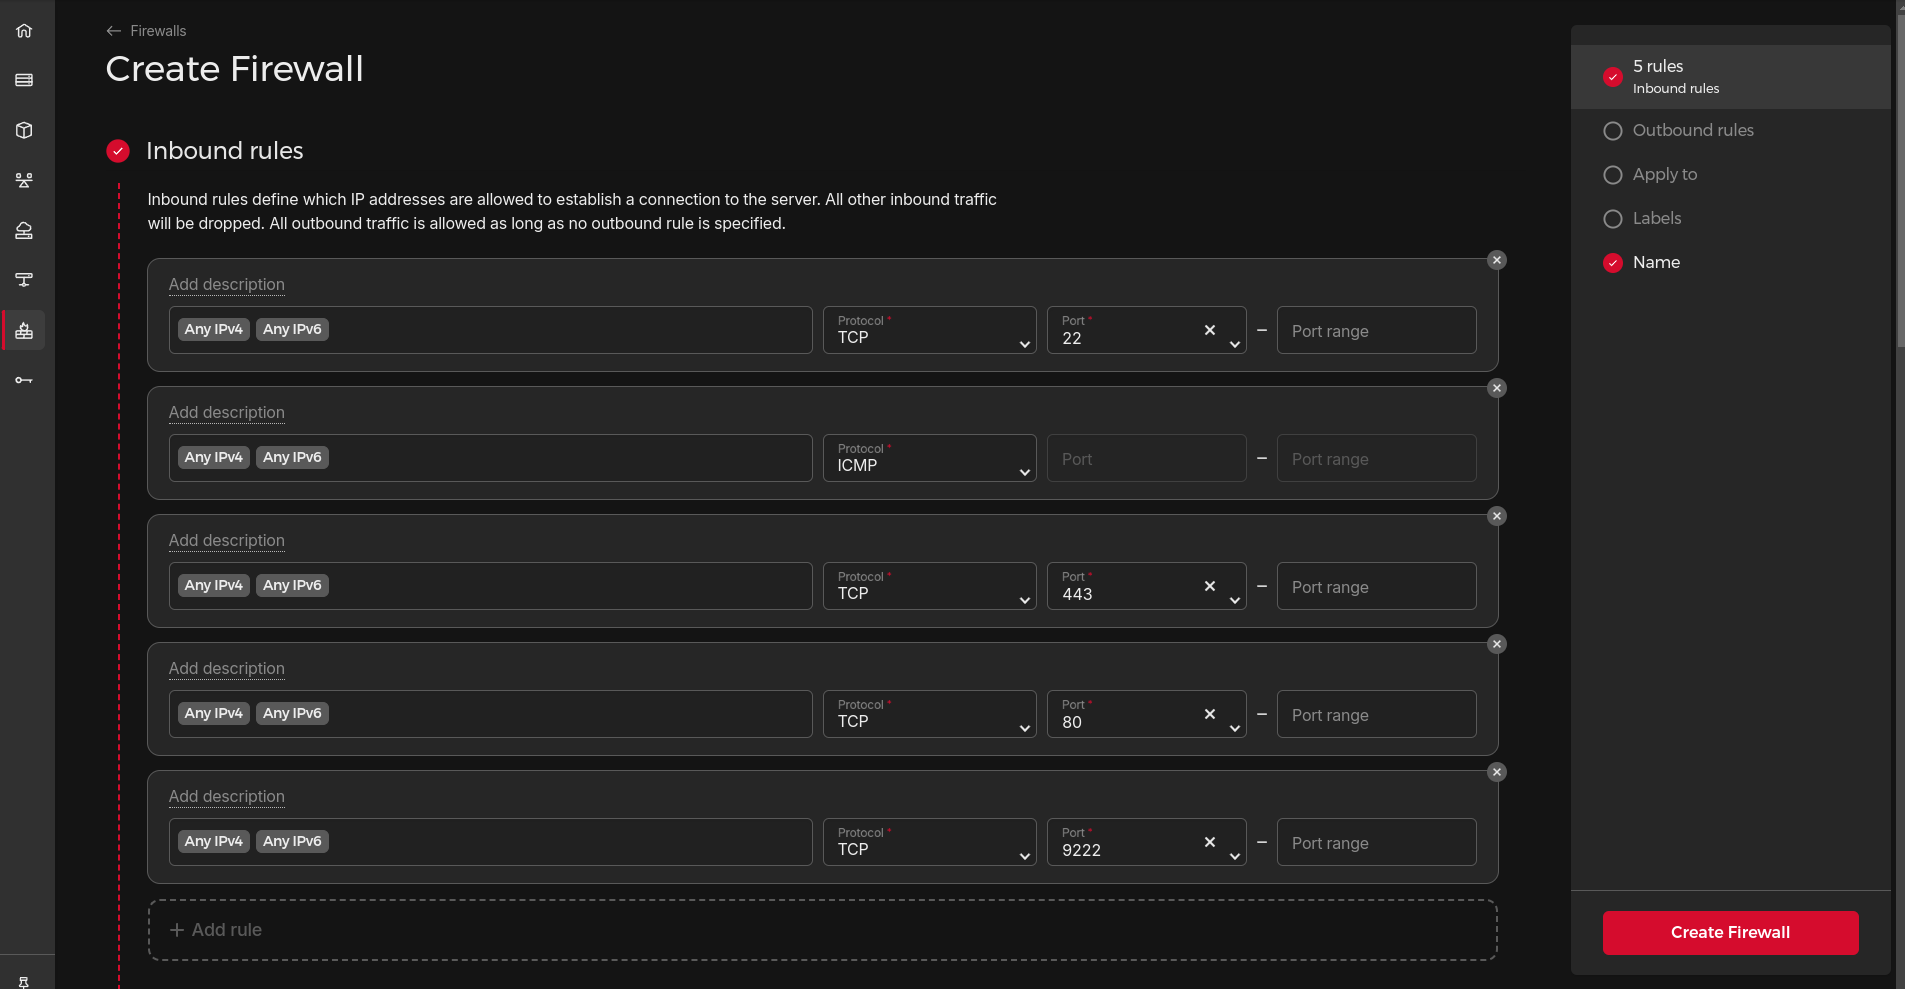
Use both a network and server firewall. Most providers including Hetzner have a concept of a network firewall (also known as a cloud firewall or WAF). You should set one up as soon as you provision your instance. Open ports (TCP): 22, 443, 80 and block everything else.
Change the default SSH port. Hackers can sniff the new port, but most attacks come from automated scripts that target port 22, by simply changing this port, you are protecting yourself from loads of automated tools.
Disable root access and create an SSH-only user.
Use a VPN, this is optional but highly recommended. You can then open ports only to your VPN keeping your server ports invisible to the rest of the internet.
Next, let’s go through each of the mentioned security steps.
Setting up a network firewall
This will differ from provider to provider; I will just give you an example using Hetzner. In the Hetzner cloud console, click on “Firewalls” in the left navigation (Cloud firewalls are free to use).
You should see the following screen. Simply just allow TCP 22, 80, and 443. In my case, I also added “9222”. This is because, in the next few steps, we’ll change the default SSH port to “9222”. You can choose any random port you want, just make sure it doesn’t clash with any process running on your server.

Whenever you create an instance in the future, you should see the “firewalls” option, just click on the one you previously created to attach the instance to that firewall:

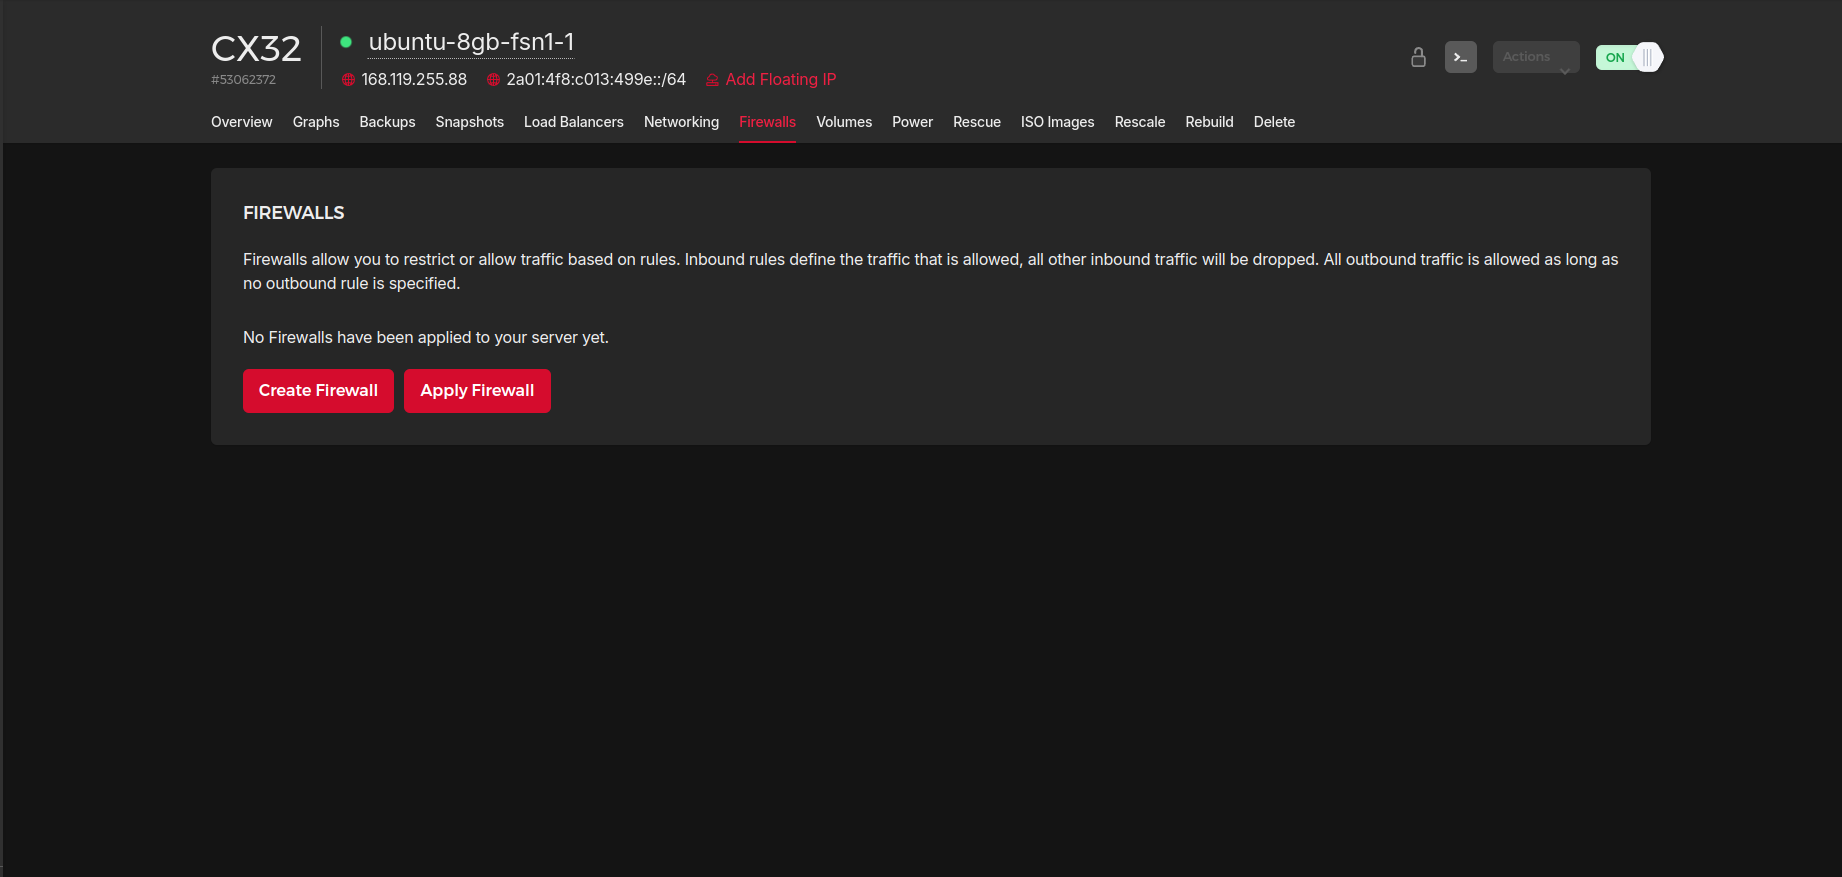
Alternatively, for existing servers. Just click on the “Firewalls” tab in the instance’s details page and select “Apply Firewall” to add the server to one of your existing firewalls:

Setting up a server firewall
It’s also a good practice to set up a firewall on your VPS instance as well, it’s highly unlikely that network traffic will bypass the main firewall, but just in case, you can never be too sure!
First, you will need to SSH into the server:
ssh root@your_ip
UFW is the default firewall on Ubuntu when you login into the remote server, you can confirm that UFW is installed by typing:
ufw
You should get the “help” menu, if not just run:
apt update -y
apt install ufw -y
Let’s allow the required ports as follows:
ufw allow http
ufw allow https
ufw allow ssh
ufw allow from any to any port 9222
ufw enable
You’ll be asked to confirm, just hit “y”. Now if you run:
ufw status numbered
###### You should see #######

Status: active

To                         Action      From
--                         ------      ----
[ 1] 80/tcp                     ALLOW IN    Anywhere
[ 2] 22/tcp                     ALLOW IN    Anywhere
[ 3] 9222                       ALLOW IN    Anywhere
[ 4] 80/tcp (v6)                ALLOW IN    Anywhere (v6)
[ 5] 22/tcp (v6)                ALLOW IN    Anywhere (v6)
[ 6] 9222 (v6)                  ALLOW IN    Anywhere (v6)
Awesome! We now have a decently secured server. If you opted for the VPN option, you can do the following instead:
ufw allow http
ufw allow https
ufw allow from x.x.x.x to any port 22
ufw allow from x.x.x.x to any port 9222
ufw enable
Naturally “x.x.x.x” should be replaced by your VPN’s IP address.
Note: I use “ufw status numbered” because this also prints the “index” of the rule, in case we need to delete that rule. You can totally omit “numbered” and this command will work fine.
Changing the default SSH port
The network firewall can be altered at any time, however, the instance firewall cannot, therefore, it’s advisable to keep one tab open with an active SSH connection and also that you allow both 22 and 9222 [or whatever port you choose] first, then test the new port works, and thereafter drop the old 22 from your firewall.
To change the port do the following (or you can just nano /etc/ssh/sshd_config and manually change it):
# Backup original file just incase
cp /etc/ssh/sshd_config /etc/ssh/sshd_config.backup

# Set the new port
sed -i 's/\#Port 22/Port 9222/' /etc/ssh/sshd_config

# Restart ssh
systemctl restart ssh
Add another layer of security
Brute force attacks are also another common security issue when you host a publically accessible server, by brute force, I mean a bot that will constantly try hundreds or thousands of different passwords or key combinations to try and break into your server.
A good layer of protection for this kind of attack is to use Fail2Ban. Fail2Ban will basically watch common ports like 22 for abuse traffic and block them automatically.
To setup Fail2Ban:
sudo apt install fail2ban
# So we can customize fail2ban settings
sudo cp /etc/fail2ban/jail.conf /etc/fail2ban/jail.local

sudo nano /etc/fail2ban/jail.local
Next, paste it into the config file:
[DEFAULT]
bantime = 1h
findtime = 10m
maxretry = 5
banaction = iptables-multiport

ignoreip = 127.0.0.1/8 ::1
destemail = your@email.com

[sshd]
enabled = true
port = 9222
filter = sshd
logpath = /var/log/auth.log
maxretry = 3
bantime = 1h
And finally, restart:
sudo systemctl restart fail2ban
You can do much more advanced stuff like preventing DDOS attacks on port 443, 80, etc…, for no,w though we are basically just protecting port 9222. If abuse is detected, Fail2Ban will block that IP for 1 hour.
Setting up an SSH-only user
SSH’ing as root is a bad idea, If this user is compromised then the attacker can access your whole system, instead, you should create a password-based user that can elevate their privileges to sudo only when needed.
adduser yourusername
usermod -aG sudo secureuser
Next, you should copy your ssh pub key to ~/.ssh/authorized_keys:
sudo su - secureuser

mkdir ~/.ssh
# Paste your pub key with
nano ~/.ssh/authorized_keys

# Fix permissions
chmod 600 ~/.ssh/authorized_keys
chmod 700 ~/.ssh
Now you should in a separate terminal, try to ssh as this user:
ssh -p 9222 secureuser@server_ip
🤞The above should allow you in, alternatively check that there are no spaces in the authorized file and retry setting the permissions, usually it’s either bad permissions or the public key is invalid.
You can also use “-i” with your SSH command to specify which key you want to use:
ssh -i ~/.ssh/id_rsa -p 9222 secureuser@server_ip
Almost there, we want to do two more security optimizations:
Prevent the root user from logging in.
Disable password logins. Earlier we created the SSH user with a password, this password is not meant for SSH access, instead, it’s just there to add an extra layer of security. Should an attacker gain access to this SSH user, it still makes it a little more difficult to access root, since running “sudo su - “ will prompt for the password.
To action:
nano /etc/ssh/sshd_config
# Uncomment and change these lines to:
PasswordAuthentication no
PermitRootLogin no
Finally, restart the ssh daemon:
systemctl restart ssh
Setting up docker
Great! Now you have a fairly secure server up and running, but to run Next.js or your application code, you probably gonna need to install docker first. Installing Docker is a breeze:
curl -fsSL https://get.docker.com -o get-docker.sh
sudo sh get-docker.sh
Now when you type the following, you should see docker installed:
docker ps
It is always a good idea to run docker as a none root user, you can do so as follows:
# You can call the user whatever you want
sudo useradd -m -s /bin/bash dockeruser
sudo usermod -aG docker dockeruser
Now, you should log in with this user and run your docker containers as “dockeruser”:
sudo su - dockeruser
Conclusion
There you go, a detailed step-by-step guide, copy-and-paste basically of all the steps you need to run your own VPS server, it may seem like a lot of steps but it’s like 99% the same for every server you setup, so it becomes muscle memory after a while.
Subscribe to my newsletter
Read articles from Kevin Naidoo directly inside your inbox. Subscribe to the newsletter, and don't miss out.
Written by

Kevin Naidoo
Kevin Naidoo
I am a South African-born tech leader with 15+ years of experience in software development including Linux servers and machine learning. My passion is web development and teaching. I often love experimenting with emerging technologies and use this blog as an outlet to share my knowledge and adventures. Learn about Python, Linux servers, SQL, Golang, SaaS, PHP, Machine Learning, and loads more.