Day 41 of 100 Days : Understanding VPCs, Security Groups, and NACLs in AWS 🔐
 Munilakshmi G J
As DevOps engineers, securing our applications in the cloud is critical. On Day 41, we explore Virtual Private Clouds (VPCs), subnets, security layers, and the differences between Security Groups and Network Access Control Lists (NACLs). Understanding these concepts is key to building a robust and secure cloud infrastructure. Additionally, we’ll walk through a practical example of creating a VPC and launching an EC2 instance to solidify these concepts.
🚀 What is a VPC?
A Virtual Private Cloud (VPC) is an isolated network in AWS that lets you manage your cloud resources securely. It acts as your private network in the AWS environment. When creating a VPC, you define an IP address range, which determines its size. For example, if the IP range is 10.1.0.0/16, the VPC can host up to 65,536 IP addresses.
Within a VPC, you can create subnets:
Public Subnets: Accessible via the internet.
Private Subnets: Internal-facing and not exposed to the internet.
🌉 How Traffic Flows in a VPC
Here’s a high-level overview:
Internet Gateway: Connects your public subnet to the internet.
Load Balancer: Serves as an intermediary, routing requests from users to private subnets.
Security Groups and NACLs: Add additional layers of security.
🔑 Security Groups vs. NACLs
AWS provides shared responsibility security, where AWS ensures infrastructure security, and users secure their applications. Two critical components in this shared responsibility are Security Groups and NACLs.
1. Security Groups
Instance-Level Security: Security Groups operate at the EC2 instance level.
Inbound and Outbound Rules:
Inbound Traffic: Manages requests coming into your EC2 instance.
Outbound Traffic: Manages requests from your EC2 instance to the internet or other resources.
By default, all inbound traffic is denied, and all outbound traffic is allowed.
Example Use Case:
Allow port
8080for a web application.Block all unused ports to prevent malicious access.
2. NACLs (Network Access Control Lists)
Subnet-Level Security: NACLs provide security at the subnet level.
Stateless Rules: NACLs allow you to explicitly allow or deny traffic.
Can be applied to multiple subnets and affect all resources within them.
🛠️ Practical: Creating a VPC and Launching an EC2 Instance
Let’s implement what we’ve learned by creating a VPC, launching an EC2 instance, and configuring Security Groups and NACLs.
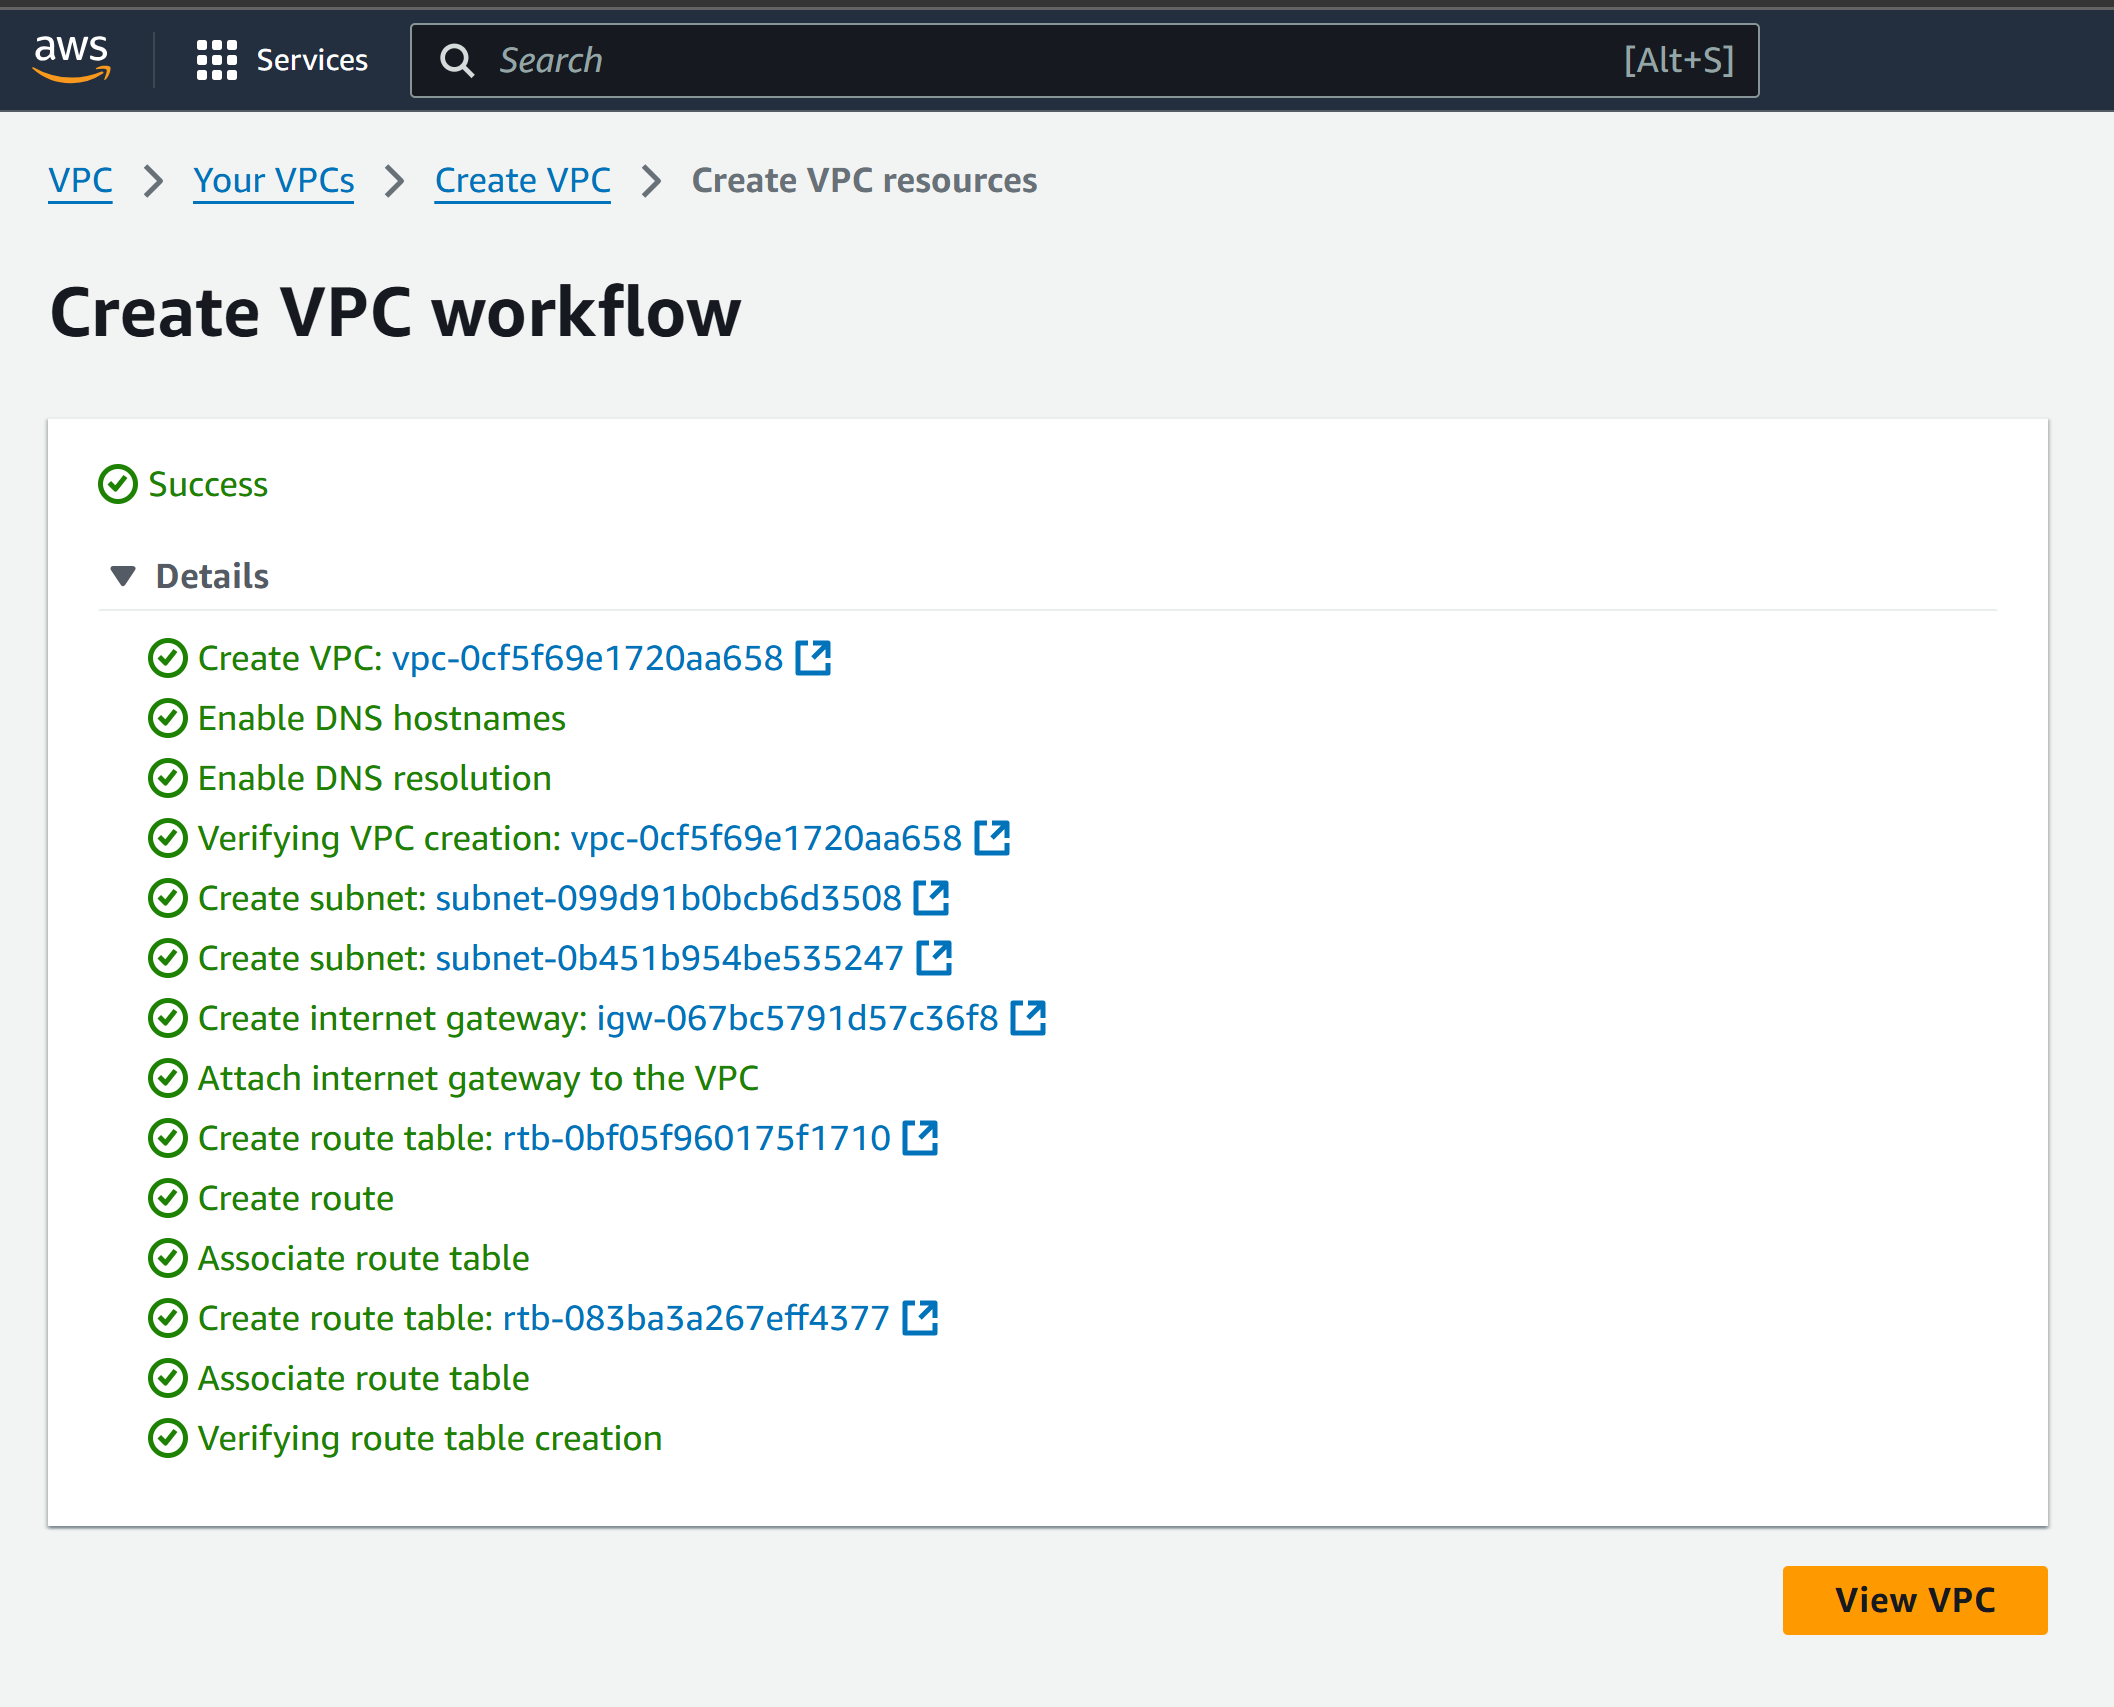
Step 1: Create a VPC
Navigate to the VPC section in the AWS Management Console.
Choose "VPC and More" to allow AWS to create default resources for the VPC automatically.
Resources AWS creates by default:
Public and private subnets in two availability zones (e.g.,
us-east-1aandus-east-1b).Internet Gateway (IGW).
Route Tables.
VPC Endpoints for S3 (optional).
Provide a Name for the VPC (e.g.,
Demo VPC).Configure the CIDR Block:
/16gives you 65,536 IP addresses./24gives you 256 IP addresses.Choose based on your requirements.
Configure the Number of Availability Zones and Subnets:
- You can use the default settings (2 AZs with both public and private subnets).
Click Create VPC.

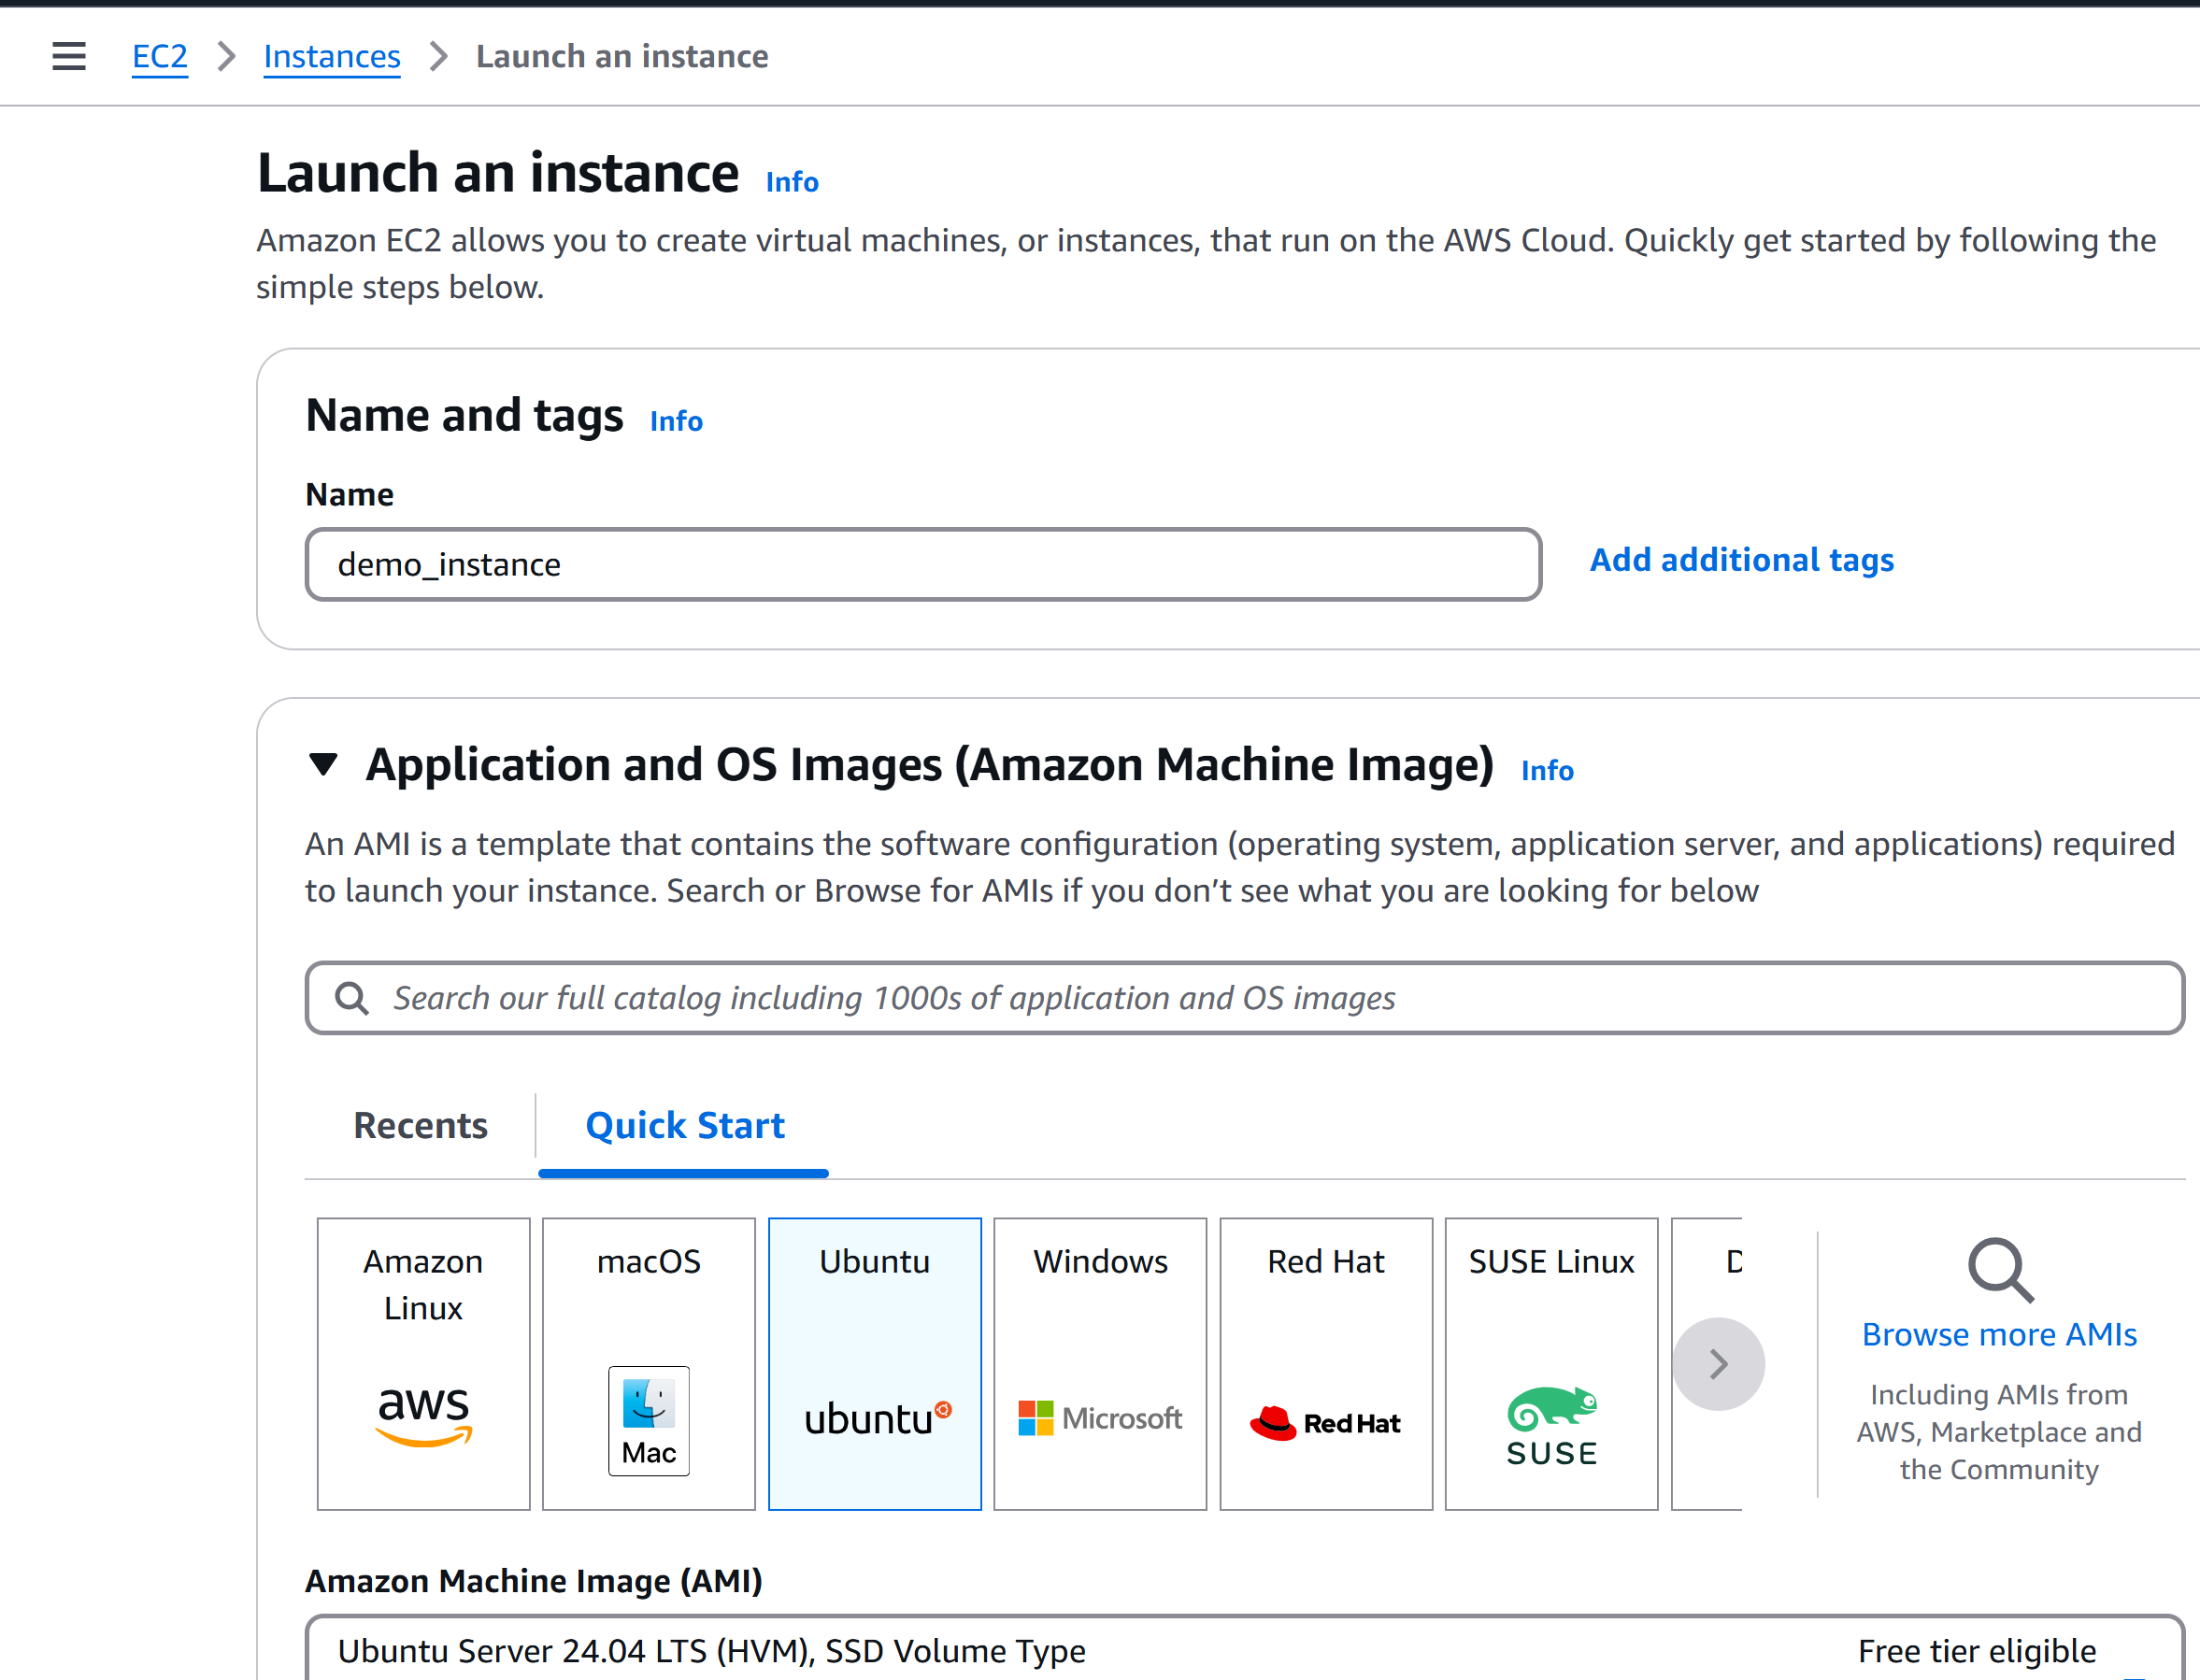
Step 2: Launch an EC2 Instance
Navigate to the EC2 section in AWS Management Console.
Click "Launch Instance".
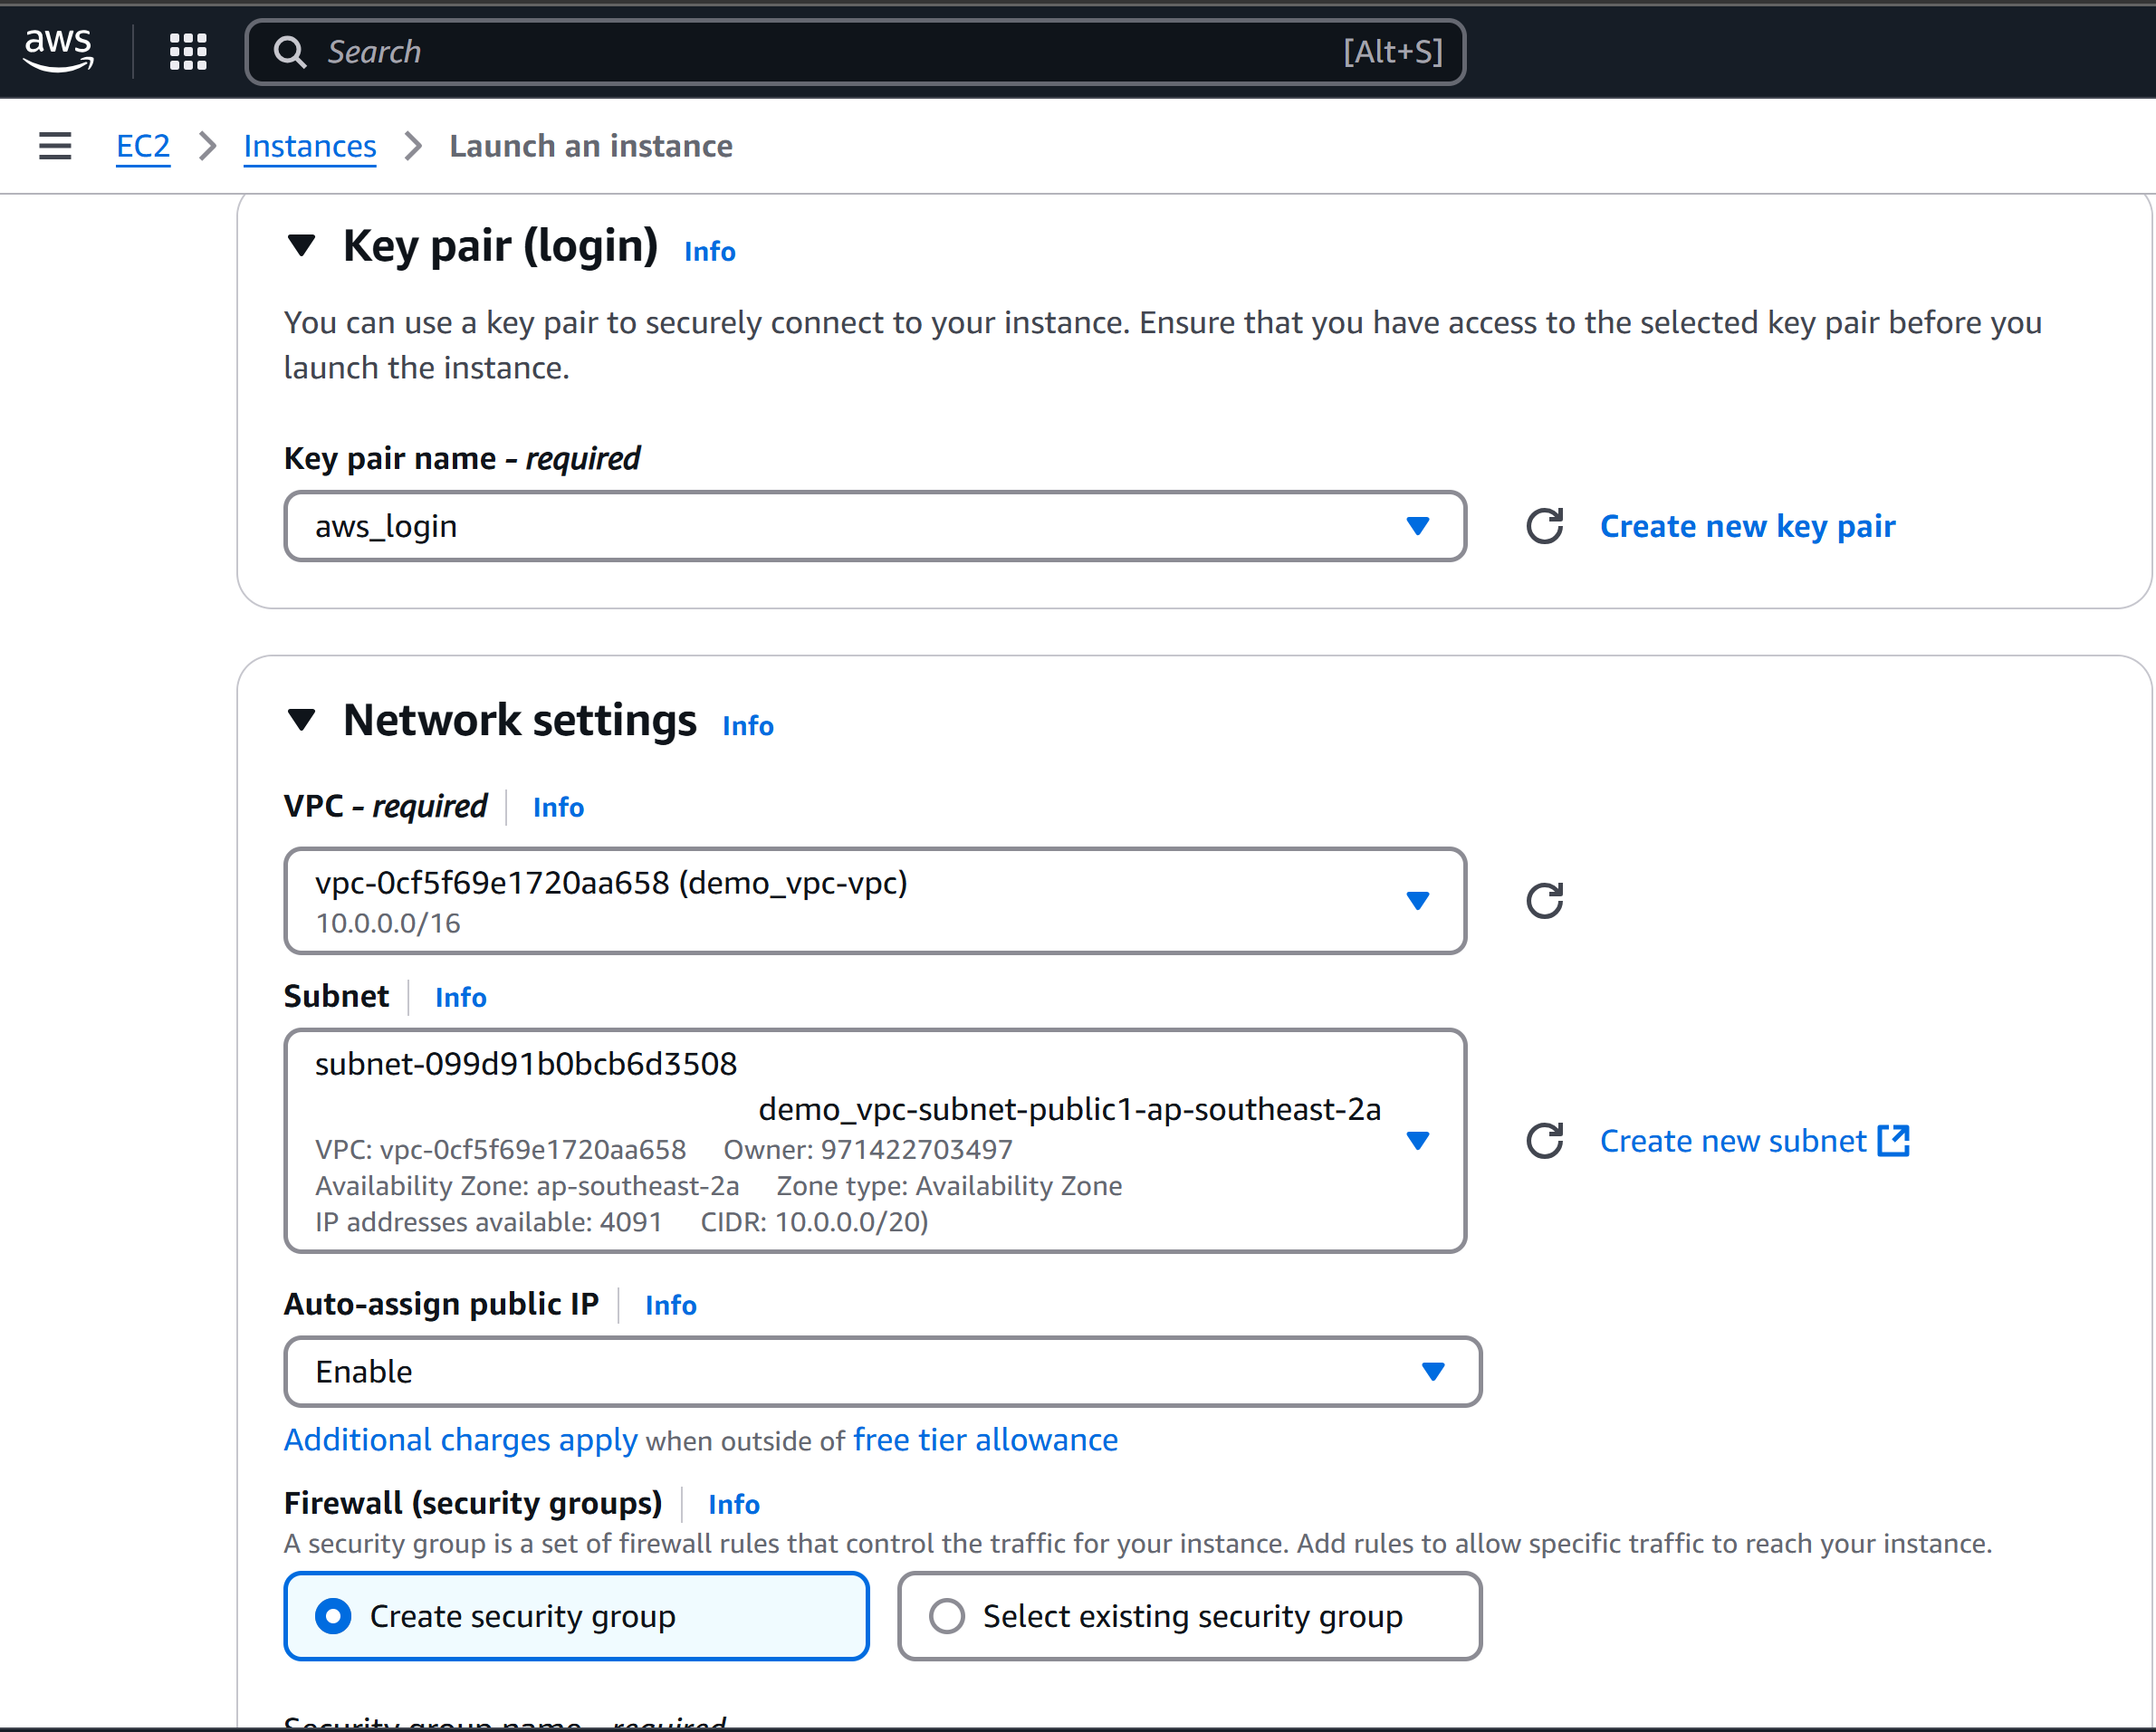
Configure the instance:
Instance Name:
Demo Instance.AMI: Choose Ubuntu.
Instance Type: t2.micro.
Key Pair: Select an existing one or create a new one.
Network Configuration:
Select your Custom VPC (
Demo VPC).Change the subnet to Public Subnet.
Assign a Public IP Address.
Click Launch Instance.


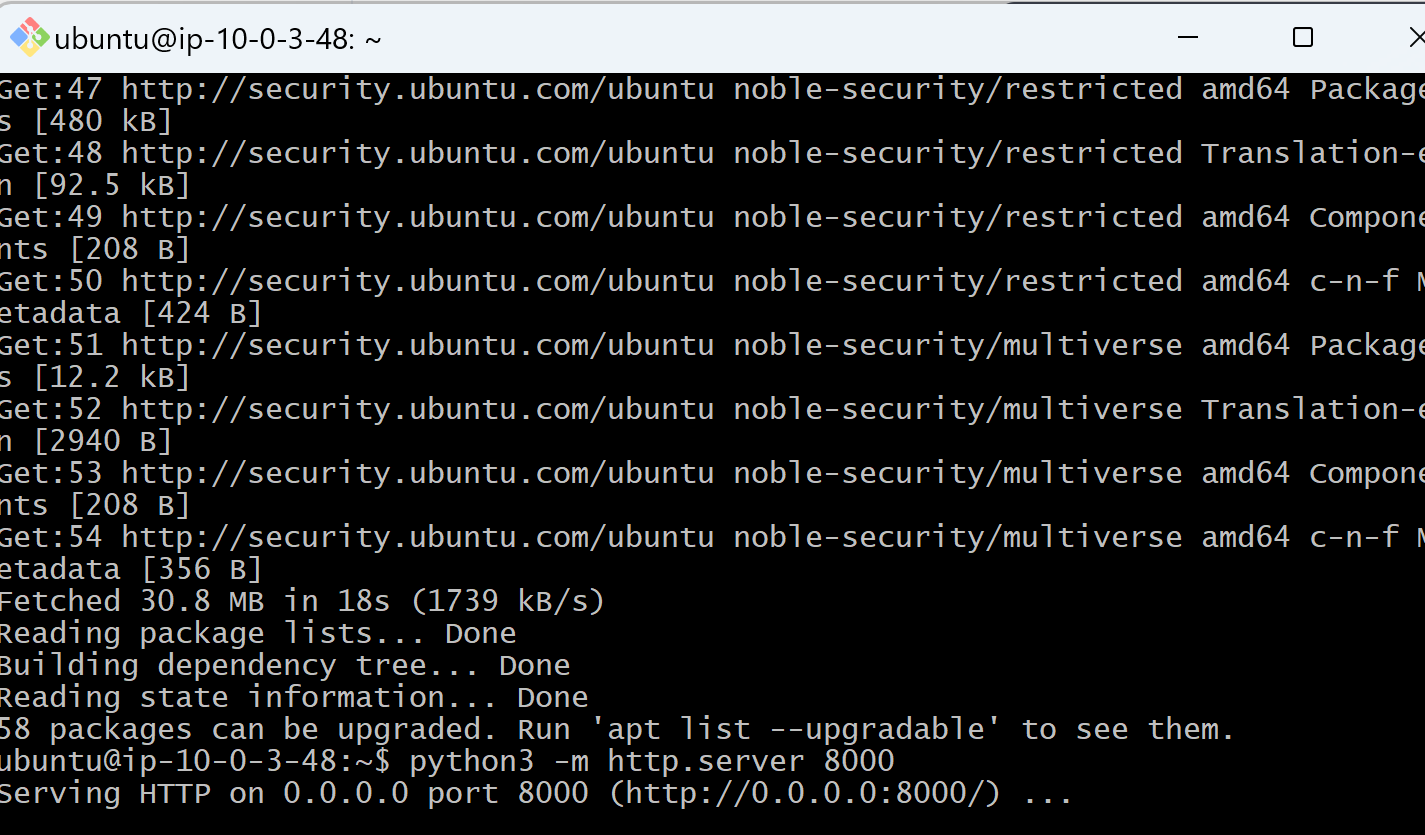
Step 3: Access the EC2 Instance
Open a terminal and SSH into the EC2 instance:
ssh -i "your-key.pem" ubuntu@<public-ip-address>Update packages:
sudo apt updateRun a simple Python HTTP server:

Step 4: Test Application Accessibility
Open your browser and navigate to:
http://<public-ip-address>:8000The application might fail to load because:
- The default security group only allows SSH traffic (Port 22).
Modify the security group to allow traffic on Port 8000:
Add an Inbound Rule for Port 8000 with Source: 0.0.0.0/0.

Step 5: Test Application Behavior Post Configuration
After updating security groups and testing NaCl rules, access the application again via:
http://<public-ip-address>:8000

Wrapping It Up🌟
Today, we unlocked the doors to secure cloud networking with AWS VPCs, Security Groups, and NACLs. These powerful tools ensure that your applications are not just functional but also fortified against threats. By mastering these concepts and applying best practices, you're laying a strong foundation for building scalable and secure cloud infrastructures.
Keep exploring, experimenting, and expanding your knowledge—each step brings you closer to DevOps mastery! See you on Day 42 for another exciting learning journey! 🚀
Subscribe to my newsletter
Read articles from Munilakshmi G J directly inside your inbox. Subscribe to the newsletter, and don't miss out.
Written by

Munilakshmi G J
Munilakshmi G J
"Aspiring DevOps Engineer on a 100-day journey to master the principles, tools, and practices of DevOps. Sharing daily insights, practical lessons, and hands-on projects to document my path from beginner to proficient. Passionate about continuous learning, automation, and bridging the gap between development and operations. Join me as I explore the world of DevOps, one day at a time!"