How to Build a Secure Authentication Service
 Lokesh Kumar Jha
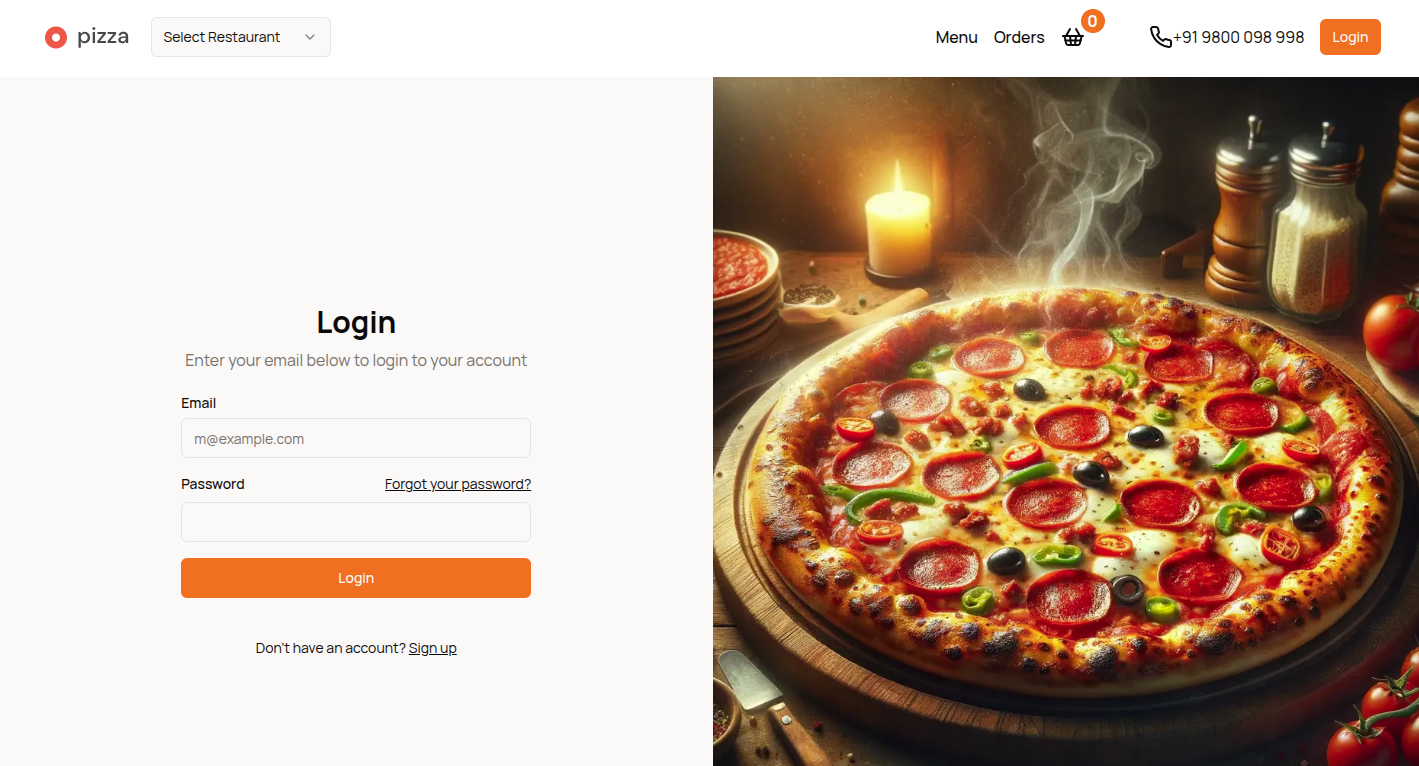
Authentication is a cornerstone of modern applications, ensuring that user data and actions remain secure. In this blog, we dive into the authentication microservice for a real-time pizza ordering application. We will explore its design, functionality, and implementation through detailed explanations and diagrams.
Introduction
In a real-time pizza ordering app, users must be authenticated to perform tasks like placing orders, tracking deliveries, or managing profiles. The authentication microservice handles user registration, login, token management, and more. It is designed to provide a seamless and secure user experience while integrating efficiently with the broader microservice architecture.
Key Features of the Authentication Service
User Registration: Handles new user creation with secure password storage.
User Login: Authenticates users and issues tokens for session management.
Token Refresh: Provides new tokens without requiring repeated logins.
Logout: Ensures tokens are invalidated for security.
Profile Retrieval: Authenticated users can fetch their profile information.
Each feature is implemented as a standalone flow to ensure clarity and modularity.
Architecture Overview
The authentication service operates as a microservice, interacting with other components in the system, such as:
AuthRoutes: Routes requests and performs initial validation.
AuthController: Orchestrates business logic for authentication.
UserService: Manages user data operations.
CredentialService: Handles password hashing and comparison.
TokenService: Generates and validates tokens.
DatabaseRepo: Interfaces with the database for user and token storage.
JWKSService: Signs tokens securely using a private key.
LoggerService: Logs all significant events for traceability.
Detailed Flow Explanations
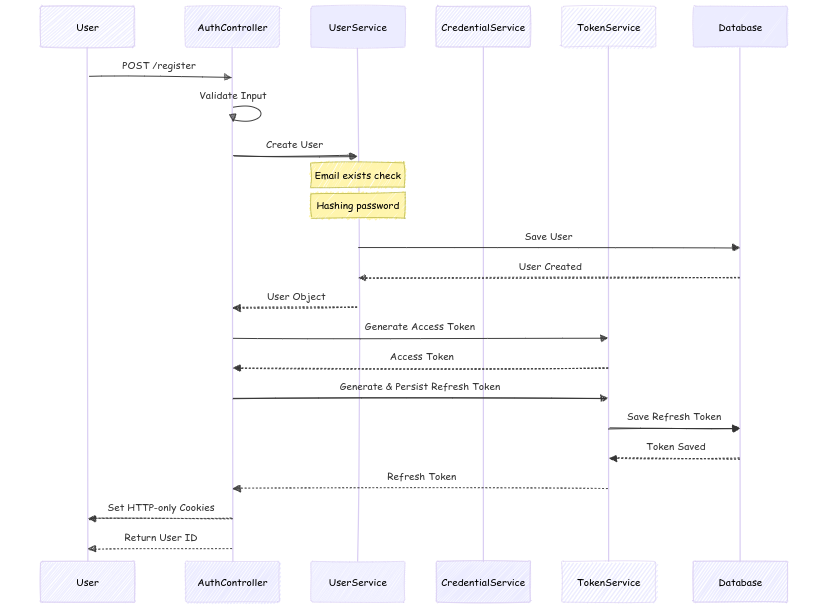
1. User Registration
When a user registers, the service performs input validation, ensures email uniqueness, securely hashes the password, and generates access and refresh tokens.
1. User Initiates Registration
- The user sends a
POST /registerrequest to theAuthControllerto start the registration process.
2. Input Validation
- The
AuthControllervalidates the registration input (e.g., checks for required fields and formats).
3. User Creation
- The
AuthControllerdelegates the user creation to theUserService.
4. Check for Existing Email & Hash Password
The
UserServicefirst checks if the email already exists in the system (usually by querying the database).If the email is new, the
UserServicehashes the user's password for security.
5. Saving User Data
- The
UserServicethen saves the user details (including hashed password) into the database.
6. User Creation Confirmation
- Once the user is created, the database responds with a confirmation to the
UserService, which then returns the newly created user object to theAuthController.
7. Generate Access Token
The
AuthControllerrequests theTokenServiceto generate an access token for the newly created user. The token is used for authenticating the user in subsequent requests.The
TokenServiceresponds with the access token.
8. Generate & Persist Refresh Token
The
AuthControllerthen requests theTokenServiceto generate a refresh token, which is used to refresh the access token when it expires.The
TokenServicesaves the refresh token in the database.
9. Save Refresh Token
- After saving the refresh token in the database, the
TokenServicesends a confirmation to theAuthController.
10. Set Cookies & Return User ID
The
AuthControllersets HTTP-only cookies with the generated tokens (access and refresh).The
AuthControllerreturns the newly created user’s ID to the user in the response.
2. User Login
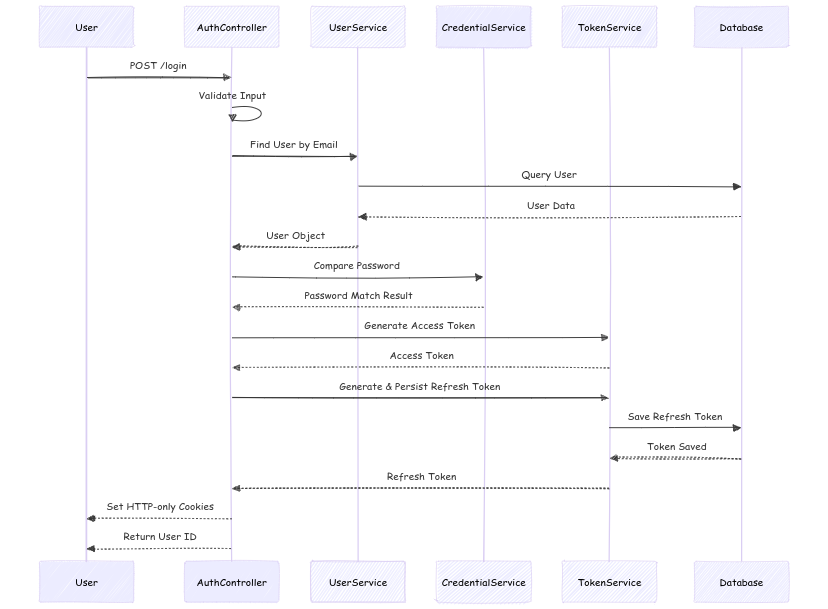
The login flow authenticates a user by verifying their email and password, then generates tokens for session management.
1. User Initiates Login
- The user sends a
POST /loginrequest to theAuthControllerwith their login credentials (email and password).
2. Input Validation
- The
AuthControllervalidates the login input (e.g., ensuring both email and password are provided).
3. Find User by Email
- The
AuthControllerrequests theUserServiceto find the user based on the provided email.
4. Query User in Database
- The
UserServicequeries the database to find the user associated with the provided email.
5. Return User Data
- The database responds with the user's data, which is then passed back to the
AuthControllerby theUserService.
6. Compare Password
- The
AuthControllerdelegates the password comparison task to theCredentialService. This service compares the hashed password in the database with the password provided by the user.
7. Password Match Check
- The
CredentialServicereturns the result of the password match (whether the provided password matches the stored password).
8. Generate Access Token
- If the password is valid, the
AuthControllerrequests theTokenServiceto generate an access token. This token is used for authenticating the user in subsequent requests.
9. Generate & Persist Refresh Token
- The
AuthControlleralso requests theTokenServiceto generate a refresh token, which can be used to refresh the access token when it expires.
10. Save Refresh Token
- The
TokenServicesaves the refresh token in the database for future use.
11. Return Confirmation
- After the refresh token is saved, the
TokenServiceresponds with the refresh token, and theAuthControllersets HTTP-only cookies containing both the access and refresh tokens.
12. Return User ID
- Finally, the
AuthControllerreturns the user ID to the client in the response.
3. Token Refresh
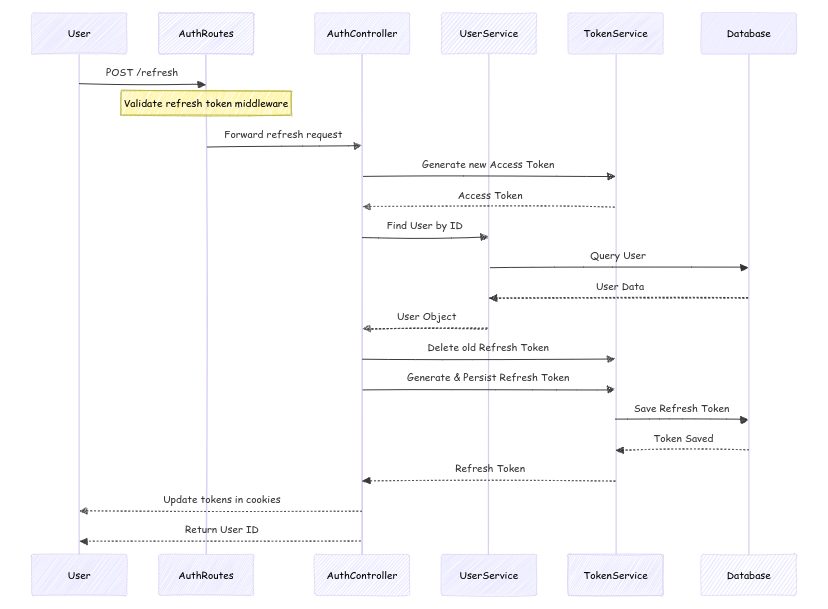
To maintain user sessions without requiring frequent logins, the service generates new tokens using a valid refresh token.
1. User Initiates Token Refresh
- The user sends a
POST /refreshrequest to theAuthRoutesto refresh their authentication tokens (access token and refresh token).
2. Validate Refresh Token
- The
AuthRoutesapplies middleware to validate the refresh token. This is typically done by checking its authenticity and ensuring it hasn’t expired.
3. Forward Refresh Request to Controller
- After the token validation, the
AuthRoutesforwards the refresh request to theAuthController.
4. Generate New Access Token
- The
AuthControllercalls theTokenServiceto generate a new access token for the user.
5. Return Access Token
- The
TokenServicegenerates a new access token and returns it to theAuthController.
6. Find User by ID
- The
AuthControlleruses the user ID (which is typically embedded in the refresh token or passed in the request) to request theUserServiceto find the user associated with that ID.
7. Query User in Database
- The
UserServicequeries the database to retrieve the user's information using their ID.
8. Return User Data
- The database responds with the user data, and the
UserServicepasses it back to theAuthController.
9. Delete Old Refresh Token
- The
AuthControllerinstructs theTokenServiceto delete the old refresh token from the database (as it is no longer valid after the refresh).
10. Generate New Refresh Token
- The
AuthControllerrequests theTokenServiceto generate a new refresh token for the user, which will be used to refresh the access token in the future.
11. Save New Refresh Token
- The
TokenServicesaves the new refresh token in the database.
12. Return New Refresh Token
- After the refresh token is saved, the
TokenServicesends the new refresh token back to theAuthController.
13. Update Tokens in Cookies
- The
AuthControllerupdates the user's cookies with the new access token and refresh token, both of which are typically stored as HTTP-only cookies for security.
14. Return User ID
- Finally, the
AuthControllerreturns the user ID to the user as part of the response, confirming the refresh process.
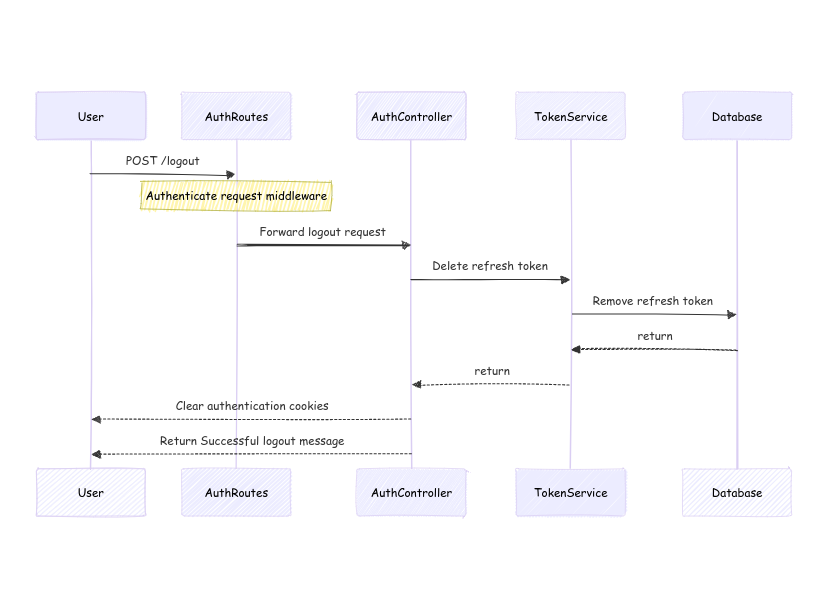
4. User Logout
The logout flow invalidates the user’s refresh token, ensuring session termination.
1. User Initiates Logout
- The user sends a
POST /logoutrequest to theAuthRoutesto log out of the system.
2. Authenticate Request
- The
AuthRoutesapplies an authentication middleware to ensure that the request is from a valid, authenticated user. This middleware checks the presence and validity of the user's access token or refresh token.
3. Forward Logout Request to Controller
- After successful authentication, the
AuthRoutesforwards the logout request to theAuthController.
4. Delete Refresh Token
- The
AuthControllercalls theTokenServiceto delete the refresh token associated with the user's session, rendering the refresh token invalid.
5. Remove Refresh Token from Database
- The
TokenServiceinstructs the database to remove the refresh token from storage.
6. Return Confirmation
- After successfully removing the refresh token, the database responds with a confirmation to the
TokenService, which then returns control back to theAuthController.
7. Clear Authentication Cookies
- The
AuthControllerclears the authentication-related cookies (access token and refresh token cookies) in the user's browser. This step ensures that the user's session is fully terminated.
8. Return Logout Success Message
- Finally, the
AuthControllerreturns a successful logout message to the user, confirming that the logout process has been completed.
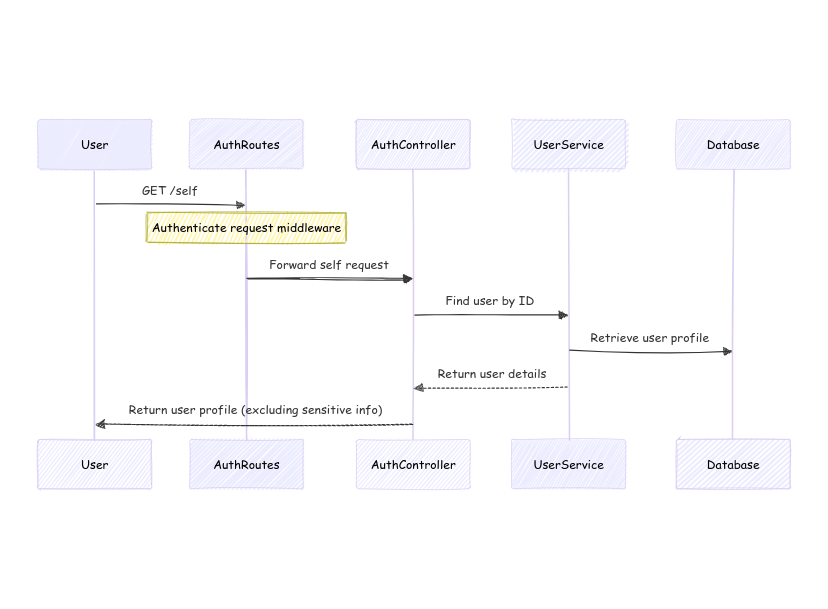
5. Profile Retrieval
Authenticated users can fetch their profile details securely.
1. User Requests Profile
- The user sends a
GET /selfrequest to theAuthRoutesto retrieve their profile details.
2. Authenticate Request
- The
AuthRoutesapplies an authentication middleware to ensure that the request is from an authenticated user. This step checks the user's session by verifying the access token or refresh token.
3. Forward Request to Controller
- After successful authentication, the
AuthRoutesforwards the request to theAuthController.
4. Find User by ID
- The
AuthControllercalls theUserServiceto find the user based on their ID. The user ID is typically retrieved from the authenticated session or token.
5. Retrieve User Profile from Database
- The
UserServicequeries the database to retrieve the user's profile details using the user ID.
6. Return User Details
- The database responds with the user’s profile data, and the
UserServicepasses this data back to theAuthController.
7. Return User Profile
- The
AuthControllerreturns the user's profile to the user. The profile typically includes non-sensitive information, such as the user’s name, email (excluding any passwords or other confidential data).
Conclusion
The authentication microservice is an essential component of the pizza ordering app. By leveraging secure practices and scalable design, it ensures user data integrity and a seamless experience. Future enhancements could include features like multi-factor authentication (MFA) or social login integrations.
What are your thoughts on this architecture? Let me know in the comments below!
P.S.: Error handling and logging mechanisms are already implemented in the code but have not yet been included in the diagrams and the blog.
Subscribe to my newsletter
Read articles from Lokesh Kumar Jha directly inside your inbox. Subscribe to the newsletter, and don't miss out.
Written by

Lokesh Kumar Jha
Lokesh Kumar Jha
💻 Passionate S/W Developer: Learning to specialize in building scalable, efficient, and user-friendly solutions tailored to business needs. 🎯 Client-Centric Approach: Committed to delivering high-quality products that solve real-world problems and drive business growth. 📚 Learners mentality: Continuously learning and sharing knowledge about programming, product development, and the tech industry. 🌟 Sharing Content: Dedicated to helping fellow developers by sharing my actionable insights, tutorials, and personal learning journey. 📈 Data-Driven Problem Solver: Experienced in analyzing data, automating workflows, and improving operational efficiency. 🤝 Collaborative Mindset: Thrive on working with clients and teams to turn ideas into impactful solutions.

