서버 부담 DOWN, 업로드 속도 UP: S3 Presigned Post로 이미지 업로드하기
 Taejung Heo
배경
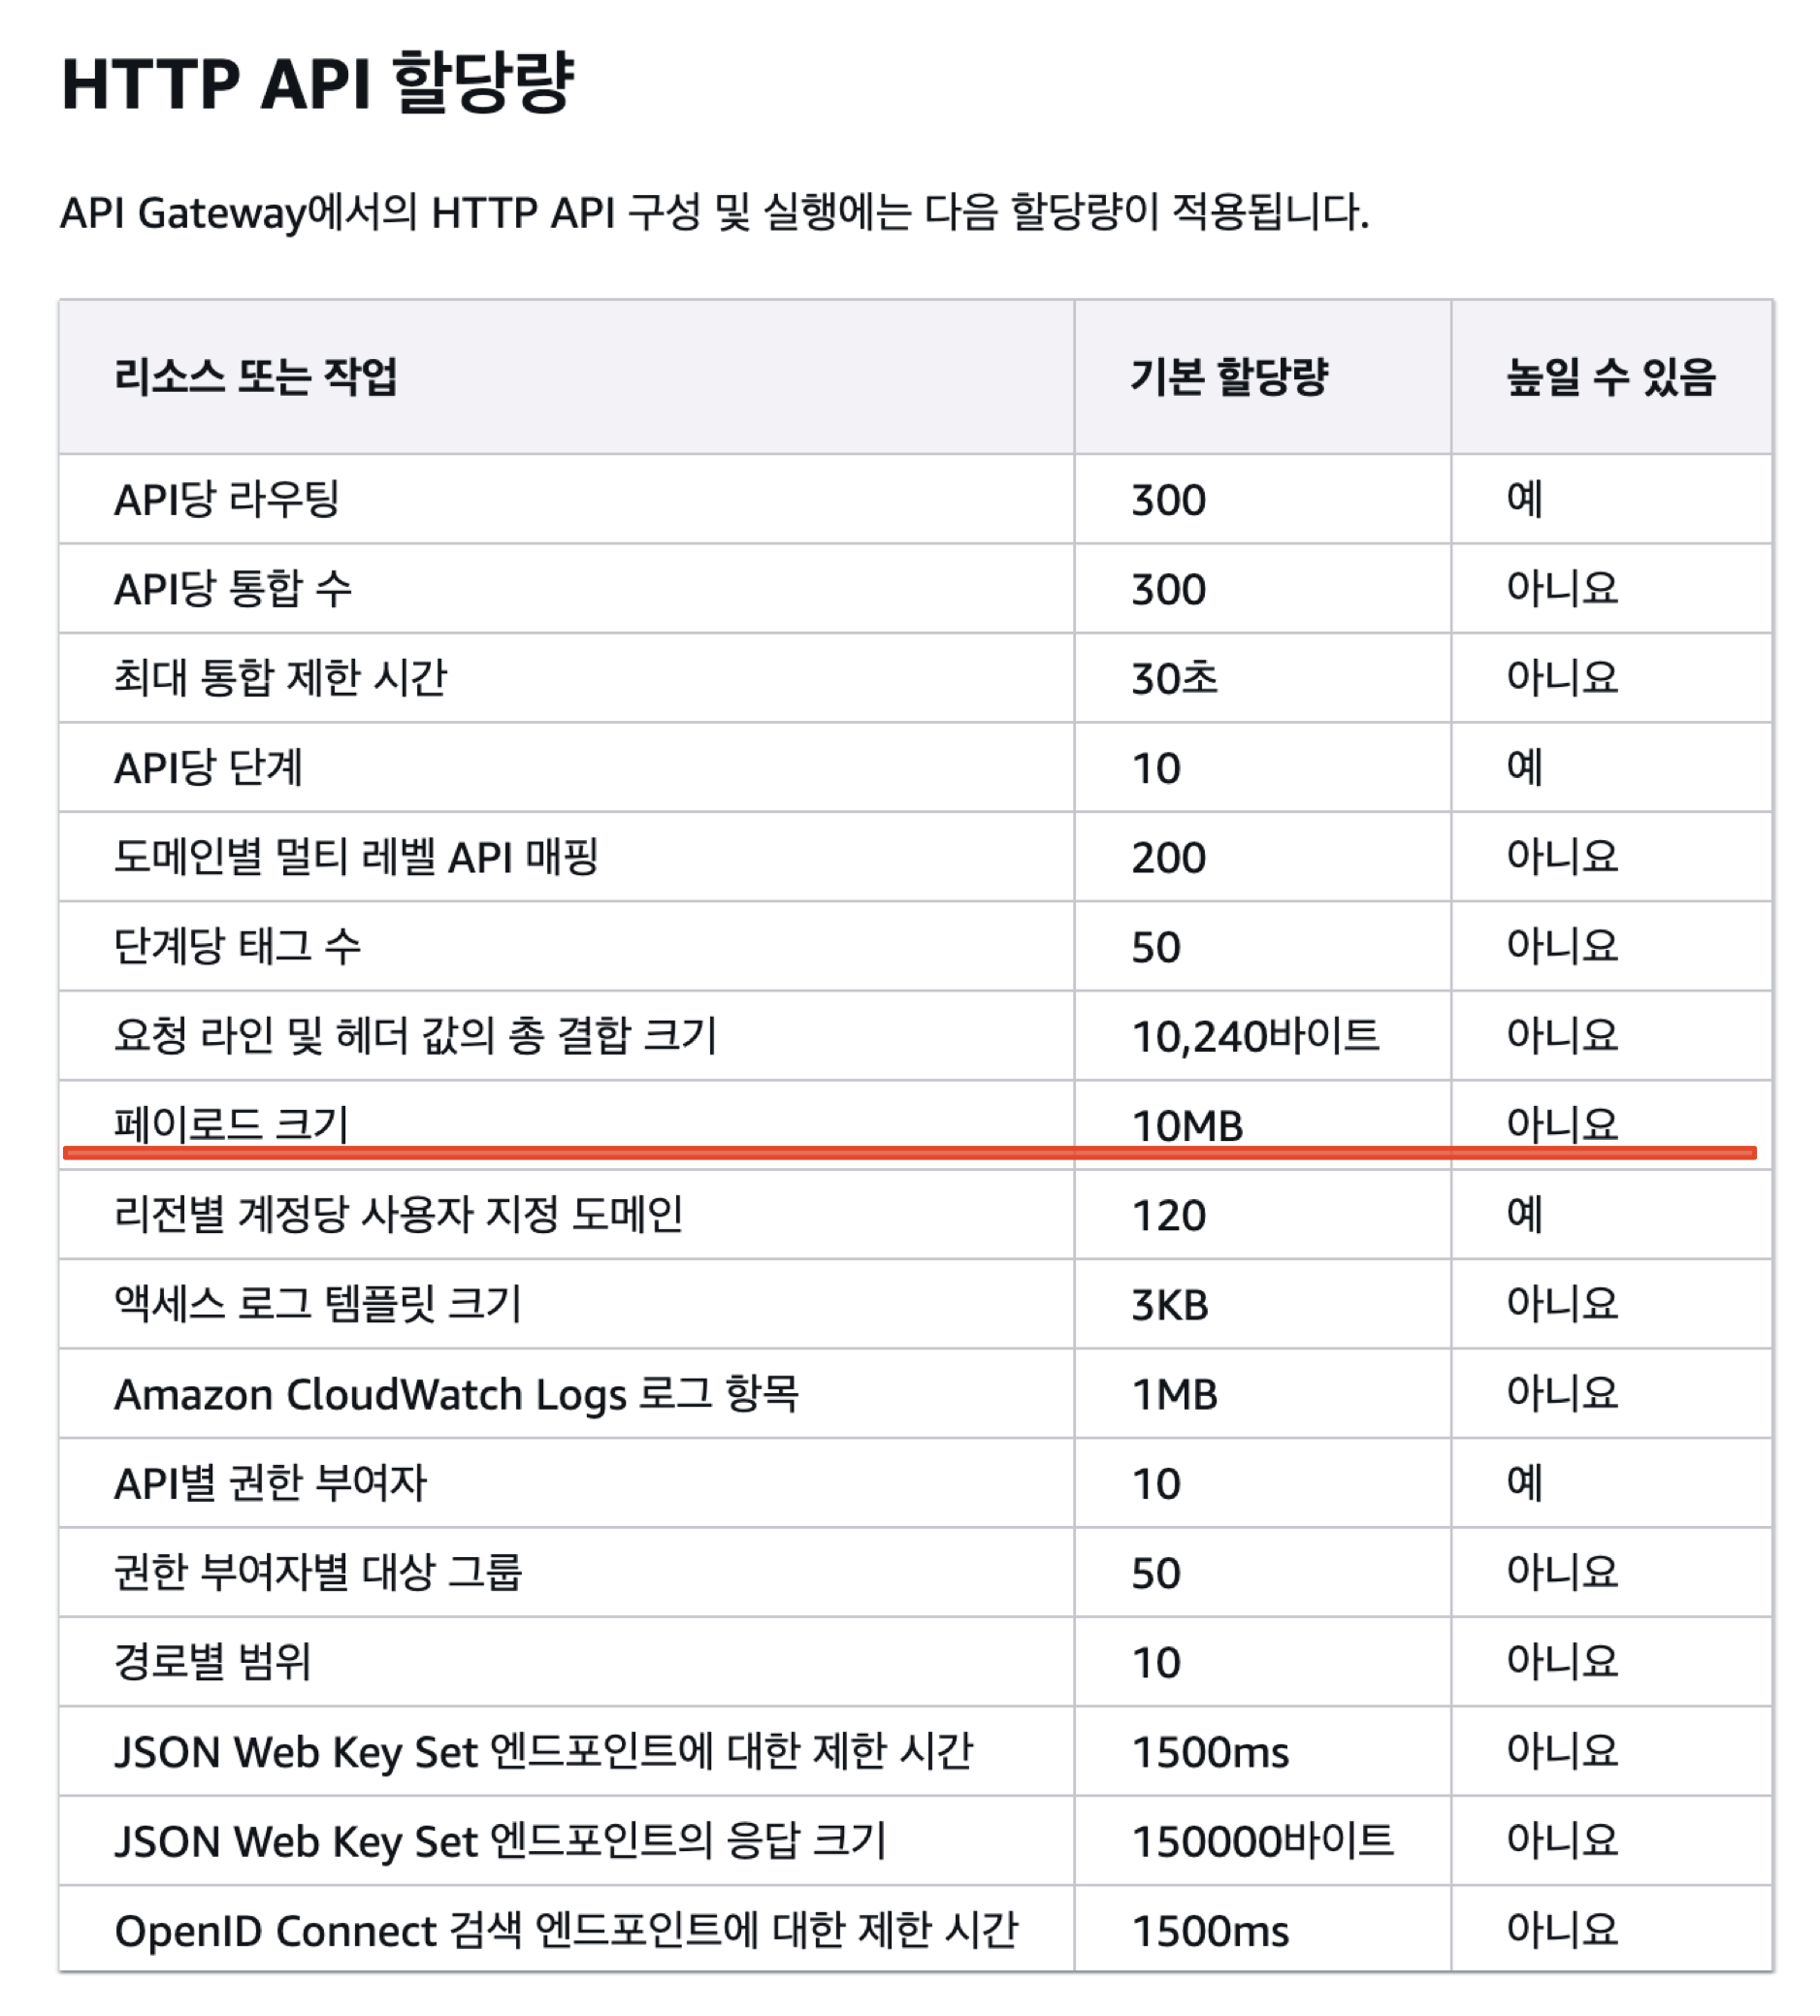
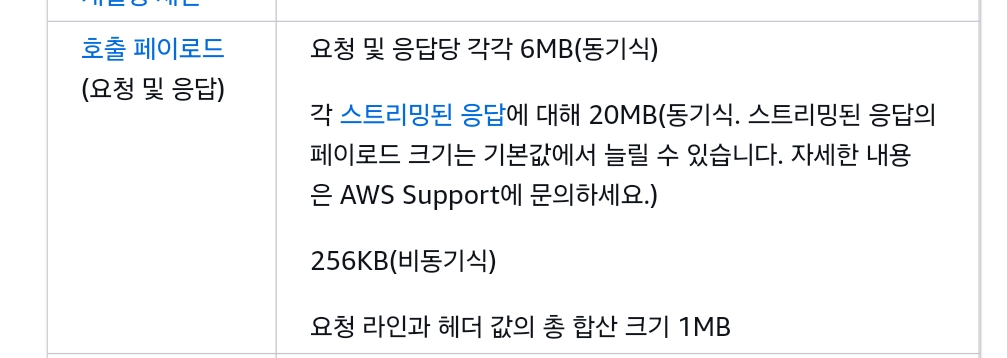
이번에 회사에서 후기 서비스를 개발하고 있다. 요구사항 중에 후기에는 최대 5개의 사진이 포함된다는 항목이 있었다. API 서버를 Aws Lambda로 만들고 있어서 Api Gateway의 payload 크기 제한인 10MB, Lambda의 payload 크기 제한이 6MB로 이미지 업로드 크기에 제한이 생기는 문제가 있다. 참고: Amazon API Gateway 할당량 및 중요 정보, AWS Lambda 할당량


또한 Lambda로 이미지를 업로드하는 경우에는 이미지 업로드 후 S3로 업로드라는 과정까지 추가되므로 이미지를 올리는 데 더 많은 시간이 소요되고 소요되는 만큼 lambda 비용이 추가적으로 나온다는 문제도 있다.
오늘은 이 문제를 해결하기 위해서 클라이언트에서 직접 s3로 파일을 업로드하는 방법들 최종적으로 선택했던 s3-presigned-post 방식에 대해서 포스팅하려고 한다.
해결책 1: API Gateway S3 Proxy
우선 API Gateway를 통해서 S3에 접근하는 방법이 있다. 이 방법은 S3를 public으로 만들지 않아도 S3에 접근할 수 있도록 할 수 있고 API Gateway의 보안 기능들을 활용할 수 있다. 그리고 Lambda를 통하지 않아도 되니 추가적인 비용이 들지도 않고 Lambda의 payload 크기 제한이 6MB가 넘는 파일도 다룰 수 있게된다.
그런데 이 방법은 여전히 10MB의 payload 제한이 있다는 단점이 있어서 이번에는 선택하지 않았다.
해결책 2: S3 presigned url
다음으로 고려했던 방법은 presigned url이었다. S3에 저장된 파일에 접근할 수 있는 권한 정보를 url에 인코딩하여 서버에서 클라이언트로 보내주면 그 url을 이용해서 파일을 조회하거나 업로드할 수 있는 기능이다.
구현이 매우 간단하고 url의 유효시간을 조절할 수 있어 유용하다.
서버에서 업로드를 관리하지 않으니 업로드 속도도 더 빠르고 파일이 커서 lambda payload limit에 걸리거나 lambda timeout이 생기는 일도 발생하지 않는다.
s3 presigned url 방식 서버 코드 예시
const { S3Client, PutObjectCommand } = require("@aws-sdk/client-s3");
const { getSignedUrl } = require("@aws-sdk/s3-request-presigner");

const s3 = new S3Client({ region: process.env.AWS_REGION });

module.exports.generateSignedUrl = async ({
  key,
  contentType,
  expiresIn = 3600,
}) => {
  const command = new PutObjectCommand({
    Bucket: process.env.BUCKET_NAME,
    Key: key,
    ContentType: contentType,
  });

  const signedUrl = await getSignedUrl(s3, command, { expiresIn });
  return signedUrl;
};
s3 presigned url 방식 클라이언트 코드 예시
const getUploadUrl = async (params: {
  key: string
  contentType: string
}): Promise<string> => {
  return axios
    .post('/generate-presigned-url', {
      ...params,
    })
    .then((res) => res.data);
}

const file = "<form으로 업로드한 파일>"
const uploadUrl = await getUploadUrl({ key, contentType: file.type })요청

const response = await fetch(uploadUrl, {
    method: 'PUT',
    body: file,
    headers: {
      'Content-Type': file.type,
    },
})

if (!response.ok) {
    throw new Error('파일 업로드 실패')
}
s3 presigned url 방식의 한계
클라이언트 측에서 파일 업로드를 전부 제어하기 때문에 content type, 파일 사이즈 등을 서버에서 컨트롤 할 수 없다는 문제가 있다. IAM 정책을 통해서 일부 제약을 걸 수도 있지만 이 경우에는 S3 전체에 적용되기 때문에 상황에 따라 유연하게 사용하기가 어렵고 인프라에서 관리하게 되니 눈으로 확인하기 어렵다고 느껴졌다.
{
  "Version": "2012-10-17",
  "Statement": [
    {
      "Effect": "Deny",
      "Action": ["s3:PutObject", "s3:PutObjectAcl"],
      "Resource": "arn:aws:s3:::your-bucket-name/*",
      "Condition": {
        "StringNotEquals": {
          "s3:x-amz-meta-file-type": ["image/jpeg", "image/png"]
        }
      }
    }
  ]
}
해결책3: S3 presigned post
마지막으로 찾아본 방법은 s3 presigned post를 활용하는 방식이다.
presigned post는 presigned url과 유사하게 s3의 특정 객체에 일시적으로 접근할 권한을 주는 방식이다. 여기에 conditions를 통해서 업로드하는 파일에 제약을 걸 수 있다. Conditions는 AWS S3 POST Policy 문서를 참고하여 작성할 수 있다.
이번에는 파일 사이즈, 파일 타입, 업로드할 폴더 정도만 제약을 걸면 되서 다음과 같은 조건들을 사용했다.
[
  ['content-length-range', 0, options.maxFileSize], // 파일 크기 제한
  ['starts-with', '$Content-Type', options.allowedMimeType], // MIME 타입 제한
  ['starts-with', '$key', prefix], // 파일 키는 특정 prefix로 시작
]
S3 presigned post 서버 코드 예시
import { S3Client } from '@aws-sdk/client-s3';
import { createPresignedPost } from '@aws-sdk/s3-presigned-post';
import { ulid } from 'ulid';

const s3Client = new S3Client({
  region: process.env.AWS_REGION,
});

export async function generatePresignedPost(
  bucketName: string,
  prefix: string,
  options: {
    maxFileSize: number;
    expirationSeconds: number;
    allowedMimeType: string;
  },
) {
  const fileKey = `${prefix}${ulid()}`;

  const post = await createPresignedPost(s3Client, {
    Bucket: bucketName,
    Key: fileKey,
    Expires: options.expirationSeconds,
    Conditions: [
      ['content-length-range', 0, options.maxFileSize], // 파일 크기 제한
      ['starts-with', '$Content-Type', options.allowedMimeType], // MIME 타입 제한
      ['starts-with', '$key', prefix], // 파일 키는 특정 prefix로 시작
    ],
  });

  return post;
}
위 함수를 실행하면 resource에 접근할 수 있는 url과 옵션으로 준 값들을 바탕으로 생성된 fields가 포함된 응답이 나온다.
{
    "url": "https://s3.<aws_region>.amazonaws.com/<bucket_name>",
    "fields": {
      "bucket": "<BUCKET_NAME>",
      "X-Amz-Algorithm": "AWS4-HMAC-SHA256",
      "X-Amz-Credential": "...",
      "X-Amz-Date": "20241220T073342Z",
      "X-Amz-Security-Token": "base64로 인코딩된 token",
      "key": "path/to/your/file",
      "Policy": "jwt로 인코딩된 policy",
      "X-Amz-Signature": "..."
    }
}
s3 presigned post 클라이언트 코드 예시
위의 서버측 응답의 url로 업로드할 파일과 fields의 값들을 formData에 넣어서 POST 요청을 하면 업로드할 수 있다.
<!DOCTYPE html>
<html lang="en">
<head>
    <meta charset="UTF-8">
    <meta name="viewport" content="width=device-width, initial-scale=1.0">
    <title>S3 Presigned POST Upload</title>
</head>
<body>
    <h1>Upload File to S3</h1>
    <input type="file" id="fileInput" />
    <button id="uploadButton">Upload</button>

    <script src="upload.js"></script>
</body>
</html>
document.getElementById('uploadButton').addEventListener('click', async () => {
    const fileInput = document.getElementById('fileInput');
    const file = fileInput.files[0];

    if (!file) {
        alert('Please select a file to upload.');
        return;
    }

    // Presigned POST 응답을 가져오는 API 호출 (예: Lambda 함수)
    const response = await fetch('/api/getPresignedPost'); // 실제 API 엔드포인트로 변경
    const presignedPost = await response.json();

    const formData = new FormData();

    // Presigned POST의 필드 추가
    Object.entries(presignedPost.fields).forEach(([key, value]) => {
        formData.append(key, value);
    });

    // 파일 추가
    formData.append('file', file);

    // S3로 파일 업로드
    const uploadResponse = await fetch(presignedPost.url, {
        method: 'POST',
        body: formData
    });

    if (uploadResponse.ok) {
        alert('File uploaded successfully!');
    } else {
        alert('File upload failed.');
    }
});
결론
서버리스 환경에서 사진을 업로드하려면 Lambda와 API Gateway의 제한(예: 10MB, 6MB)과 Lambda 실행 비용·시간을 모두 고려해야 합니다. 이러한 제약을 해결하면서도, 후기 서비스나 이미지 업로드가 많은 환경에서 유연하고 효율적인 방안을 원한다면, “S3 Presigned Post” 방식이 탁월한 선택입니다.
별도의 Lambda 처리 없이 직접 업로드가 가능해, Lambda 비용과 응답 지연을 줄일 수 있습니다.
파일 크기, MIME 타입, 파일 경로 등 세부 조건을 정책(conditions)으로 설정해 업로드를 유연하게 제어할 수 있습니다.
API Gateway의 페이로드 제한과 Lambda의 메모리·타임아웃 문제에서 자유로울 수 있어, 대규모 트래픽이나 대용량 파일 업로드에도 안정적으로 대응 가능합니다.
결국, 서버리스 환경에서 필요 이상의 비용·시간을 소모하지 않으면서도 확장성과 보안성을 모두 담보할 수 있다는 점이 “S3 Presigned Post” 방식의 가장 큰 장점입니다. 앞으로 후기 서비스를 비롯한 다양한 이미지 업로드 시나리오에서 이 방식을 고려해보셔도 좋을 것 같습니다.
참고자료
Subscribe to my newsletter
Read articles from Taejung Heo directly inside your inbox. Subscribe to the newsletter, and don't miss out.
Written by