Part 1: Introduction to Building a Scalable Video Transcoder Using Nest, TypeORM, and AWS Serverless
 Abdulmateen Pitodia
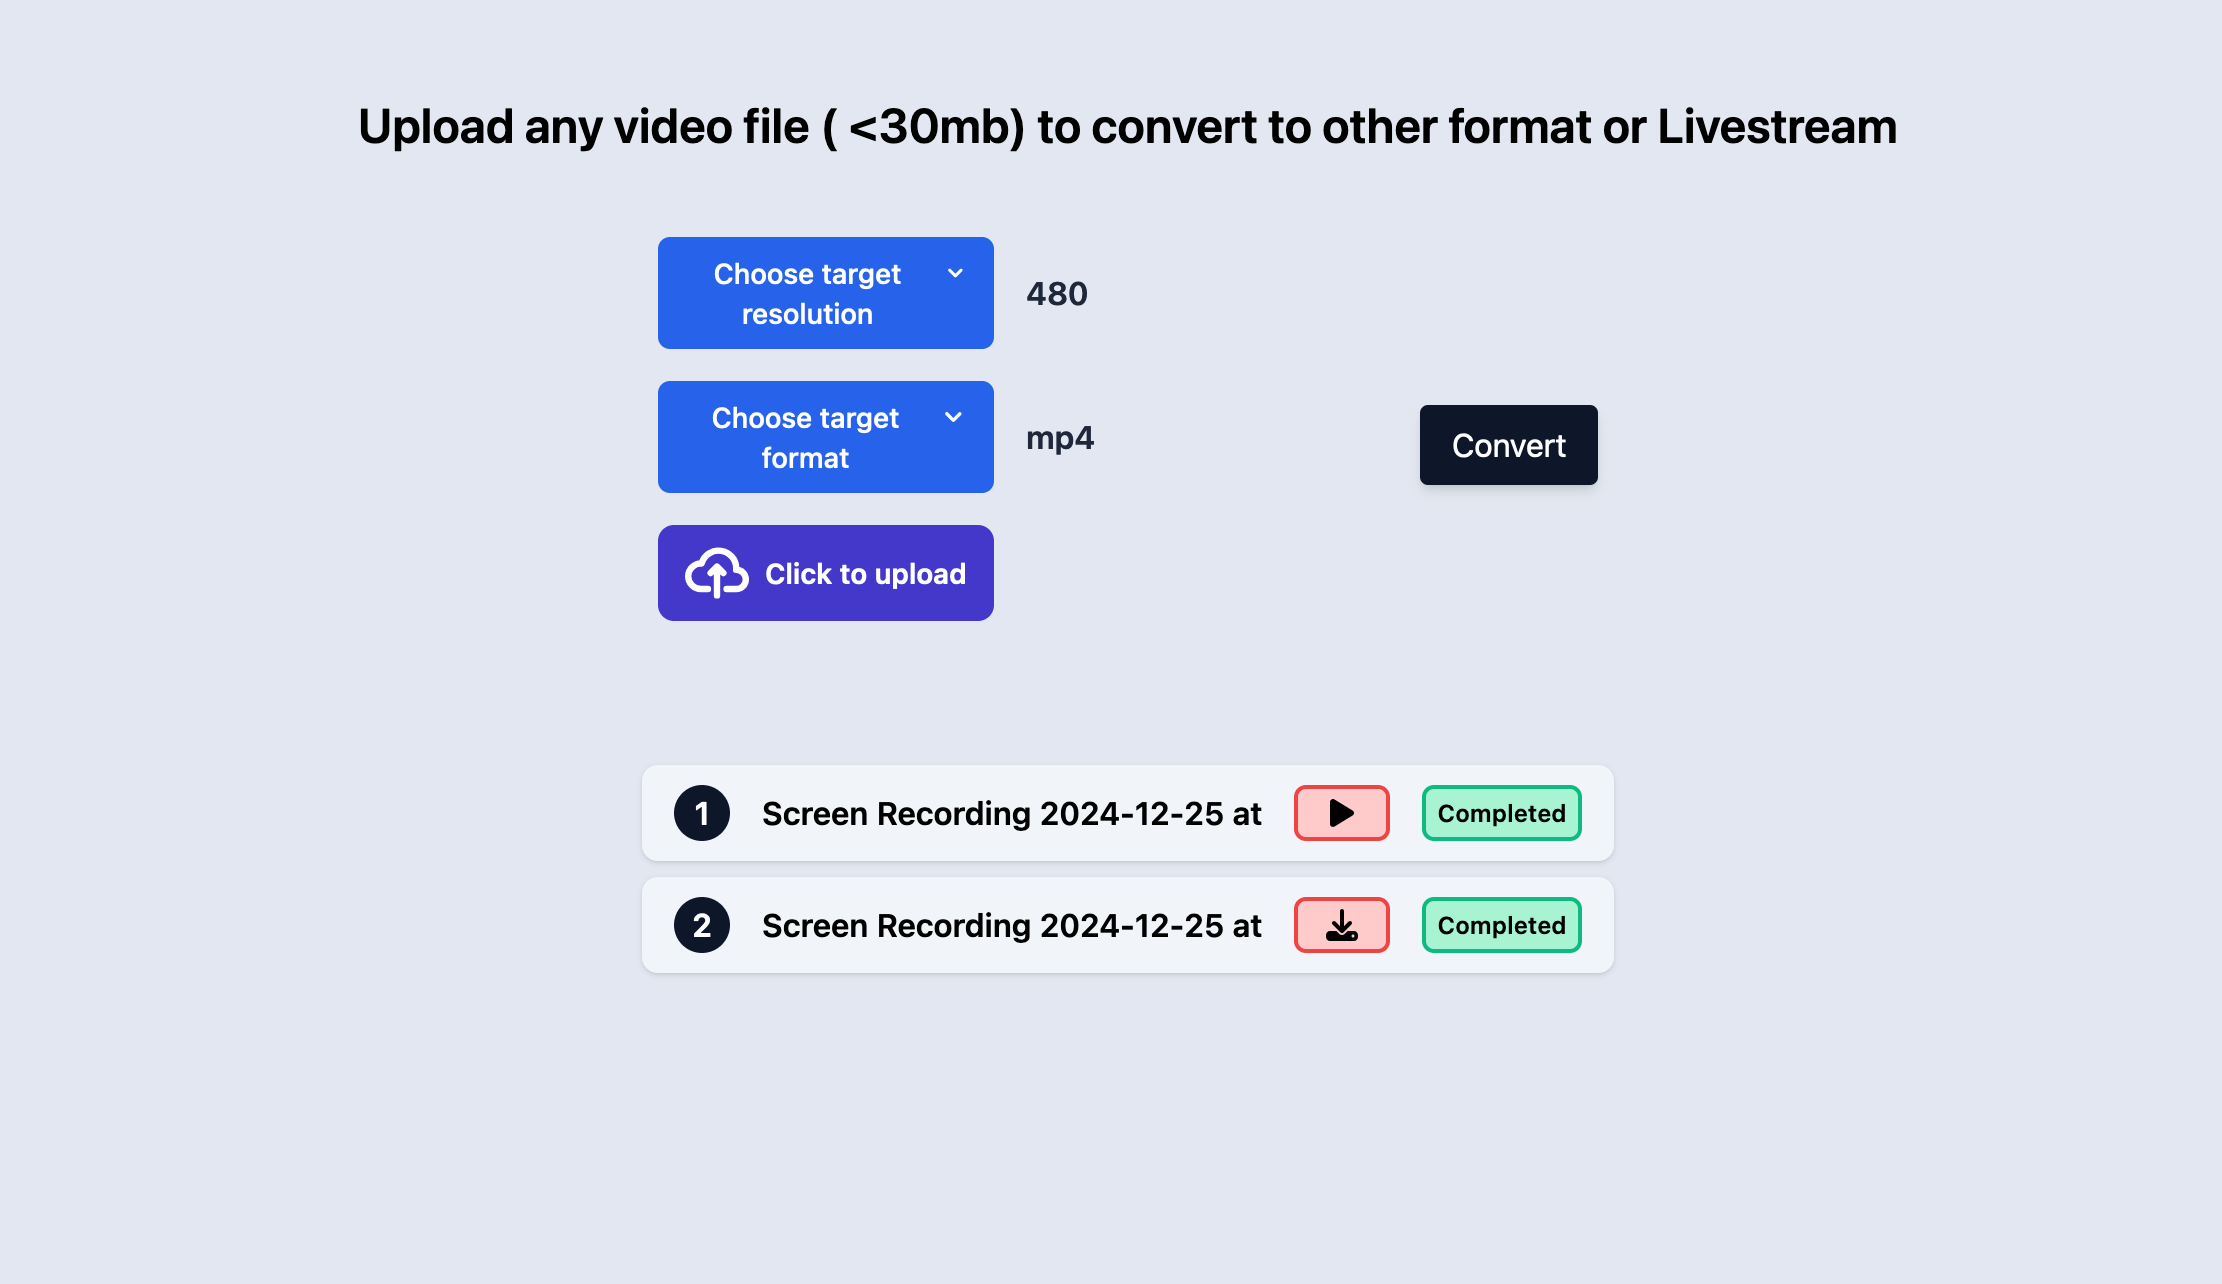
Overview
In this article, I explain how I developed a fully scalable, video transcoding application that leverages the Serverless architecture of AWS, which is capable of transforming videos from one format to other formats, or create a live streaming file hosted on AWS S3 to livestream the video
Users can upload a video on the frontend, the backend then handles the uploaded video and posts it to AWS S3, and an asynchronous work-flow is triggered that completes the transcoding to the desired format and stores the converted video output to another S3 bucket, and pushes an event to notify the backend about completion of the transcoding process, which in turn updates the database.
The frontend app keeps polling the backend for fetching the completion status of the whole process for a video periodically, to update the user that the process is complete.
Users can then download the video if they requested it to be converted to another format, or live stream the video if they chose the livestream option on the frontend.
The article covers the high level system design and in-depth discussion about the main components, in the next article, I intend to cover the serverless part, along with the actual implementation on AWS

The above image shows the system design of the app, below is the high level workflow:
The backend starts with an internet facing Application Load Balancer (ALB). AWS provides the ALB, one can configure the ALB to listen to incoming HTTP traffic and forward the traffic to a target group.
The target groups are controlled by an ECS Fargate Service which takes care of auto-scaling, each container in the service is a docker image of the backend application that hosts some controller endpoints to be able to upload videos, fetch video statuses, get pre-signed urls or fetch playlist files for live-streaming(more on this later)
The containers serve as individual units, providing orchestration to the whole workflow, and use RDS, which is a scalable PostgreSQL cluster to keep track of the completed transcoding processes.
I have used AWS S3 for utilising persistent storage across the application, it is responsible to store user-uploaded videos and application converted videos
The compute power is provided by AWS Lambda, a serverless Function As A Service (FaaS) which utilises an ffmpeg layer under the hood, powered by a python CLI that interacts with the ffmpeg layer for doing the actual conversion of the video from one format to another.
After the lambda processing is complete, the converted video is stored to an output bucket, which pushes an event upon video upload to an SQS queue.
The containers also keep listening to the queue to receive updates about the process asynchronously, and update the status in the RDS
Lets discuss each of these components in detail
Application schema
TypeORM configuration
Backend configuration in NestJS
APIs and service
SQS Listener
Docker file and compose setup for local development
Application schema

UUID (v4) helps tag each video transcoding process to a unique identifier, and as the application is supposed to be run via multiple instances, UUIDs help achieve the uniqueness across instances as their collision probability is extremely low and is suitable to be used as a unique identifier to uniquely identify each video transcoding request.
Key is the S3 key that points to the S3 path of the transcoded video. For example,
- 18d509f2-2fc6-41bc-ad00-500956f18896/mp4/720/output.mov
The Key column is populated after the whole process completes, and is of the format
- uuid/format/resolution/output.output_file_extension
This is done at the end, so that when the user wants to download the transcoded video, this key can be used to fetch the video from S3.
conversionFormat and conversionResolution store the output format and resolution for the video
status , as the name suggests, is a simple enum to denote the 3 states of the video conversion process, whether Completed, Incomplete or Failed due to an error
An example schema

TypeORM configuration
Database and entity configuration
TypeORM and NestJS work flawlessly out of the box, with some basic configuration:
@Module({
  imports: [
    ConfigModule.forRoot({
      load: [appConfig],
      isGlobal: true,
    }),
    TypeOrmModule.forRootAsync({
      useClass: TypeOrmConfigService,
      imports: [AppModule],
    }),
    TypeOrmModule.forFeature([VideoDetails]),
  ],
  controllers: [AppController],
  providers: [AppService, AppConfigService, VideoStatusService],
  exports: [AppConfigService],
})
export class AppModule {}
- I have provided the configuration using callback defined in
TypeOrmConfigServiceclass:
@Injectable()
export class TypeOrmConfigService implements TypeOrmOptionsFactory {
  private postgresOpts: PostgresConnectionOptions = {
    type: "postgres",
    host: this.appConfigService.databaseHost,
    username: this.appConfigService.databaseUserName,
    port: +this.appConfigService.databasePort,
    database: this.appConfigService.databaseName,
    password: this.appConfigService.databasePassword,
    entities: [VideoDetails],
  };

  constructor(private appConfigService: AppConfigService) {}

  async createTypeOrmOptions(): Promise<TypeOrmModuleOptions> {
    return this.postgresOpts;
  }
}
The
createTypeOrmOptionsmethod is overriden to provide thePostgresConnectionOptionstype object, which is instantiated using theappConfigService(more on this in the backend part)The entity
VideoDetailsis registered usingTypeOrmModule.forFeature([VideoDetails])in the global App Module.
Datasource configuration for TypeORM CLI
TypeORM provides a CLI to manage database migrations, migrations are a way to manage database schema changes smoothly, over a period of time.
The CLI requires a
DataSourceobject which is where we define the instance details and migration filesMigration files are .sql based files which have alter / update queries, to be pushed to the DB.
import * as dotenv from "dotenv";
import { DataSource } from "typeorm";

dotenv.config();

const isProduction = process.env.NODE_ENV === "prod";

console.log("Dot env port -> " + process.env.DATABASE_PORT);

export default new DataSource({
  type: "postgres",
  host: process.env.DATABASE_HOST,
  port: +process.env.DATABASE_PORT,
  username: process.env.DATABASE_USER_NAME,
  password: process.env.DATABASE_PASSWORD,
  database: process.env.DATABASE_NAME,
  entities: isProduction
    ? ["dist/**/*.entity.js"] // Only JS files in production
    : ["**/*.entity.ts"], // Only TS files in development
  migrations: isProduction
    ? ["dist/src/db/migrations/*.js"] // Only JS migrations in production
    : ["src/db/migrations/*.ts"], // Only TS migrations in development
});
It is important to keep the
migrationsinsidesrc/dbas I had several problems when I kept it outside thesrcfolder, upon searching a bit, I found out that TypeORM migrations are relative to thesrcdirectory, and after placing the migrations folder inside thesrcfolder, the CLI was able to detect my migrations and save the new migrations properly.For production, I have kept the migrations directory to be parsed from
distFor re-using the database details from the
.envfile, I have useddotenvdotenv.config()loads the configuration during runtime.
{
  "typeorm": "typeorm-ts-node-commonjs",
  "migration:generate": "npm run typeorm -- migration:generate ./src/db/migrations/$npm_config_name --dataSource ./data-source.ts",
  "migration:run": "npm run typeorm -- migration:run -d ./data-source.ts",
  "migration:revert": "npm run typeorm -- migration:revert --dataSource ./data-source.ts",
  "migration:run:prod": "NODE_ENV=prod typeorm migration:run -d ./dist/data-source.js"
}
The above is a snippet from my
package.jsonfile that is relevant to the TypeORM CLI config.migration:generatehelps generate the migration file in case there is an update to the TypeORM entity, in our case,VideoDetails.It also takes a command line argument
$npm_config_namewhich is provided to name the migration--dataSourceprovides the data source configuration path
migration:runonce the data-source configuration is set-up correctly, this command will run the migrations as defined in the data-source.ts file (discussed above)migration:reverthelps in case of rollbacks, TypeORM by default creates migrations for updations and rollbacks automatically.migration:run:prodsetsNODE_ENVvariable in the session toprodtemporarily, which is in turn used by thedata-sourceto use appropriate migration files and entites
Backend configuration in NestJS
// app.module.ts
@Module({
  imports: [
    ConfigModule.forRoot({
      load: [appConfig],
      isGlobal: true,
    })
  ],
  controllers: [AppController],
  providers: [
    AppService,
    AppConfigService,
    VideoStatusService
  ],
  exports: [AppConfigService],
})
export class AppModule {}
// app.config.ts
import { registerAs } from "@nestjs/config";

export default registerAs("appConfig", () => ({
  database: {
    host: process.env.DATABASE_HOST,
    port: process.env.DATABASE_PORT || 5432,
    user: process.env.DATABASE_USER_NAME,
    password: process.env.DATABASE_PASSWORD,
    name: process.env.DATABASE_NAME,
  },
  s3: {
    bucket: process.env.S3_BUCKET,
    output: process.env.OUTPUT_BUCKET,
  },
  aws: {
    region: process.env.AWS_REGION,
    profile: process.env.AWS_PROFILE,
    sqsUrl: process.env.AWS_SQS_URL,
    sqsName: process.env.AWS_SQS_NAME,
  },
}));
// app.config.service.ts

import { Inject, Injectable } from "@nestjs/common/decorators";
import { ConfigType } from "@nestjs/config";
import appConfig from "src/app.config";

@Injectable()
export class AppConfigService {
  constructor(
    @Inject(appConfig.KEY)
    private appConfiguration: ConfigType<typeof appConfig>,
  ) {}

  get databasePort() {
    return this.appConfiguration.database.port;
  }

  get databaseName() {
    return this.appConfiguration.database.name;
  }

  get databaseHost() {
    return this.appConfiguration.database.host;
  }

  // more getter methods...
}
// .env example file
AWS_REGION=<region>
AWS_PROFILE=<profile>
AWS_SQS_URL=<queue-url>
AWS_SQS_NAME=<queue-name>
S3_BUCKET=<bucket-name>
OUTPUT_BUCKET=<bucket-name>
DATABASE_HOST=<host>
DATABASE_PORT=<port>
DATABASE_USER_NAME=<user>
DATABASE_PASSWORD=<password>
DATABASE_NAME=<database>
CORS_ORIGIN=<cors-origin>
The
appConfigis a config namespace that can be created using nest-js/config packageIn the
app.module.ts, simply register the configuration, I have kept it global as I want this configuration to be applied globally to the app.I have created an
AppConfigServiceto create wrapper methods to get the configuration valuesMake sure to provide the same class in the
exportsso that other modules can use the service to fetch config values via Nest’s Dependency injection.envexample file is a required file where configuration values for the environment are passed.
APIs and Services
- Video Upload endpoint (POST)
// upload-request.dto.ts
export class UploadRequestDto {
  @IsIn(["mp4", "mkv", "webm", "m3u8"], {
    message: "Format must be one of mp4, mkv, m3u8, or webm.",
  })
  format: string;

  @Transform(({ value }) => parseInt(value, 10))
  @IsInt({ message: "Resolution must be an integer" })
  @IsIn([480, 720, 1080], {
    message: "Resolution must be one of 480, 720, or 1080.",
  })
  resolution: number;
}
The UploadRequestDto that forms the request payload, which defines the video transcoding request variables, such as what format to transcode to, and what resolution.
@Transform and other pipes are used for basic error checking and validation and throw a BadRequest 400 exception if any of the validations fail
  @Throttle({ default: { limit: 20, ttl: 60000 } })
  @Post('uploadVideo')
  @UsePipes(
    new ValidationPipe({
      whitelist: true,
      exceptionFactory: (errors: ValidationError[]) => {
        const messages = errors.map((error) => {
          const constraints = error.constraints
            ? Object.values(error.constraints).join(', ')
            : 'Invalid value';
          return `${error.property} - ${constraints}`;
        });
        return new BadRequestException(messages);
      },
    }),
  )
  @UseInterceptors(FileInterceptor('file'))
  async uploadVideo(
    @UploadedFile(
      new ParseFilePipeBuilder()
        .addMaxSizeValidator({
          maxSize: 30000000,
          message: (size) =>
            `Max video upload limit is of size: ${size / 1000000} bytes`,
        })
        .build(),
      VideoFileValidator,
    )
    video: Express.Multer.File,
    @Body() body: any,
  ) {
    const uploadRequestDto = plainToClass(UploadRequestDto, {
      ...body,
    });
    try {
      await validateOrReject(uploadRequestDto);
      return await this.appService.uploadVideoToS3(video, uploadRequestDto);
    } catch (errors) {
      console.error('Validation errors:', errors);
      throw new BadRequestException(errors);
    }
  }
@Post('uploadVideo')creates a POST-based endpoint to upload videosValidationPipeis provided a callback function to format error messages in case of invalid payload@UseInterceptors(FileInterceptor('file'))is a decorator used to parse files in the form data payloadvideois decorated withParseFilePipeBuilderto add file size validation (30Mb)Extra validators are provided by the custom validator
VideoFileValidatorThe controller defintion receives the payload and tries to convert it to
UploadRequestDtoinstance
// app.service.ts
async function uploadVideoToS3(
  video: Express.Multer.File,
  uploadRequestDto: UploadRequestDto,
): Promise<VideoDto> {
  try {
    // uuid for folder
    const folderUuidName = uuid();

    // name of the path where to upload the file
    const fileKey = this.generateS3FileName(
      folderUuidName,
      uploadRequestDto,
      video.originalname,
    );

    // upload received video
    const uploadFileS3Command = new PutObjectCommand({
      Bucket: this.appConfigService.videoStorageBucket,
      Key: fileKey,
      Body: video.buffer,
      ContentType: video.mimetype,
    });

    // video upload result
    const result = await this.s3.send(uploadFileS3Command);

    // Check if the upload was successful
    if (result.$metadata.httpStatusCode === 200 || 201 || 204) {
      // update the database for this video
      const savedVideo = await this.videoDetailsRepository.save({
        uuid: folderUuidName,
        originalName: video.originalname,
        conversionFormat: uploadRequestDto.format,
        conversionResolution: uploadRequestDto.resolution,
      });

      return { ...savedVideo };
    } else {
      throw new InternalServerErrorException(
        `File upload failed with status code: ${result.$metadata.httpStatusCode}`,
      );
    }
  } catch (err) {
    throw new InternalServerErrorException(
      `Video upload to S3 failed due to ${err}`,
    );
  }
}
uploadVideoToS3is the function that takes the video and uploads to S3It simply accepts the video file, generates a path, and uploads video to that path on S3
The S3 bucket name is taken from the configuration
Upon successfull upload, the DB is updated with the same
The video is uploaded to the path
uuid/format/resolution/<timestamp>.fileExtension
Once the video is pushed to S3, the AWS architecture kicks in, which asynchronously processes the video to desired format using lambda workers and pushes the video completion event to an SQS queue.
I will discuss the working of lambda workers in depth in the next article.
Status fetch Endpoint and service (GET)

- This endpoint fetches the status for all video processing requests.
Download video endpoint (GET)
  @Get('getVideo/:id')
  async function fetchVideoPresignedUrl(@Param('id') id: string) {
    return await this.appService.fetchVideoPresignedUrl(id);
  }
async function fetchVideoPresignedUrl(id: string): Promise<{ url: string }> {
  try {
    let video = await this.videoDetailsRepository.findOne({
      select: {
        key: true,
      },
      where: {
        uuid: id,
      },
    });

    const presignedUrl = await this.getPreSignedUrl(video.key, 180);

    return { url: presignedUrl };
  } catch (err) {
    throw new BadRequestException(
      `Error fetching url for video with id ${id}. It may not exist in database, or there is some other error ${err}`,
    );
  }
}
async function getPreSignedUrl(key: string, expires: number) {
  return getSignedUrl(
    this.s3,
    new GetObjectCommand({
      Bucket: this.appConfigService.videoOutputBucket,
      Key: key,
    }),
    {
      expiresIn: expires,
    },
  );
}
- This endpoint creates a pre-signed, downloadable, S3 URL that has a configurable expiry (set to 180s), which provides a link to download the converted video file.
Get Playlist file (GET)
  @Get('getPlaylistFile/:id')
  @Header('Content-Type', 'application/octet-stream')
  async fetchPlaylistFileForLiveStreaming(@Param('id') id: string) {
    const playlistFile =
      await this.appService.fetchLivestreamingPlaylistFile(id);
    return playlistFile;
  }
async function fetchLivestreamingPlaylistFile(id: string): Promise<string> {
  try {
    // find the video by uuid
    const video = await this.videoDetailsRepository.findOne({
      where: {
        uuid: id,
      },
    });

    // if its not a livestream type, throw error
    if (video.conversionFormat !== "m3u8") {
      throw new BadRequestException(
        "The selected video is not converted to live streaming format",
      );
    }

    // fetch the playlist file from s3 output bucket using key
    const m3u8File = await this.s3.send(
      new GetObjectCommand({
        Bucket: this.appConfigService.videoOutputBucket,
        Key: video.key,
      }),
    );

    // playlist file conversion
    // modify the contents of m3u8 file
    const chunks: Uint8Array[] = [];
    for await (const chunk of m3u8File.Body as Readable) {
      chunks.push(chunk);
    }
    const m3u8Content = Buffer.concat(chunks).toString("utf-8");

    const lines = m3u8Content.split("\n");

    // chunk modifier
    const modifiedLines: string[] = await Promise.all(
      lines.map(async (line) => {
        try {
          if (line.trim() && !line.startsWith("#")) {
            // replace each chunk file url to a pre-signed url
            const chunkKey =
              video.key.substring(0, video.key.lastIndexOf("/") + 1) +
              line.trim();
            const signedUrlForChunkFile = await this.getPreSignedUrl(
              chunkKey,
              300,
            );
            return signedUrlForChunkFile;
          }
          return line;
        } catch (err) {
          throw new Error(
            "Unable to map content of m3u8 file to presigned URL",
          );
        }
      }),
    );
    // return mutated playlist file
    return modifiedLines.join("\n");
  } catch (err) {
    throw new InternalServerErrorException(
      `Unable to fetch live streaming playlist file due to unknown error ${err}`,
    );
  }
}
This endpoint serves to provide the playlist file required by any HLS player
HLS is a HTML based, video streaming protocol that works by taking a playlist file, usually in the
.m3u8extension which is a simple text file, denoting the information about the individual video chunks.HLS works by splitting a large video file into chunks, which are smaller in size, can be download individually, based on the client’s bandwidth.
If the client requests the video to be converted to a live stream format, the process converts the video into an
.m3u8fileIn our architecture, the chunk files along with the playlist file are hosted on S3, as shown below

  output.m3u8
  #EXTM3U
  #EXT-X-VERSION:3
  #EXT-X-TARGETDURATION:6
  #EXT-X-MEDIA-SEQUENCE:0
  #EXT-X-PLAYLIST-TYPE:VOD
  #EXTINF:5.600000,
  output0.ts
  #EXT-X-ENDLIST
An
.m3u8file typically looks like above, which has information about chunks, in the above example,output0.tsis a chunk file#EXT-X-ENDLISTis the delimiter used to denote the end of the fileThe other declarations are specific to the
M3UversionIf we serve this file as is, to a HLS player, it will not work. The reason being, the playlist file has the chunk information relative to where it is hosted, in this case S3.
Any HLS player will thus not be able to find the
output0.tschunk as it only exists on S3.To work around this issue, I had to modify the playlist file itself, to include downloadable links to the chunks as well
This is where the chunk modifier code converts each of these chunks to a presigned S3 url that is downloadable by any HLS player. This modifies the file and sends the modified file back to the frontend, so that the HLS player can play the chunks as required.
#EXTM3U
#EXT-X-VERSION:3
#EXT-X-TARGETDURATION:12
#EXT-X-MEDIA-SEQUENCE:0
#EXT-X-PLAYLIST-TYPE:VOD
#EXTINF:11.850000,
https://videooutput-890bcd68ed3a4ba9a70b4c0587fb5edf.s3.ap-south-1.amazonaws.com/254791cb-2830-44dc-b8ad-fa639e2107dc/m3u8/720/output0.ts?X-Amz-Algorithm=AWS4-HMAC-SHA256&X-Amz-Content-Sha256=UNSIGNED-PAYLOAD&X-Amz-Credential=ASIA5CBDRFRLDY7X3JLS%2F20241226%2Fap-south-1%2Fs3%2Faws4_request&X-Amz-Date=20241226T061838Z&X-Amz-Expires=300&X-Amz-Security-Token=IQoJb3JpZ2luX2VjEEkaCmFwLXNvdXRoLTEiRzBFAiBdPbvrFdpAdj%2FHgh29uUY18dJ61XC5e6jxzIgPwuF2PQIhAIweBt58ARF2gTrIrpMAd%2FJp8UKdzsooyjD9X2NAZlHCKvgDCCIQABoMODk3NzIyNjkwNjQ2IgzlA5w6JC1m0v7%2B4IEq1QPPQ50fBfxmp1XbfANHUbuxarblkx9JSvo6LXx8OOkZtDureMZ2DtVqpX7AmI16xP82qceXbzpk1ROJT5UQc0DdJ%2FYHfJIEXEvVDI%2BQ2hKs1%2BE3ShQbQTBN9fF3%2FT%2FKEsh5iMLviRYQd8aXrDB5MKMUTcW4UFitoZLOk1wOMO2itF1n%2B2O%2B0WckpSQXA%2FGERQDCaQhQTrHNbHGDxBK1kKQJTfMe7X9%2FSnnmddTBSwSuWU85Pk3Oi8VoZC2BjUpPJYwq7xAo7TG3itCtLHd8f7UBVMwZtSZyDEjOwsxzGRpGVrh8ZsS84HDcCPPvi%2BcDa7F0e6OA6xFAC2HHVYRA%2FbT0unIIUvECcZTB4AJ4%2FnH%2F%2BmFTPwwHuBdG3HoSX4p45okKcXgI4IIhOc6krtmrZJ8g%2FWBuNq7lmmhXVV%2F4sI6XxTB%2FxArliQ%2FRbZFfu4OvyTMedMpUWBaBwHbKgg6tI30OSfGy1rayx6aYAKomXQzfvigmaDxOdBv8rL0qFLFW9Y2jACLzg%2FudPm6LSl43UWVKznEhUECrCRleUIljGV%2BgmH78dB5Fs4qSfZcUZhFI5azPvEcadj0oagHw%2F6dbge6l1XHwF7JMIK7QEUGJo1yUe0PMkKUTMPncsrsGOqUByefVV2xHKQtqPZle8%2BEKM6PMYOQ4Cf16UAzFMN2pp8J%2F6BWipBjj%2FHdLGTmL%2B2nR1nNA%2ByH8lFflIiUDUcnVppjnHV9DiLPo81CsazqCDvmapevXZiZeMrM5nuTYb2nVIwURcT8asiiSQsCkns0GoIR0Ghw4pcPCz8k%2FqwodUM0sZuzl7YaAOLbVt%2BaJWWO5eTVCQDHYfnhN5F97bd5AW4EOBQk3&X-Amz-Signature=4186534575d18556d91fe1f1d8b2d495dcadd0eedb26722064274afa807b4c44&X-Amz-SignedHeaders=host&x-id=GetObject
#EXT-X-ENDLIST
- This is how after the modification, the
.m3u8file looks like.
SQS Listener
The backend app also keeps listening to the events from SQS queue.

I have used
'@ssut/nestjs-sqs'module which is a client library to interact with SQS in NestJS.As soon as a message is received, the message body is parsed to extract out the key.
The key is of the format
uuid/format/resolution/output.format_extensionThe key is split on
/anduuidis extracted out of it.The status of the video processing is marked as completed in RDS for that particular
uuidIf the status marking was success, we delete the message from SQS
The SQS is configured with a 3-min visibility timeout, which means that when any instance of the app consumes the message, it will not be visible to other instances (consumers) untill the duration of the timeout
Thus, if within this time period, a consumer consumes and successfully deletes the message, the process gets completed.
If at all, an instance during processing is unable to successfully consume the message, it will not mark it as deleted, and after the visibility timeout expires, the message will be available to other consumers
SQS guarantees atleast-once delivery in case of normal queue mode.
Docker file and compose set-up
Dockerfile setup
#Build Stage
FROM --platform=linux/amd64 node:18-alpine AS builder

WORKDIR /app

COPY package*.json ./

RUN npm install

COPY . .

RUN npm run build

#Runtime Stage
FROM node:18-alpine

WORKDIR /app

RUN apk add --no-cache curl bash

COPY --from=builder /app/dist ./dist
COPY --from=builder /app/node_modules ./node_modules
COPY --from=builder /app/package*.json ./

EXPOSE 3000

CMD ["node", "dist/src/main"]
The Dockerfile includes the application in a
distbundleTo make an optimised image, I have used multi-layer docker build to reduce the resultant image size.
The container is exposed on port
3000to serve the endpoints
Docker compose setup
version: '3.8'

services:
  postgres:
    image: postgres:latest
    container_name: my-video-convertor-app-db
    environment:
      POSTGRES_USER: $DATABASE_USER_NAME
      POSTGRES_PASSWORD: $DATABASE_PASSWORD
      POSTGRES_DB: $DATABASE_NAME
    ports:
      - "$DATABASE_PORT:5432"
    env_file:
      - .env
    volumes:
      - postgres_data:/var/lib/postgresql/data
    networks:
      - backend

  nestjs-app:
    image: video-transcoder-app:latest
    container_name: nestjs-app-container
    ports:
      - "3000:3000"
    env_file:
      - .env
    environment:
      DATABASE_HOST: postgres
      DATABASE_PORT: 5432
    depends_on:
      - postgres
    networks:
      - backend
    volumes:
      - ~/.aws:/root/.aws:ro
    command: sh -c "./wait-for-it.sh postgres:5432 -- npm run migration:run:prod && node dist/src/main"

volumes:
  postgres_data:

networks:
  backend:
    driver: bridge
The compose file requires a
.envfile that provides environment variables to both the containersBefore the NestJS container starts, we have to run the TypeORM migrations to create the required tables and schema.
For accessing S3 and SQS, the
~/.awsdirectory must be present with your static credentials, these will get mounted asread-onlyin the container, thus allowing access to AWS resources via their SDKs.
The end
Thanks for reading my article, this was Part-1, where I explained the application and code related side of things, there are more things such as, the complete setup of these services on AWS to ensure a scalable, serverless architecture, along with the simple frontend part which is built on React.
I hope you enjoyed reading this, please find relevant links to the project / my profile below
Subscribe to my newsletter
Read articles from Abdulmateen Pitodia directly inside your inbox. Subscribe to the newsletter, and don't miss out.
Written by
Abdulmateen Pitodia
Abdulmateen Pitodia
Software engineer, passionate about learning and exploring distributed systems, tinkering around with Frontend, learning on the go