Improving Infrastructure as Code (IAC) Using DevOps and CI/CD | Multi-Environment Deployment
 Ritesh Kumar Nayak
Table of contents
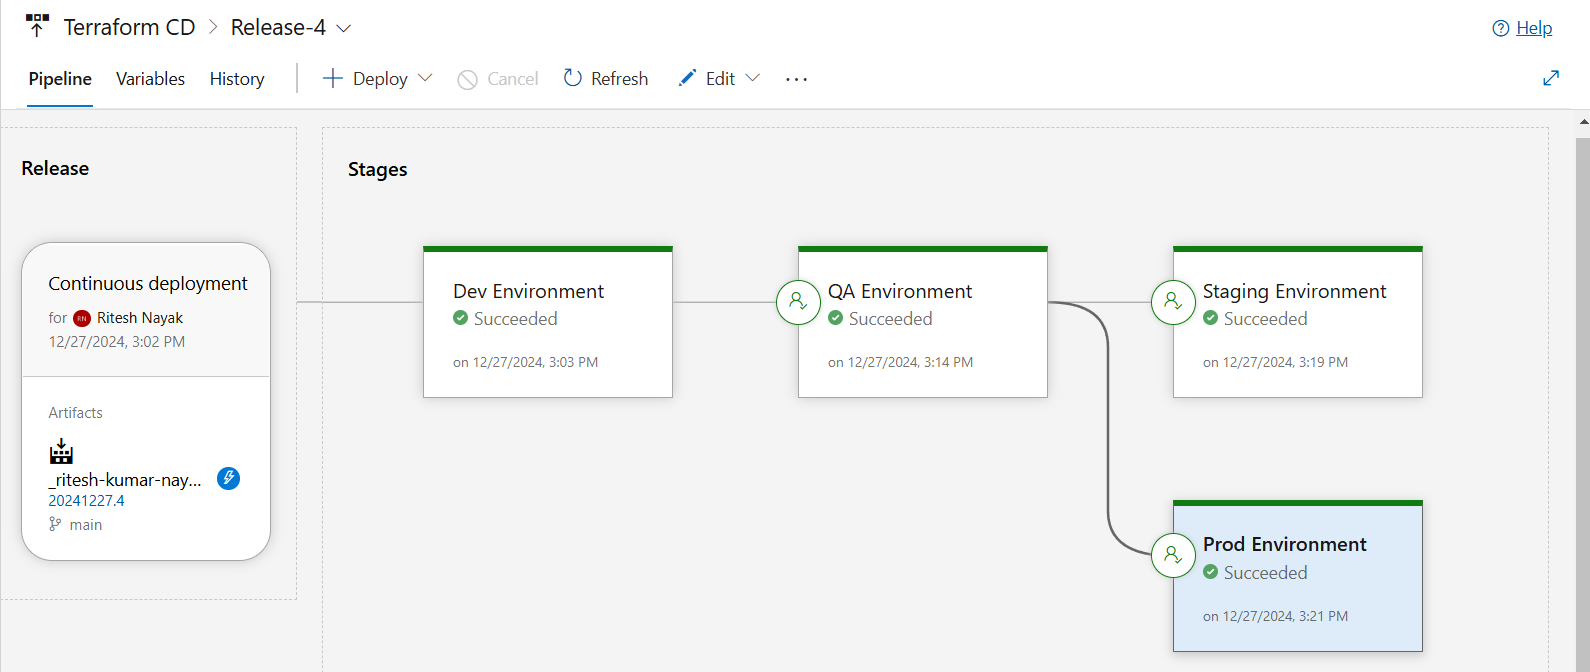
In this project, we’ll leverage the Azure DevOps pipeline for automating the infrastructure deployment. We are also going to create multiple environment such as Dev, QA, Staging, and Prod having identical resources in each environment via Terraform.
Creating Service Connection
This build and release pipeline will plan and apply Terraform manifests, as part of which it will generate the state files and create resources that are on Azure. To enable this communication between the pipeline and Azure Cloud, we need to establish a Service Connection which can be done using the following steps.

CI-Build Pipeline
Task 1
In this step, the Terraform manifests, which are essential for infrastructure provisioning, are copied from the system's default directory to the build artifact directory. This ensures that the configuration files are organized and accessible for downstream pipeline stages.
The Continuous Integration (CI) pipeline is a critical part of the DevOps lifecycle, enabling seamless integration and testing of code changes. In this pipeline, we handle the preparation of Terraform manifests for deployment and ensure they are readily available for subsequent release pipelines.
# Starter pipeline
# Start with a minimal pipeline that you can customize to build and deploy your code.
# Add steps that build, run tests, deploy, and more:
# https://aka.ms/yaml

trigger:
- main

pool: Default
  #vmImage: ubuntu-latest
stages:
  - stage: GetTerraformManifests
    displayName: Build Stage
    jobs:
      - job: FetchTerraformManifests
        steps:
          - bash: echo "contents in working directoy"; ls -lrth $(System.DefaultWorkingDirectory)

          - task: CopyFiles@2
            inputs:          #/home/ubuntu/myagent/_work/1/s/16-Azure-IAC-DevOps/terraform-manifests
              SourceFolder: '$(System.DefaultWorkingDirectory)/16-Azure-IAC-DevOps/'
              Contents: '**'
              TargetFolder: '$(System.DefaultWorkingDirectory)'

          - bash: echo "contents in working directoy"; ls -lrth $(System.DefaultWorkingDirectory)
            displayName: List Contents post copying

          # Copy Terraform files to the Artifact Staging Directory
          - task: CopyFiles@2
            displayName: Copy Terraform Manifests to Staging Directory
            inputs:
              SourceFolder: '$(System.DefaultWorkingDirectory)/terraform-manifests'
              Contents: '**/*'  # Copy all files and subdirectories
              TargetFolder: '$(Build.ArtifactStagingDirectory)'

          - task: PublishBuildArtifacts@1
            displayName: Publish Manifests to Release pipeline
            inputs:
              PathtoPublish: '$(Build.ArtifactStagingDirectory)'
              ArtifactName: 'terraform-manifests'
              publishLocation: 'Container'
This pipeline is a foundational example that demonstrates how to fetch, process, and publish Terraform manifests for use in subsequent stages like deployment. Below is a detailed breakdown of each section of the YAML pipeline.
Trigger Section
trigger:
- main
- Purpose:
The pipeline is configured to trigger automatically whenever there is a commit to the main branch.
Pool Section
pool: Default
- Purpose:
The pipeline runs on the default agent pool. I have added my self-hosted agent to the default pool.
Stages
The pipeline contains a single stage, GetTerraformManifests, designed to build and prepare Terraform manifests.
Stage: GetTerraformManifests
stages:
  - stage: GetTerraformManifests
    displayName: Build Stage
- Purpose:
The primary stage to gather and publish Terraform manifests required for deployment.
Job: FetchTerraformManifests
jobs:
  - job: FetchTerraformManifests
- Purpose:
A single job under the stage that defines the steps to fetch and publish the Terraform manifests.
Steps Breakdown
List Initial Directory Contents
- bash: echo "contents in working directory"; ls -lrth $(System.DefaultWorkingDirectory)- Explanation:
Outputs the contents of the working directory before any processing. This helps to verify the initial state and debug potential issues.
- Explanation:
Copy Terraform Manifests from Source to Working Directory
 - task: CopyFiles@2
   inputs:
     SourceFolder: '$(System.DefaultWorkingDirectory)/16-Azure-IAC-DevOps/'
     Contents: '**'
     TargetFolder: '$(System.DefaultWorkingDirectory)'
Purpose:
Copies all files from the specified source folder (
16-Azure-IAC-DevOps) to the working directory.Ensures Terraform files are available for further processing.
List Directory Contents Post-Copying
- bash: echo "contents in working directory"; ls -lrth $(System.DefaultWorkingDirectory) displayName: List Contents post copying- Purpose:
Outputs the contents of the directory after copying to verify the successful transfer of files.
- Purpose:
Copy Terraform Files to Staging Directory
 - task: CopyFiles@2
   displayName: Copy Terraform Manifests to Staging Directory
   inputs:
     SourceFolder: '$(System.DefaultWorkingDirectory)/terraform-manifests'
     Contents: '**/*'  # Copy all files and subdirectories
     TargetFolder: '$(Build.ArtifactStagingDirectory)'
Purpose:
Moves all Terraform manifests to the
Artifact Staging Directory.Prepares the files for publishing as build artifacts.
Publish Terraform Manifests as Build Artifacts
 - task: PublishBuildArtifacts@1
   displayName: Publish Manifests to Release pipeline
   inputs:
     PathtoPublish: '$(Build.ArtifactStagingDirectory)'
     ArtifactName: 'terraform-manifests'
     publishLocation: 'Container'
Purpose:
Publishes the Terraform manifests from the staging directory as build artifacts.
The artifact is named
terraform-manifestsand is made available in the container.These artifacts can be used in subsequent Release Pipelines for deploying infrastructure.
Key Benefits of This Pipeline
Streamlined Artifact Management:
Automates the process of gathering and preparing Terraform manifests for deployment.Modularity:
Artifacts published here can be reused across multiple release pipelines, enabling consistent and efficient deployment workflows.Traceability:
Each step is logged and auditable, ensuring that the process is transparent and easy to troubleshoot.Scalability:
Provides a base pipeline that can be extended to include additional stages, such as testing or multi-environment deployments.
This pipeline is a crucial first step in integrating Terraform workflows into your CI/CD processes, ensuring that the infrastructure-as-code artifacts are always ready for deployment.
Release Pipeline
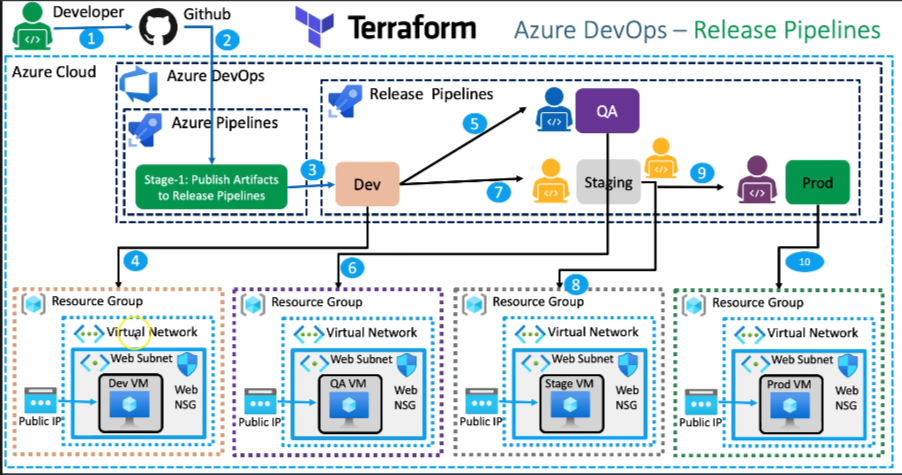
The release pipeline leverages the artifacts created during the CI process to deploy identical resources in multiple environments—Dev, QA, Staging, and Production. Each environment is isolated and configured with unique settings to reflect the appropriate stage of the application lifecycle.
NOTE: by default, the creation of a Release Pipeline is disabled as it is considered as legacy. To create the release pipeline you have to
Go to your Project Settings.
Under the Pipelines section, select Settings.
Scroll down to the Classic Release Pipelines option and enable it.
Configure Artifact Source
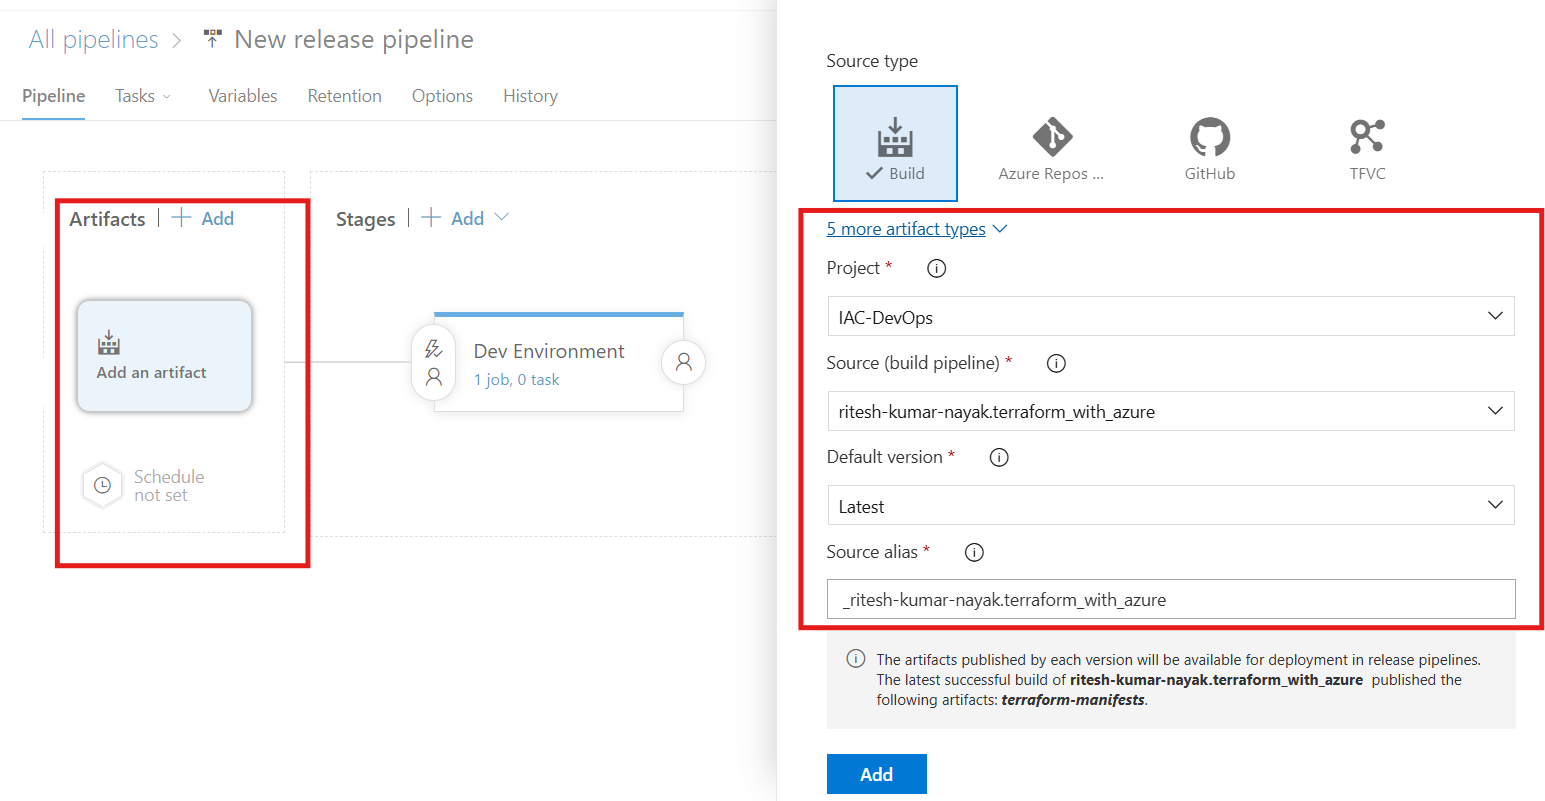
In the release pipeline, we have first to configure the source of artifacts i.e. from our build pipeline
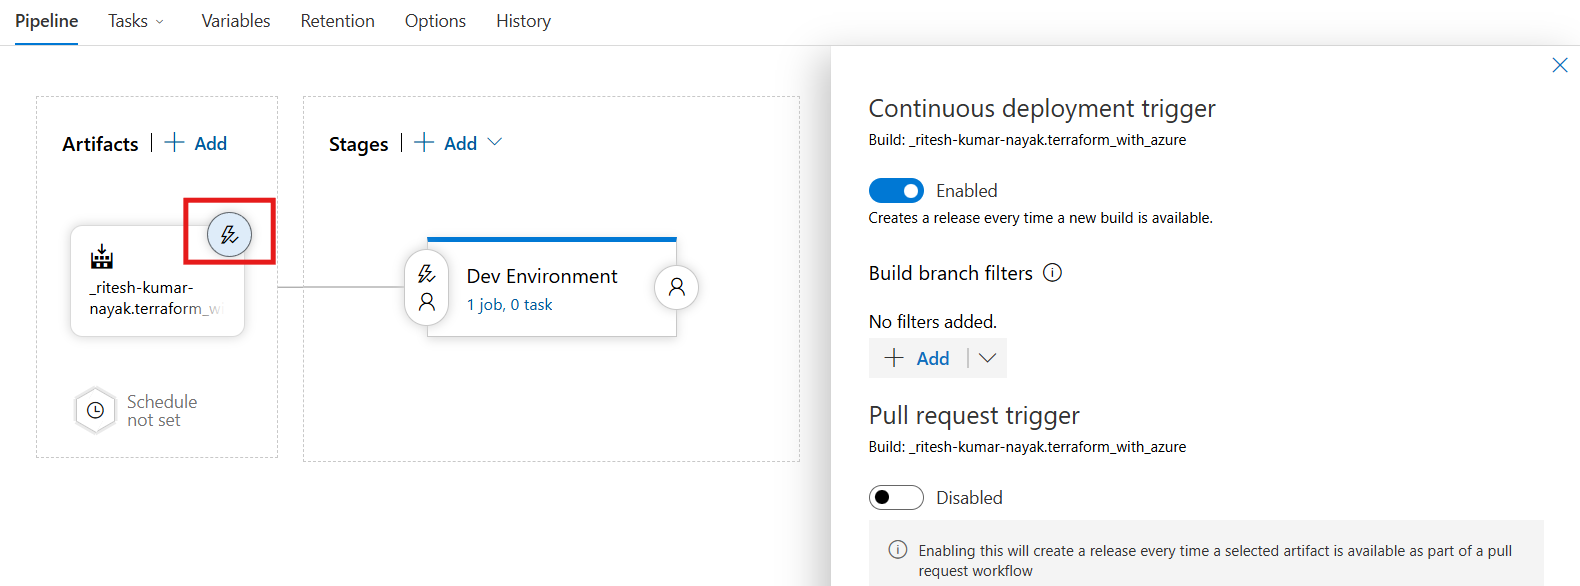
Then enable the continuous deployment trigger as shown below
Dev Environment
Release Pipeline for Dev
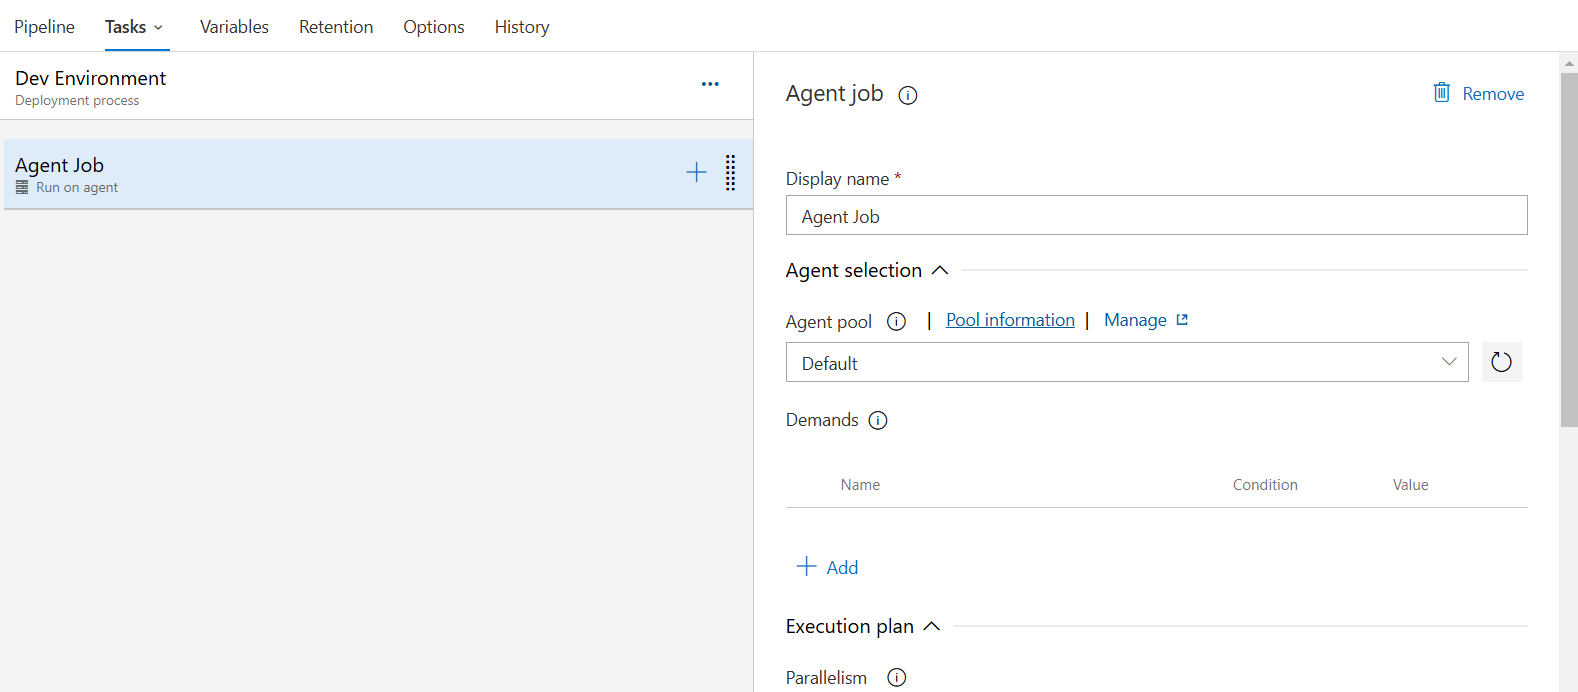
- Configure the agent job where you define the pool and other configurations
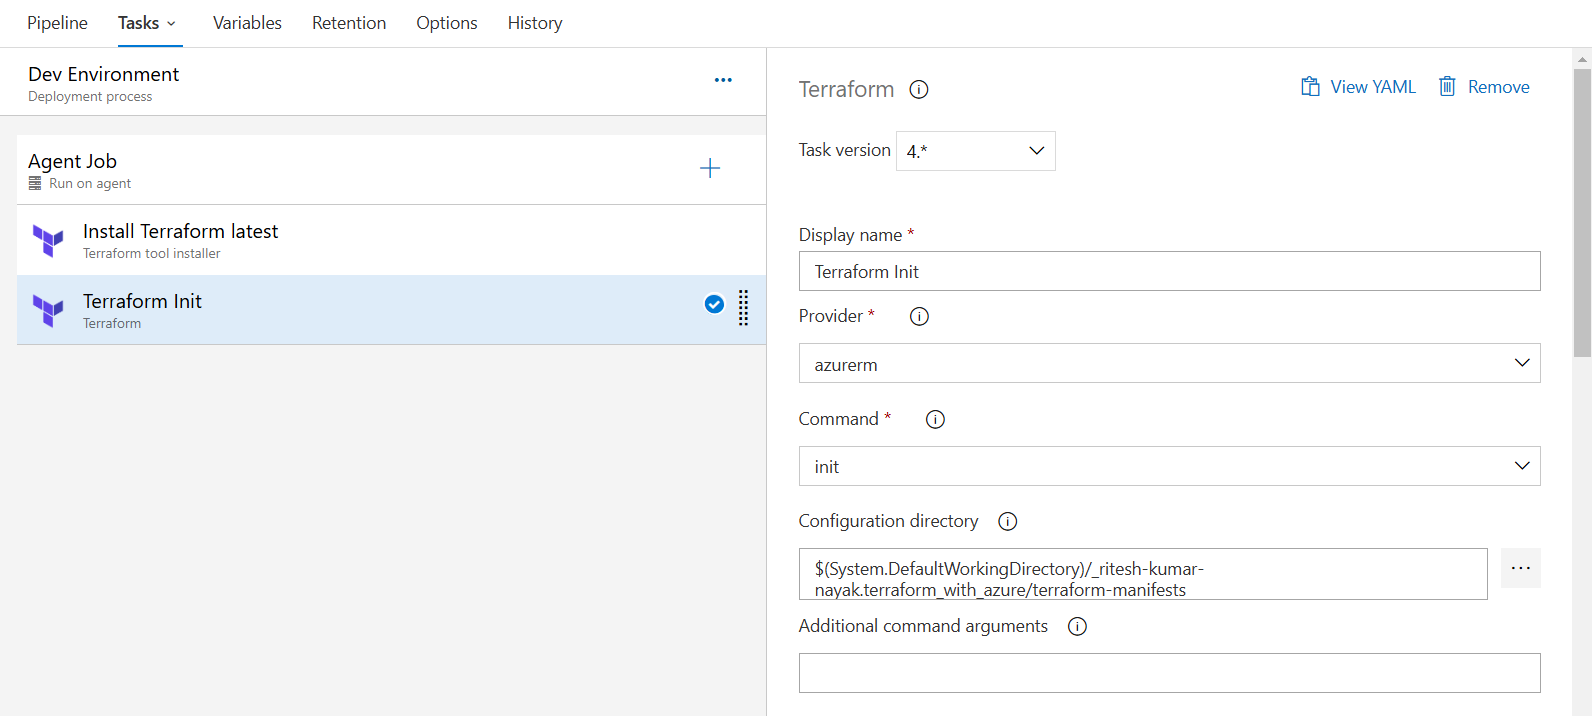
Terraform Installation Task where you define the supported terraform version that needs to be installed in your server and perform the execution

Terraform Init task
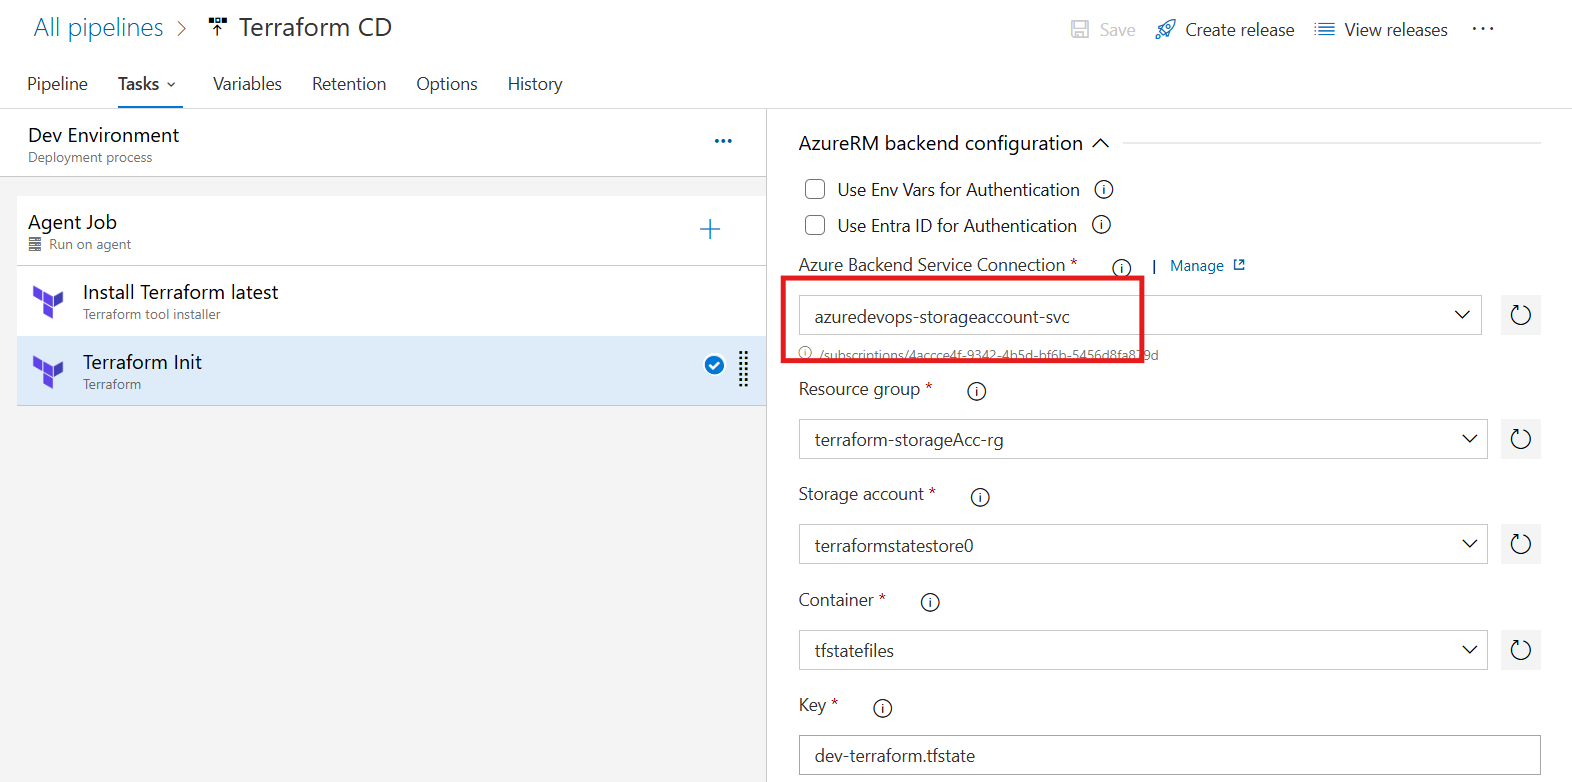
Here we configure the backend which eliminates the need to explicitly define details in the terraform configuration ( versions.tf ) file.
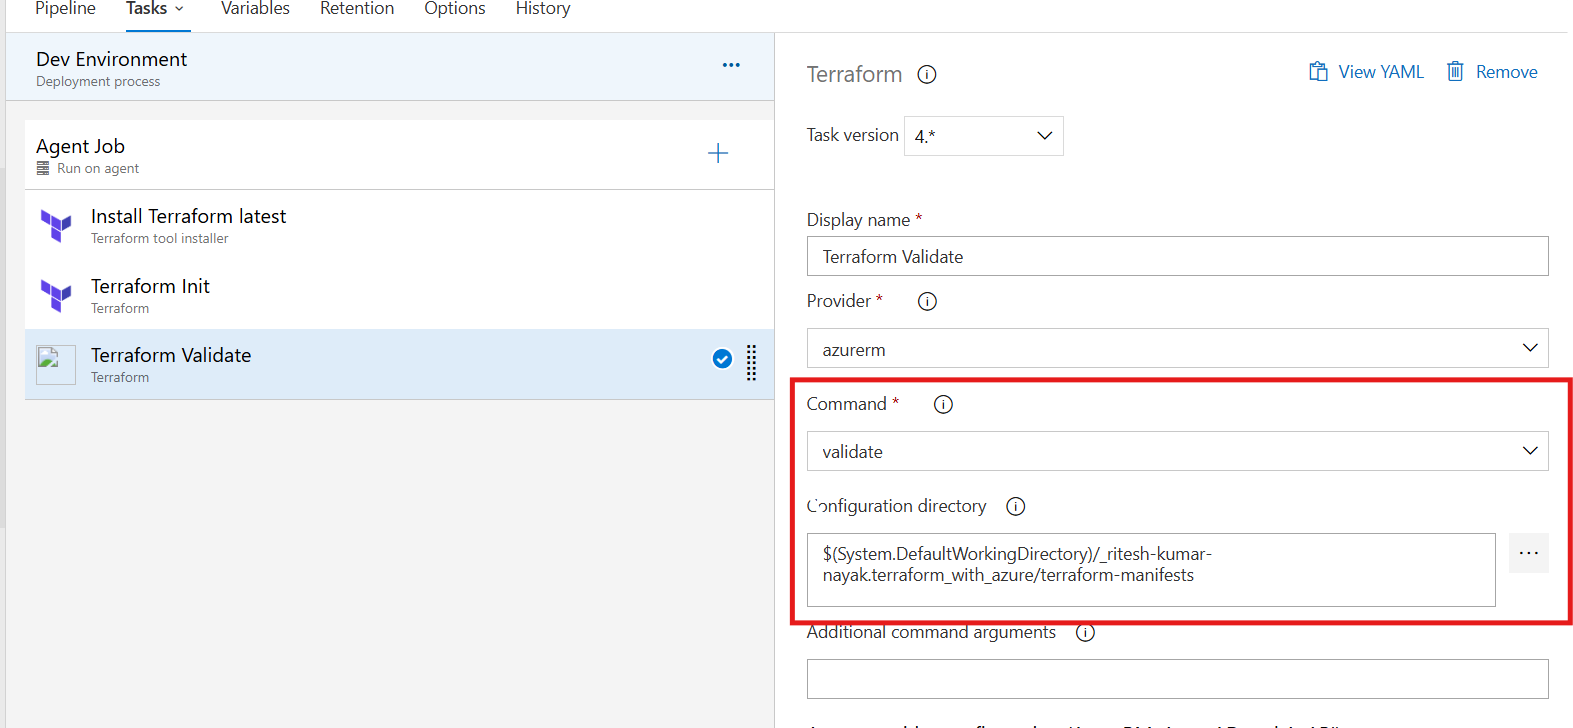
Terraform Validate Task
This task will validate the terraform configuration present inside the path given in the configuration directory
Terraform Plan Task
This task will run the terraform plan command and display the resource creation plan for the same dev environment. Here along with
terraform plan, we are providing an additional argument as-var-file=dev.tfvarswhich will utilize the variables dedicated to the dev environment for resource creation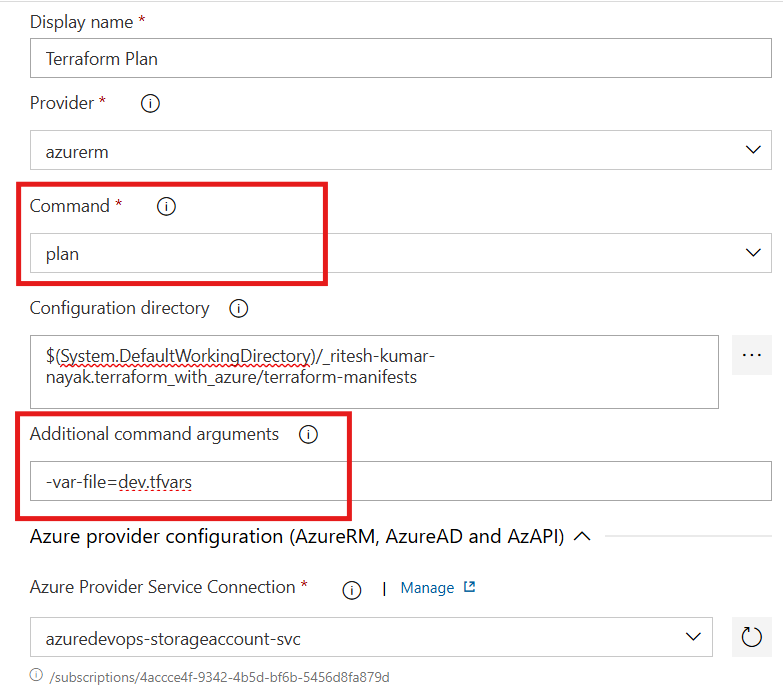
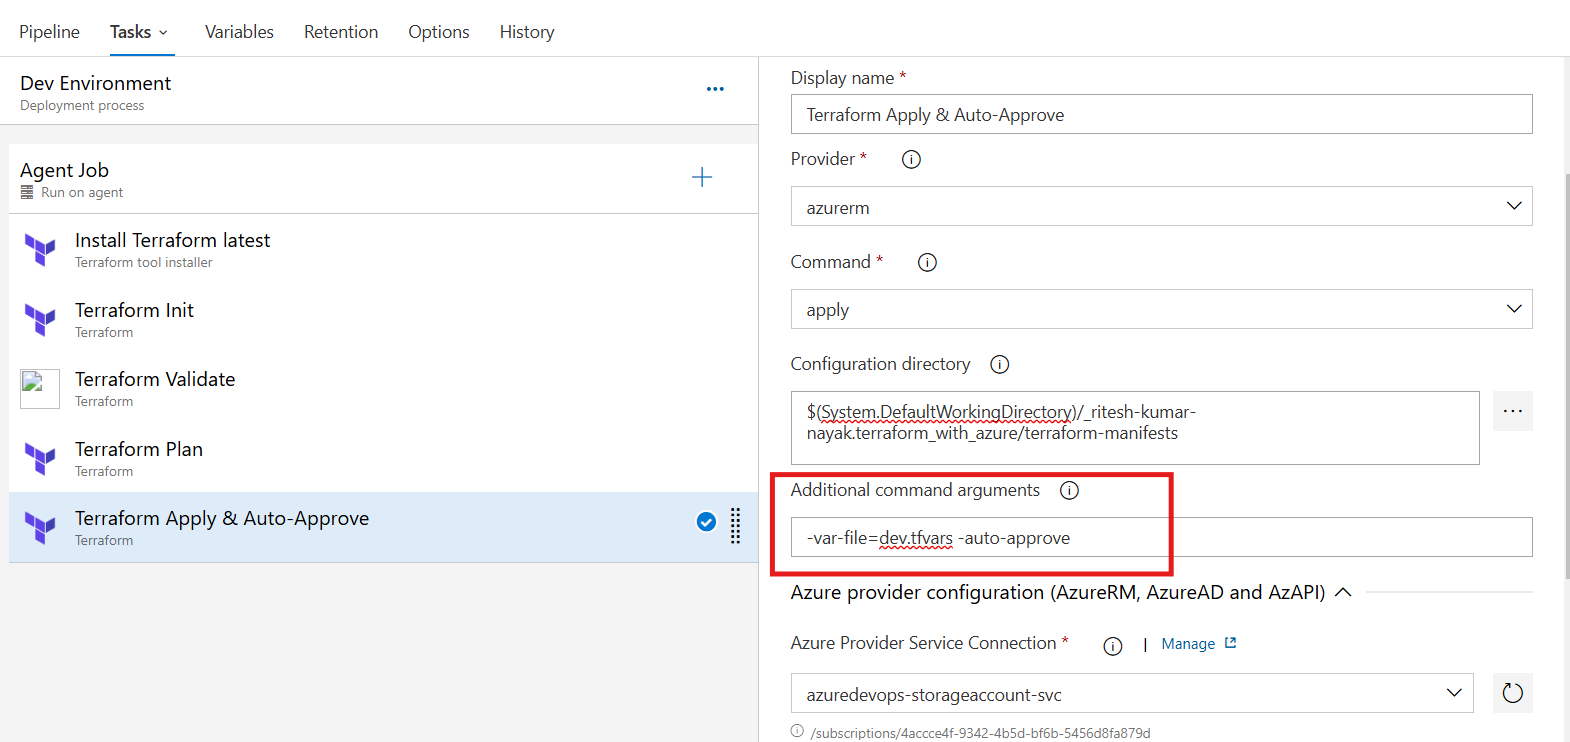
Terraform Apply Task
This task will run the terraform apply command and perform the resource creation in the dev environment. Here along with terraform apply, we are providing an additional argument as -var-file=dev.tfvars & -auto-approve which will utilize the variables dedicated to the dev environment for resource creation without asking for manual intervention
Dev Environment Completion
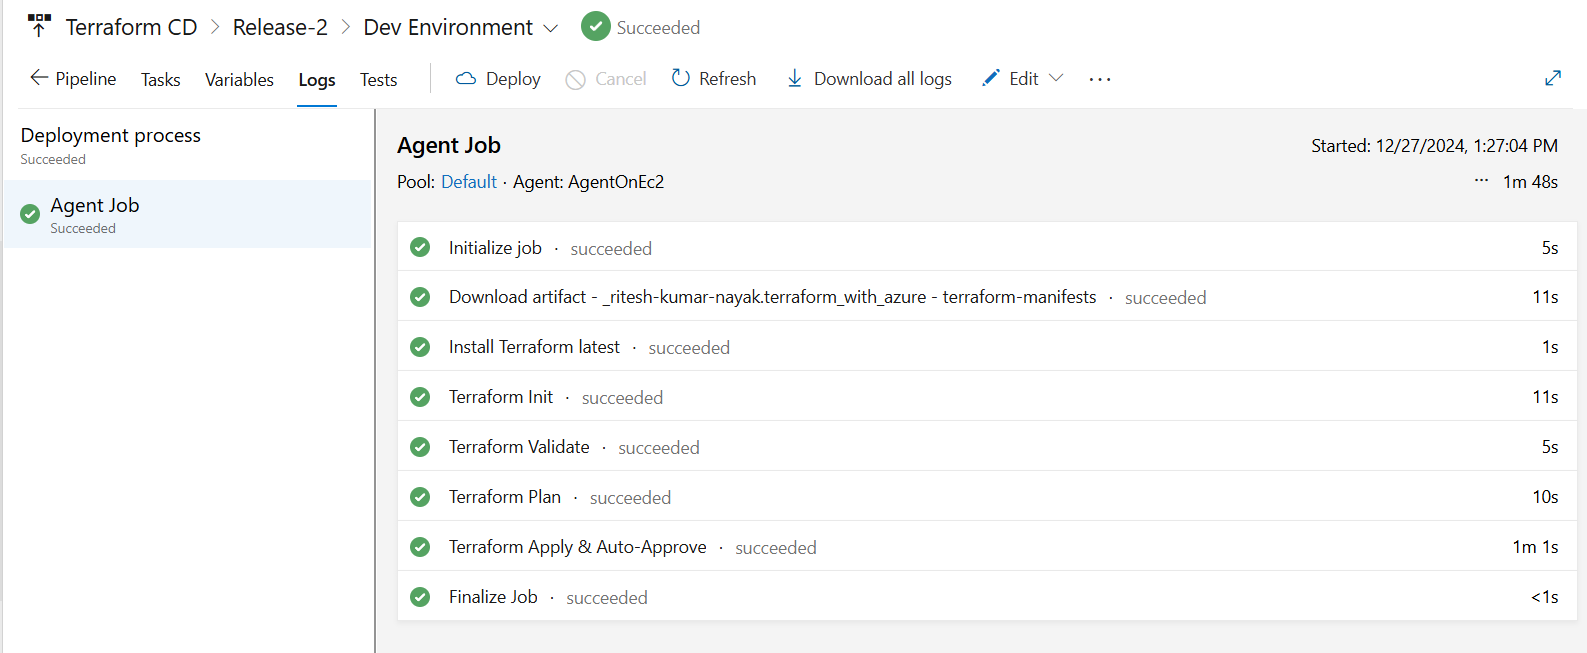
With this the dev deployment has been completed
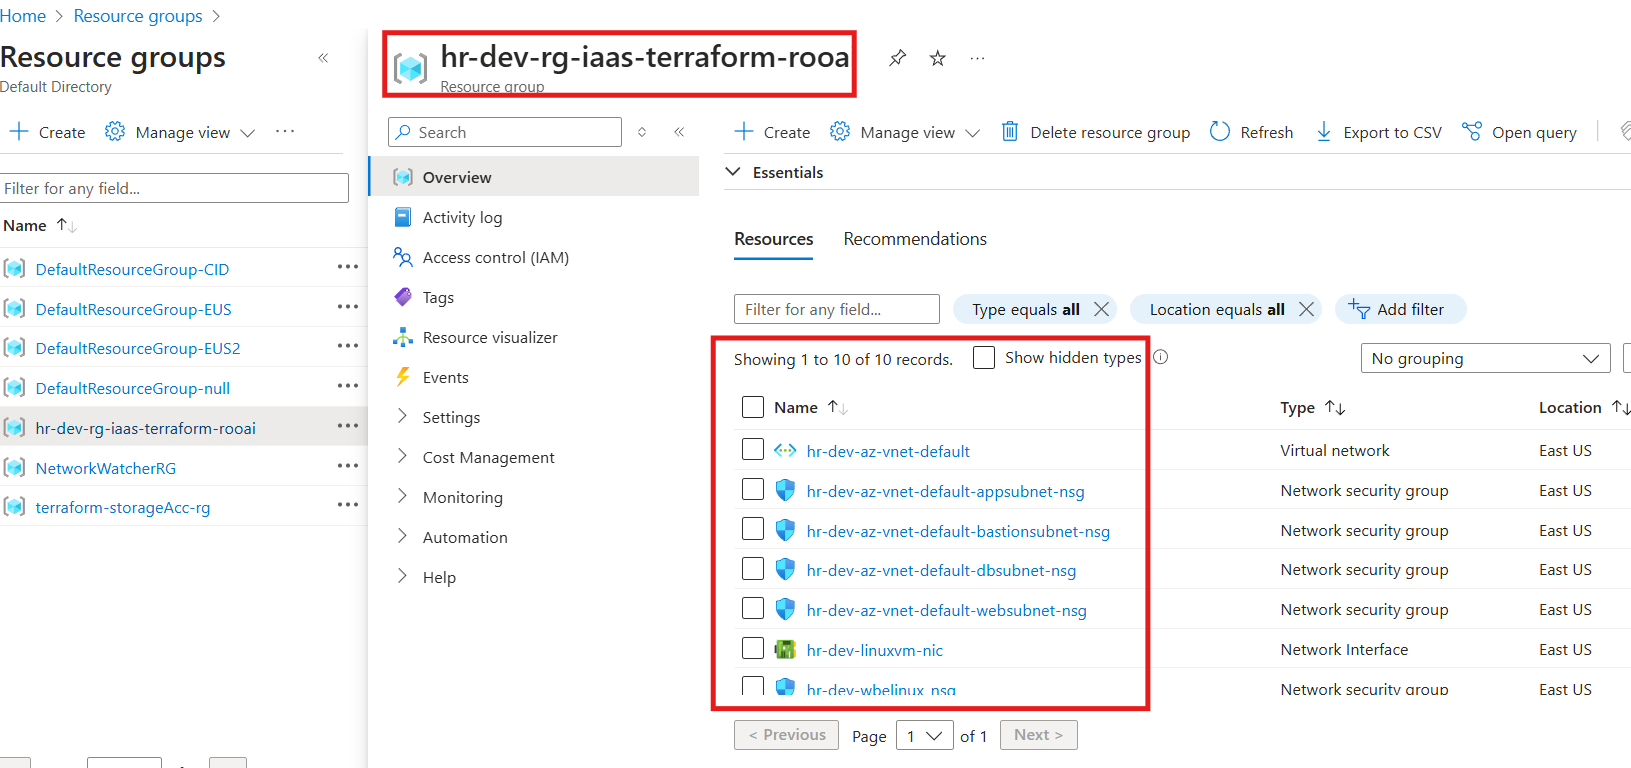
Terraform manifest Modification for Dev Environment
The Dev environment serves as the first stage for deploying and testing infrastructure. The configuration (tfvars) for the Dev environment includes:
Virtual Network (VNet):
10.1.0.0/16Subnets:
Web Subnet:
10.1.1.0/24App Subnet:
10.1.11.0/24DB Subnet:
10.1.21.0/24Bastion Subnet:
10.1.100.0/24
This environment is automatically deployed without manual intervention.
tfvars for Dev environment
environment = "dev"
vnet_address_space = ["10.1.0.0/16"]

web_subnet_name    = "websubnet"
web_subnet_address = ["10.1.1.0/24"]

app_subnet_name    = "appsubnet"
app_subnet_address = ["10.1.11.0/24"]

db_subnet_name    = "dbsubnet"
db_subnet_address = ["10.1.21.0/24"]

bastion_subnet_name    = "bastionsubnet"
bastion_subnet_address = ["10.1.100.0/24"]
QA Environment
Release Pipeline for QA Environment with Pre-Deployment Approval
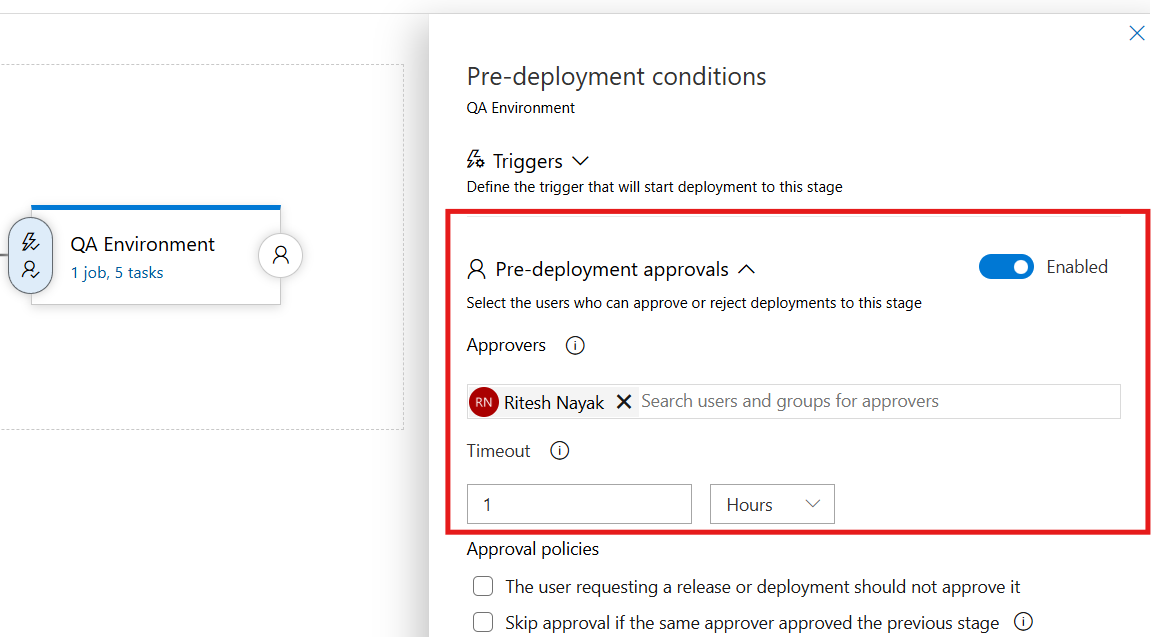
The QA environment introduces Pre-Deployment Approvals, ensuring changes are reviewed before deployment. This step adds an extra layer of validation to maintain infrastructure consistency.
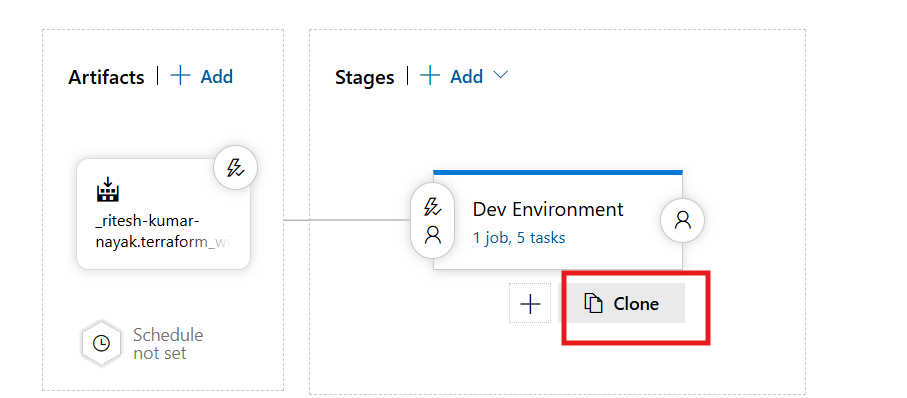
Most of the pipeline configuration will remain same with minor modifications, moving forward we’ll highlight only modified configurations for QA environment here. As most of the configuration will remain unchanged we can directly clone the dev stage by clicking on the clone has highlighteded below and then make the necessary modification to it.
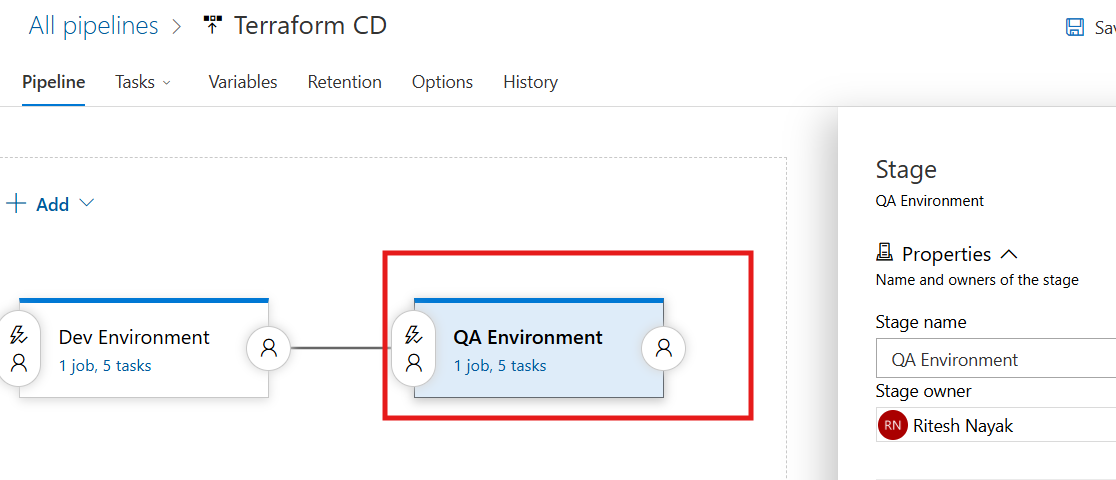
Once cloned we can make the necessary modifications as shown
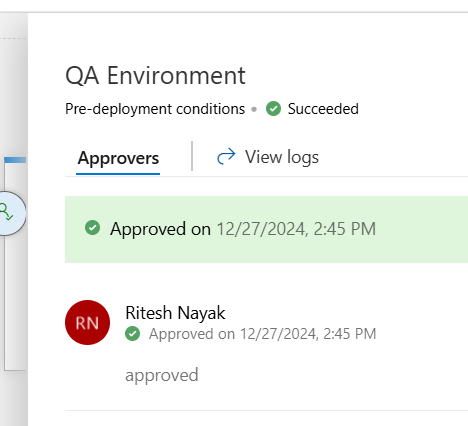
Configure Pre-Deployment Approver
Here in QA deployment, we are required to verify the deployment before proceeding for which setting up the deployment approval is necessary and that can be configured as shown below
Terraform Init Task - QA
In the QA environment, the
terraform initcommand must be configured with a backend block pointing to the QA-specific container key.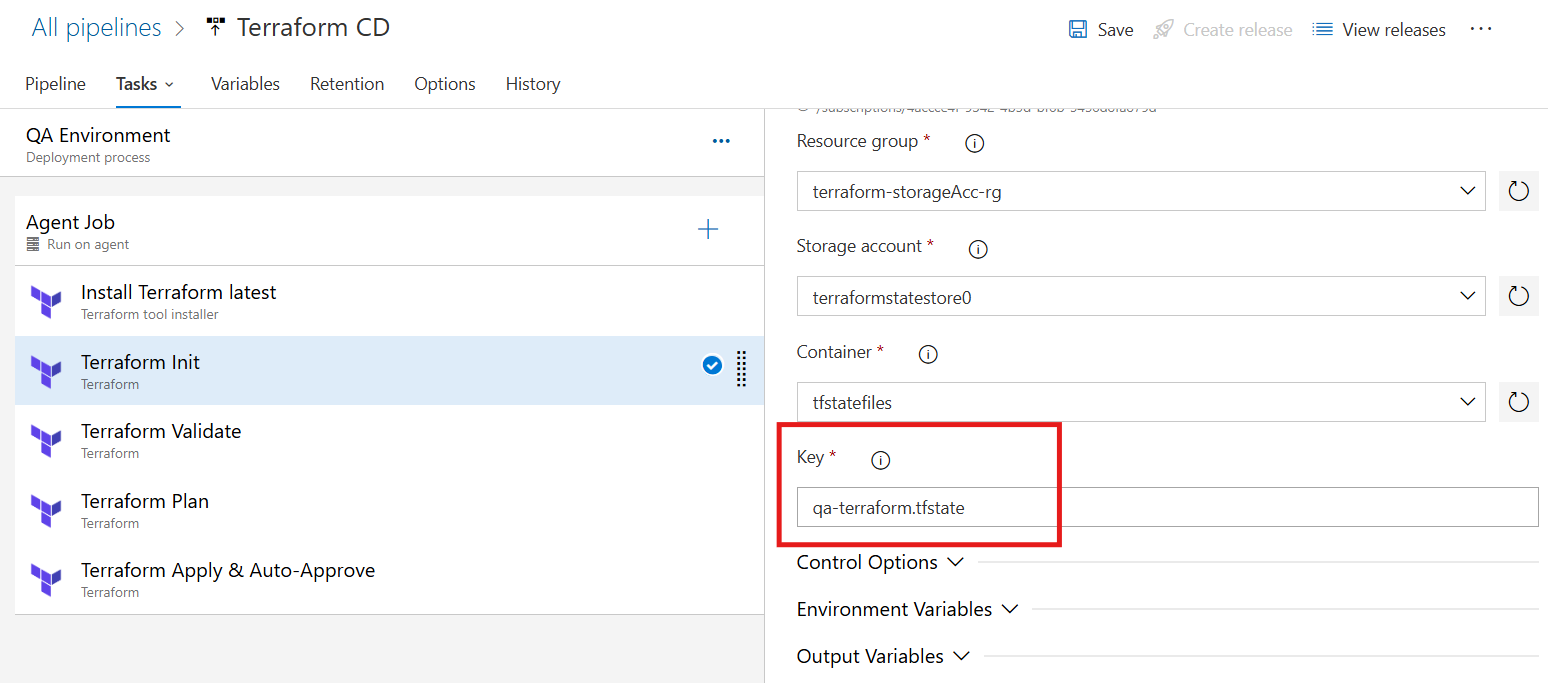
Terraform Plan Task - QA
There will be no change to the validation task. At the plan task the terraform plan command has to proceed with dev.tfvars file which requires the following change and then only the command will act as
terraform plan -var-file=qa.tfvars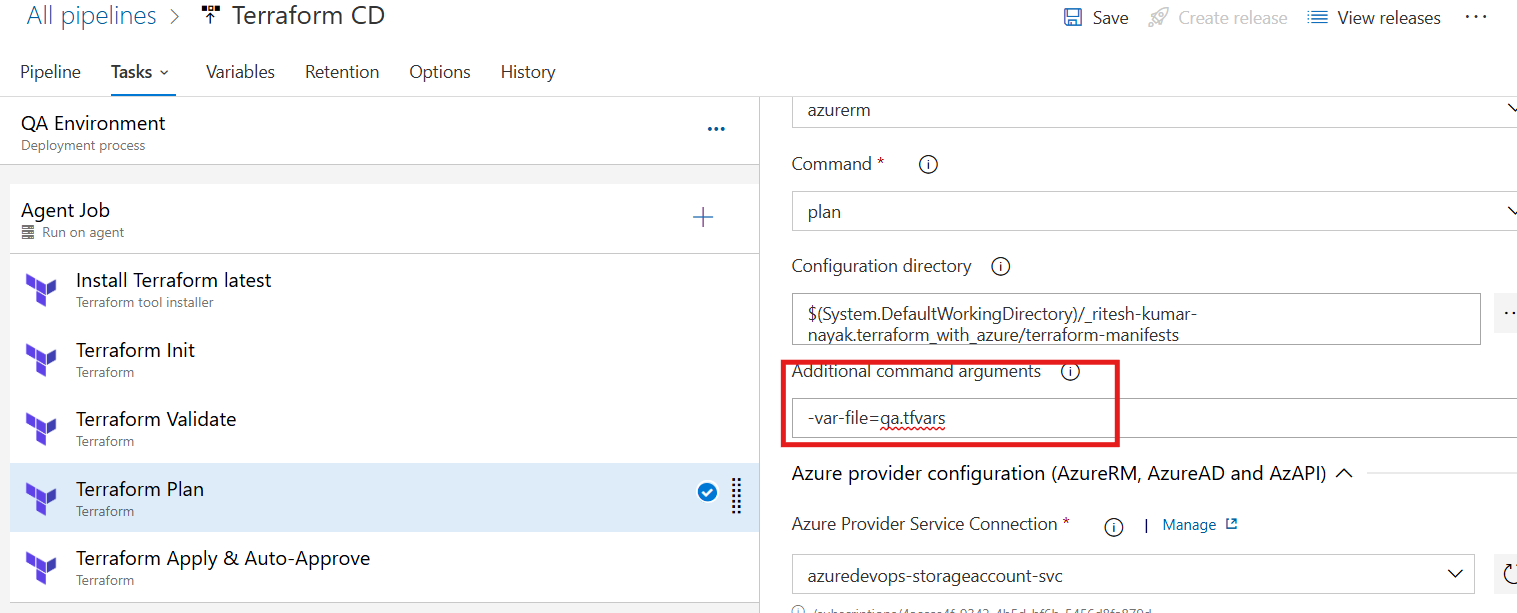
Terraform Apply Task - QA
Similarly, for the terraform apply task the
qa.tfvarsvar file has to be picked up as shown below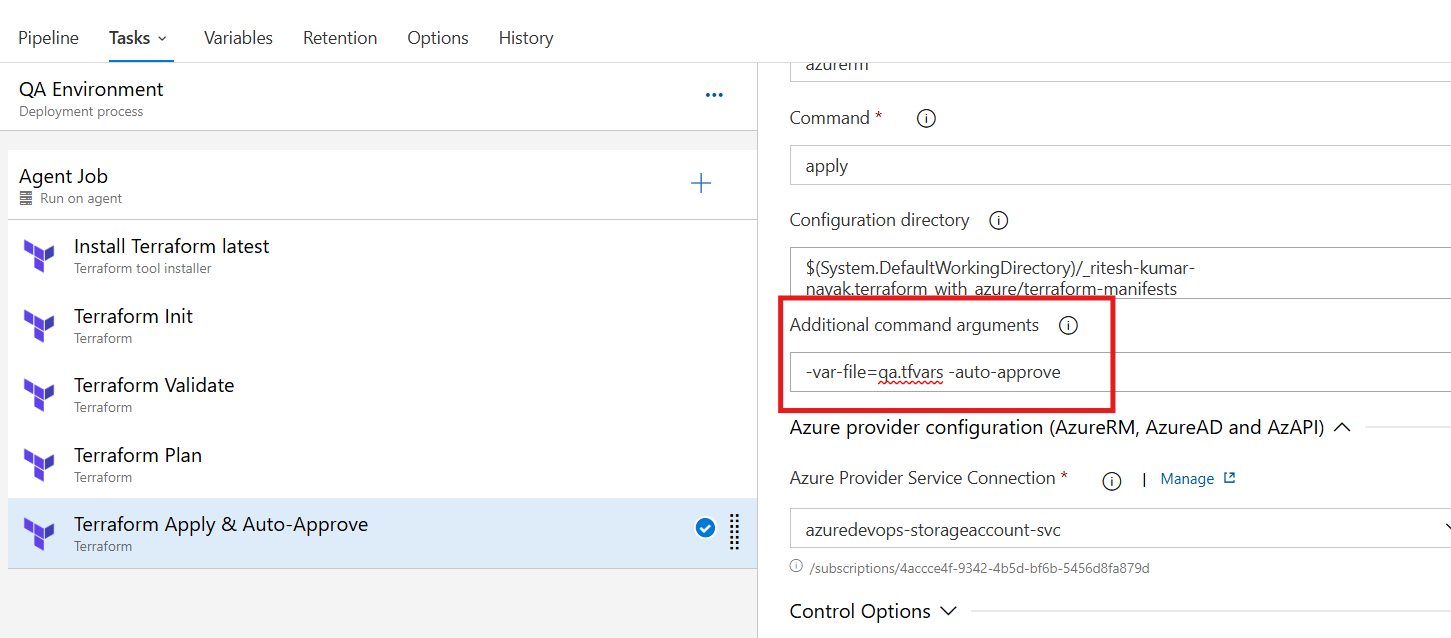
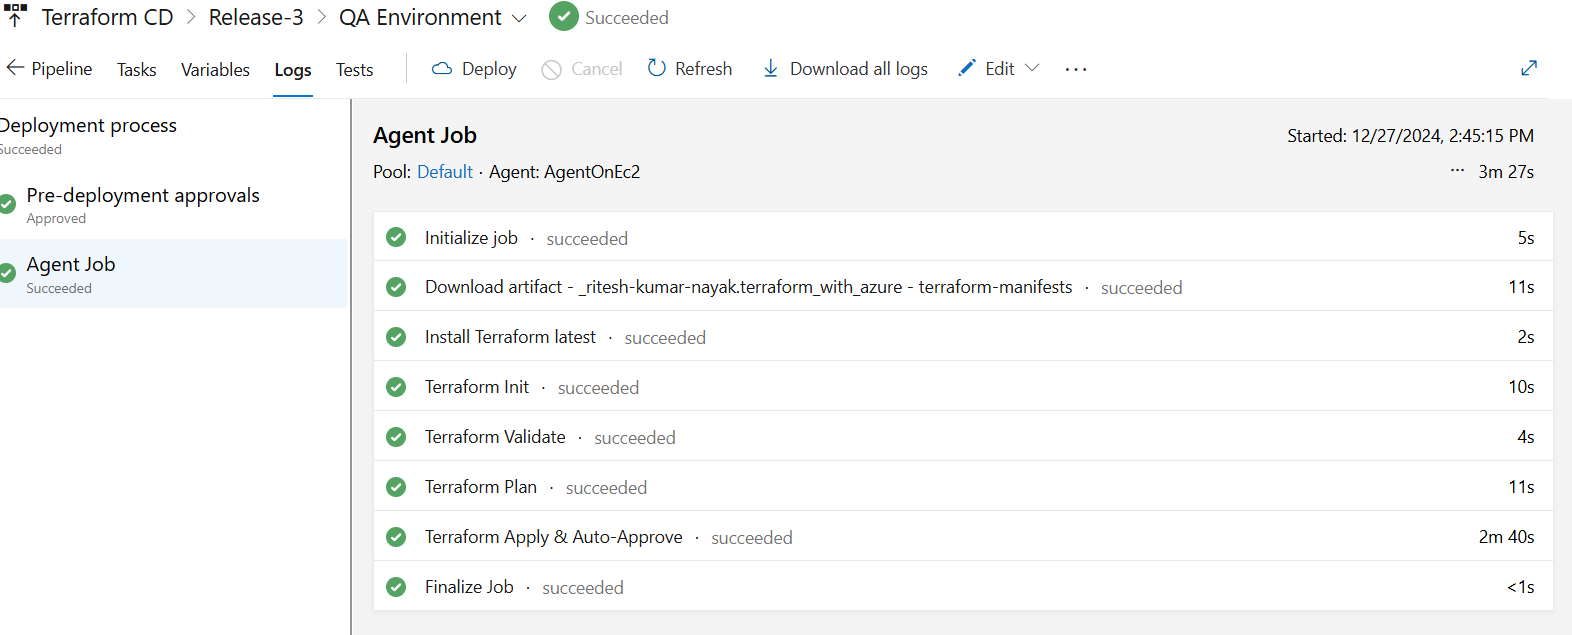
QA Environment Completion
As per the configuration, the QA deployment is now pending approval and once it is approved, it will deploy the identical environment.

Once approved it has now started the deployment
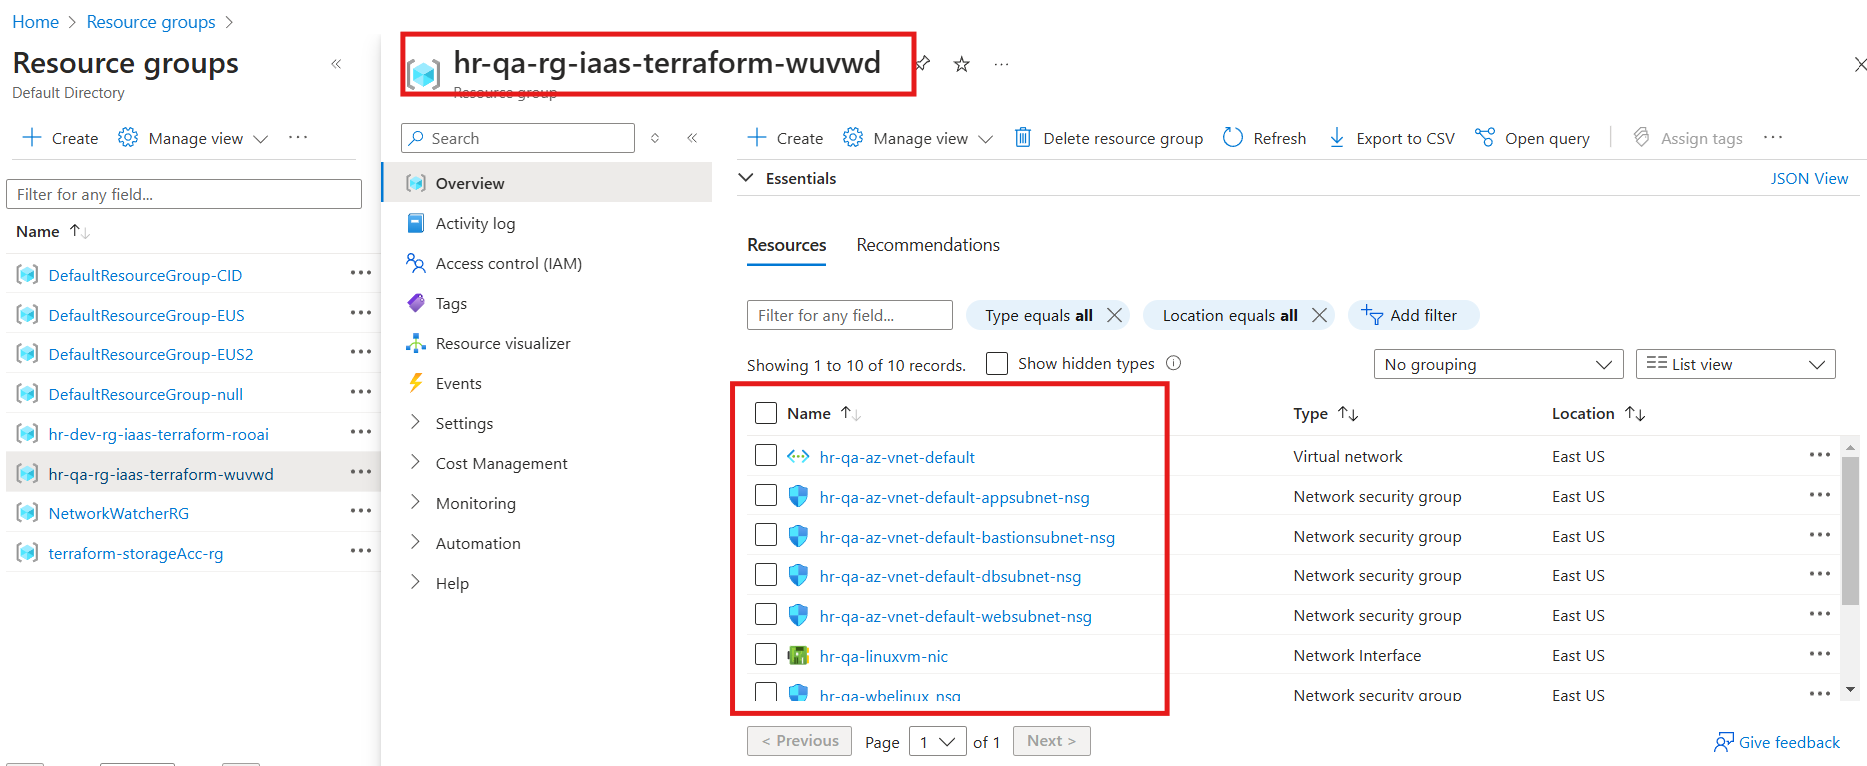
QA Deployment is now completed with all respective resources
Terraform Manifest Modification for QA Environment
Configuration for QA includes:
Virtual Network (VNet):
10.2.0.0/16Subnets:
Web Subnet:
10.2.1.0/24App Subnet:
10.2.11.0/24DB Subnet:
10.2.21.0/24Bastion Subnet:
10.2.100.0/24
tfvars for QA environment
environment = "qa"

vnet_address_space = ["10.2.0.0/16"]

web_subnet_name    = "websubnet"
web_subnet_address = ["10.2.1.0/24"]

app_subnet_name    = "appsubnet"
app_subnet_address = ["10.2.11.0/24"]

db_subnet_name    = "dbsubnet"
db_subnet_address = ["10.2.21.0/24"]

bastion_subnet_name    = "bastionsubnet"
bastion_subnet_address = ["10.2.100.0/24"]
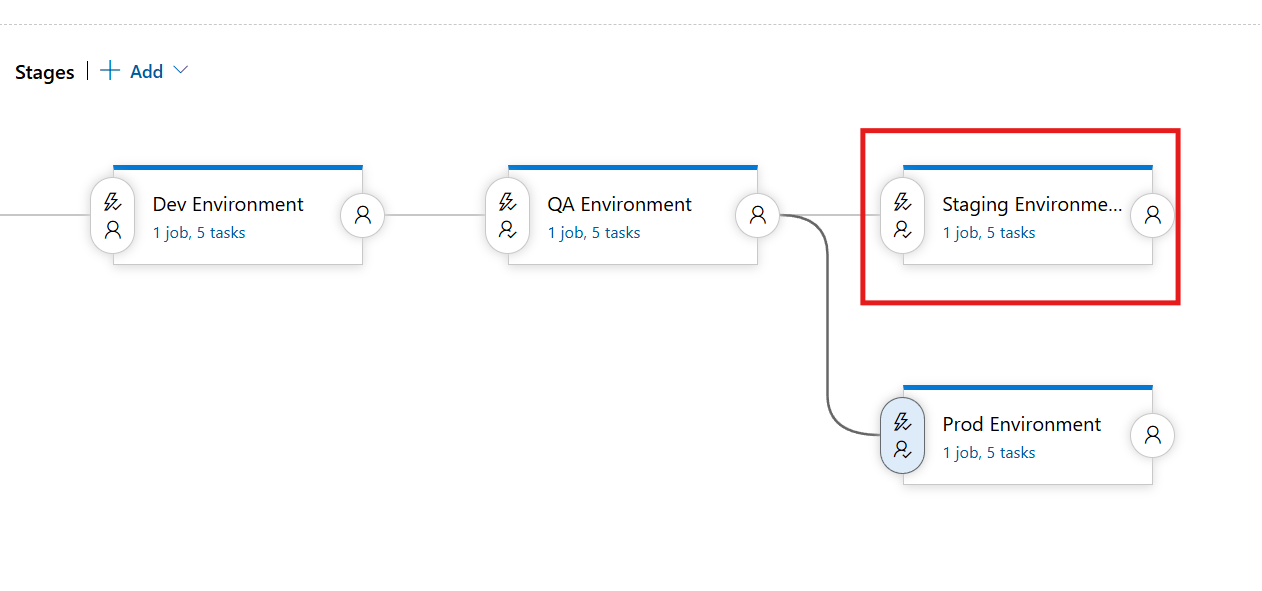
Staging Environment with Pre & Post Deployment Approval
Just like the QA environment similar modification to each task also has to be done
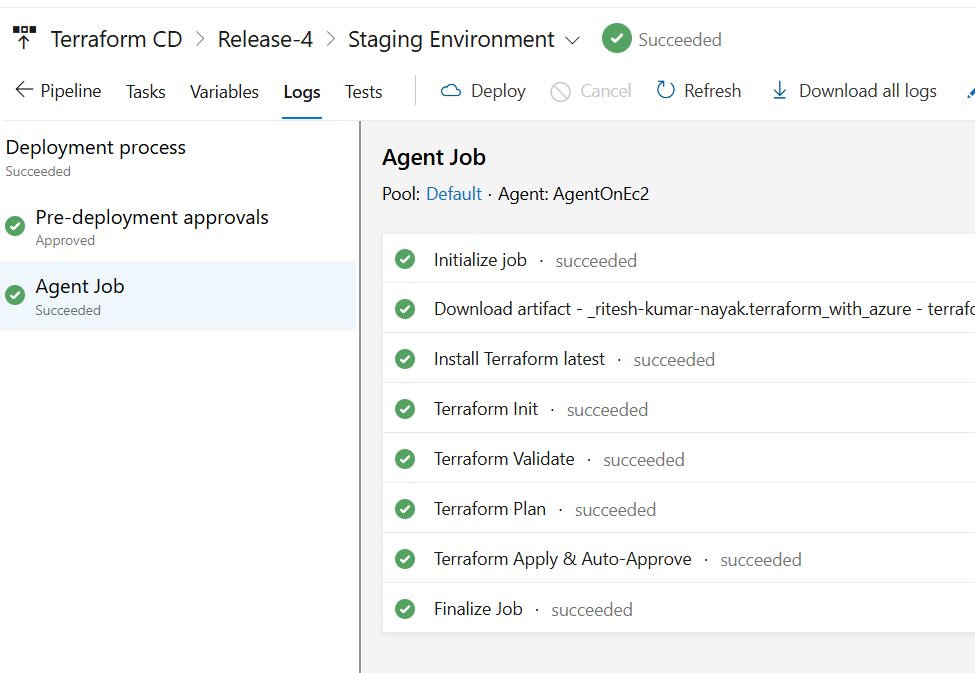
Staging Environment Completion
For staging as well the deployment is completed post approval
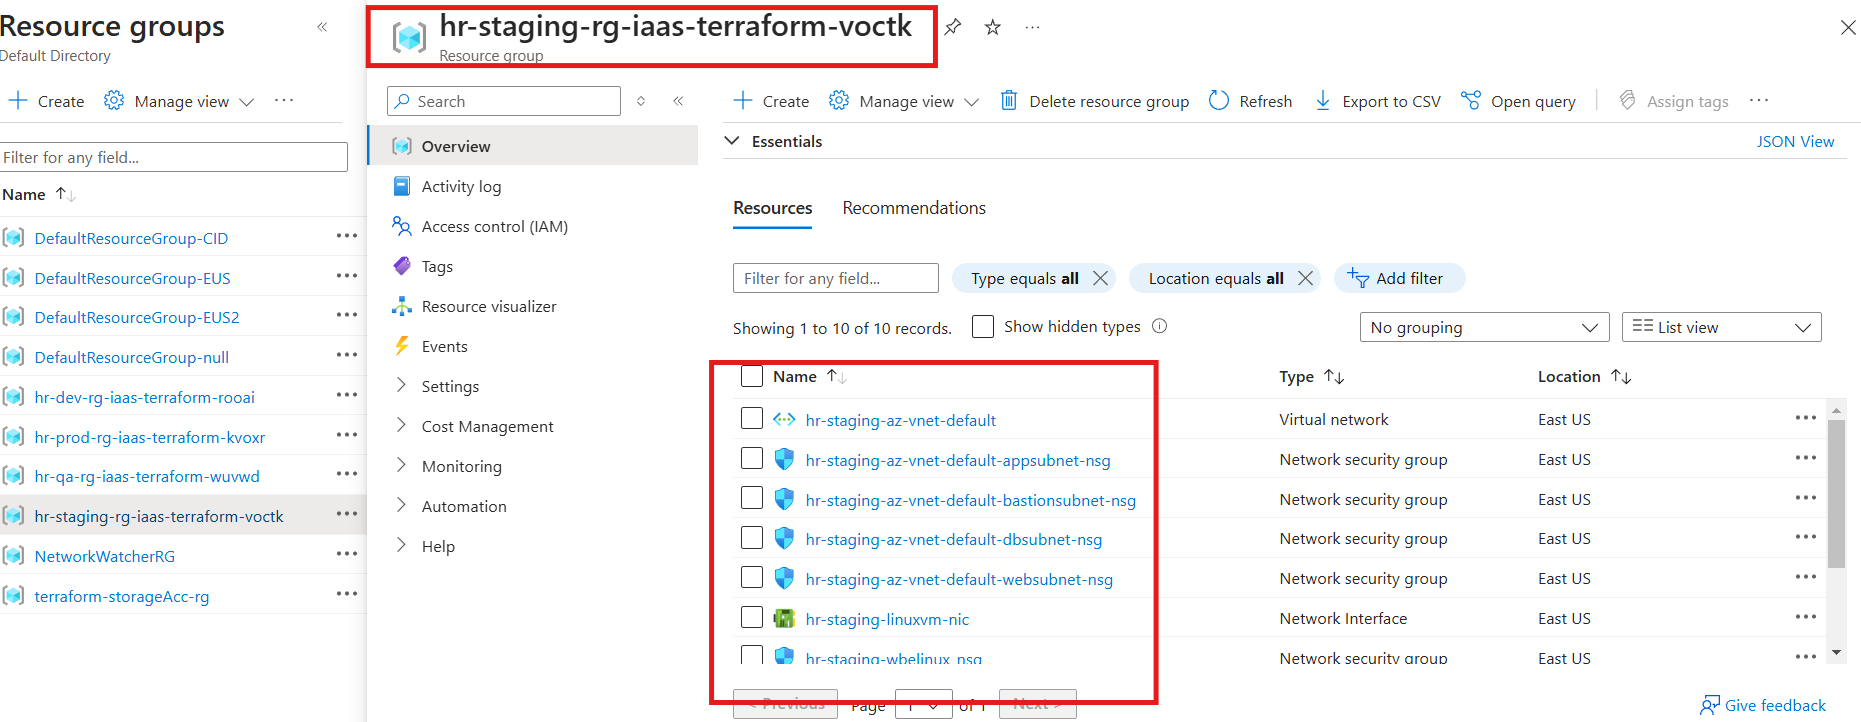
The Staging environment represents a near-production setup and includes both Pre-Deployment and Post-Deployment Approvals. Pre-deployment approval ensures changes are authorized before execution, while post-deployment approval validates successful deployment and functionality.
Configuration for Staging includes:
Virtual Network (VNet):
10.3.0.0/16Subnets:
Web Subnet:
10.3.1.0/24App Subnet:
10.3.11.0/24DB Subnet:
10.3.21.0/24Bastion Subnet:
10.3.100.0/24
tfvars for Staging environment
environment = "staging"

vnet_address_space = ["10.3.0.0/16"]

web_subnet_name    = "websubnet"
web_subnet_address = ["10.3.1.0/24"]

app_subnet_name    = "appsubnet"
app_subnet_address = ["10.3.11.0/24"]

db_subnet_name    = "dbsubnet"
db_subnet_address = ["10.3.21.0/24"]

bastion_subnet_name    = "bastionsubnet"
bastion_subnet_address = ["10.3.100.0/24"]
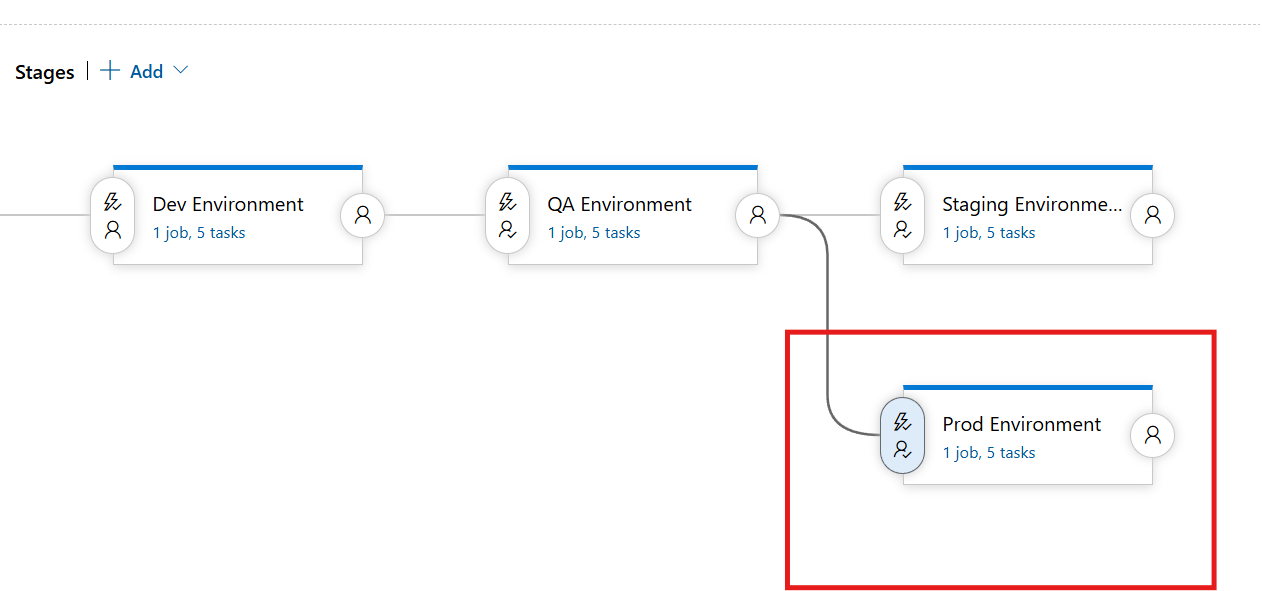
Prod Environment with Pre-Deployment Approval
Like the Stage environment, similar changes must also be made for Prod.
Prod Deployment Completion
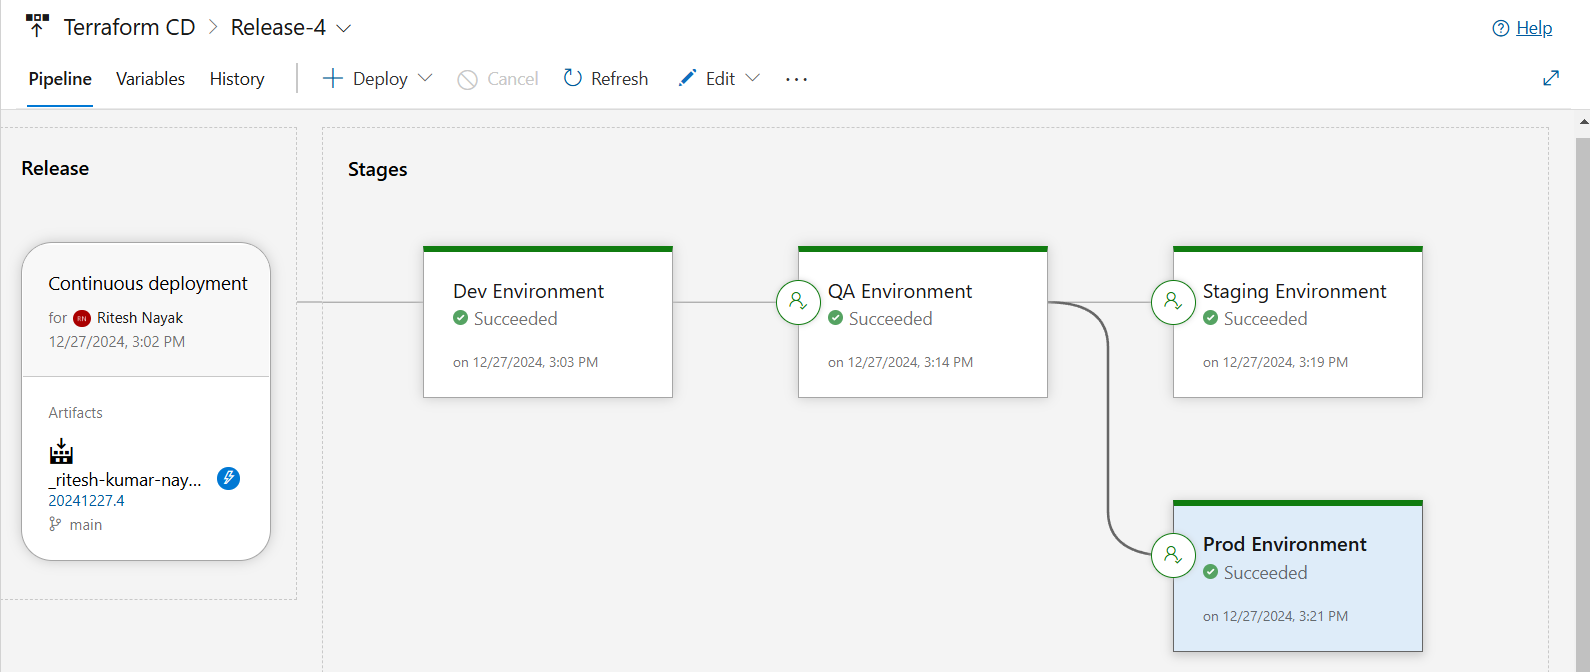
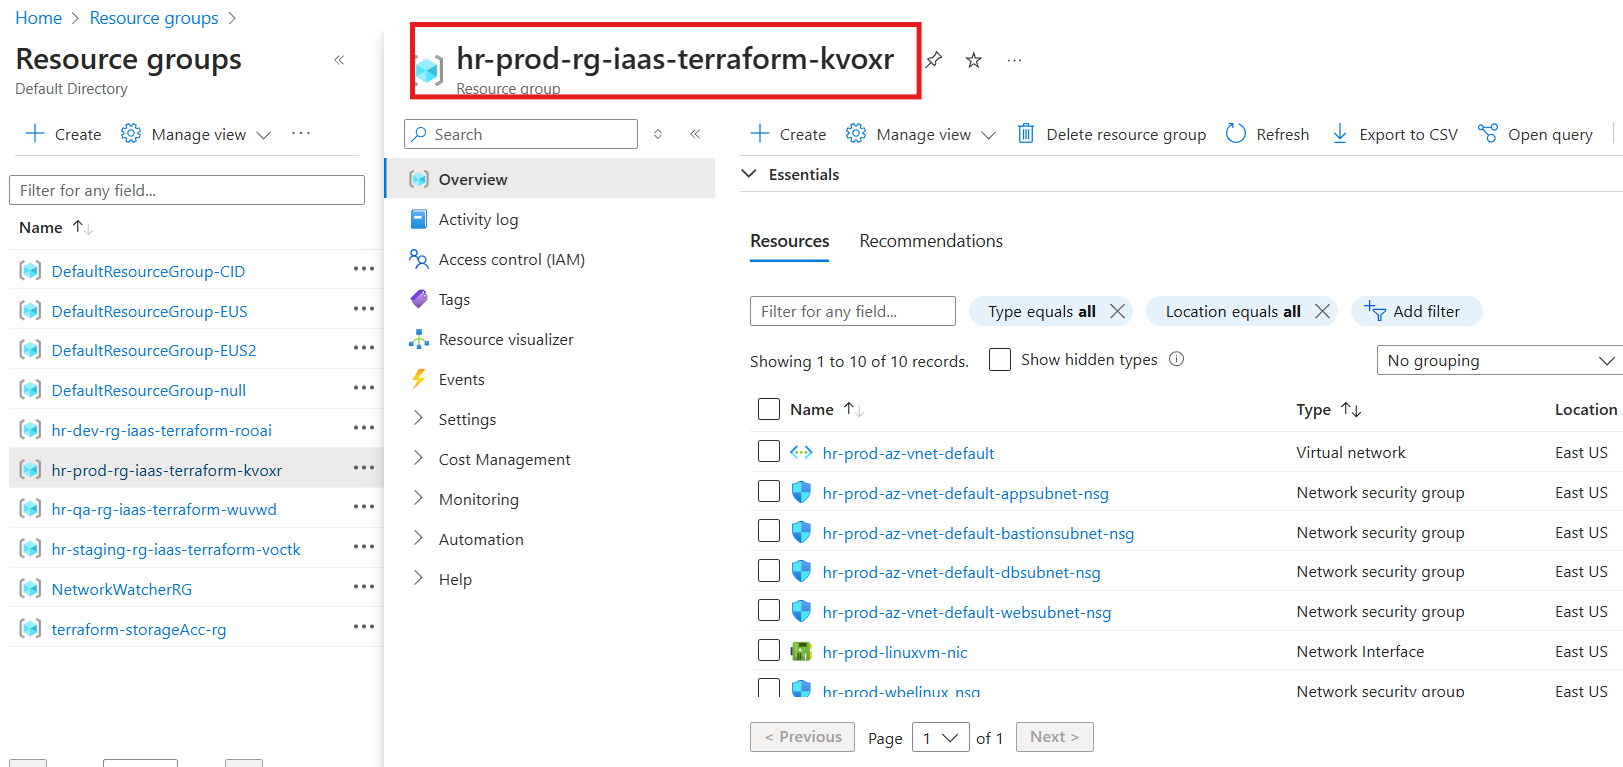
The Production (Prod) environment is the final deployment stage, ensuring the infrastructure is ready for live traffic. This environment requires Pre-Deployment Approvals to prevent unintended changes and maintain high reliability.
Configuration for Prod includes:
Virtual Network (VNet):
10.4.0.0/16Subnets:
Web Subnet:
10.4.1.0/24App Subnet:
10.4.11.0/24DB Subnet:
10.4.21.0/24Bastion Subnet:
10.4.100.0/24
tfvars for Prod Environment
environment = "prod"

vnet_address_space = ["10.4.0.0/16"]

web_subnet_name    = "websubnet"
web_subnet_address = ["10.4.1.0/24"]

app_subnet_name    = "appsubnet"
app_subnet_address = ["10.4.11.0/24"]

db_subnet_name    = "dbsubnet"
db_subnet_address = ["10.4.21.0/24"]

bastion_subnet_name    = "bastionsubnet"
bastion_subnet_address = ["10.4.100.0/24"]
Remote Backend
To ensure environment-specific isolation and consistency in Terraform state management, we configure a separate state storage container for each environment. This approach allows for safe, concurrent deployments while avoiding conflicts in state files. Here's how the Terraform settings are structured:
terraform {
  required_version = "~>1.5.6" # Minor version upgrades are allowed
  required_providers {
    azurerm = {
      source  = "hashicorp/azurerm"
      version = "~>4.3.0"
    }

    random = {
      source  = "hashicorp/random"
      version = ">=3.6.0"
    }
  }
  # Nothing should be configured here in backend block as the detils will be passed via Azure DevOps pipeline
  backend "azurerm" {

  }

}

provider "azurerm" {
  features {}
  subscription_id = "XXXXXX-9342-XXXXXXX-XXXXXXXX"
}
Terraform Block
The terraform block defines the required Terraform version, providers, and the backend configuration:
Required Version: Locked to
~>1.5.6allowing minor upgrades.Providers:
azurerm: Azure Resource Manager provider, pinned to~>4.3.0for stability.random: Used for generating random values, with a flexible version constraint of>=3.6.0.
Backend Block:
The backend block is intentionally left blank as the configuration will be dynamically provided through the Azure DevOps pipeline, ensuring secure and consistent handling of state files across environments.
Provider Configuration
The provider block configures the Azure Resource Manager (AzureRM) provider. It includes:
Features Block: Enables additional provider features.
Subscription ID: Specifies the Azure subscription for provisioning resources.
This setup ensures that the Terraform backend remains decoupled from the static code and is dynamically configured during pipeline execution. It allows for:
Environment-specific state management.
Enhanced security by avoiding hardcoding backend credentials.
Flexibility in scaling across multiple environments.
Dependency Lock File
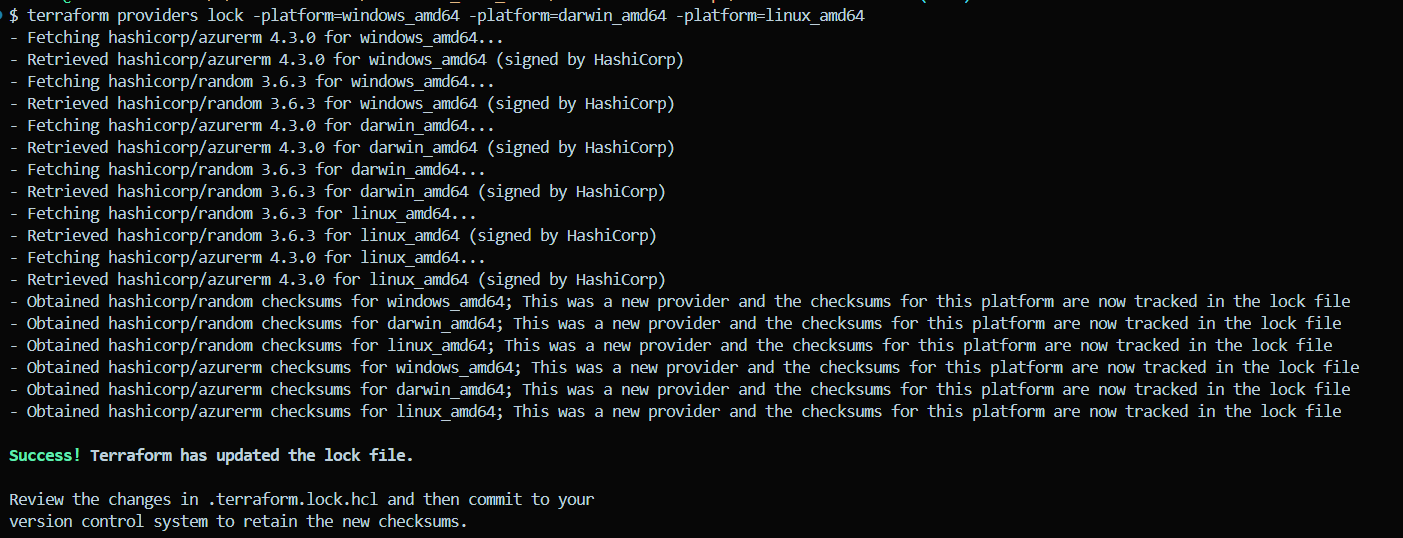
The .terraform.lock.hcl file ensures consistency and reproducibility of Terraform runs by locking provider dependencies to specific versions. When multiple team members or CI/CD pipelines work on the same Terraform configuration, this file ensures that all environments use the exact same provider versions. Provider updates may introduce breaking changes or unexpected behaviors. Locking versions prevents Terraform from automatically upgrading to potentially incompatible versions.
You can use the below command to generate a platform-independent lock file which will support all types of operating systems.
terraform providers lock -platform=windows_amd64 -platform=darwin_amd64 -platform=linux_amd64
Subscribe to my newsletter
Read articles from Ritesh Kumar Nayak directly inside your inbox. Subscribe to the newsletter, and don't miss out.
Written by

Ritesh Kumar Nayak
Ritesh Kumar Nayak
Passionate about helping organizations build scalable infrastructure and DevOps solutions with cloud technologies. Experienced in designing robust systems, automating processes, and driving efficiency through innovative cloud solutions. Advocate for best practices in DevOps and cloud computing, committed to enabling teams to achieve their full potential.