Understanding Terraform Provisioner: A Beginner's Tutorial
 Fırat TONAK
We will examine the provisioner in this article, and you will learn about some common details, such as the file, local-exec, and remote-exec commands and how to use them.
What is a Provisioner?
A provisioner is a mechanism that is used to execute commands or scripts on a resource after the resource has been created. It is part of the infrastructure deployment process, allowing you to install the necessary software or apply the required configurations.
There are three types of provisioners:
File Provisioner: Used to transfer files or directories from the local machine to a remote resource.
Remote-Exec Provisioner: Used to execute commands on the remote resource using SSH or WinRM, which is why the remote resource must support SSH or WinRM.
Local-Exec Provisioner: Used to execute commands on the local machine (the machine running Terraform).
File Provisioner
As we mentioned earlier, it is used to transfer files or directories from a local machine to remote resources.
Let's imagine we will create an e-commerce platform and want to host our backend on EC2 in AWS. We will need to define critical details such as database connections, payment gateway configurations, and so on for the backend server.
In this case, we need to use the File Provisioner to upload the configuration file from the local machine to the EC2 server.
We need to create a configuration file named ecommerce.conf and add some details to it.
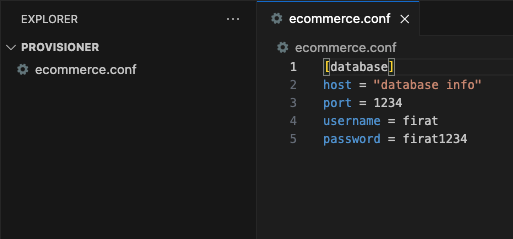
[database]
host = "database info"
port = 1234
username = firat
password = firat1234
Our database configuration file is ready, and we can start writing the Terraform configuration code to create EC2 in AWS.
You can check how to configure
AWS CLIif you have not.
Create a folder and move your configuration file under the folder because we want to keep the configuration file where our main.tf file is.
Now we need to write our EC2 configuration code and get started with fetching the latest Linux AMI. I will use Linux because it will not be charged for the operating system additionally.
We need a key pair for EC2 creation and connection. Please follow the steps here before moving forward.
Here is the data block configuration code.
# Get the latest Amazon Linux 2 AMI
data "aws_ami" "linux"{
    most_recent = true

    filter{
        name = "name"
        values = ["amzn2-ami-hvm-*-x86_64-gp2"]
    }

    filter{
        name = "owner-id"
        values = ["137112412989"] # Amazon's official AMI owner ID
    }
}
The filter is used to narrow down the results that come from the provider. You do not have to use it. It is optional.
name is a key that is used by the filter. For example, the result will be filtered by name. If you want to filter the result by architecture, then you need to create code like that below.
filter{
    name = "architecture"
    values = ["x86_64"]
}
If you want to learn more details about filters, you can visit here
Now, we are able to fetch the latest AMI , and it's time to create our EC2 instance. In this case, we will use the default security group that AWS provides us.
We need to make sure that our default security group allows SSH (port 22) from our IP address. If it allows
All traffic, then you do not have to configure anything. However, keeping your security group asAll trafficis not recommended.
Let's check our security group details first. Go to the EC2 page and hit the Security Groups on the left side.
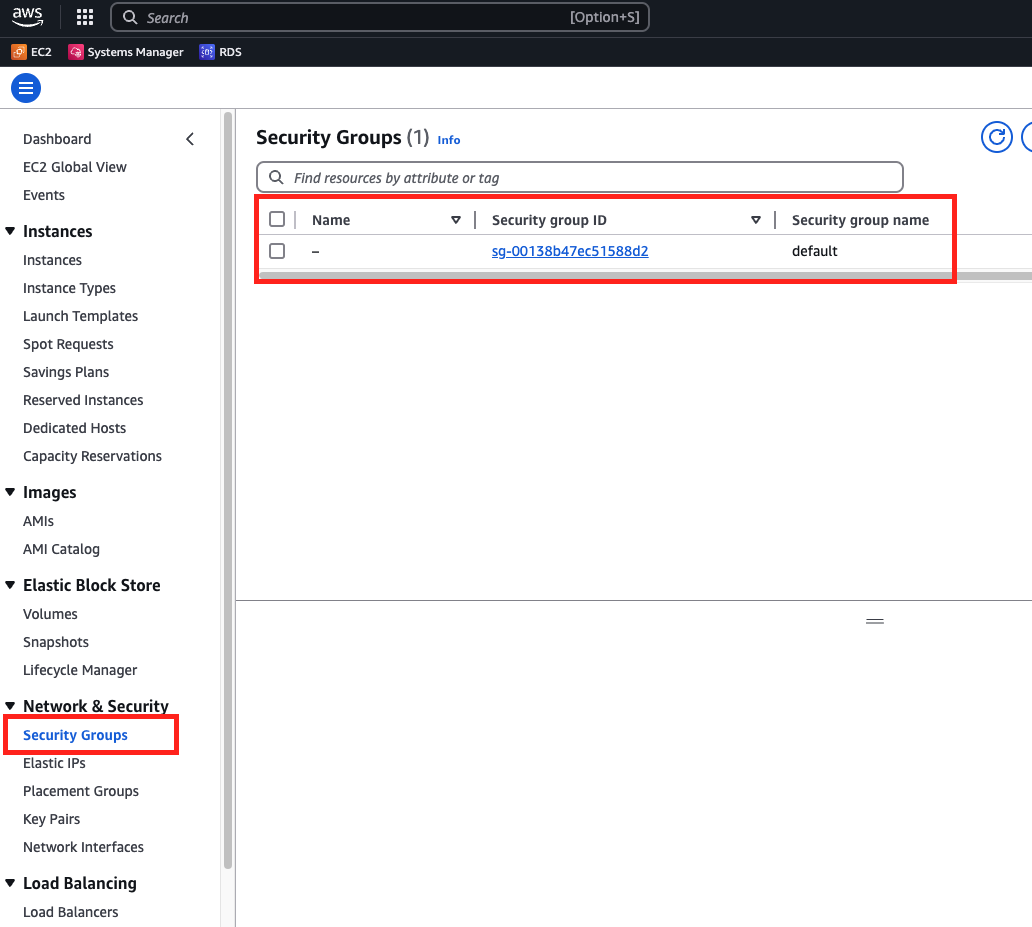
Go to Inbound rules and hit Edit Inbound rules

Hit Add rule and add the line like the one below, and then hit Save rules

As I mentioned before, if your security group allows all traffic, you do not have to set up SSH. Let’s create an EC2 instance code.
resource "aws_instance" "ecommerce_server" {
  ami           = data.aws_ami.linux.id
  instance_type = "t2.micro"
  key_name      = "ProvisionerKeyPair"

  vpc_security_group_ids = ["sg-00138b47ec51588d2"] # the security group that we just created
  associate_public_ip_address = true # SSH does not work without public IP. this line ensures that EC2 gets a public IP.

  provisioner "file" {
    source      = "ecommerce.conf"
    destination = "/home/ec2-user/ecommerce.conf"

    connection {
      type        = "ssh"
      user        = "ec2-user"
      private_key = file("./ProvisionerKeyPair.pem")
      host        = self.public_ip
    }
  }

  tags = {
    Name = "EcommerceServer"
  }
}
We need to test our code after creation; that is why we need a public IP. We will use the out keyword to output the public IP.
output "ec2_instance_public_ip"{
    value = aws_instance.ecommerce_server.public_ip
}
Our configuration is ready now. We will execute terraform init, terraform plan, and terraform apply commands respectively and create an EC2 instance.
The entire code should be like the one below.
data "aws_ami" "linux"{
    most_recent = true

    filter{
        name = "name"
        values = ["amzn2-ami-hvm-*-x86_64-gp2"]
    }

    filter{
        name = "owner-id"
        values = ["137112412989"] # Amazon's official AMI owner ID
    }
}

resource "aws_instance" "ecommerce_server" {
  ami           = data.aws_ami.linux.id
  instance_type = "t2.micro"
  key_name      = "ProvisionerKeyPair"

  vpc_security_group_ids = ["sg-00138b47ec51588d2"] # the security group that we just created
  associate_public_ip_address = true # SSH does not work without public IP. this line ensures that EC2 gets a public IP.

  provisioner "file" {
    source      = "ecommerce.conf"
    destination = "/home/ec2-user/ecommerce.conf"

    connection {
      type        = "ssh"
      user        = "ec2-user"
      private_key = file("./ProvisionerKeyPair.pem")
      host        = self.public_ip
    }
  }

  tags = {
    Name = "EcommerceServer"
  }
}

output "ec2_instance_public_ip"{
    value = aws_instance.ecommerce_server.public_ip
}
Let's start with the terraform init command. You should see a similar following result when you execute the command.
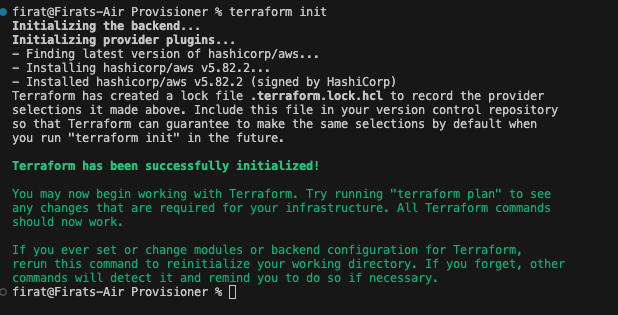
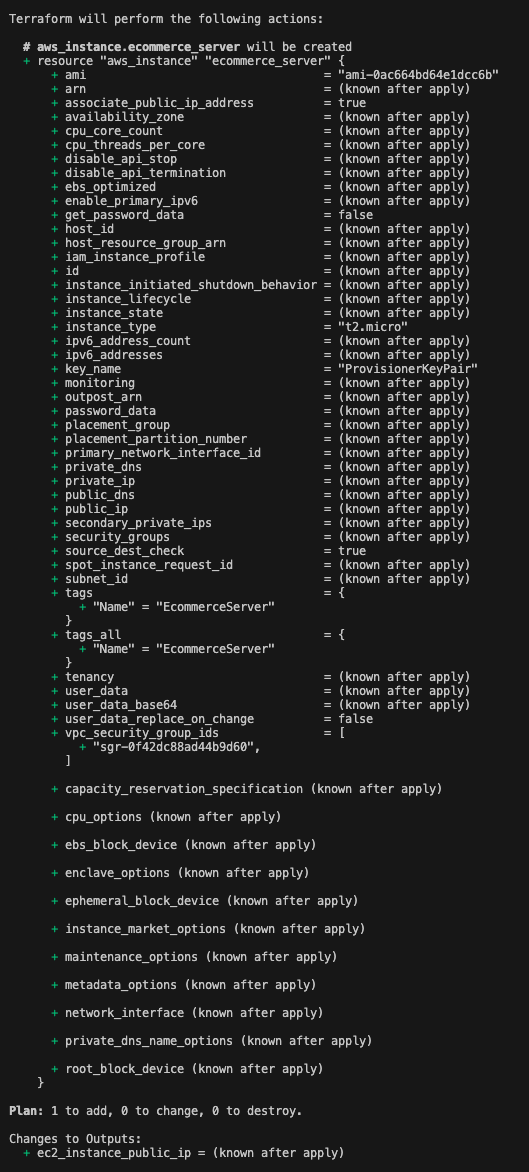
Time to execute terraform plan and see what Terraform will create.
If you encounter an error like the one below, you need to give your user proper permissions. I will give AmazonEC2FullAccess in this article for now.

After configuring the permission issue, you should see the plan after you execute the terraform plan command. The plan shows all the details about what Terraform will do once you execute terraform apply.
Let's execute terraform apply and create our EC2 instance and upload the ecommerce.conf file. It will ask you a question like 'Do you want to perform these actions?' when you execute the code, and you need to type yes if you want to move forward.
Keep in mind that if you want to run
terraform applywithout any confirmation, you should use the-auto-approveflag.. More details
You should see a similar result once you have finished executing the terraform apply command.
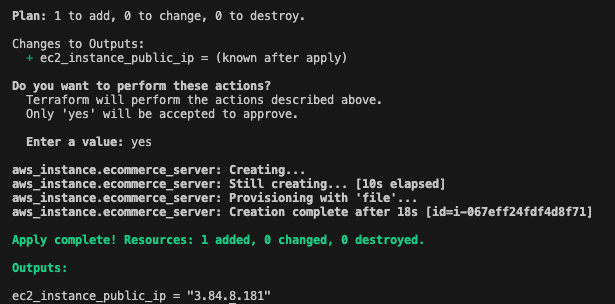
We created our server and uploaded the configuration file. However, we should test our infrastructure and see the configuration file on the server.
First, let's check to see if the EC2 instance is created or not. You should see a server named EcommerceServer in the instances list.

If we are good with creating EC2 instances, let's go and check our configuration file. Now, we will try to connect to our EC2 instance. You need to give proper permissions again to your key pair file if you might run into the following error.

You need to execute chmod 400 and ssh -i ./ProvisionerKeyPair.pem ec2-user@<Your EC2 Public IP> respectively, and then you should see the result below.

You can access your EC2 server and you should check your configuration file by typing the dir command. It will list all files in the directory.

Now, let's check if the file is correct or not by checking what is inside. You need to execute the cat command to see the content of the file.
[ec2-user@ip-172-31-80-65 ~]$ cat ecommerce.conf
[database]
host = "database info"
port = 1234
username = firat
password = firat1234
If you are done with checking the details, you can execute the exit command to return to the local machine.
[ec2-user@ip-172-31-80-65 ~]$ exit
logout
Connection to 3.84.8.181 closed.
Local-Exec Provisioner
Local-exec command is used to run commands on the local machine where Terraform is working. It is useful for informing users, running scripts, logging information, and so on during the processes.
The important point is that you need to write
local-execin the resource definition block.
The scenario will be the same, and we want to create an EC2 instance on AWS. We will store the public IP of the EC2 instance in a text file after creation is done.
Let's create the resource code and execute terraform plan and terraform apply respectively.
resource "aws_instance" "ecommerce_server" {
  ami           = data.aws_ami.linux.id
  instance_type = "t2.micro"
  key_name      = "ProvisionerKeyPair"

  vpc_security_group_ids = ["sg-00138b47ec51588d2"] # the security group that we just created
  associate_public_ip_address = true # SSH does not work without public IP. this line ensures that EC2 gets a public IP.

  provisioner "local-exec"{
    command = "echo ${self.public_ip} > instance_public_ip.txt"
  }

  tags = {
    Name = "EcommerceServer"
  }
}
As you can see above, the resource code is almost the same. The only differences are that we removed the file provisioner implementation and wrote the local-exec implementation. However, you can implement both file and local-exec provisioners.
The final code should be like the one below.
data "aws_ami" "linux"{
    most_recent = true

    filter{
        name = "name"
        values = ["amzn2-ami-hvm-*-x86_64-gp2"]
    }

    filter{
        name = "owner-id"
        values = ["137112412989"] # Amazon's official AMI owner ID
    }
}

resource "aws_instance" "ecommerce_server" {
  ami           = data.aws_ami.linux.id
  instance_type = "t2.micro"
  key_name      = "ProvisionerKeyPair"

  vpc_security_group_ids = ["sg-00138b47ec51588d2"] # the security group that we just created
  associate_public_ip_address = true # SSH does not work without public IP. this line ensures that EC2 gets a public IP.

  provisioner "local-exec"{
    command = "echo ${self.public_ip} > instance_public_ip.txt"
  }

  tags = {
    Name = "EcommerceServer"
  }
}
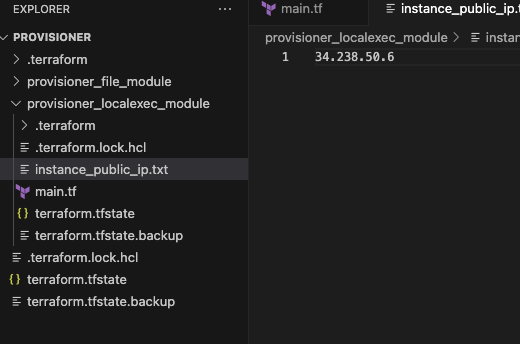
You should see your EC2 instance after you execute the commands. If you see the EC2 instance, you should see the instance_public_ip.txt file in the directory where main.tf is located in the local-exec provisioner. You will see the IP address when you check the details of the txt file.
Remote-Exec Provisioner
Remote-exec provisioner is used to execute commands on a remote machine after your infrastructure has been created.
It is used to install software packages, configure services, run setup scripts, and so on.
You have to specify the connection details such as WinRM for Windows or SSH for Linux instances. Terraform needs connection details to make communication with the remote resource.
The scenario will be the same, and we want to create an EC2 instance. We will write "Hello from Terraform" into a text file after creation is done.
You can install the Apache server by following the codes, but you may face some additional costs.
sudo yum update -y # it updates the system packages
sudo yum install -y httpd # it installs Apache HTTP Server
sudo systemctl start httpd # it starts the Apache service
sudo systemctl enable httpd # it configures Apache to start on boot
Let's create a resource code for the EC2 instance and execute terraform plan and terraform apply respectively.
resource "aws_instance" "ecommerce_server" {
  ami           = data.aws_ami.linux.id
  instance_type = "t2.micro"
  key_name      = "ProvisionerKeyPair"

  connection {
        type = "ssh"
        user = "ec2-user"
        private_key = file("./ProvisionerKeyPair.pem")
        host = self.public_ip
    }

  provisioner "remote-exec"{
    inline = [
        "echo 'Hello from Terraform!' > /home/ec2-user/testfile.txt"
     ]
  }

  tags = {
    Name = "EcommerceServer"
  }
}
As you can see, we specify connection details like what we did for the file provisioner earlier and create a text file to store our message.
The final code should be like the one below.
data "aws_ami" "linux"{
    most_recent = true

    filter{
        name = "name"
        values = ["amzn2-ami-hvm-*-x86_64-gp2"]
    }

    filter{
        name = "owner-id"
        values = ["137112412989"] # Amazon's official AMI owner ID
    }
}

resource "aws_instance" "ecommerce_server" {
  ami           = data.aws_ami.linux.id
  instance_type = "t2.micro"
  key_name      = "ProvisionerKeyPair"

    connection {
        type = "ssh"
        user = "ec2-user"
        private_key = file("./ProvisionerKeyPair.pem")
        host = self.public_ip
    }

  provisioner "remote-exec"{
    inline = [
        "echo 'Hello from Terraform!' > /home/ec2-user/testfile.txt"
     ]
  }

  tags = {
    Name = "EcommerceServer"
  }
}

output "server_public_IP" {
  value = aws_instance.ecommerce_server.public_ip
}
You should see the EC2 instance in the list on the AWS management console.

If you execute the following command, you will connect to your EC2 instance that you just created.
ssh -i ProvisionerKeyPair.pem ec2-user@<Your EC2 Public IP>
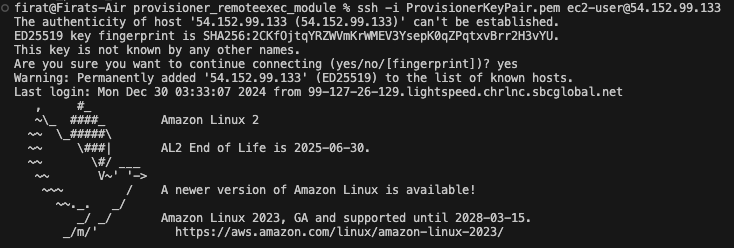
Let's check to see if our message is stored on the server or not. We need to use the cat command to see the details.
cat /home/ec2-user/testfile.txt

When Keyword
The When keyword is used to tell the provisioner when it should run. The keyword is for the local-exec provisioner and remote-exec provisioner. You cannot use it for the file provisioner.
Let's use the keyword and learn how to use it. local-exec will be used for it. You need to add the when keyword in the provisioner and decide when the provisioner should run. I will define when = "destroy" and execute the terraform apply command.
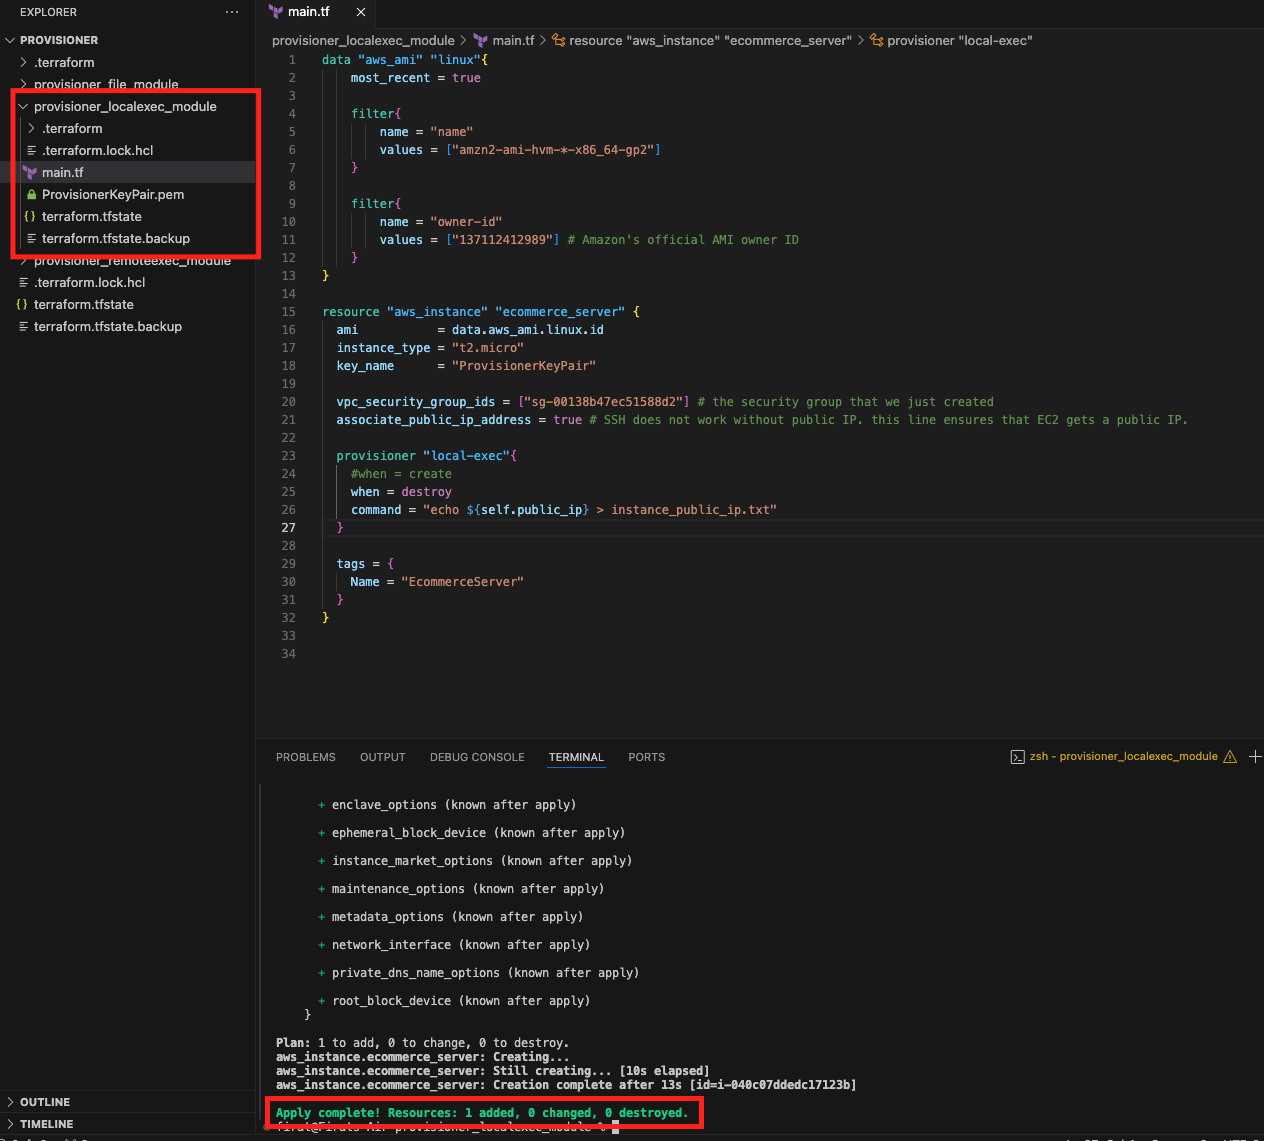
As you can see, the EC2 has been created but there is no text file in the directory. Let's destroy the EC2 using terraform destroy and see if the text file has been created or not.
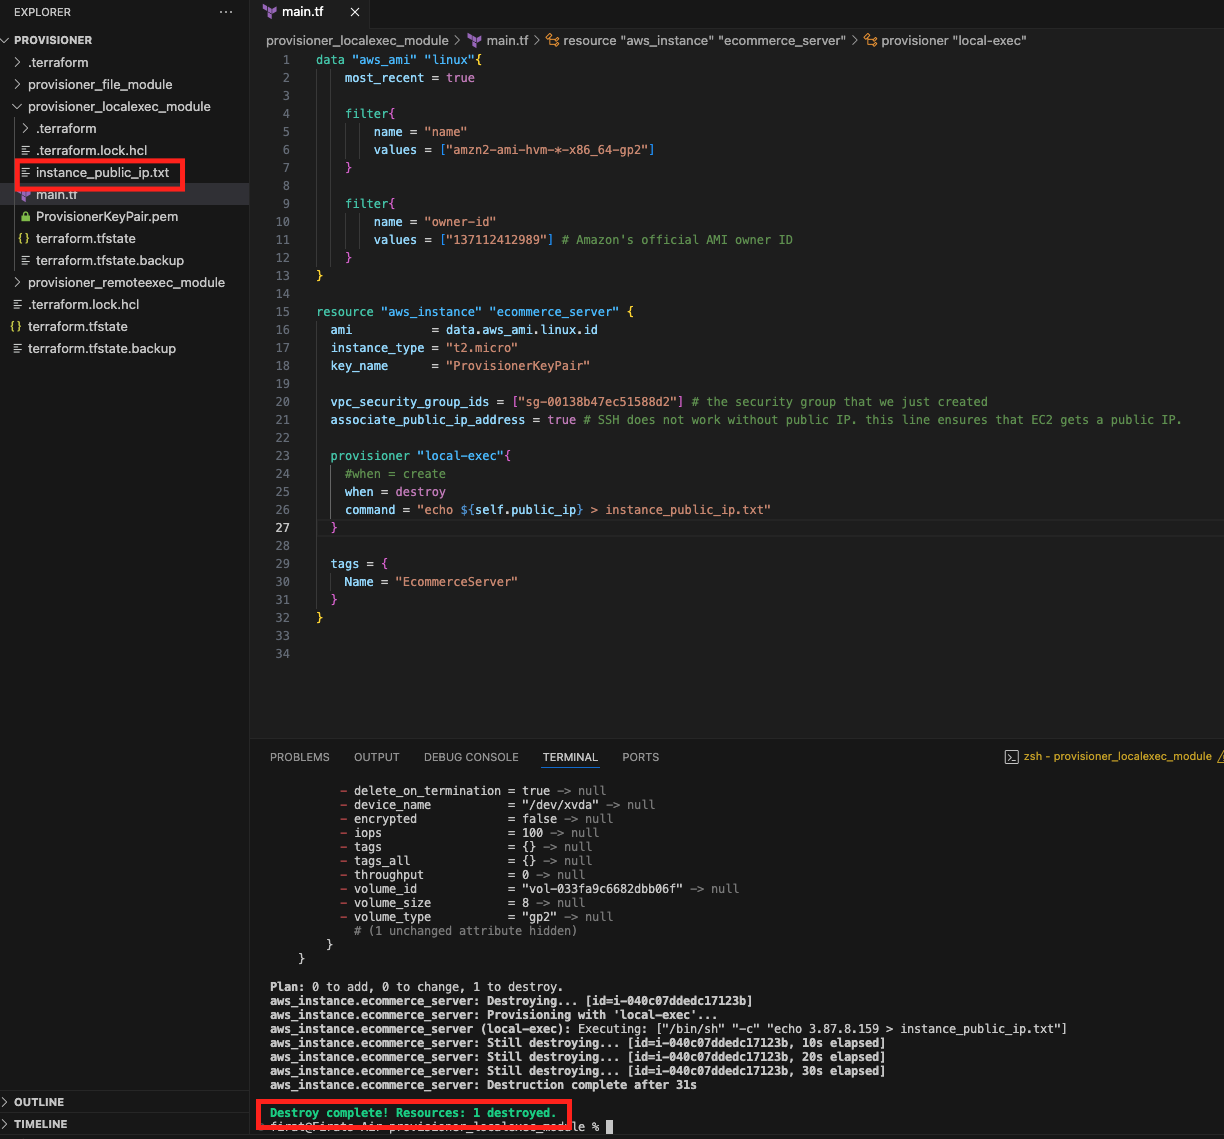
As you can see above, the text file has been created after the destroy process.
We checked on how to use Provider in Terraform with examples. You can use the details according to your needs or projects. If we summarize what we did:
If you want to upload a file, you need to use the
fileprovisionerIf you want to execute a command on the local machine where Terraform is working, you need to use the
local-execprovisionerIf you want to execute a command on a remote resource after the infrastructure has been created, you need to use the
remote-execprovisioner
Since the article is for educational purposes, we should execute the terraform destroy command before we leave to avoid additional costs.
You can access the entire code here.
Subscribe to my newsletter
Read articles from Fırat TONAK directly inside your inbox. Subscribe to the newsletter, and don't miss out.
Written by
