Real-time pose estimation and movement detection with YOLOv11
 Alexander Polev
Intro
In this article, we explore how to stream video from your smartphone to your computer, using it as a webcam. Then, we combine this with OpenCV video capturing and use YOLOv11 for pose estimation and movement detection.
I am using Python, OpenCV and Ultralytics library for coding and Camo Studio as software.
Streaming from smartphone
To emulate real-life gym usage, I decided to use a video from my smartphone for the detection task. Luckily, I found a nice article, that describes how to do exactly that and convert your smartphone to a webcam: https://medium.com/@saicoumar/how-to-use-a-smartphone-as-a-webcam-with-opencv-b68773db9ddd
Long story short, you install Camo Studio on both a laptop and a phone, and connect them:
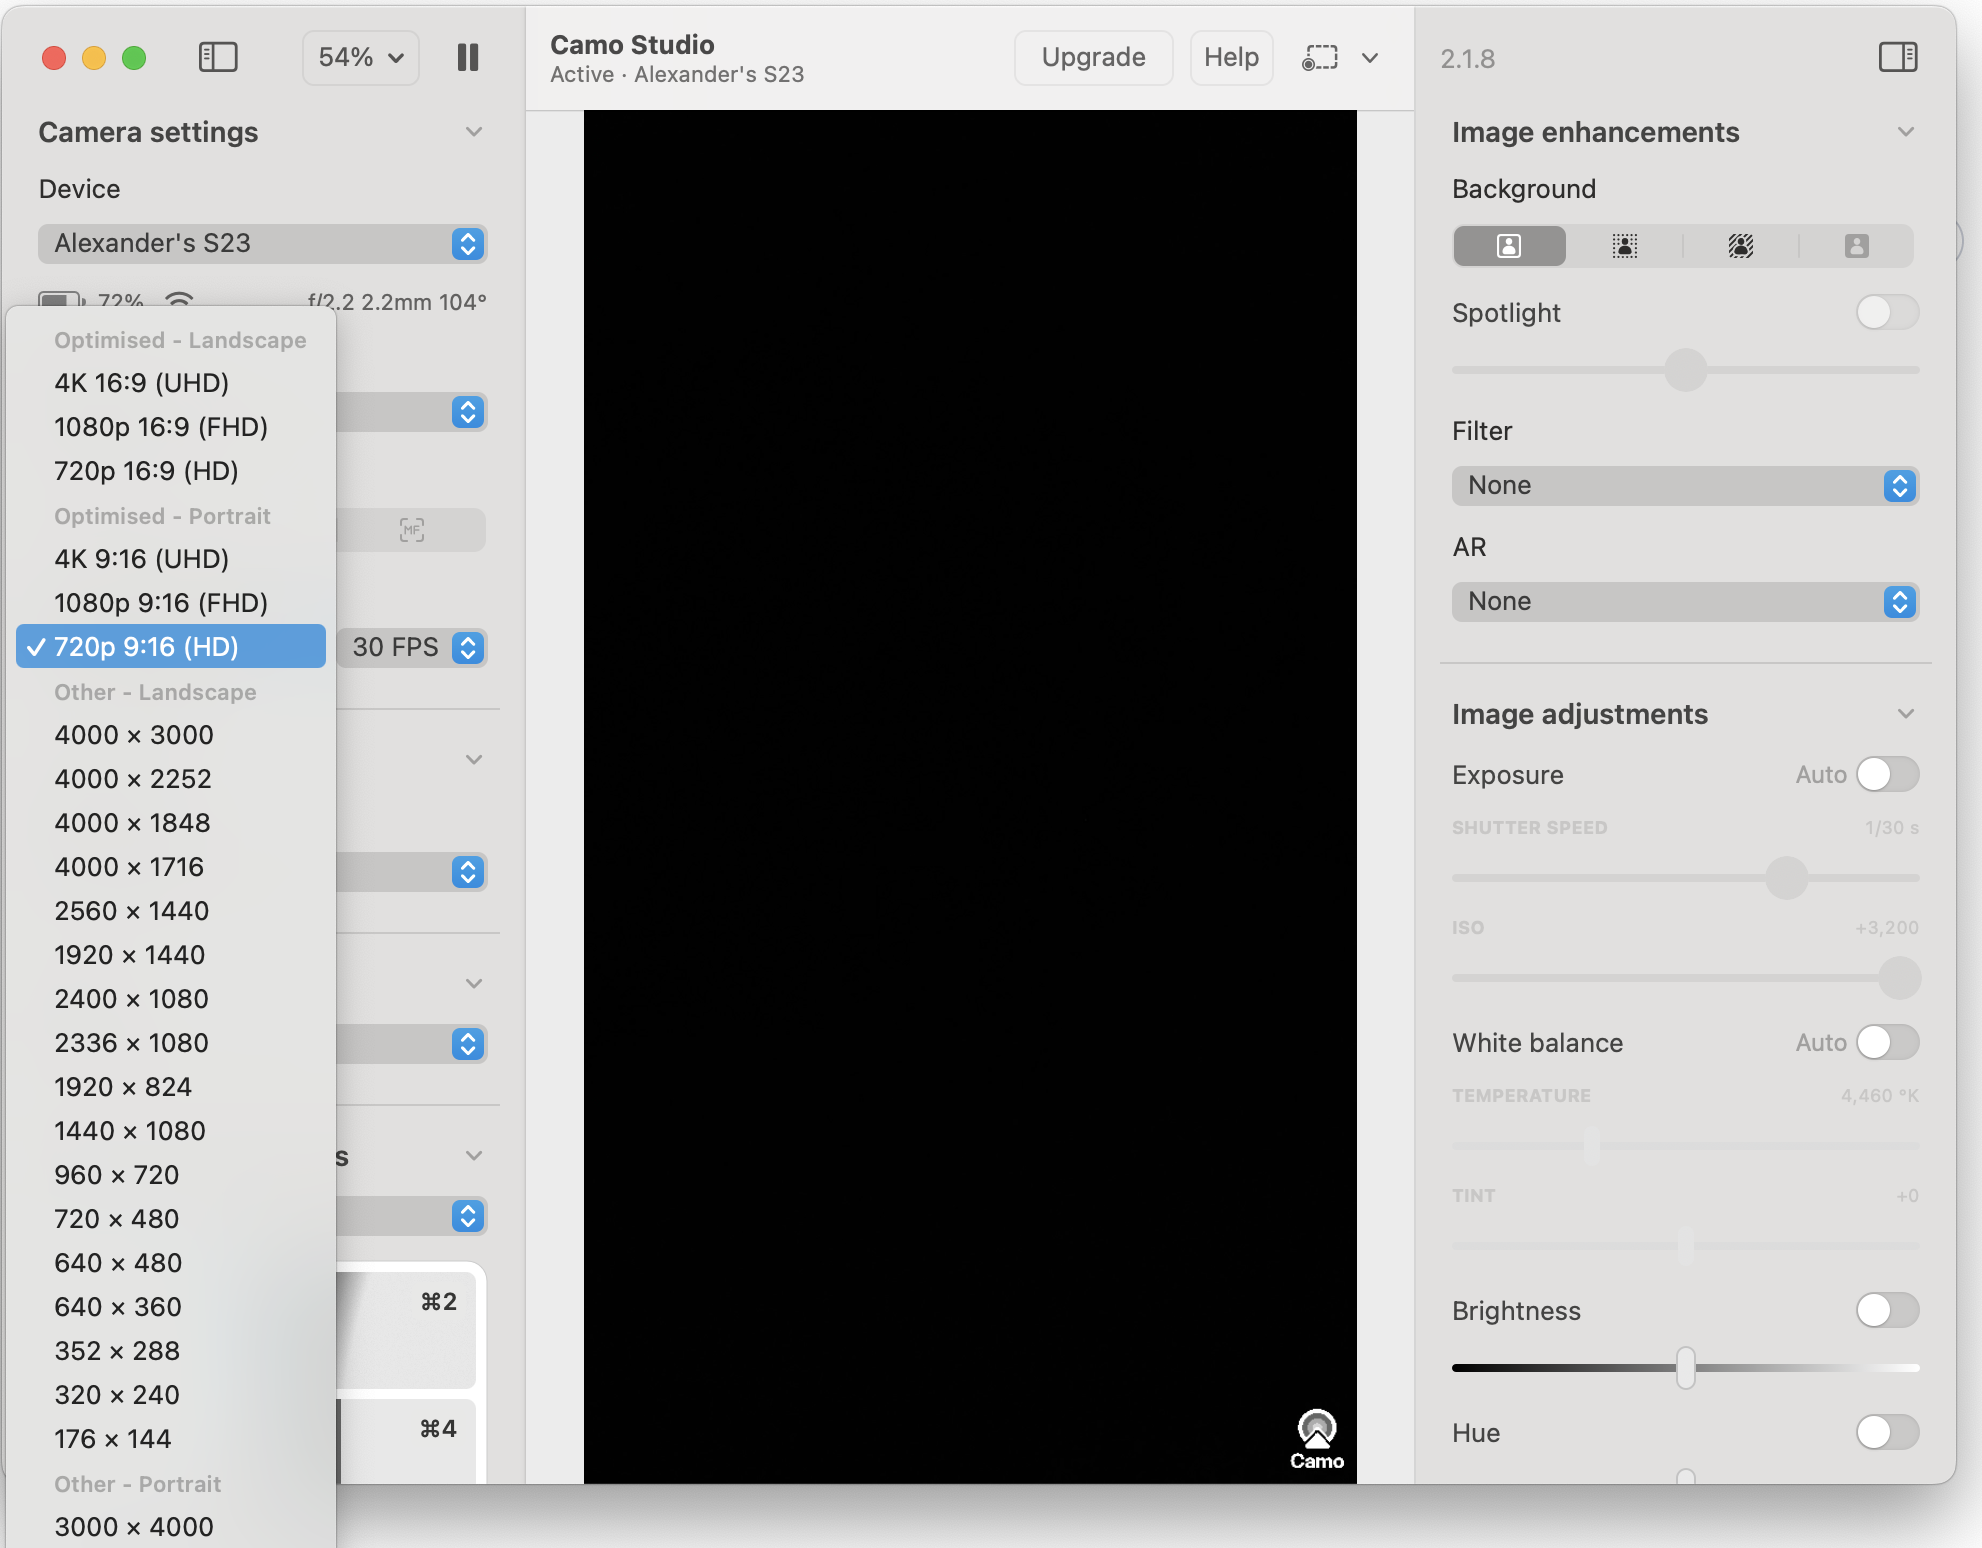
After that, it could be used in OpenCV as video capture:
    cap = cv2.VideoCapture(1)

    # Your resolution from Camo
    cap.set(cv2.CAP_PROP_FRAME_WIDTH, 720)
    cap.set(cv2.CAP_PROP_FRAME_HEIGHT, 1280)

    while cap.isOpened():
        ret, frame = cap.read()
Pose estimation with YOLOv11
Pose estimation is the task of identifying the specific points of an object, in this particular example, in the human body. The keypoints can represent various parts of the object, such as joints.
There are different models that could be used for this task, such as:
Mediapipe from Google
A popular dataset and output format is COCO17, which is widely used in pose estimation.
It looks like many models were trained using this dataset since the output format is the same. However, some of them are using extended COCO-WholeBody: 133 keypoints (17 kps body, 6 kps feet, 68 kps face, 42 kps hands). The Google model outputs 33 key points.
However, for tracking body movements in our task, we only need body keypoints, which are pretty much the same for all models, so I decided to stick to YOLOv11 since it is easy to use.
It outputs the following keypoints:
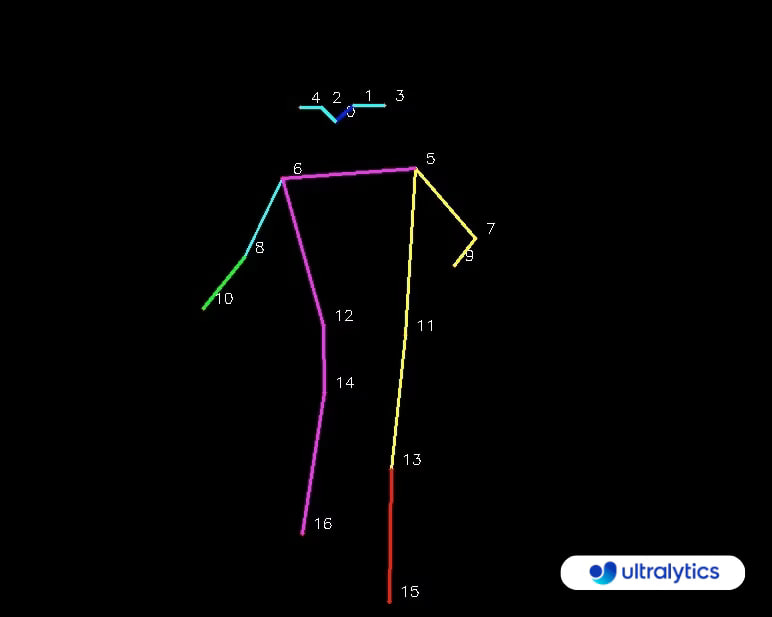
0: Nose 1: Left Eye 2: Right Eye 3: Left Ear 4: Right Ear
5: Left Shoulder 6: Right Shoulder 7: Left Elbow 8: Right Elbow
9: Left Wrist 10: Right Wrist 11: Left Hip 12: Right Hip
13: Left Knee 14: Right Knee 15: Left Ankle 16: Right Ankle
You can simply call the model on every frame. I used the medium version, which gives about 10 FPS when working on the CPU - enough for a test, anyway.
To draw the result, you can use result.plot(), which will return the copy of the frame, but I decided, that I wanted to build a pipeline, that applies all the changes to the existing frame, so I went one level deeper, and used Annotator utility class, and its kpts function, to draw the keypoints.
The resulting code:
model = YOLO("yolo11m-pose.pt")

# ... capture init code and a loop ...
    results = model(frame)
    # Model can accept a list of images or a single image, but returns a list
    result = results[0]
    keypoints = result.keypoints.xy.tolist()
    keypoints = keypoints[0]  # we are taking the first detected person

    annotator = Annotator(frame)
    annotator.kpts(result.keypoints.data[0], result.orig_shape, 5, True)
    annotated_frame = annotator.result()

    draw_angles(annotated_frame, keypoints)

    cv2.imshow("YOLO Inference", annotated_frame)
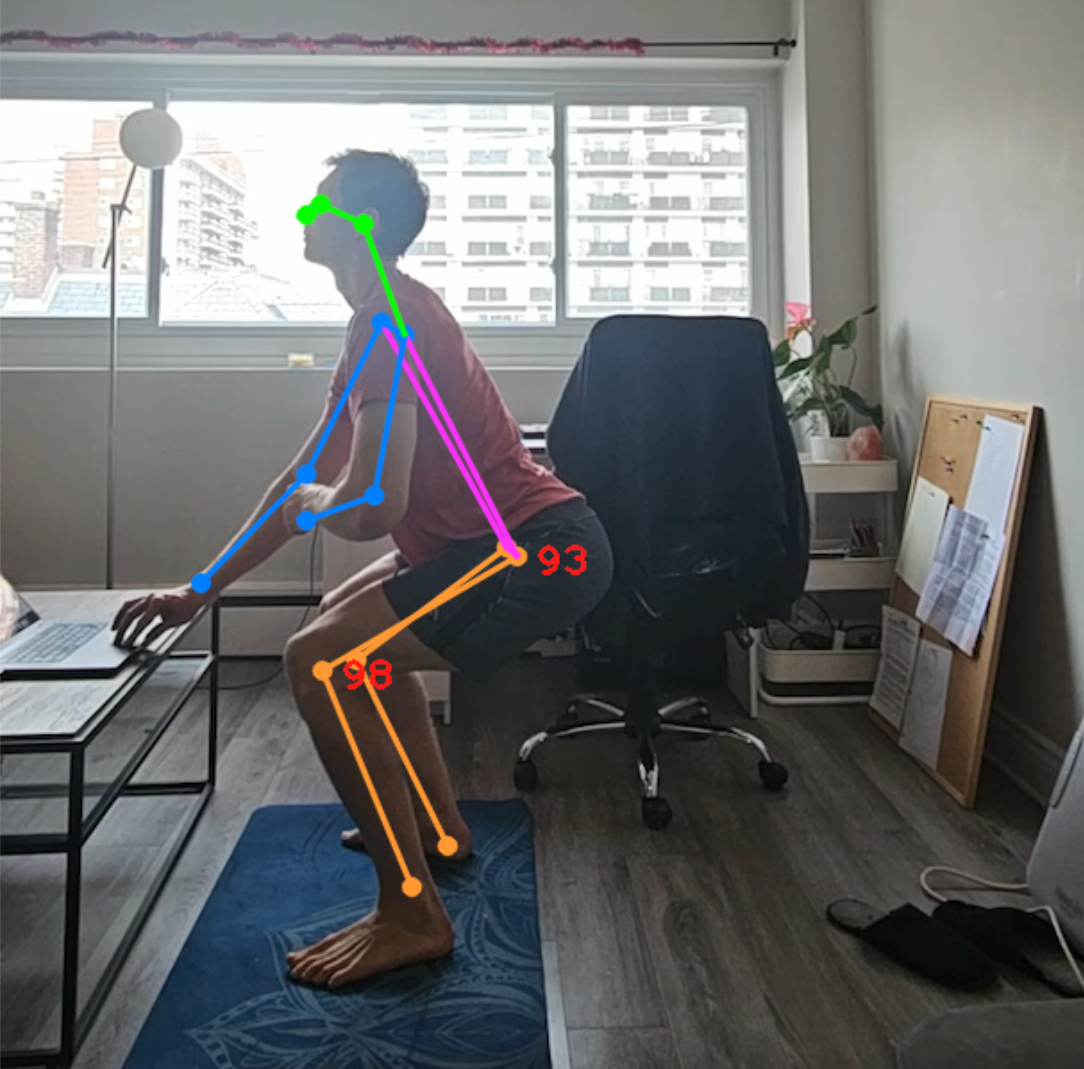
draw_angles function calculates the angle in the knee and a hip joint, and draws that single number next to them.
I also added a FPS counter in the top left corner. So the resulting image looks like this:
Movement detection
Movement detection is a more advanced technique, relying on analyzing keypoints across time.
Ultralytics provides a separate Workouts Monitoring module, that can automatically track movements across certain keypoints.

However, since I plan to keep experimenting with different models and even platforms, it is more helpful to implement them yourself.
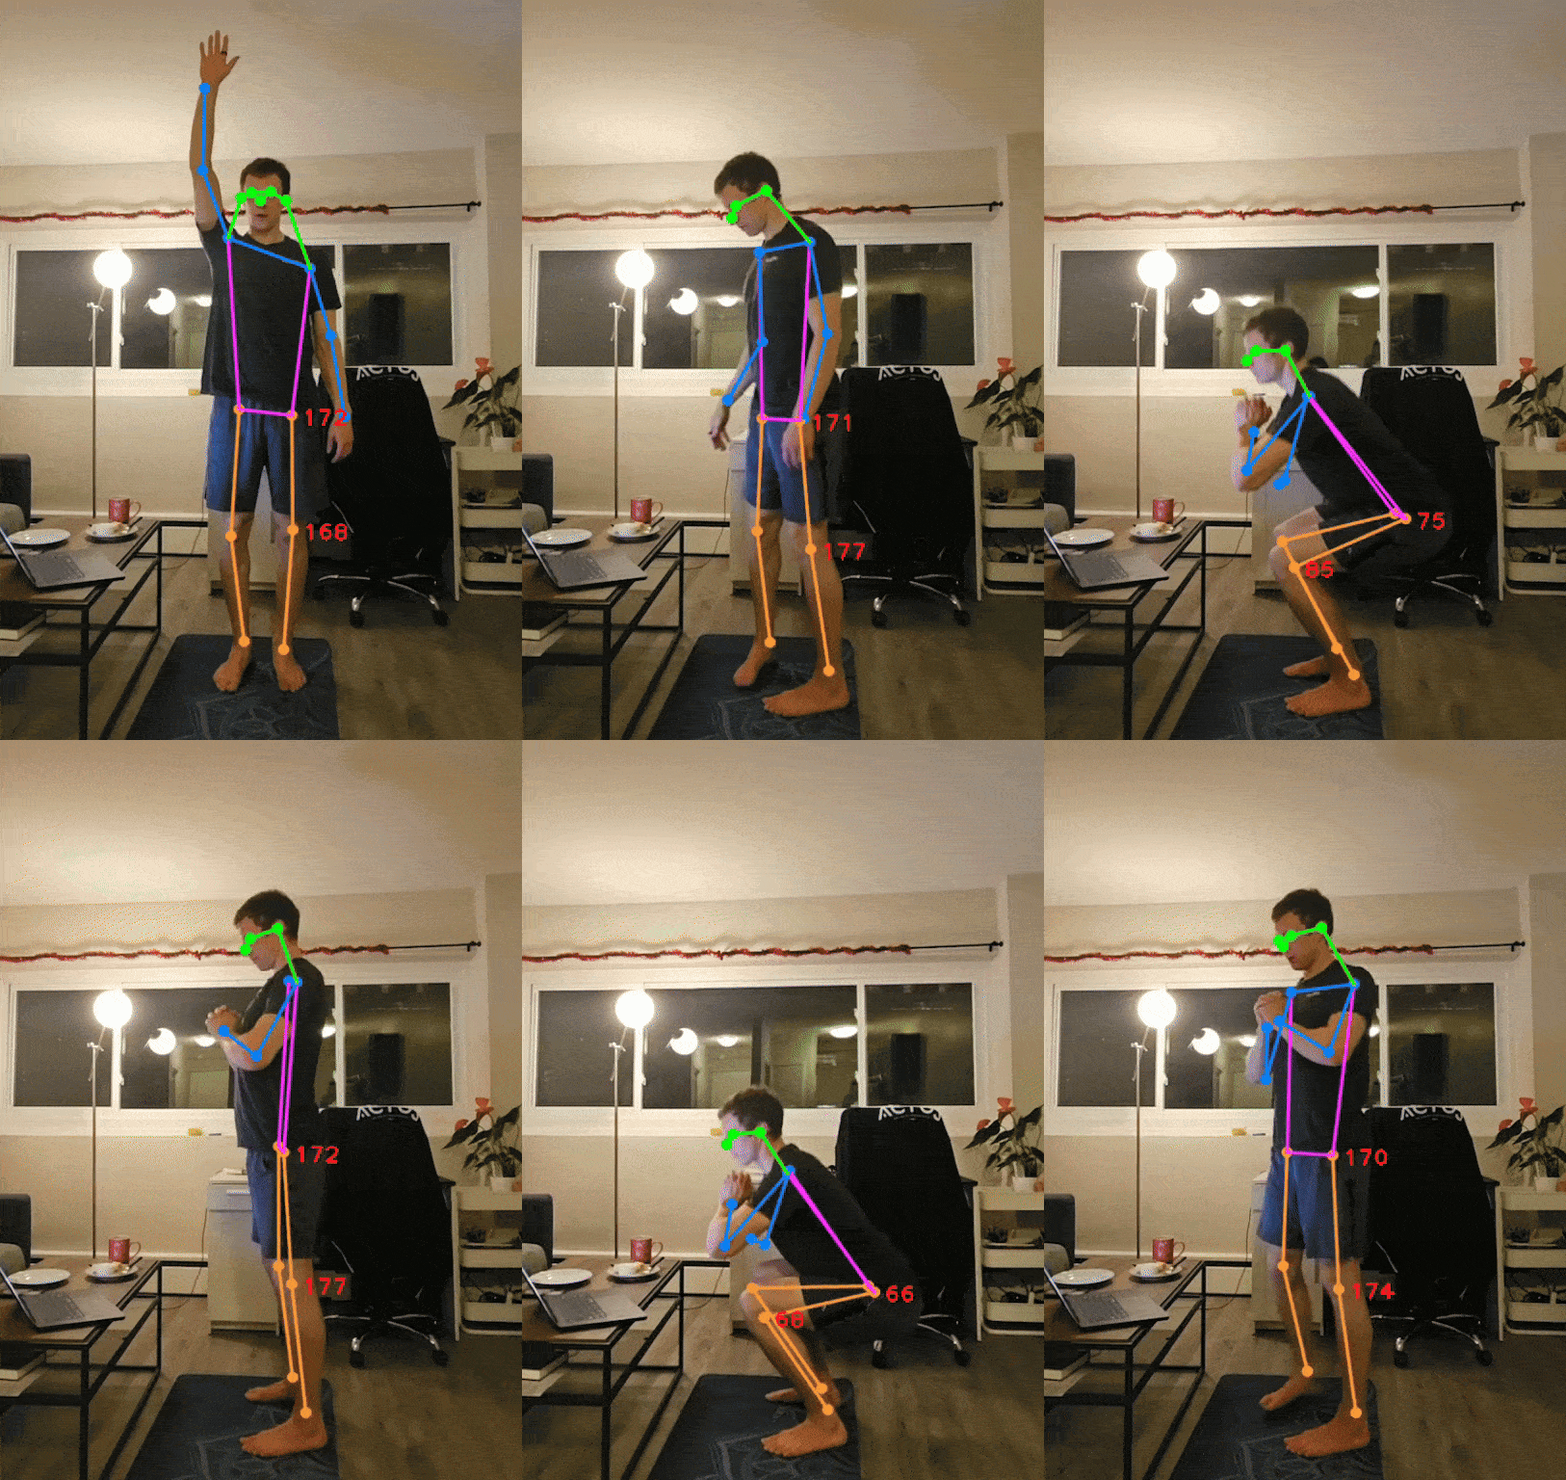
I wanted to create a simple gesture detector that would use a raised hand for 2 seconds as a signal to start and stop video recording.
I implemented this simple class:
class GesturedVideoCapture:
    is_recording: bool = False
    video_writer: cv2.VideoWriter | None = None
    capture_gesture_start_time: float = 0.0

    GESTURE_HOLD_TIME = 2.0 # 2 seconds

    def process_frame(self, frame, keypoints, current_time):
        nose = keypoints[0]
        nose_seen = nose[0] > 0 and nose[1] > 0
        left_ear_seen = keypoints[3][0] > 0 and keypoints[3][1] > 0
        right_ear_seen = keypoints[4][0] > 0 and keypoints[4][1] > 0

        left_wrist = keypoints[9]
        right_wrist = keypoints[10]

        in_capture_gesture = (
            nose_seen and left_ear_seen and right_ear_seen and
            right_wrist[1] < nose[1] < left_wrist[1]
        )

        if self.is_recording and self.video_writer is not None:
            resized = cv2.resize(frame, (WRITER_WIDTH, WRITER_HEIGHT))
            self.video_writer.write(resized)

        if self.capture_gesture_start_time:
            if in_capture_gesture:
                if self.capture_gesture_start_time + self.GESTURE_HOLD_TIME < current_time:
                    # Hold for GESTURE_HOLD_TIME seconds - starting or stopping capture
                    if self.is_recording:
                        self.stop_and_save_capture()
                    else:
                        self.start_capture()

                    return
            else:
                self.capture_gesture_start_time = 0
        elif in_capture_gesture:
                self.capture_gesture_start_time = current_time


    def start_capture(self):
        print("Start capturing")
        self.is_recording = True
        self.capture_gesture_start_time = 0
        self.video_writer = cv2.VideoWriter(
            f"output_{int(time.time())}.mp4",
            cv2.VideoWriter_fourcc(*'avc1'),
            10,
            (WRITER_WIDTH, WRITER_HEIGHT)
        )


    def stop_and_save_capture(self):
        print("Stop capturing")
        self.is_recording = False
        self.capture_gesture_start_time = 0
        self.video_writer.release()
        self.video_writer = None
That could be added into a main loop pipeline, after draw_angles:
video_capture = GesturedVideoCapture()

# .....
        draw_angles(annotated_frame, keypoints)
        video_capture.process_frame(annotated_frame, keypoints, time.time())
And here is the result: the video writer, that is activated by a raised hand:
The code is available here - https://github.com/hypnocapybara/pose_estimation_test
Subscribe to my newsletter
Read articles from Alexander Polev directly inside your inbox. Subscribe to the newsletter, and don't miss out.
Written by
