How to mount your EFI partition in different OSES
 Josh
Josh
What can you do with the EFI partition mounted?
With the EFI partition mounted, you can fix issues you may have caused by installing grub or another bootloader incorrectly. Another reason you may want to mount the EFI partition is to install a bootloader such as grub, rEFInd, clover, OpenCore and more. You could also use the EFI partition to delete Windows Bootloader to prevent your computer from auto booting to that instead of something like grub or rEFInd.
Windows
Prerequisites
Administrator Privileges
Knowledge on how to open a command prompt and run commands
Step 1 - Open Command Prompt as administrator
Press Win+X and click Command Prompt (Admin) or Terminal (Admin) if on Windows 11.

Step 2 - Terminal Commands
With the terminal open, you should see a simple command prompt with a blinking cursor. Start by typing the following, and click enter:
mountvol X: /s
After typing this, you can close the terminal.
Step 3 - Opening Explorer++
Due to limitations in Windows Explorer, you cannot open the EFI partition by default. Instead we have to use a software called explorer++. The link to download this is up in the prequisites section. Once downloaded and extracted, right click on Explorer++ and click run as administrator.

Step 4 - Opening the EFI Partition
Once in Explorer++, you should see the EFI partition mounted as X:\ labelled as EFI, ESP or just Local Disk.
Double click on it and you should be able to access all files in your EFI partition.

Linux (Ubuntu)
Step 1 - Terminal
Start by opening terminal on linux (Can press Ctrl+Alt+T). You will be presented with a blinking cursor.

Step 2 - Find the EFI Partition
To find which partition the EFI is on, you must run the following
sudo fdisk -l
Look for a partition that is Fat32 formatted and is labelled something like ‘EFI’ ‘ESP’ ‘SYSTEM’ It’ll usually be around 100MB. Once you have found which one it is, take note of it as it will be needed later. It’ll be something like /dev/sda1
Step 3 - Make the directory
Now, run this command to make the directory for where your EFI partition will be held.
sudo mkdir -p /boot/efi
Step 4 - Mount the EFI partition
To mount the EFI partition to the directory you made above, run this command:
sudo mount /dev/sdXn /boot/efi
Note: Replace /dev/sdXn with the appropriate partition you took down earlier in Step 2!
Step 5 - Access the partition
Open your file explorer and go to /boot/efi and your EFI partition should be there! If it didn’t show, go over the steps again carefully and make sure you didn’t miss anything!
MacOS
Prerequisites
Python Installed
Step 1 - Mount the main HD
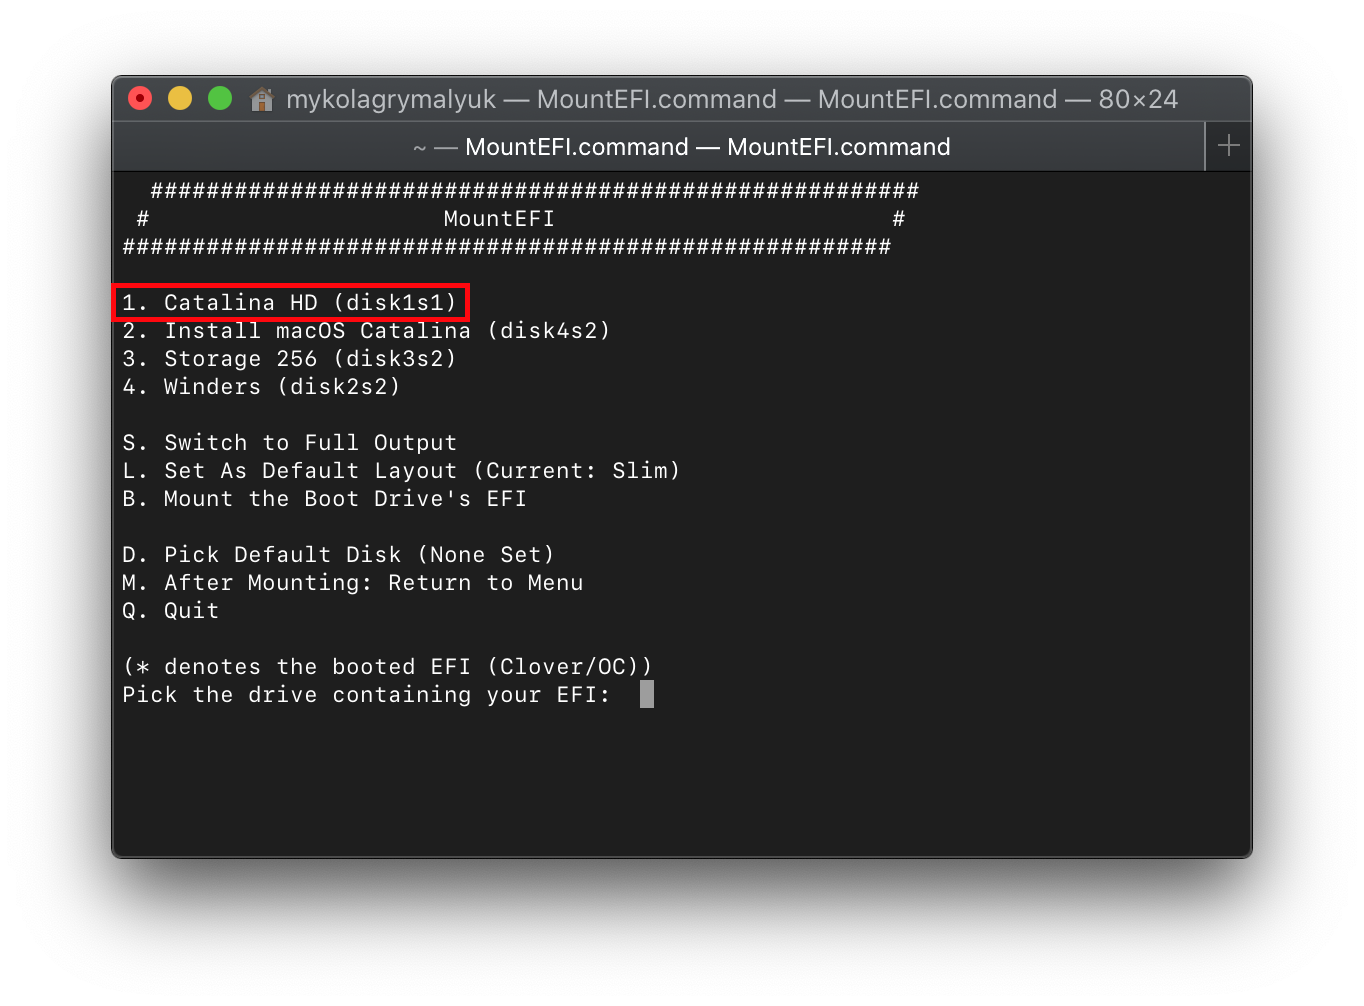
Once the software is open, you should see a list of drives. Mount your main drive (not partitions) that contain the EFI partition. It will usually be called ‘Macintosh HD’ and would usually be number 1.

Step 2 - Accessing the EFI Partition
Open Finder, find the EFI partition and there you go! All done! Be careful not to delete any important data while MacOS is running.
Conclusion
I have now showed you ways to mount your EFI partition on 3 different OSes. In my opinion MacOS is the easiest. MountEFI was made in mind for hackintoshes but can also be used to access your EFI partition in general. Hope you enjoyed this guide!
Subscribe to my newsletter
Read articles from Josh directly inside your inbox. Subscribe to the newsletter, and don't miss out.
Written by
