How to Use GitHub Codespaces for Sitecore XM Cloud Development
 Amit Kumar
Table of contents
- What is GitHub Codespaces?
- Why GitHub Codespaces for Sitecore XM Cloud Development Workflow?
- Step-by-Step Guide to Setting Up Sitecore XM Cloud Workflow Using GitHub Codespaces
- Create a Code Repository
- Set Up the GitHub Codespaces Configuration
- Integrating GitHub Codespaces for Sitecore XM Cloud Projects Hosted on GitHub
- Integrating GitHub Codespaces for Sitecore XM Cloud Projects Hosted on Azure DevOps Repo
- Run and Test Your Sitecore XM Cloud Project
- Connecting Your GitHub Codespaces Application to the Pages Editor
- Common Errors and How to Avoid Them
- 🔦Conclusion
- 🙏Credit/References
- 🏓Pingback

As Sitecore XM Cloud gains popularity among modern developers, it's important to build efficient and scalable workflows. Developers always seek ways to improve their workflows, and most front-end developers prefer not to use Docker-based local development environments. A great tool for this is GitHub Codespaces, a cloud-based development environment.
In this blog, we'll look at how to set up a Sitecore XM Cloud Development Workflow using GitHub Codespaces with the help of Development Workflow: Github Codespaces, the benefits of this method, and how to fix common errors.
What is GitHub Codespaces?
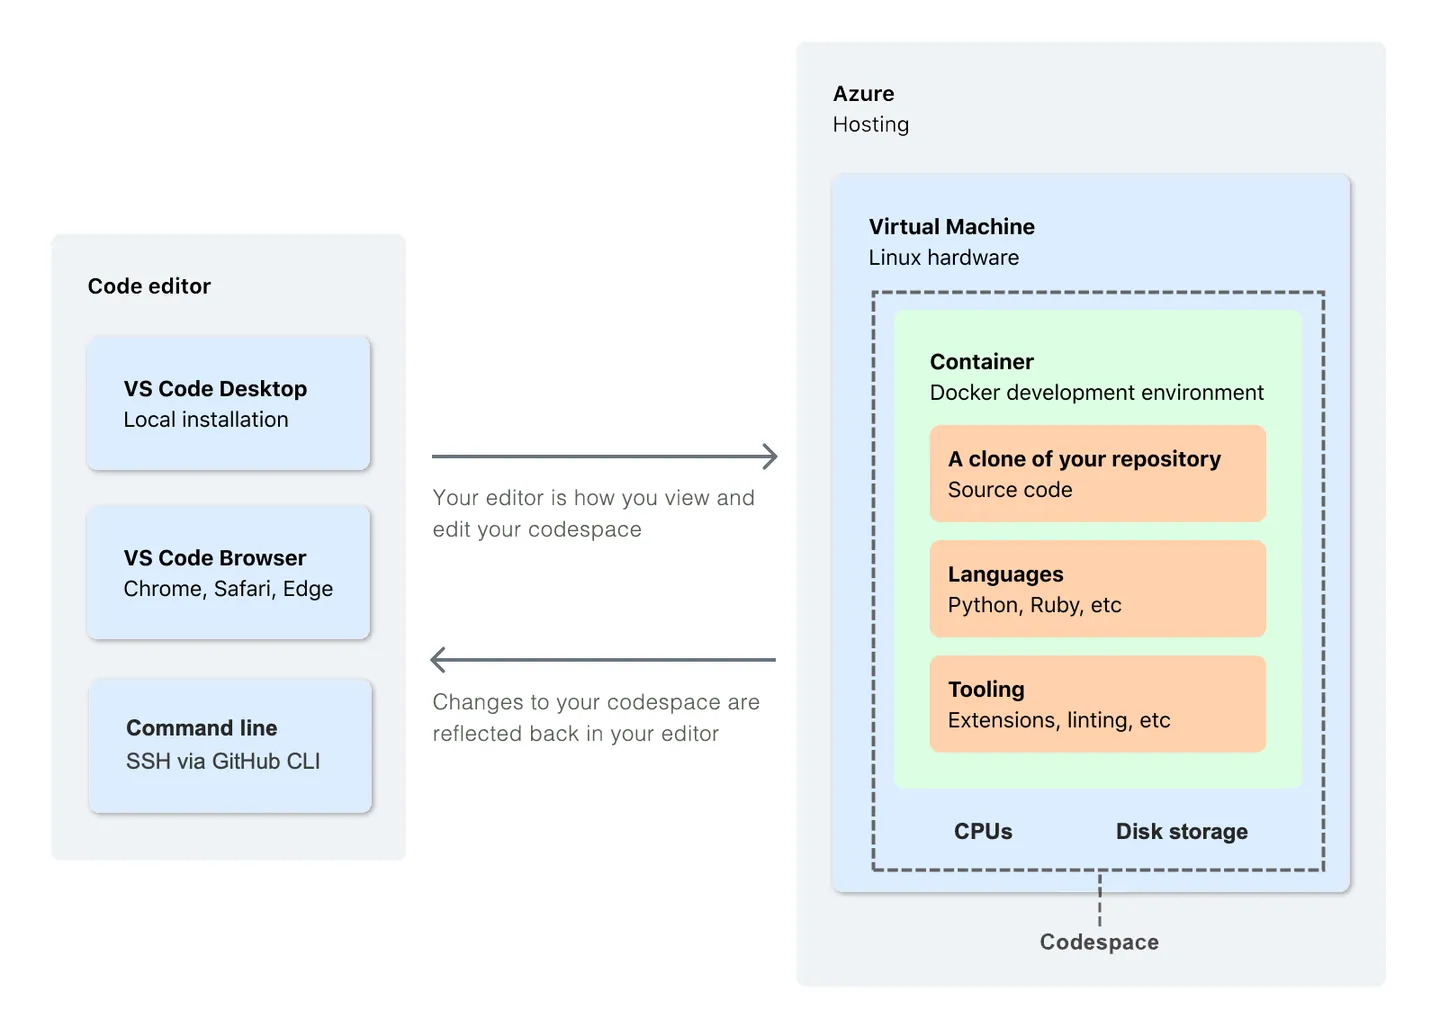
GitHub Codespaces is a cloud-based development tool that lets developers code, build, test, and debug projects right from their browser. It offers a ready-to-use, container-based environment for repositories with all the needed tools and extensions. This means there's no need for local setup, allowing developers to focus on coding instead of setting up and maintaining their environment. It also lets developers work on their projects from anywhere.
Benefits of GitHub Codespaces
Instant setup: Get started with a pre-configured environment in seconds. 🔝
Consistency: Ensures a consistent development environment across all team members.
Scalability: Easily scale your development environment as your project grows and easily adjust computational resources as needed.
Accessibility: Access your development environment from any device with an internet connection.
No Local Dependencies: Eliminate local machine dependencies, ensuring that every team member works in an identical environment.
Integration with GitHub or Azure DevOps: GitHub Codespaces integrates tightly with GitHub or Azure DevOps repositories, streamlining the entire workflow.
Why GitHub Codespaces for Sitecore XM Cloud Development Workflow?
GitHub Codespaces helps maintain a consistent development environment for Sitecore XM Cloud by simplifying setup and management across team members. 🔝
Standardized Development: Ensures all developers work in the same environment designed for Sitecore XM Cloud.
Reduced Setup Time: GitHub Codespaces drastically reduces setup time by offering a pre-configured development environment.
Seamless Cloud Development: Enables developers to efficiently use Sitecore's cloud-native platform without concerns about local configurations.
Remote Development: Access your development environment from anywhere, making it easier to work remotely or on the go.
Integrated Tools: Use Visual Studio Code and other development tools directly within the codespace.
Step-by-Step Guide to Setting Up Sitecore XM Cloud Workflow Using GitHub Codespaces
I followed the steps provided by Sitecore in their Development Workflow for GitHub Codespaces. Additionally, I incorporated my own insights and adjustments to streamline the integration process with Sitecore XM Cloud. These enhancements aim to simplify the setup and improve efficiency, making it easier for developers to integrate GitHub Codespaces with Sitecore XM Cloud projects. 🔝
Create a Code Repository
Start by creating a new repository on GitHub or Azure DevOps for your Sitecore XM Cloud project OR use the existing one.
💡You can easily migrate your GitHub repo to Azure DevOps by following the steps in Import a Git Repo.
Set Up the GitHub Codespaces Configuration
In your repository, create a folder named
.devcontainer.Inside this folder, create a file named
devcontainer.jsonwith the following configuration:// For format details, see https://aka.ms/devcontainer.json. For config options, see the // README at: https://github.com/devcontainers/templates/tree/main/src/dotnet { "name": "Add Your Desired Codespace Name Here", // Or use a Dockerfile or Docker Compose file. More info: https://containers.dev/guide/dockerfile "image": "mcr.microsoft.com/devcontainers/dotnet:1-6.0", "features": { "ghcr.io/devcontainers/features/node:1": { "nodeGypDependencies": true, "version": "lts", "nvmVersion": "latest" } }, // Use 'forwardPorts' to make a list of ports inside the container available locally. "forwardPorts": [3000], "portsAttributes": { "3000": { "visibility": "public" } } }
In this file, we configure Codespaces with a name, a base image, Node.js features, and port forwarding settings. This configuration sets up a development container with .NET 6.0 and Node.js LTS, and forwards port 3000 for public access
Commit these changes to your Git repository and proceed to the next step according to your repository's hosting location. 🔝
Integrating GitHub Codespaces for Sitecore XM Cloud Projects Hosted on GitHub
Create a Codespace:
Navigate to your repository on GitHub.
Go to Settings > Codespaces and enable Codespaces for the Organization.
Click the green "Code" button and switch to the "Codespaces" tab.

Click "Create codespace on main" to create a new codespace (This action opens a new tab where your codespace is being created.). 🔝

Open the Terminal tab and navigate (
cd src/sxastarter) to your Next.js codebase located in the [Root Folder] src/sxastarter
Integrating GitHub Codespaces for Sitecore XM Cloud Projects Hosted on Azure DevOps Repo
Create a Codespace:
Navigate to your GitHub Codespaces.
Use the Blank quick start template to set up a new codespace. 🔝

This action opens a new tab where your codespace is being created.

Now, open a terminal in the root of the codespace and initialize it with a git repository.
git init

Now, link your existing Azure DevOps repo, which you set up earlier, to this new GitHub Codespace. To do this, go to your Azure DevOps repo and click on clone to copy the SSH or HTTP git URL. Also, generate the Git credentials (the password needed when you run the
git pullcommand) 🔝
For example, if my Git repo clone URL is
https://AmitKumar@dev.azure.com/AmitKumar-AK/Contoso_Corporation/_git/Sitecore.Demo.XMCloud.Verticals.gi, then run the command (git remote add origin [YOUR GIT CLONE URL]) below to connect your remote Azure DevOps Repo with your GitHub Codespace and after thatgit pullcommand (enter the password generated in the previous step):git remote add origin https://AmitKumar@dev.azure.com/AmitKumar-AK/Contoso_Corporation/_git/Sitecore.Demo.XMCloud.Verticals.git; git pull;
It will download the remote branches into your GitHub Codespace, and you can choose a specific branch by running the command
git checkout develop.You can also rebuild the container (optional) by pressing Ctrl + Shift + P to open the Command Palette and searching for the command
Codespace: Rebuild Container.

Run and Test Your Sitecore XM Cloud Project
First, we need to set up the necessary environment variables in the
.envfile or.env.local(do not check these files into version control). To get the required environment variables from the XM Cloud Environment, you need access to the XM Cloud Deploy app. 🔝Add the following values into the
.envfile or.env.localfile: for JSS 21.6 or greater:
  PUBLIC_URL=https://$CODESPACE_NAME-3000.app.github.dev/
  JSS_EDITING_SECRET=<Get the editing secret from <xmcloud CM URL>/sitecore/admin/showconfig.aspx
  SITECORE_SITE_NAME=<Your Site name>
  SITECORE_EDGE_CONTEXT_ID=<Get the context ID from the Developer Settings tab for your environment in the deploy app>
Add the following values into the
.envfile or.env.localfile: for JSS 21.5.x or earlier: 🔝
  PUBLIC_URL=https://$CODESPACE_NAME-3000.app.github.dev/
  JSS_EDITING_SECRET=<Get the editing secret from <xmcloud CM URL>/sitecore/admin/showconfig.aspx
  SITECORE_API_KEY=<Get the API key from the XM Deploy app (see below)>
  SITECORE_API_HOST=<The URL of your XM Cloud CM instance>
  SITECORE_SITE_NAME=<Your site name>
Open the Terminal tab and go to your Next.js codebase by typing
cd src/sxastarter. This is located in the src/sxastarter folder or wherever your Next.js codebase is stored.Run these commands in the Terminal window. 🔝
  npm install
  npm run start:connected
Once you run the command above, it will attempt to register your Next.js component and ask you to open your application, which is running on PORT 3000. Please see the flow in the screenshot below

You can check the PORTS tab in your Codespaces to see which applications are running on specific ports.

Connecting Your GitHub Codespaces Application to the Pages Editor
The Pages editor is automatically connected to the XM Cloud editing host, so any content updates in Pages impact the whole environment. However, developers working on components for XM Cloud can link the Pages editor to their local host. This allows them to see and test their components without affecting other users in the shared environment or any live sites. 🔝
Verify the Rendering Host Visibility
First, we need to check if the app set up at PORT 3000 by GitHub Codespaces, acting as the RENDERING HOST, is PUBLIC. If it is not, change it from PRIVATE to PUBLIC by right-clicking on that entry, going to PORT visibility, and selecting PUBLIC

Create the Rendering Host item
Next, open the Content Editor in your XM Cloud development environment and go to /sitecore/system/Settings/Services/Rendering Hosts. Here, create a new predefined rendering host that points to your Codespaces site (https://verbose-xylophone-g565q6xr5j2gvp-3000.app.github.dev).
Right-click the Rendering Hosts folder and add a new Rendering Host item. 🔝

This will be your unique rendering host, so make sure to name it properly. In this case, my Codespaces forwarded URL for port 3000, which is the Rendering Host URL, is https://verbose-xylophone-g565q6xr5j2gvp-3000.app.github.dev.
Server side rendering engine endpoint URL- enter your codespaces application URL (Copy the forwarded address for port 3000), followed by the path:/api/editing/render.Server side rendering engine application URL- enter your codespaces application URL.Server side rendering engine configuration URL- leave blank.Application name- Set the application name to your JSS application name found in the [Root Folder]/src/sxastarter/package.json.
Save the item. 🔝

Create your development Site Definition item
Open Content Editor, navigate to <site root>/Settings/Site Grouping in your site, and insert a new Site item.
Set the following fields:
Site name- set this to match your application nameHostname- set this to your Codespaces forwarded URL for port 3000Predefined application rendering host- set this to the new Rendering Host created in the step above.
We also need to change the Hostname field on the original Site item. By default, it is set to *, which will override your new Site item mapping. Change the * to a different URL, usually the URL for your hosted Next.js application. 🔝
Once everything is set up, Pages will connect to your application running in Codespaces. The first time you load Pages, it might have cached the previous editing host details, so if it shows an error, wait 10 minutes and try again.

How to Access the XM Cloud Pages Editor
Open
Content Editor, navigate to<site root>/Settings/Site Groupingin your site, and insert a newSiteitem. 🔝Set the following fields:
To connect your local host to Pages:
To open Pages on your site, click Actions > Edit in Pages. Alternatively, go directly to
https://pages.sitecorecloud.io/editorand select the relevant site from the drop-down menu at the top left.On the top left, choose the editing host selector and pick Local host.

Enter the name of your local host, in this case enter the Codespaces forwarded URL for port 3000 ( which is the Rendering Host URL)
https://verbose-xylophone-g565q6xr5j2gvp-3000.app.github.dev.Save your changes. 🔝
Changes done in the LOCAL Pages Editor Instance will reflect on the Rendering Host and XM Cloud

Common Errors and How to Avoid Them
When setting up your Sitecore XM Cloud development workflow with GitHub Codespaces, you might face some common issues. Here's how to avoid them: 🔝
1. Missing Dependencies
Error: Missing tools like .NET Core SDK or Node.js in the Codespaces environment.
Solution: Add the required tools to your devcontainer.json under postCreateCommand. For example:
"postCreateCommand": "dotnet tool install sitecore-cli --global"
2. Port Configuration Issues
Error: Application not accessible in Codespaces due to missing port forwarding.
Solution: Ensure you expose the required ports in devcontainer.json: 🔝
"forwardPorts": [3000]
3. XM Cloud Rendering Host Not Loading
Error: Rendering Host not loading
Solution: If you open or create more than one GitHub Codespace at the same time, PORT 3000 might be used by another app. In such cases, your app will open using PORT 3001, and you will see a blank page. It's best to close all other GitHub Codespaces and try to open the required one with PORT 3000.
4. Sitecore XM Multisite setup website not loading
Error: Sitecore XM Cloud Website not loading
Solution: In your Sitecore Headless SXA Multisite setup, if the site you specified in the .env file isn't loading, make sure the site item exists at sitecore/content/[Tenant]/[Website]/Settings/Site Grouping/[Site Item] and has the host name also have localhost. This is necessary because it will try to access data from localhost:3000.

🔦Conclusion
Integrating GitHub Codespaces into your Sitecore XM Cloud development workflow provides many benefits, such as consistency, scalability, and efficiency. By following the steps in this guide, you can create a strong development environment that boosts your productivity and simplifies your development process. 🔝
🙏Credit/References
🏓Pingback
Subscribe to my newsletter
Read articles from Amit Kumar directly inside your inbox. Subscribe to the newsletter, and don't miss out.
Written by
Amit Kumar
Amit Kumar
My name is Amit Kumar. I work as a hands-on Solution Architect. My experience allows me to provide valuable insights and guidance to organizations looking to leverage cutting edge technologies for their digital solutions.As a Solution Architect, I have extensive experience in designing and implementing robust and scalable solutions using server-side and client-side technologies. My expertise lies in architecting complex systems, integrating various modules, and optimizing performance to deliver exceptional user experiences. Additionally, I stay up-to-date with the latest industry trends and best practices to ensure that my solutions are always cutting-edge and aligned with business objectives.