Setting up VS code for Machine learning projects
 David singh
To make machine learning projects, we need to setup following in vs code
Jupyter environment
Virtual environment
Python and it's libraries installation
Version control integration (Git and GitHub)
Step 1 : Create a Virtual environment
Open VS code
Create and select a folder where all your projects will be available.
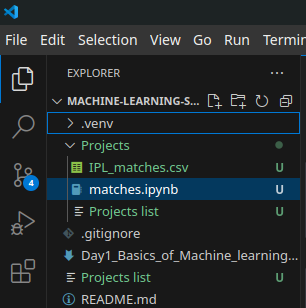
Let's assume folder structure
Machine_learning_series folder → Projects folder
“Projects” folder includes, Datasets (csv, excel, json files), file_name.ipynb files, and venv

In vs code, click on top left “Terminal” option, and then “New terminal”

It will open a new terminal window
To create a virtual environment having name “.venv”, type “python3 -m venv .venv”
To activate virtual environment, type “source .venv/bin/activate”

To check which python version is installed in your virtual environment, type “python - -version”
To check location of above installed python, type “which python”
To check what pip packages are installed already, type “pip list”, it will list 2 packages : pip , setuptools
To upgrade pip, type “pip install - -upgrade pip”
Again, check “pip list”
Step 2 : Setup ipynb kernel
Create an file_name.ipynb file, let's matches.ipynb
On top right, click “Select kernel”
Choose “Python Environments”
Then, “+Create Python Environment”
Then, “Enter interpreter path”
Then,”Find”
It will open the location of folder (here ,Projects folder), Right-click mouse and choose “Show hidden files”, then choose “.venv” folder
When you open “.venv” folder, you find “bin” folder there, open it , and select “python3.11” or whatever latest python version available, and then “Select interpreter” option.
Now, vs code will automatically download “ipykernel” package, and select the .venv kernel
We don't need to download , jupyter lab or jupyter notebook separately, just download following extensions
Step 3 : Download extensions
In extensions tab of VS code, install following extensions :
Python
Jupyter
GitHub copilot
Step 4 : Download Python libraries
We need to download python libraries like pandas, numpy, matplotlib, etc to perform EDA on datasets.
In VS code , open “Terminal”(Top left), “New terminal”
And type following commands
pip install ipykernel ipython
pip install <package_name> like pip install pandas numpy matplotlib
Remember, activate the .venv before typing above commands
To deactivate the vene, type “deactivate”
Step 5 : Version control setup
To setup version control like Git, in VS code, we need to
Open “Accounts”(Bottom left icon), and “sign-in” with GitHub account username and email password.
“Initialize Repository” in folder, here we have “Projects” folder opened.
In “source control” tab, we can stage our files, commit and push to “cloned” repo
Important point “Open .gitignore file” and type below statements
.venv/
.ipynb_checkpoints/
These are to avoid pushing the virtual environment to version control.
Now, our VS Code is set up for machine learning projects.
Subscribe to my newsletter
Read articles from David singh directly inside your inbox. Subscribe to the newsletter, and don't miss out.
Written by

David singh
David singh
Aspiring Data Scientist , Proficient in Python & its libraries (pandas, numpy, matplotlib/seaborn, scikit-learn), SQL, and Advanced Excel for data analysis and manipulation. Skilled in data visualization and making interactive dashboards using Tableau and Power BI. Experienced in MERN stack for full-stack development and Java for programming. Passionate about AI/ML and working with Linux-based systems. Actively contributing to open-source projects and eager to leverage data-driven insights to solve real-world problems.