Deploy and Verify Your First ERC-20 Smart Contract on Rootstock Testnet
 Pranav Konde
Table of contents
- Introducing Rootstock
- Deploy an ERC-20 Contract on Rootstock Testnet
- Code Explanation:
- Basic Token Details
- Checking Balances
- Transferring Tokens
- Approving Allowance
- Using transferFrom
- Test Scenarios
- Scenario 1: Transfer Tokens
- Scenario 2: Approve and TransferFrom
- Scenario 3: Invalid Transactions
- Verify Your Smart Contract on Rootstock Testnet

Welcome, Smart Contract Pioneers!
As a smart contract developer, chances are you’ve been crafting Solidity contracts on various EVM-compatible chains. But have you ever thought about running Solidity smart contracts on Bitcoin? Sounds intriguing, right? That’s where Rootstock steps in.
Introducing Rootstock
Rootstock (RSK) is the first and most established Bitcoin sidechain, offering a groundbreaking Layer 2 solution that combines Bitcoin’s unmatched proof-of-work security with Ethereum’s smart contract capabilities. Fully open-source and EVM-compatible, RSK enables developers to build and deploy decentralized applications (dApps) seamlessly while leveraging the strength and decentralization of Bitcoin’s network.
Secured by over 60% of Bitcoin’s hashing power through merged mining, RSK ensures a high level of security and trustlessness for its users. This innovative platform acts as a bridge, expanding Bitcoin’s functionality beyond simple transactions to power use cases such as DeFi, tokenization, and identity management.
With its commitment to scalability, interoperability, and decentralization, RSK is at the forefront of enabling a vibrant ecosystem of dApps, fostering innovation while staying anchored to Bitcoin’s secure and decentralized infrastructure.
Now that you’ve got a quick overview of Rootstock, let’s jump right into deploying an ERC-20 Solidity smart contract on the Rootstock testnet. The process is straightforward and follows a similar approach to EVM-based deployments. Let’s get started!
Deploy an ERC-20 Contract on Rootstock Testnet
Step 1: Setting Up Your Environment
To begin, you’ll need some basic tools:
Install MetaMask
Add the MetaMask browser extension set it up and pin it.
To connect MetaMask to the Rootstock Testnet, open MetaMask > Settings > Networks > Add Network, and then enter the required details.
Network Name: Rootstock Testnet
RPC URL:
https://public-node.testnet.rsk.co/Chain ID: 31
Currency Symbol: tRBTC
Block Explorer URL:
https://explorer.testnet.rootstock.io/
Get Test RBTC
Visit the Rootstock faucet to acquire some test RBTC. This will cover your deployment transaction costs.
Finally, it should look like:
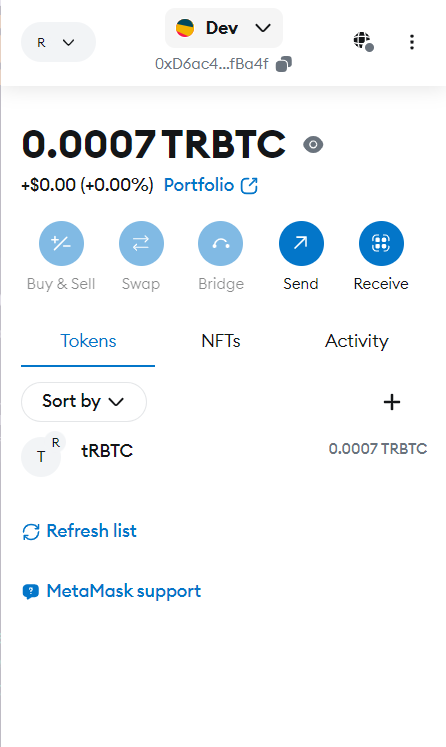
💡 Tip: For more information, check out the official setup guide: MetaMask Integration Guide.
Step 2: Writing Your Smart Contract
We’ll use Remix IDE, a popular web-based tool for developing, testing, and deploying smart contracts.
Open Remix IDE.
Create a new file under the contracts section
MyToken.sol
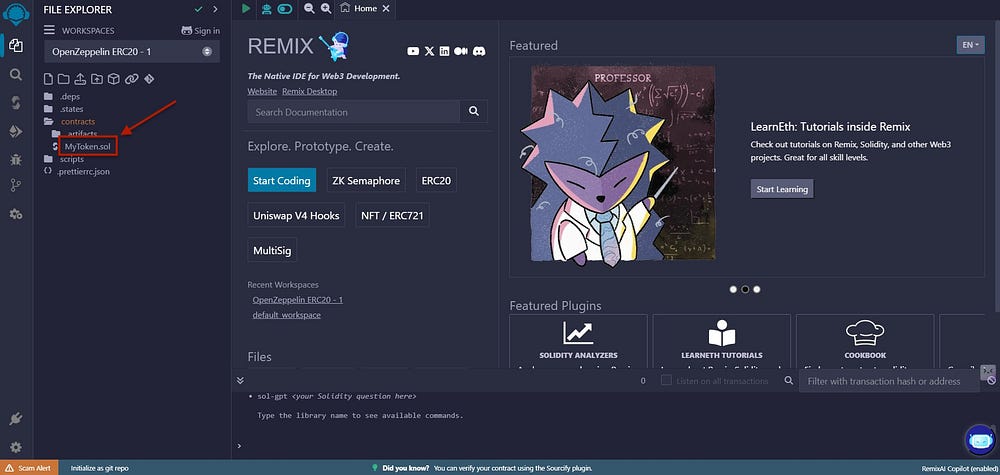
3. Copy and paste the following simple ERC-20 smart contract code:
// SPDX-License-Identifier: MIT
pragma solidity ^0.8.0;

contract MyToken {
    string public name;
    string public symbol;
    uint8 public decimals;
    uint256 public totalSupply;
    mapping(address => uint256) public balanceOf;
    mapping(address => mapping(address => uint256)) public allowance;

    event Transfer(address indexed from, address indexed to, uint256 value);
    event Approval(address indexed owner, address indexed spender, uint256 value);

    constructor(
        string memory _name,
        string memory _symbol,
        uint8 _decimals,
        uint256 _initialSupply
    ) {
        name = _name;
        symbol = _symbol;
        decimals = _decimals;
        totalSupply = _initialSupply * (10**uint256(_decimals));
        balanceOf[msg.sender] = totalSupply;
    }

    function transfer(address _to, uint256 _value) public returns (bool success) {
        require(balanceOf[msg.sender] >= _value, "Not enough balance");
        balanceOf[msg.sender] -= _value;
        balanceOf[_to] += _value;
        emit Transfer(msg.sender, _to, _value);
        return true;
    }

    function approve(address _spender, uint256 _value) public returns (bool success) {
        allowance[msg.sender][_spender] = _value;
        emit Approval(msg.sender, _spender, _value);
        return true;
    }

    function transferFrom(
        address _from,
        address _to,
        uint256 _value
    ) public returns (bool success) {
        require(_value <= balanceOf[_from], "Not enough balance");
        require(_value <= allowance[_from][msg.sender], "Allowance exceeded");
        balanceOf[_from] -= _value;
        balanceOf[_to] += _value;
        allowance[_from][msg.sender] -= _value;
        emit Transfer(_from, _to, _value);
        return true;
    }

    // Additional function 1: Get the total supply of the token
    function getTotalSupply() public view returns (uint256) {
        return totalSupply;
    }

    // Additional function 2: Get the balance of a specific address
    function getBalance(address _owner) public view returns (uint256) {
        return balanceOf[_owner];
    }

    // Additional function 3: Check the allowance for a specific address
    function getAllowance(address _owner, address _spender) public view returns (uint256) {
        return allowance[_owner][_spender];
    }
}
it should look like:

Code Explanation:
This is a Solidity smart contract for a token on the Ethereum blockchain. Let’s break down the key components and functionalities of this contract:
1. Contract Structure: The contract is named MyToken and it contains several state variables and functions for managing the token. The state variables include name, symbol, decimals, totalSupply, balanceOf, and allowance. These variables store the token’s metadata and account balances.
2. Constructor Function: The constructor function initializes the token when it is deployed. It takes parameters for _name (token name), _symbol (token symbol), _decimals (decimal places for the token), and _initialSupply (initial total supply). The initial total supply is multiplied by 10 to the power of the number of decimals to convert it to the token’s base unit.
3. Transfer Function: The transfer function allows the sender to transfer tokens to a specified address. It checks if the sender has enough balance, updates the balances, and emits a Transfer event.
4. Approve Function: The approve function allows the token owner to approve a spender to spend a specified amount of tokens on their behalf. It updates the allowance mapping and emits an Approval event.
5. Transfer From Function: The transferFrom function allows a designated spender to transfer tokens from one address to another on behalf of the owner. It checks if the spender has sufficient allowance and the owner has enough balance, updates the balances and allowance, and emits a Transfer event.
6. Additional Functions: Three additional view functions are included in the contract to retrieve specific information:
- getTotalSupply(): Returns the total supply of the token.
- getBalance(*address _owner*): Returns the balance of a specific address.
- getAllowance(*address _owner, address _spender*): Returns the allowance for a specific address.
This contract demonstrates the basic functionalities of an ERC-20 compliant token, including the ability to transfer tokens, approve delegated transfers, and query token balances and allowances.
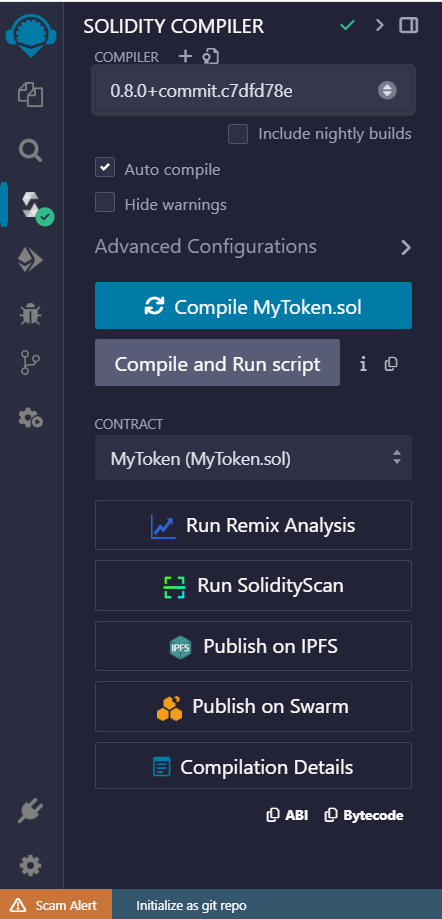
Step 3: Compiling Your Contract
In the Remix sidebar, click on the Solidity Compiler icon.
Select Solidity version 0.8.0.
Hit the Compile MyToken.sol button. Make sure the Auto Compile option is enabled for smooth development.
it should look like:
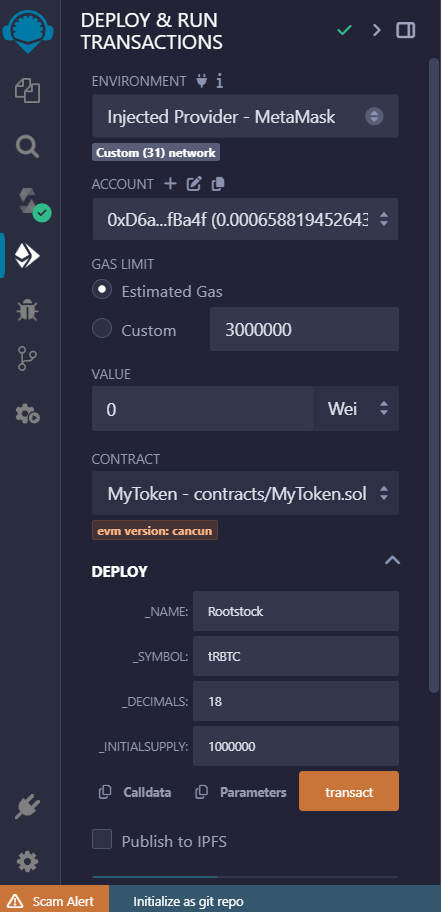
Step 4: Deploying Your Contract
Navigate to the Deploy & Run Transactions tab in Remix.
Set the Environment to Injected Provider — MetaMask.
Select your MetaMask account connected to the Rootstock testnet.
Choose
MyTokenunder the Contract dropdown.Enter constructor arguments:
_name:"Rootstock"_symbol:"tRBTC"_decimals:18_initialSupply:1000000(for 1,000,000 tokens).
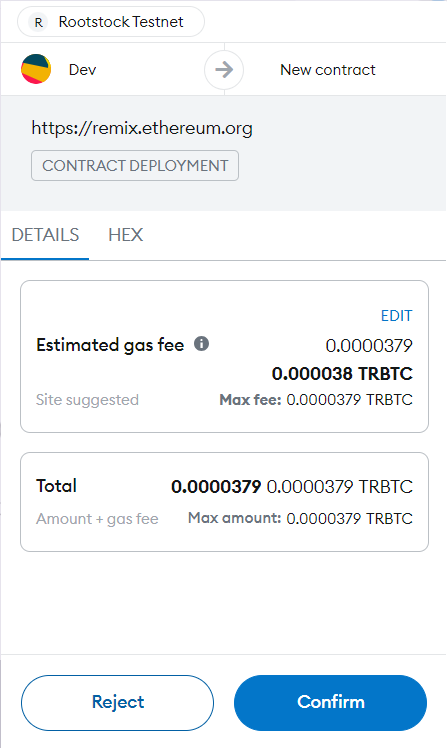
6. Click the Deploy button.
it should look like:
7. Confirm the transaction by clicking Approve in MetaMask.
Once successfully deployed it should look like this in terminal

Congratulations! 🎉 Your ERC-20 smart contract is now deployed on the Rootstock testnet. You can view the transaction details in your Remix terminal and explore it on the Rootstock block explorer.
Step 5: Interacting with Your Deployed Contract
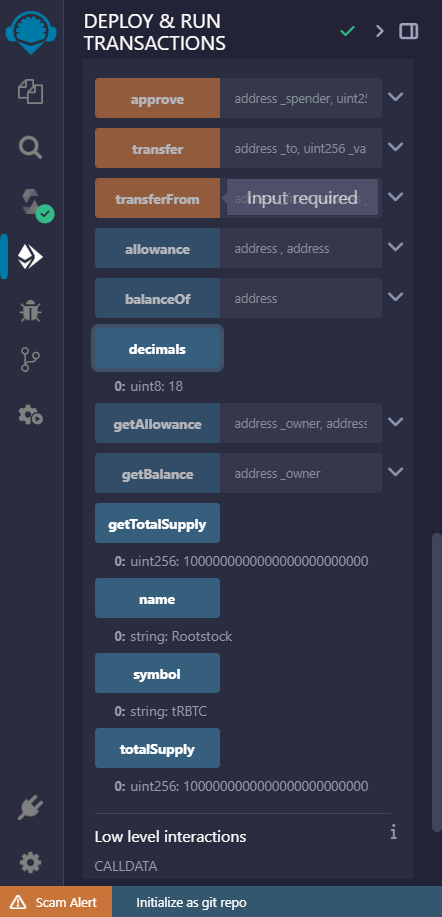
Once deployed, the contract functions will appear under the Deployed Contracts section in Remix. You can interact with them as follows:
Basic Token Details
- Fetch the Token Name
- Click on the
namebutton
Output:"Rootstock"
2. Fetch the Token Symbol
- Click on the
symbolbutton
Output:"tRBTC"
3. Fetch the Number of Decimals
- Click on the
decimalsbutton.
Output:18
4. Fetch Total Supply
- Click on
getTotalSupply().
Output:1000000000000000000000000(1,000,000 tokens with 18 decimals).
it should look like this:
Checking Balances
- Check Your Balance
Click on
getBalance(address _owner).Input your wallet address (e.g.,
0xYourAddress).
Output: The balance in wei units (e.g.,1000000000000000000000000).
2. Check Another User’s Balance
- Input any valid Ethereum address in
getBalance().
Transferring Tokens
- Transfer Tokens
Click on
transfer(address _to, uint256 _value).Input the recipient address in
_to.Enter the amount of tokens to transfer in
_value(with decimals):
For example, to send 100 tokens:
100 * 10^18 = 100000000000000000000
Example Steps:
_to:0xRecipientAddress_value:100000000000000000000(100 tokens with 18 decimals)-Click transact and confirm the MetaMask transaction.
2. Verify Transfer
- Use
getBalance()to check the updated balances of both addresses.
Approving Allowance
- Approve a Spender
Click on
approve(address _spender, uint256 _value).Input the spender’s address in
_spender.Enter the amount of tokens they can spend in
_value.
Example Steps:
_spender:0xSpenderAddress_value:500000000000000000000(500 tokens).Click transact to approve.
2. Check Allowance
Click on
getAllowance(address _owner, address _spender).Input the owner’s and spender’s addresses.
Output: Approved allowance amount.
Using transferFrom
- Transfer Tokens on Behalf of Owner
Click on
transferFrom(address _from, address _to, uint256 _value).Input:
_from: Owner's address._to: Recipient's address._value: Amount of tokens to transfer.Ensure the spender (your account) is approved to spend tokens.
Example:
_from:0xOwnerAddress_to:0xRecipientAddress_value:100000000000000000000(100 tokens).
2. Verify
Check balances using
getBalance()for the involved accounts.Check allowance using
getAllowance()to confirm it decreased.
Test Scenarios
Scenario 1: Transfer Tokens
Transfer 100 tokens from the deployer to another address.
Verify both balances using
getBalance().
Scenario 2: Approve and TransferFrom
Approve 50 tokens for a spender.
Use
transferFrom()to move tokens from the owner to another address.Check the allowance and balances.
Scenario 3: Invalid Transactions
Try to transfer more tokens than the sender’s balance.
Expected: Transaction fails with “Not enough balance”.Try to transfer more than the approved allowance.
Expected: Transaction fails with “Allowance exceeded”.
Verify Your Smart Contract on Rootstock Testnet
Congratulations on deploying your smart contract on the Rootstock testnet! But what’s next? Verifying your contract on the blockchain is an essential step. It ensures transparency, allows others to interact with your contract more confidently, and makes debugging easier by providing the verified source code publicly.
Below steps will show you how to verify your deployed contract on Rootstock testnet using Remix and the Rootstock block explorer. Let’s get started!
Why Verify Your Smart Contract?
Contract verification matches the bytecode on the blockchain with the source code, providing:
Transparency: Developers and users can see the exact source code.
Debugging Tools: Verified contracts integrate seamlessly with tools like block explorers.
Community Trust: Shows professionalism and builds trust in your project.
Guide to Verify Your Smart Contract
Step 1: Prepare Your Contract for Verification
Before verifying, ensure you’ve completed the following:
Deployed the Contract
Your smart contract must already be deployed on the Rootstock testnet.Save Contract Details
Note the deployed contract’s address and the compiler version you used during deployment.Enable Optimization
If you enabled optimization during compilation, note the optimization settings as well.
Step 2: Locate the Verification Page
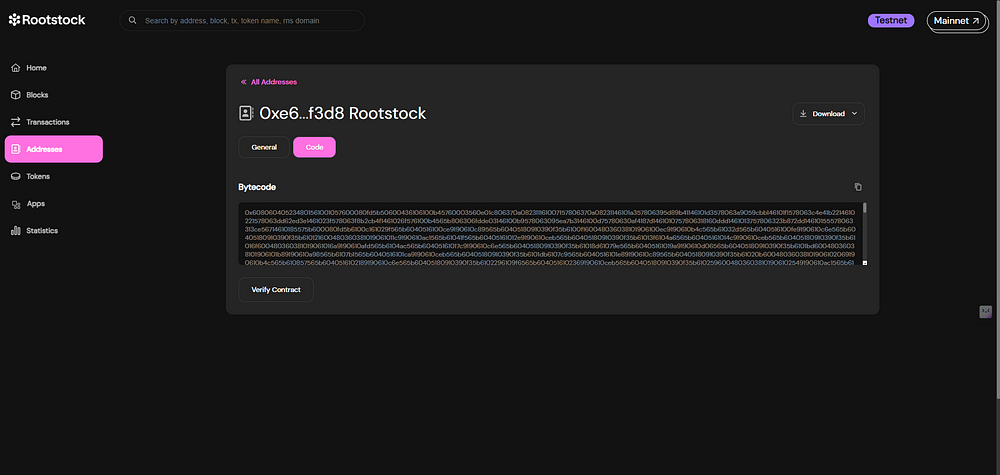
Visit the Rootstock Testnet Block Explorer.
Search for your deployed contract using the contract address.
On the contract’s detail page, look for the option to verify the contract (typically a “Verify ” button) which is in the Code button.
Step 3: Collect the Required Information
You’ll need the following details to proceed with verification:
Contract Address: The address of your deployed contract.
Contract Code: The source code of your smart contract.
Compiler Version: The exact compiler version used (e.g.,
0.8.0).Optimization Settings: Whether optimization was enabled during compilation.
💡 Tip: You can find these details in Remix under the Solidity Compiler tab.
Step 4: Submit Your Contract for Verification
Navigate to the verification page on the Rootstock block explorer.
Enter the contract address and Contract name.
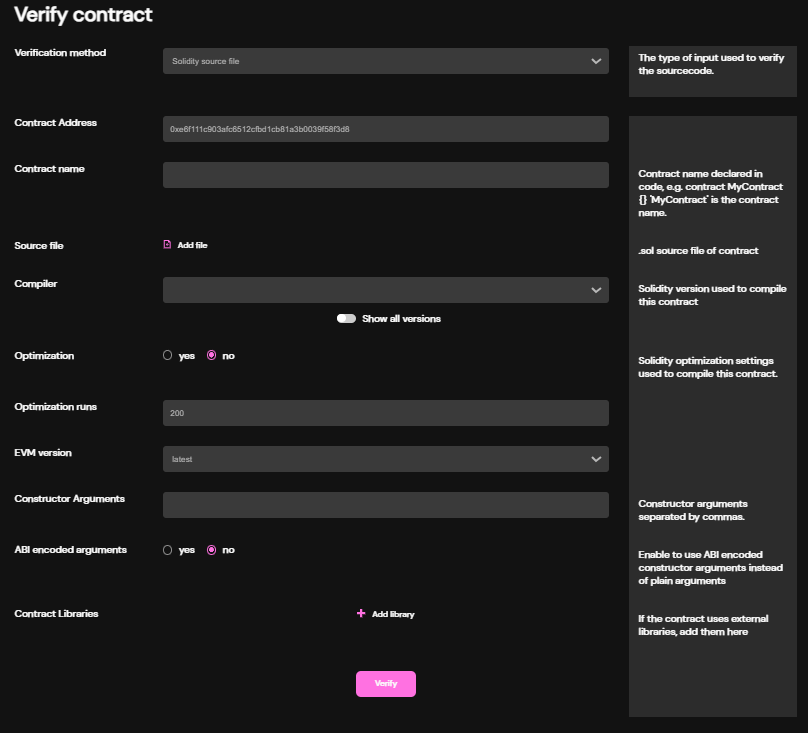
3. Upload your .sol file (The file where our contract is written)
4. Select the compiler version and optimization settings to match your deployment.
5. Click on Verify.
Step 5: Handle Verification Issues
If the verification fails:
Double-check the compiler version and optimization settings.
Ensure your contract’s ABI and bytecode match the deployed version.
Verify all dependencies are included in the source code.
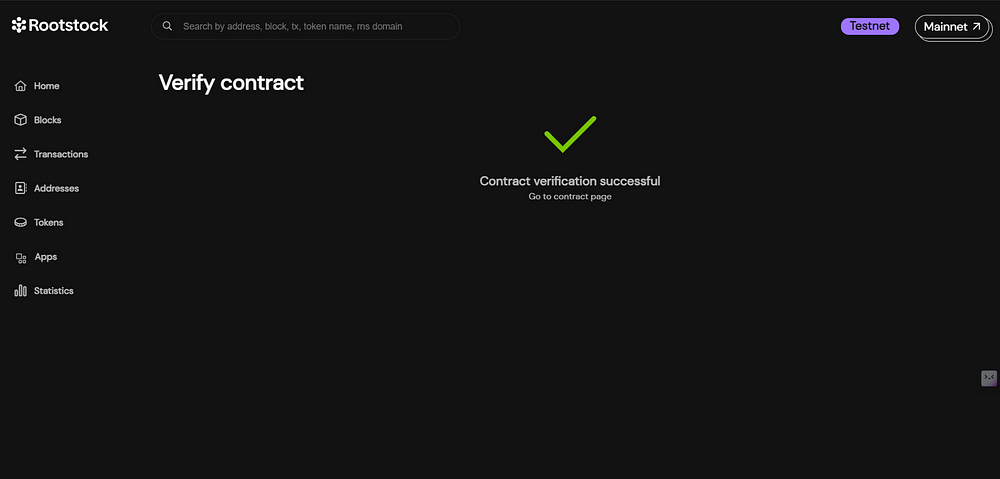
What Happens After Verification?
Once verified, your contract’s source code becomes visible on the Rootstock block explorer. Users and developers can interact with it directly, and tools like Remix and MetaMask can recognize and work seamlessly with the verified contract.
Best Practices for Contract Verification
Use Standard Libraries: Stick to well-known libraries like OpenZeppelin for enhanced security and easier verification.
Save Deployment Settings: Always record compiler versions and optimization flags for future reference.
Test Thoroughly: Ensure your contract is error-free before deployment to avoid unnecessary updates and re-verifications.
Wrapping Up
Verifying your smart contract is a critical step toward building trust and credibility in the blockchain ecosystem. Rootstock makes this process straightforward, ensuring your contract is accessible and transparent to all.
If facing any errors, join Rootstock discord and ask under the respective channel.
Until then, dive deeper into Rootstock by exploring its official documentation. Keep experimenting, and happy coding!
Subscribe to my newsletter
Read articles from Pranav Konde directly inside your inbox. Subscribe to the newsletter, and don't miss out.
Written by