Step-by-Step Solution for KodeKloud's Terraform Challenge 1
 Isac Coutinho
KodeKloud is the #1 DevOps course provider and helps students learn trending technologies they need to thrive in their career.
They also have this Terraform Challenges series that consists of a set of challenges that will assist you in mastering provisioning and managing infrastructure using Terraform.
In this challenge we will deploy several Kubernetes resources using terraform.
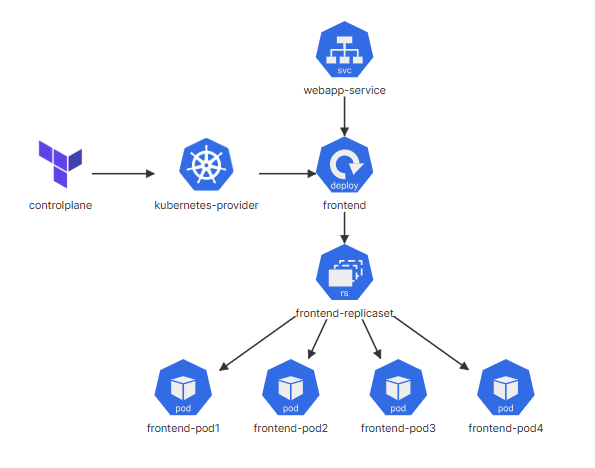
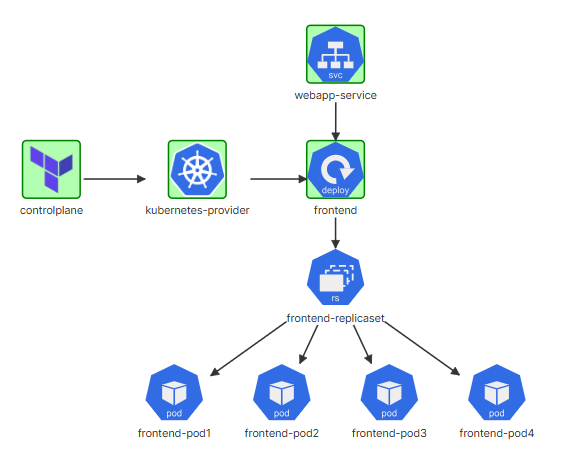
Architecture diagram
1º Task - Install Terraform version 1.1.5 on controlplane
Terraform version: 1.1.5 installed on controlplane?
Solution:
First things first, let's check if terraform is installed:

Well, it looks like we need to install terraform CLI…
According to the official documentation, there are two ways to do it:
Downloading and installing the binary package
Installing using your OS package manager
The video in the official documentation is pretty good, so I highly recommend you take a look.
I´m gonna install it using the easiest way in my opinion: using the OS package manager.
Since the controlplane is Ubuntu/Debian based OS, we need to copy and run the following commands:
sudo apt-get update && sudo apt-get install -y gnupg software-properties-common

wget -O- https://apt.releases.hashicorp.com/gpg | \
gpg --dearmor | \
sudo tee /usr/share/keyrings/hashicorp-archive-keyring.gpg > /dev/null

echo "deb [signed-by=/usr/share/keyrings/hashicorp-archive-keyring.gpg] \
https://apt.releases.hashicorp.com $(lsb_release -cs) main" | \
sudo tee /etc/apt/sources.list.d/hashicorp.list

sudo apt update

sudo apt install terraform=1.1.5
Checking if terraform was installed:


Let's keep going! =)
2º Task - Configure Kubernetes provider
Configure terraform and provider settings within provider.tf file with following specifications:
Configure terraform to use
hashicorp/kubernetesprovider.Specify the provider's local name: kubernetes
Provider version: 2.11.0
Configure kubernetes provider with path to your kubeconfig file: /root/.kube/config
Solution:
When it comes to know how to use a provider, the best place to look at is the terraform registry
Let's search for the provider hashicorp/kubernetes version 2.11.0
I´ll leave the documentation here (You´re welcome): https://registry.terraform.io/providers/hashicorp/kubernetes/2.11.0/docs
Click on “USE PROVIDER” and just copy and past the configuration into provider.tf
provider.tf
terraform {
  required_providers {
    kubernetes = {
      source = "hashicorp/kubernetes"
      version = "2.11.0"
    }
  }
}

provider "kubernetes" {
  config_path    = "/root/.kube/config"
}

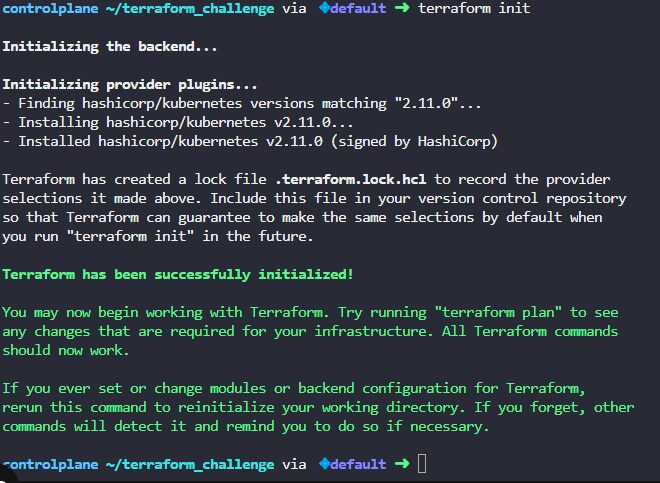
Don´t forget to run terraform init within the configuration directory to install the provider´s plugin
3º Task - Create a kubernetes deployment
Create a terraform resource frontend for kubernetes deployment with following specs:
Deployment Name: frontend
Deployment Labels = name: frontend
Replicas: 4
Pod Labels = name: webapp
Image: kodekloud/webapp-color:v1
Container name: simple-webapp
Container port: 8080
Solution:
Again, let's make use of the documentation!: https://registry.terraform.io/providers/hashicorp/kubernetes/2.11.0/docs/resources/deployment
![]()
Although not mentioned, there is a convertion that says to concentrate all your terraform resources into a single file named main.tf
Let's make use of the example as reference, and modify it according to the requirements.
main.tf
resource "kubernetes_deployment" "frontend" {
  metadata {
    name = "frontend"
    labels = {
      name = "frontend"
    }
  }

  spec {
    replicas = 4

    selector {
      match_labels = {
        name = "webapp"
      }
    }

    template {
      metadata {
        labels = {
          name = "webapp"
        }
      }

      spec {
        container {
          image = "kodekloud/webapp-color:v1"
          name  = "simple-webapp"
          port {
              container_port = 8080
          }
        }
      }
    }
  }
}
Run the command terraform plan to review the execution plan, and terraform apply to create it.
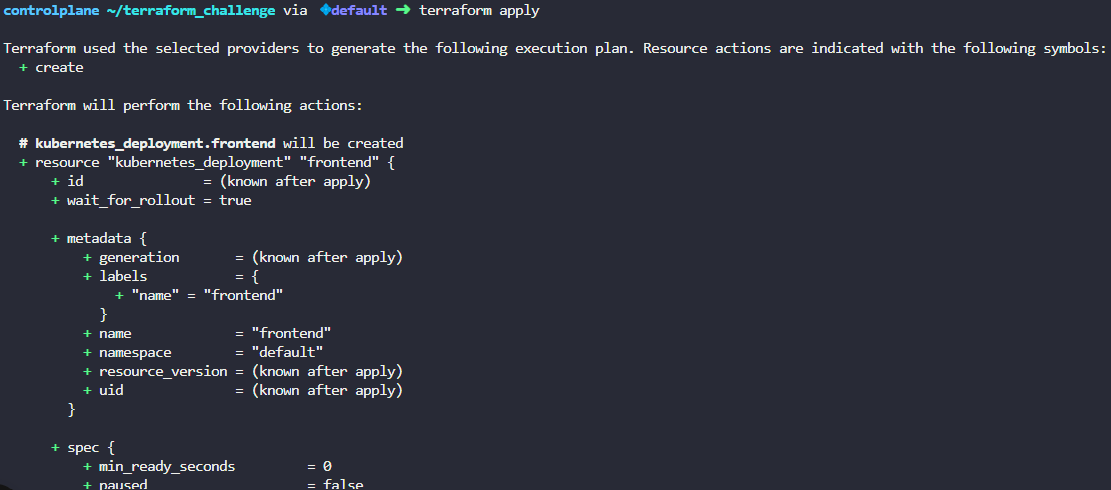
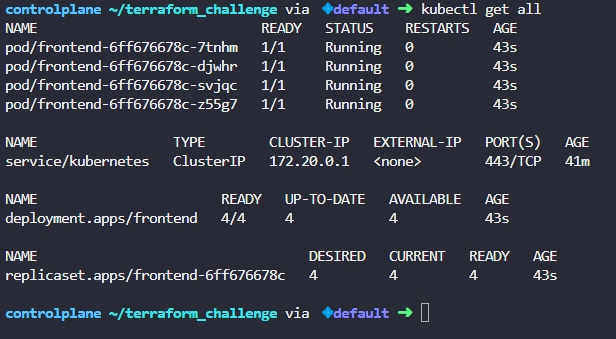
To check what was created, let's make use of the kubernetes CLI:

4º Task - Create a kubernetes service
Create a terraform resource webapp-service for kubernetes service with following specs:
Service name: webapp-service
Service Type: NodePort
Port: 8080
NodePort: 30080
Solution:
Again...documentation: https://registry.terraform.io/providers/hashicorp/kubernetes/2.11.0/docs/resources/service

And again, let's make use of the example as reference, and modify it according to the requirements.
main.tf
resource "kubernetes_service" "webapp-service" {
  metadata {
    name = "webapp-service"
  }
  spec {
    selector = {
      name = kubernetes_deployment.frontend.spec.0.selector.0.match_labels.name
    }
    port {
      port     = 8080
      node_port = 30080
    }
    type = "NodePort"
  }
}
...
...
Run the commands terraform plan to review the execution plan, and terraform apply to create it.
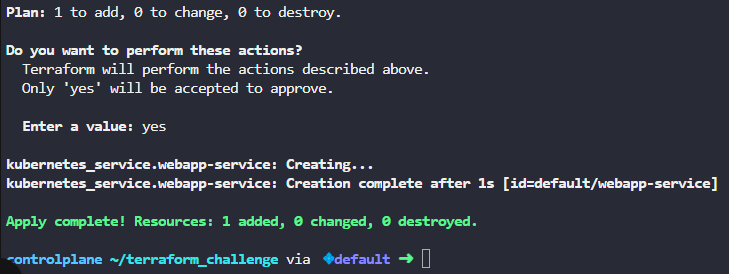
To check what was created:


Conclusion
At the end, click on the “Check” button, and you should see the architecture diagram highlighted in green like this:
I hope this article helped you understand the challenge! If you found this guide useful, consider following for more insightful DevOps content.
I would appreciate it if you like and share this content. Happy learning!
Subscribe to my newsletter
Read articles from Isac Coutinho directly inside your inbox. Subscribe to the newsletter, and don't miss out.
Written by
Isac Coutinho
Isac Coutinho
👨🏻💻 I’m a DevOps Engineer with 7+ years of experience helping organizations deliver software faster, with quality, and a focus on security. My expertise lies in optimizing development workflows, automating processes, and ensuring scalable, efficient systems. 💡 Most relevant skills: Docker, Kubernetes, Git, Bitbucket, Jenkins, SonarQube, Linux, Terraform, Python, Grafana, Scrum/Kanban. 🔎 I’m a data-driven professional passionate about improving software delivery performance. I focus on leveraging data—like DORA metrics—to continuously improve team efficiency and drive high-quality releases. I’m always excited to collaborate on projects where I can contribute to the growth and success of the team.