Kong-Introduction
 Srijan Srivastava
Welcome to part 1 of the “Kong - API Gateway” series!
Note: This blog is for the production-level setup of Kong using docker-compose.
What is Kong Gateway?
Kong Gateway is a lightweight, fast, and flexible cloud-native API gateway. An API gateway is a reverse proxy that lets you manage, configure, and route requests to your APIs.
In simpler words, Kong Gateway is a tool that helps manage and control the traffic going to and from your APIs.Think of it like a traffic cop for your API: it sits in front of your services and makes sure every incoming request goes to the right place, handles any rules or security checks you set, and keeps things running smoothly. It’s designed to work well in modern cloud environments, making it fast, easy to customize, and lightweight.
Why do we need Kong?
There may be no. of reasons to use Kong Gateway to manage APIs, but I find two of them really useful. First, for rate limiting and throttling, and secondly having detailed metrics that can be used for monitoring latency and RPS.
Setup of Kong
Kong can be used in two ways, one along with a database(imperative approach) and another is the DB-less method(declarative approach). In this blog, we are focusing on the DB Less declarative approach, which is mostly used in production-level setups.
Key Difference between DB on mode and no DB mode
DB-Less(declarative approach)
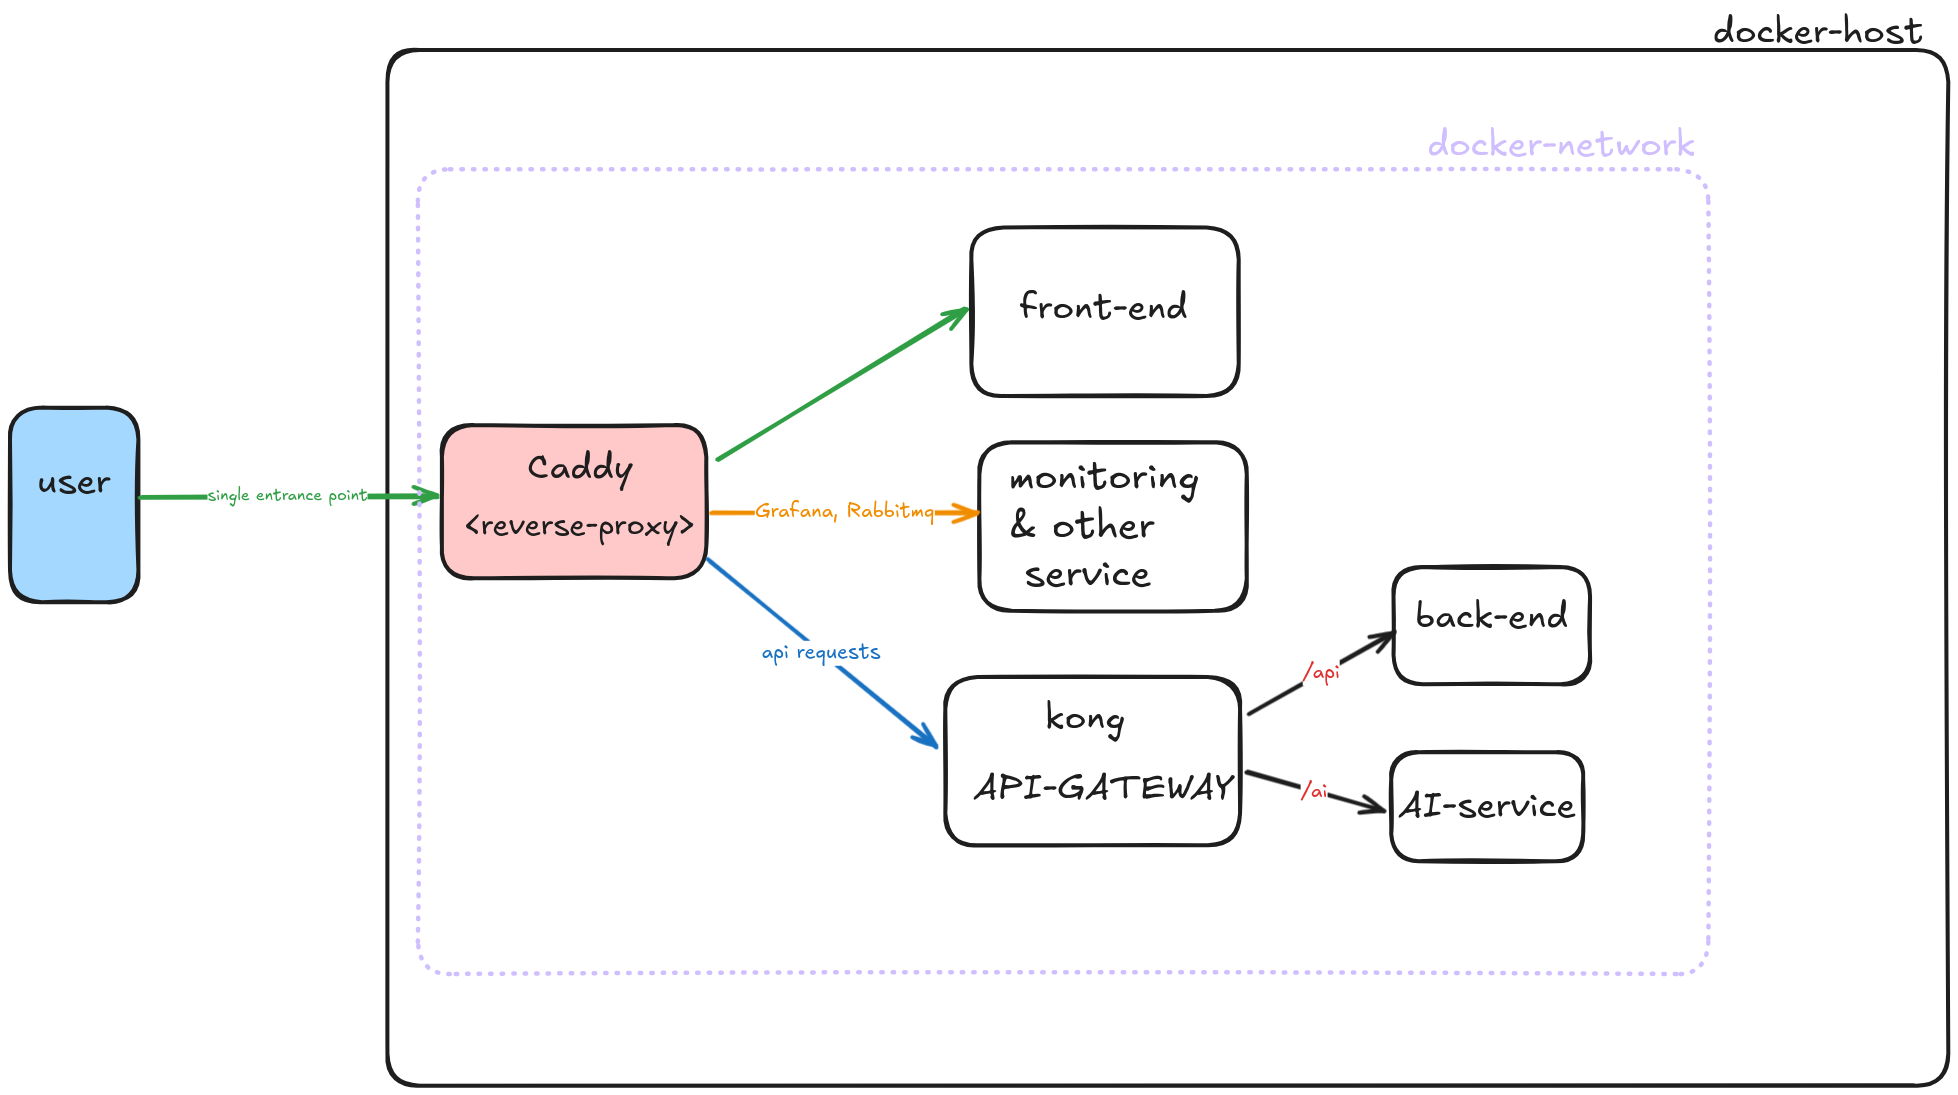
For the setup of kong, we are going to follow a microservice architecture. In this example, we are using Caddy for reverse proxy for all the services, and then using Kong to route(reverse proxy) our backend services and AI-based services. This might initially sound confusing, but I assure you it will be clear as we go on.

Above is the system diagram for using Kong API-GATEWAY, now let’s jump to the code part of the Kong setup.
The directory structure of our setup is as such.
You can find the GitHub repository for the setup here Kong-Setup
.
├── Caddyfile
├── docker-compose.yaml
├── frontend
│   └── index.html
└── kong.yaml
Kong uses environment variables like KONG_DATABASE and KONG_DECLARATIVE_CONFIG to determine its mode of operation and to set up a declarative configuration. In this setup, we specify the path KONG_DECLARATIVE_CONFIG as "/opt/kong/kong.yaml".
Although we are deploying Kong using its Docker image in docker-compose.yaml, we define its configuration separately in another file, kong.yaml. To make this configuration available inside the container, we use Docker volumes within our Kong service:
    volumes:
      - ./:/opt/kong
Since this blog focuses on Kong, we have only explained its setup and not any additional services. Below is the complete docker-compose.yaml file.
docker-compose.yaml
services:
  caddy:
    image: caddy:2.8
    restart: always
    cap_add:
      - NET_ADMIN
    ports:
      - "80:80"
      - "443:443"
    environment:
      DOMAIN_SCHEME: ${DOMAIN_SCHEME:-http}
      DOMAIN_NAME: ${DOMAIN_NAME:-localdev.me}
      TLS_ENTRY: ${TLS_ENTRY}
    volumes:
      - ./:/etc/caddy
      - ./Caddyfile/:/etc/caddy/Caddyfile
      - caddy_data:/data
      - caddy_config:/config

  kong:
    image: kong:3.9.0
    user: kong
    healthcheck:
      test: [ "CMD", "kong", "health" ]
      interval: 10s
      timeout: 10s
      retries: 10
    restart: always
    environment:
      KONG_DATABASE: off
      KONG_ADMIN_ACCESS_LOG: /dev/stdout
      KONG_ADMIN_ERROR_LOG: /dev/stderr
      KONG_PROXY_ACCESS_LOG: /dev/stdout
      KONG_PROXY_ERROR_LOG: /dev/stderr
      KONG_PREFIX: /usr/local/kong
      KONG_DECLARATIVE_CONFIG: "/opt/kong/kong.yaml"
      KONG_PLUGINS: bundled,prometheus
      KONG_LOG_LEVEL: ${KONG_LOG_LEVEL:-info}
      KONG_ADMIN_LISTEN: "0.0.0.0:8001"
      KONG_PROXY_LISTEN: "0.0.0.0:8000"
      KONG_ADMIN_GUI_LISTEN: "127.0.0.1:8002"
      KONG_ROUTER_FLAVOR: "expressions"
    volumes:
      - ./:/opt/kong

  backend:
    image: kennethreitz/httpbin
    restart: always

  frontend:
    image: nginx:latest
    volumes:
      - ./frontend:/usr/share/nginx/html
    restart: always

volumes:
  caddy_data:
  caddy_config:
Now, let's define our API routes in the kong.yaml file. You’ll notice plugins like Prometheus and rate-limiting, but these are optional and not required for Kong to function. They simply add additional features—for example, the Prometheus plugin exposes metrics that can be scraped by Prometheus, while the rate-limiting plugin restricts the number of requests that can be made within a specific time frame (e.g., per minute or second).
In the services section, we define our backend services and provide the URL for Kong to act as a reverse proxy. In this case, my backend service is running on port 80 within the same Docker network, so the internal URL is:
  - name: backend
    url: http://backend:80
Next, we define routing rules using regular expressions to specify which paths should be routed to our backend service. For example expression: 'http.path ^= "/api"
kong.yaml
_format_version: "3.0"

plugins:
  - name: prometheus
    enabled: true
    config:
      per_consumer: true
      status_code_metrics: true
      latency_metrics: true
      bandwidth_metrics: true
      upstream_health_metrics: true

  - name: rate-limiting
    enabled: true
    config:
      minute: 100
      policy: local


services:
  - name: backend
    url: http://backend:80
    routes:
    - name: backend_route
      expression: 'http.path ^= "/api" '
      plugins:
        - name: rate-limiting
          config:
            second: 10
            policy: local
In our architecture, we have set up Caddy as a reverse proxy in front of Kong, making Caddy the single entry point for all services. Kong runs on port 8000, and we have configured Caddy to proxy requests to it.
If you are running this setup locally, you can access Kong at:
📌 http://kong.localdev.me
Additionally, you can find the metrics exposed by the Prometheu****s plugin at:
📌 http://kong-metrics.localdev.me
{$DOMAIN_SCHEME}://kong.{$DOMAIN_NAME} {
    reverse_proxy kong:8000
}

{$DOMAIN_SCHEME}://kong-metrics.{$DOMAIN_NAME} {
    reverse_proxy kong:8001
}


{$DOMAIN_SCHEME}://frontend.{$DOMAIN_NAME} {
    reverse_proxy frontend:80
}
Here DOMAIN_SCHEME and DOMAIN_NAME can be set using .env files
.env file
DOMAIN_SCHEME=http
DOMAIN_NAME=localdev.me
Since we are running this locally we can set DOMAIN_SCHEME to HTTP and not HTTPS.
We can access them at the following endpoints:
Frontend Service: http://frontend.localdev.me
Here, we can clearly see that the frontend service is directly accessible through the reverse proxy, while the backend service is only accessible via the Kong API Gateway (/api).
This setup
Enhances Security through single point entrance
Provides Centralized API management
Helps in traffic control
Supports regex based routing
And helps in Real Time monitoring
Subscribe to my newsletter
Read articles from Srijan Srivastava directly inside your inbox. Subscribe to the newsletter, and don't miss out.
Written by

Srijan Srivastava
Srijan Srivastava
I'm Srijan, a passionate DevOps enthusiast currently pursuing a Bachelor's degree in Information Technology. With a love for programming in both Golang and Python, I bring two years of valuable tech experience to the table. As an avid advocate for open source technologies, I'm dedicated to fostering collaborative and innovative solutions within the tech community.