How We Built a Scalable Rate Limiter to Secure Our High Traffic APIs .
 Dev sanghvi
Hey fellow developers! 👋
If you’ve ever built an API or worked on a web application, you’ve probably faced the challenge of handling too many requests. Maybe it was a burst of traffic, a misbehaving client or even a malicious attack. Whatever the case, the solution often boils down to one thing: rate limiting.
In this blog, I’ll walk you through how I designed a rate limiter for my business’s platform. We’ll cover the basics, explore different algorithms, and dive into the technical details of implementation.
Let’s get started!
What is a Rate Limiter?
A rate limiter is a mechanism that controls how many requests a client can make to your system within a specific time frame. Think of it like a bouncer at a club it lets in only a certain number of people at a time to avoid overcrowding.
Why Do We Need Rate Limiters?
Prevent Abuse: Stop malicious users from overwhelming your system (eg.-DDoS attacks).
Ensure Fair Usage: Give all users equal access to your resources.
Protect System Stability: Avoid crashes or slowdowns during traffic spikes.
For example, X’s API limits how many tweets you can fetch per minute. Without this, their servers would be flooded with requests and the platform would become unusable.
Key Concepts to Understand
Before getting into the design, let’s clarify some terms:
Request Rate: The number of requests allowed per second/minute/hour.
Burst vs Sustained Traffic: Burst traffic is a sudden spike in requests, while sustained traffic is consistent over time.
Throttling: Slowing down requests instead of outright blocking them.
Rate Limiting Algorithms
There are several algorithms to implement rate limiting. Each has its pros and cons, so let’s break them down.
1. Token Bucket
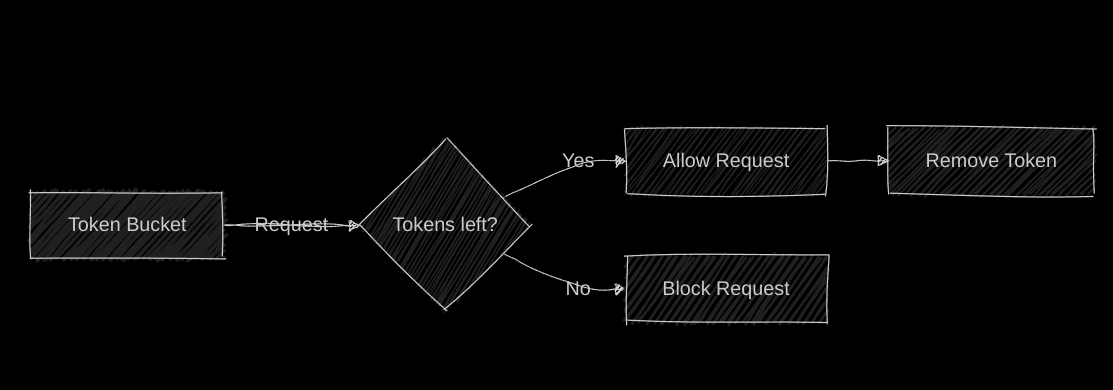
Imagine a bucket filled with tokens. Each request consumes a token and tokens are refilled at a fixed rate. If the bucket is empty, the request is denied.

Pros: Simple, allows for burst traffic.
Cons: Requires storage for tokens.
2. Leaky Bucket
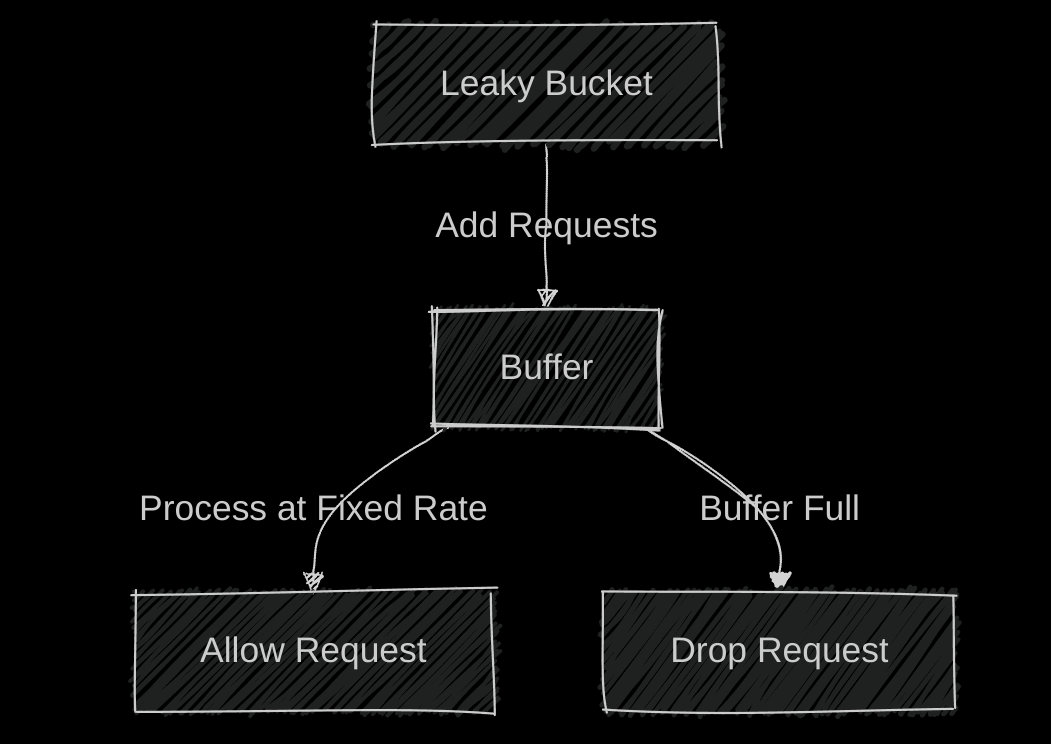
Think of a bucket with a small hole at the bottom. Requests (water) are added to the bucket, and they leak out at a constant rate. If the bucket overflows, requests are dropped.

Pros: Smooths out traffic, easy to implement.
Cons: Doesn’t handle bursts well.
3. Fixed Window Counter
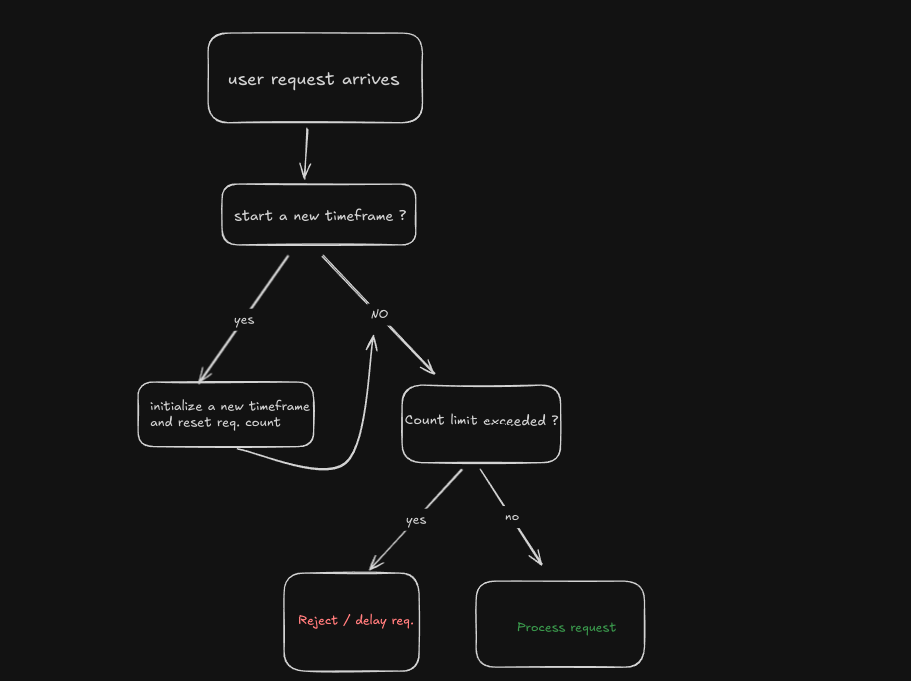
This algorithm divides time into fixed windows (for ex . 1 minute). It counts requests in each window and resets the count after the window ends.

Pros: Simple to implement.
Cons: Prone to bursts at window boundaries.
4. Sliding Window Log
This algorithm keeps a log of timestamps for each request. It allows requests if the number of logs within the sliding window is below the limit.
Pros: Accurate, handles bursts well.
Cons: Memory-intensive.
5. Sliding Window Counter
A hybrid approach that combines fixed windows and sliding logs. It’s more efficient than the sliding window log and more accurate than the fixed window.
Pros: Balances accuracy and efficiency.
Cons: Slightly more complex to implement.
Designing the Rate Limiter
Now that we’ve explored the algorithms, let’s talk about how can we design a rate limiter.

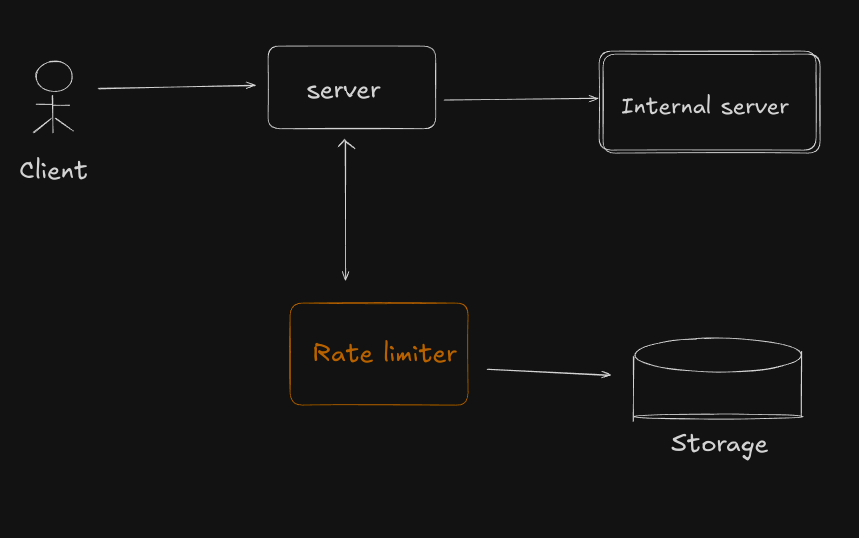
High Level Design
Step 1: Define Requirements
What’s the rate limit? (e.g 100 requests/minute)
Should it be per user, IP or API key?
Do we need to handle distributed systems?
Step 2: Choose an Algorithm
For our platform, we chose the Sliding Window Counter because it balances accuracy and efficiency. It’s also easier to implement in a distributed system compared to the sliding window log.
Step 3: Storage
We need a fast and scalable way to store request counts. We opted for Redis because:
It’s in-memory, so it’s fast.
It supports atomic operations, which are crucial for avoiding race conditions.
Step 4 : Implementation
package main

import (
    "github.com/gomodule/redigo/redis"
    "time"
    "fmt"
    "log"
)

type RateLimiter struct {
    maxRequests int
    windowSize  time.Duration
    pool        *redis.Pool
}

func NewRateLimiter(maxRequests int, windowSize time.Duration, redisAddr string) *RateLimiter {
    return &RateLimiter{
        maxRequests: maxRequests,
        windowSize:  windowSize,
        pool: &redis.Pool{
            MaxIdle: 10,
            Dial: func() (redis.Conn, error) {
                return redis.Dial("tcp", redisAddr)
            },
        },
    }
}

func (rl *RateLimiter) AllowRequest(userID string) (bool, error) {
    conn := rl.pool.Get()
    defer conn.Close()

    now := time.Now().UnixNano() / 1e6 // Millisecs
    windowStart := now - int64(rl.windowSize/time.Millisecond)
    key := "rate_limit:" + userID

    // Remove old entries
    _, err := conn.Do("ZREMRANGEBYSCORE", key, 0, windowStart)
    if err != nil {
        return false, fmt.Errorf("error removing old entries: %w", err)
    }

    // Count remaining requests
    count, err := redis.Int(conn.Do("ZCARD", key))
    if err != nil {
        return false, fmt.Errorf("error getting request count: %w", err)
    }

    if count < rl.maxRequests {
        // Adding new request
        _, err = conn.Do("ZADD", key, now, now)
        if err != nil {
            return false, fmt.Errorf("error adding new request: %w", err)
        }
        // Set expiration
        _, err = conn.Do("EXPIRE", key, rl.windowSize.Seconds())
        if err != nil {
            return false, fmt.Errorf("error setting expiration: %w", err)         }
        return true, nil
    }
    return false, nil
}


func main() {
    limiter := NewRateLimiter(100, time.Minute, "localhost:6379")
    allowed, err := limiter.AllowRequest("dev2003")
    if err != nil {
        log.Fatalf("Error during AllowRequest: %v", err)
    }
    fmt.Printf("Request allowed: %v\n", allowed)
}
Challenges and Trade-offs
Distributed Systems: In a distributed setup, you need to ensure consistency across servers. Redis helps, but it’s a single point of failure. Consider using a distributed cache like Memcached or a consistent hashing mechanism.
False Positives/Negatives: Sometimes legitimate users get blocked, or attackers slip through. Fine-tuning the algorithm and limits can help.
Performance Overhead: Rate limiting adds latency. Keep it lightweight to avoid slowing down your system.
Wrapping Up
Let’s be real -rate limiting isn’t the flashiest part of building software, but when your API starts melting down at 2 AM because some script kiddie decided to bombard it? You’ll wish you’d prioritised this sooner.
Here’s what worked for us: sliding window counters + Redis. It’s not perfect (what is?). If you’re just starting out, keep it simple - grab the token bucket algorithm and tweak it as you grow.
If you found this blog helpful or learned something new, I’d love to hear from you! Share it or shoot me a message to let me know your thoughts .
Thank you :)
Subscribe to my newsletter
Read articles from Dev sanghvi directly inside your inbox. Subscribe to the newsletter, and don't miss out.
Written by
