The Ultimate Guide to Microservices Architecture using NodeJS
 Utkarsh
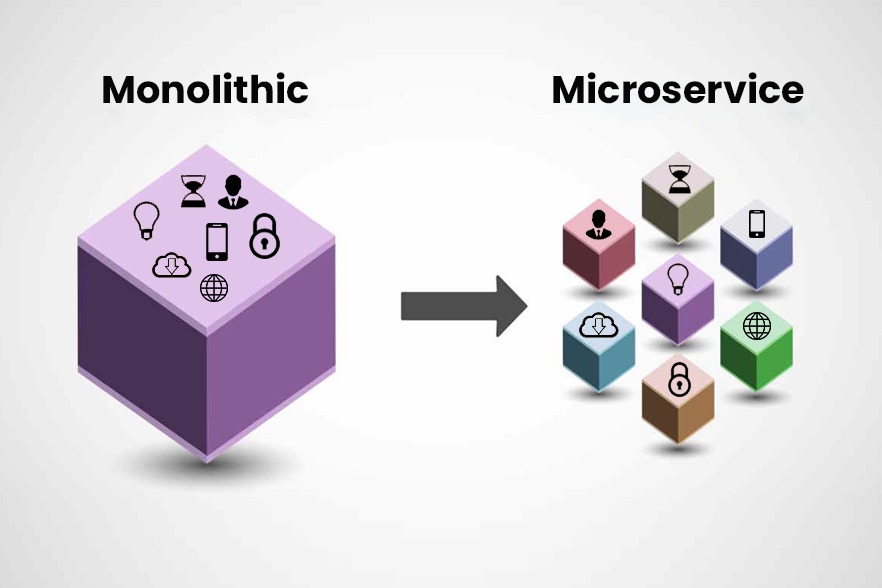
Introduction
Microservices: the buzzword that makes engineers look smart and managers panic. If you've ever wanted to break your monolithic Node.js app into smaller, independent services (or just want an excuse to create more GitHub repositories), this guide is for you.
Why Microservices?
Microservices allow you to:
Scale individual components independently.
Deploy services without affecting the entire application.
Increase complexity (just kidding, but also not kidding).
Make debugging an exciting scavenger hunt.
Monolithic vs Microservices Architecture
| Feature | Monolithic Architecture | Microservices Architecture |
| Scalability | Limited, scaling means replicating the entire app | Highly scalable, only scale the needed service |
| Deployment | Deploy the entire app together | Deploy services independently |
| Technology Stack | Usually one stack for the whole app | Each service can have its own stack |
| Fault Isolation | One bug can crash the whole app | Fault in one service doesn't affect others |
| Inter-Service Communication | Direct function calls | Message broker or API calls |
Project Overview
We'll build a simple e-commerce system with the following microservices:
User Service - Handles user authentication and profiles.
Product Service - Manages product listings.
Order Service - Handles orders and payments.
Each service will be a standalone Express.js app communicating via a message broker (RabbitMQ).
Folder Structure
Before we start coding, let's set up our directory structure like a pro:
microservices-app/
│-- user-service/
│   │-- src/
│   │   │-- controllers/
│   │   │-- routes/
│   │   │-- models/
│   │   │-- services/
│   │   │-- index.js
│   │-- package.json
│
│-- product-service/
│-- order-service/
│-- gateway/
│-- shared/
│   │-- message-broker/
│   │-- utils/
│-- docker-compose.yml
│-- README.md
Each service has its own routes, controllers, and models, while common utilities are kept in the shared/ folder.
Setting Up a Microservice
Let's start by creating our User Service.
Step 1: Initialize the Service
mkdir user-service && cd user-service
npm init -y
npm install express dotenv mongoose cors amqplib
Step 2: Create an Express Server
// user-service/src/index.js
import express from "express";
import dotenv from "dotenv";
dotenv.config();
import userRoutes from "./routes/userRoutes.js";

const app = express();
app.use(express.json());
app.use("/users", userRoutes);

const PORT = process.env.PORT || 5001;
app.listen(PORT, () => console.log(`User Service running on port ${PORT}`));
Step 3: Create User Routes and Controller
// user-service/src/routes/userRoutes.js
import express from "express";
import { registerUser, getUser } from "../controllers/userController.js";
const router = express.Router();

router.post("/register", registerUser);
router.get("/:id", getUser);

export default router;
// user-service/src/controllers/userController.js
export const registerUser = (req, res) => {
    res.json({ message: "User registered successfully!" });
};

export const getUser = (req, res) => {
    res.json({ userId: req.params.id, name: "John Doe" });
};
Boom! We have a working User Service. Now, let’s create the Product and Order Services similarly.
Inter-Service Communication with RabbitMQ
Microservices communicate through a message broker. You can simplify inter-service communication by using REST APIs as well. However, for this tutorial, we’ll use RabbitMQ.
Step 1: Setting Up RabbitMQ
First, install RabbitMQ on your system or run it using Docker:
docker run -d --name rabbitmq -p 5672:5672 -p 15672:15672 rabbitmq:management
Step 2: Create a Message Broker Utility
// shared/message-broker/index.js
import amqp from "amqplib";

let channel;

export const connectRabbitMQ = async () => {
    try {
        const connection = await amqp.connect("amqp://localhost");
        channel = await connection.createChannel();
        console.log("Connected to RabbitMQ");
    } catch (error) {
        console.error("RabbitMQ Connection Error", error);
    }
};

export const publishMessage = async (queue, message) => {
    if (!channel) return;
    await channel.assertQueue(queue);
    channel.sendToQueue(queue, Buffer.from(JSON.stringify(message)));
};

export const consumeMessage = async (queue, callback) => {
    if (!channel) return;
    await channel.assertQueue(queue);
    channel.consume(queue, (msg) => {
        if (msg !== null) {
            callback(JSON.parse(msg.content.toString()));
            channel.ack(msg);
        }
    });
};
Step 3: Sending Messages from Order Service
// order-service/src/index.js
import express from "express";
import dotenv from "dotenv";
dotenv.config();
import { connectRabbitMQ, publishMessage } from "../../shared/message-broker/index.js";

const app = express();
app.use(express.json());

app.post("/order", async (req, res) => {
    const order = { orderId: Date.now(), userId: req.body.userId };
    await publishMessage("ORDER_CREATED", order);
    res.json({ message: "Order placed successfully" });
});

const PORT = process.env.PORT || 5003;
connectRabbitMQ().then(() => {
    app.listen(PORT, () => console.log(`Order Service running on port ${PORT}`));
});
Step 4: Consuming Messages in User Service
// user-service/src/index.js
import { connectRabbitMQ, consumeMessage } from "../../shared/message-broker/index.js";

connectRabbitMQ().then(() => {
    consumeMessage("ORDER_CREATED", (order) => {
        console.log("Received Order Event:", order);
    });
});
Now, when an order is placed, the User Service listens for the event and processes it asynchronously.
Conclusion
Congratulations! You now have a functioning microservices architecture using RabbitMQ for communication. 🎉 No more REST APIs between services—only pure, asynchronous messaging goodness. Happy coding!
Subscribe to my newsletter
Read articles from Utkarsh directly inside your inbox. Subscribe to the newsletter, and don't miss out.
Written by
Utkarsh
Utkarsh
I'm a MERN Stack developer and technical writer that loves to share his thoughts in words on latest trends and technologies. For queries and opportunities, I'm available at r.utkarsh.0010@gmail.com