How to Create an Azure Storage Account and Securely Share Confidential Documents using SAS URL
 Benjamin Gbolaru

Imagine you work for a company handling sensitive customer data—like personal addresses, medical records, or financial information. If this data falls into the wrong hands, it can lead to identity theft, legal problems, and loss of trust. For example, if you accidentally send a confidential file to the wrong person or if hackers gain access to your storage, the consequences could be serious.
When sharing sensitive files, you must ensure they are only available to the right people and for a limited time. Azure Blob Storage provides a safe way to store these files. By using a Shared Access Signature (SAS) URL, you can share a file securely for a specific period without giving full access to your storage account.
This guide explains how to create an Azure Storage Account and securely share a confidential document using a Shared Access Signature (SAS) URL for 5 minutes.
What is a SAS URL?
A Shared Access Signature (SAS) URL is a secure, time-limited link that allows access to specific resources within your Azure Storage Account. With a SAS URL, you can control:
What operations are allowed (read, write, delete, etc.).
How long the access is available.
Which IP addresses can use the link (optional).
How to Create an Azure Storage Account
Step 1: Access the Azure Portal
Sign in to the Azure Portal.
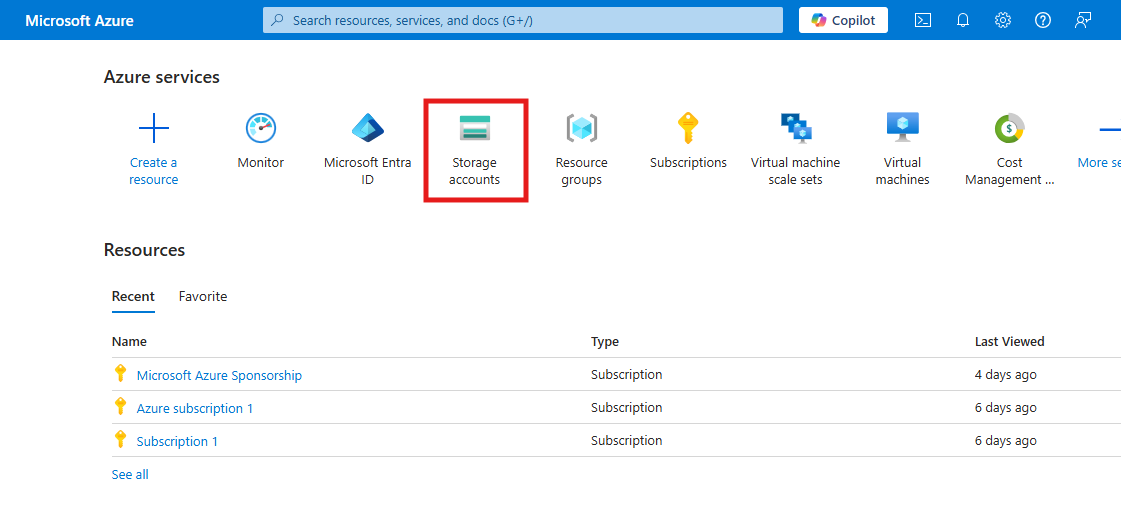
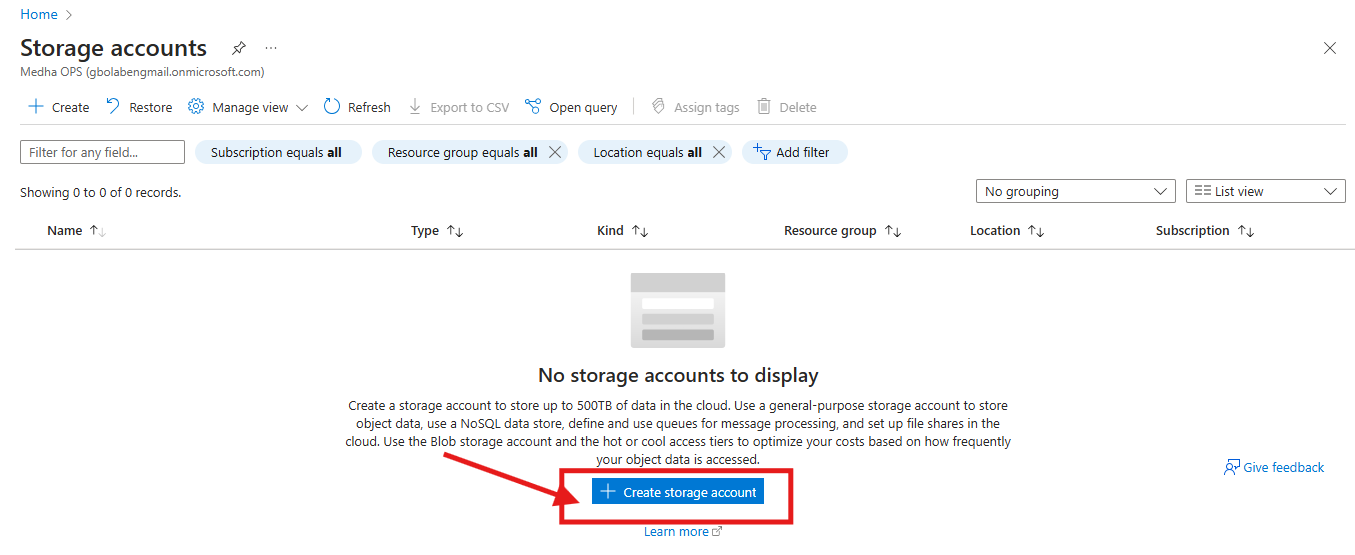
Click Storage accounts > Create Storage Account.
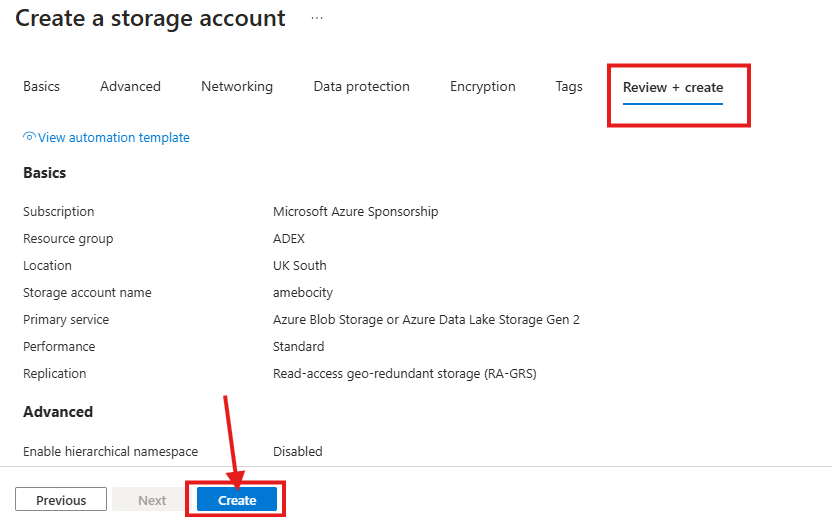
Step 2: Configure the Basics Storage Account
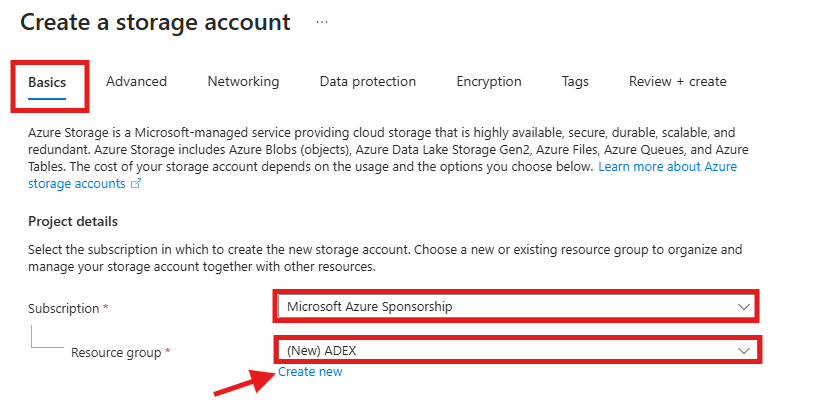
Subscription: Select your subscription.
Resource group: Choose an existing group or create a new one.
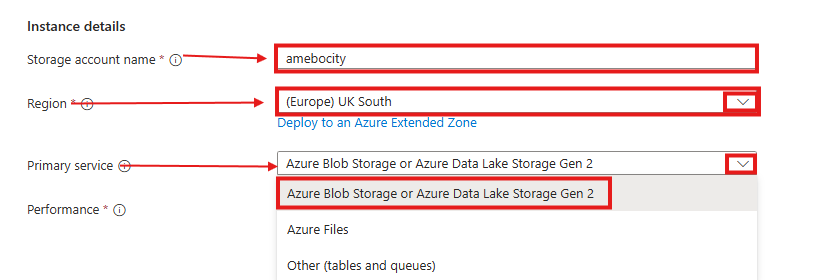
Storage account name: Enter a unique name.
Region: Select the closest region for performance.
Primary service: Choose **“**Azure Blob Storage or Azure Data Lake Gen 2”
Performance: Choose Standard (for general-purpose storage).
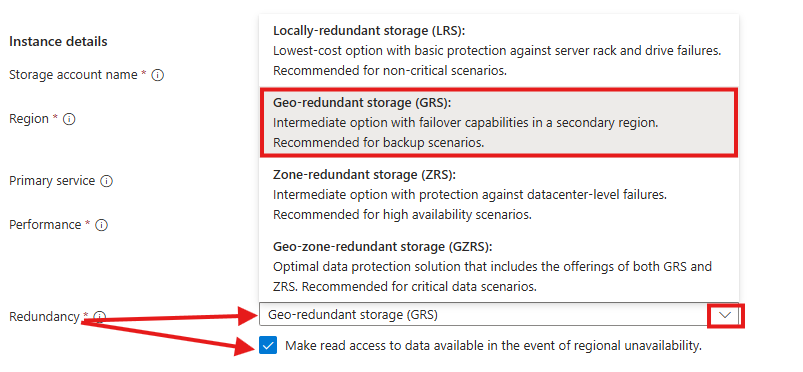
Redundancy: Select Geo-Redundant Storage(GRS).
Click Next for Advance Settings.


Step 3: Configure the Advanced Storage Account Settings
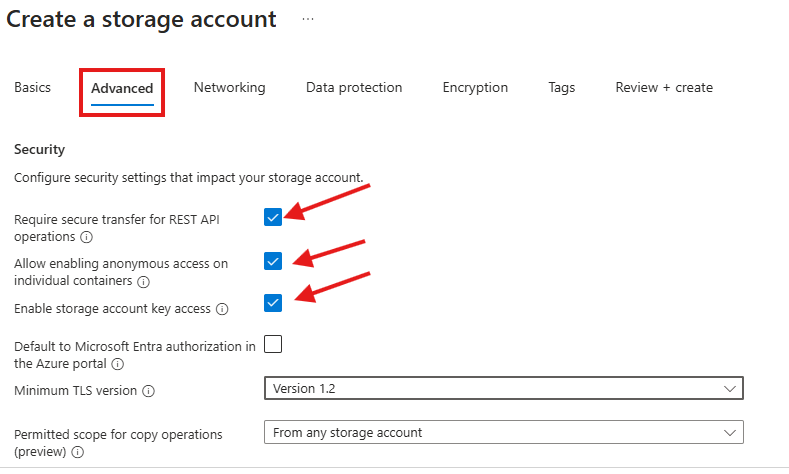
Configure Advanced Settings by:
Allowing anonymous access on individual containers
Enabling storage account key access
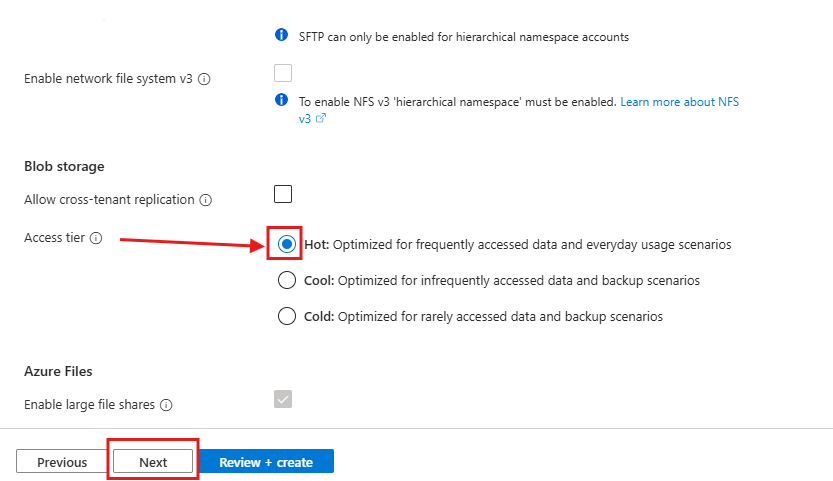
Configuring the Blob storage access tier (e.g., Hot, Cool, Archive)
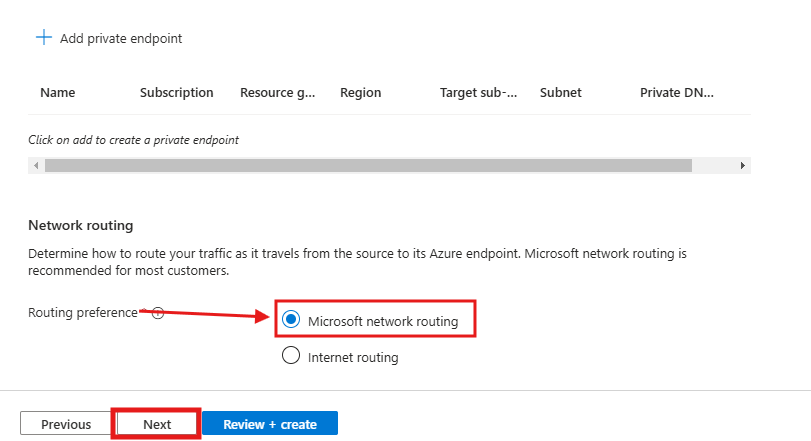
Step 4: Configure Networking Settings for the Storage Account
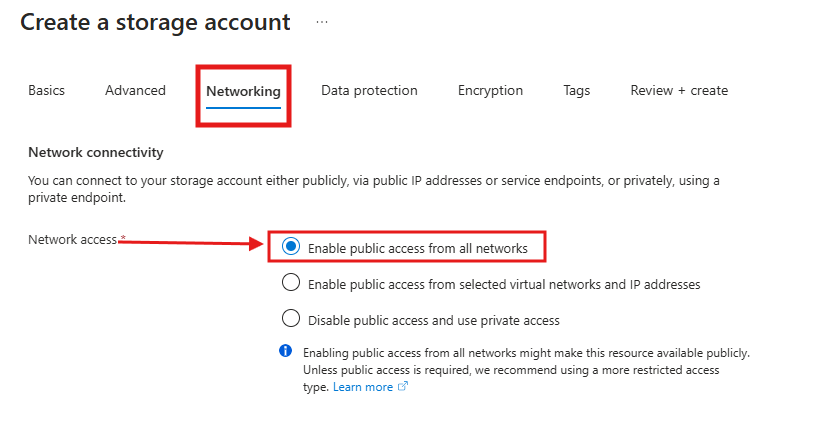
For Networking settings, you can connect to your storage account either publicly or privately. To configure network access:
Select "Enable public access from all networks"
Choose "Microsoft network routing" for Routing preference
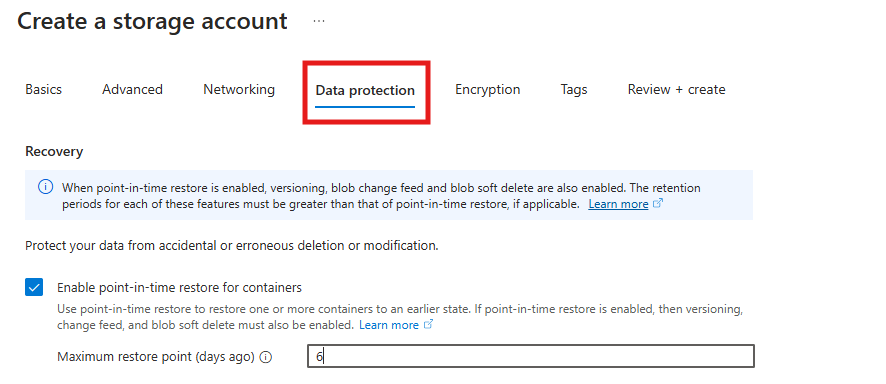
Step 5: Configure Data Protection for the Storage Account
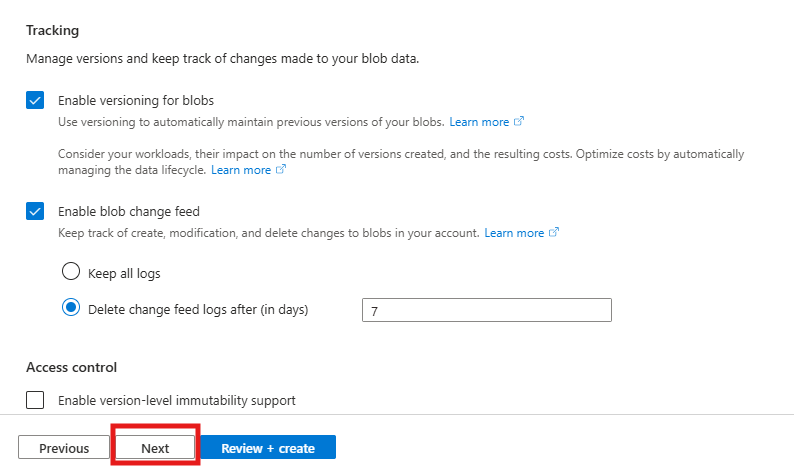
To protect your data from accidental deletion or modification, consider enabling the following data protection features:
Point-in-time restore for containers
Soft delete for blobs
Soft delete for containers
Soft delete for file shares
Versioning for blobs
Blob change feed

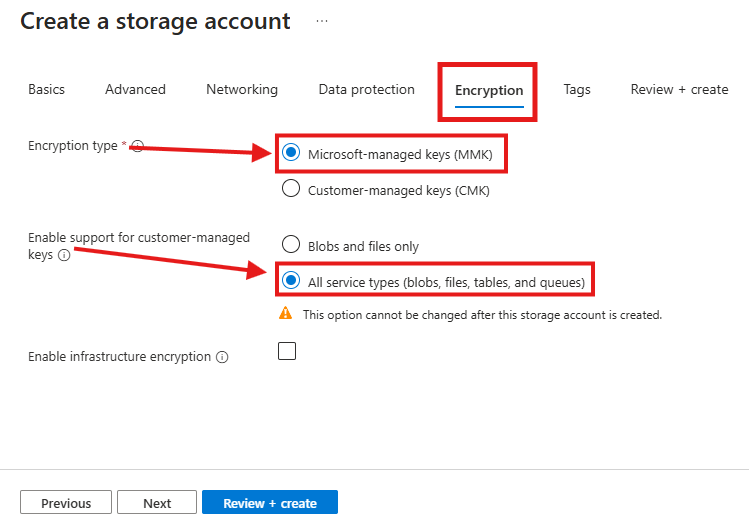
Step 6: Configure Encryption for the Storage Account
To configure encryption:
Select "Microsoft-managed key" as the encryption type
Enable support for customer-managed keys
Step 7: Review and Create the Storage Account
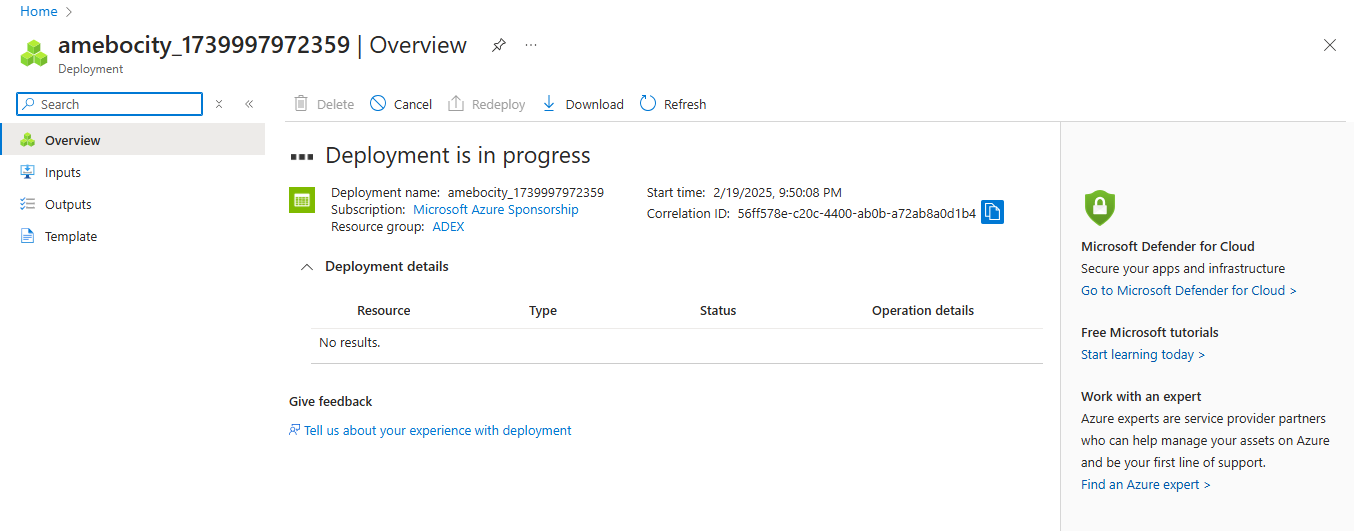
Click "Review + Create" to validate your settings. Click "Create" to initiate the deployment. Wait for the deployment to complete. This may take a few minutes. Once deployed, navigate to your newly created Storage Account.

How to Securely Sharing a Confidential Document Using Azure Blob Storage and SAS
Step 1: Upload the Confidential Document to Azure Blob Storage
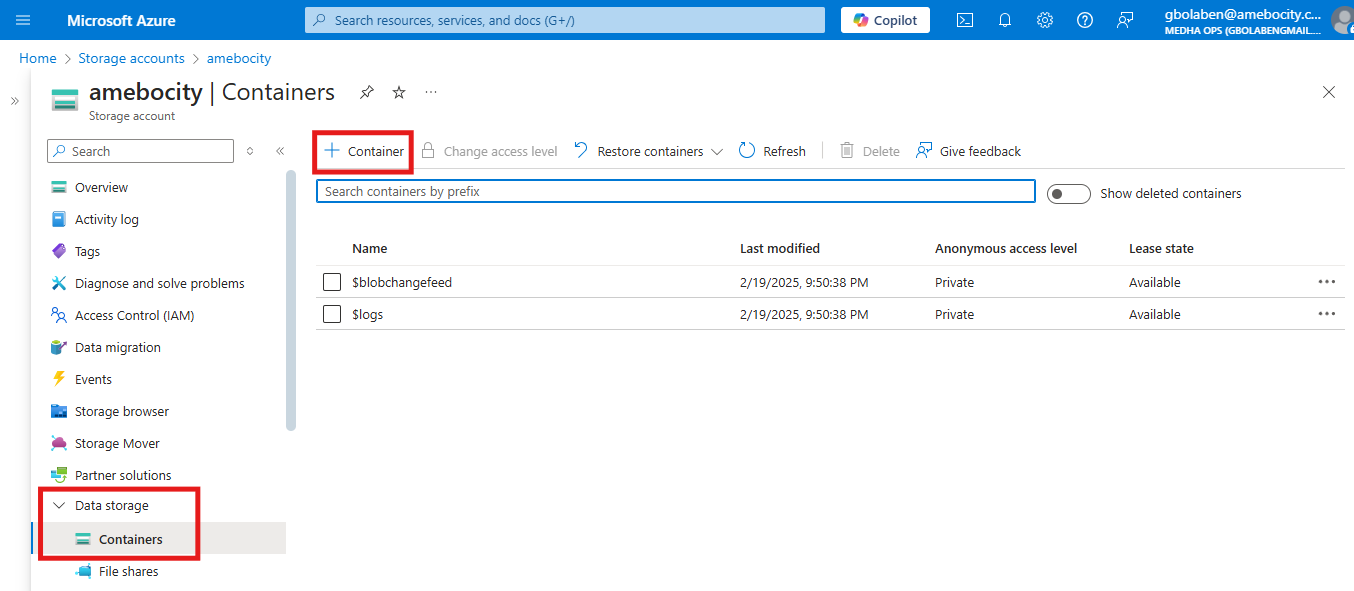
- Navigate to Storage Accounts and select the storage account you just created.


In the left menu, Click Data Storage > Containers and create a new private container:
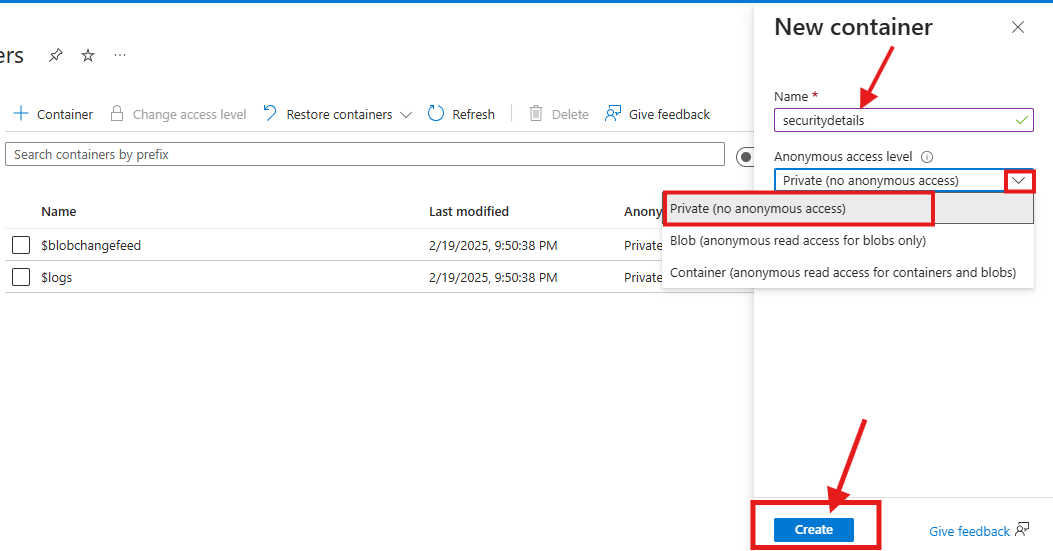
Click + Container.
Enter a Name.
Set Public access level to Private (no anonymous access).
Click Create.
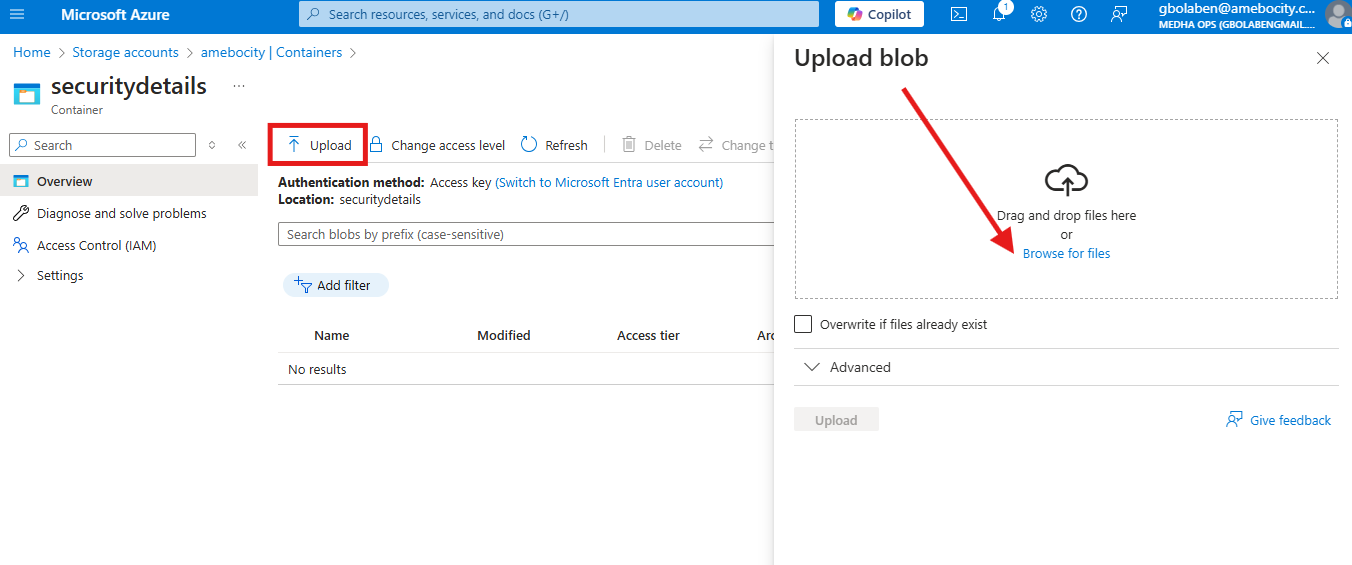
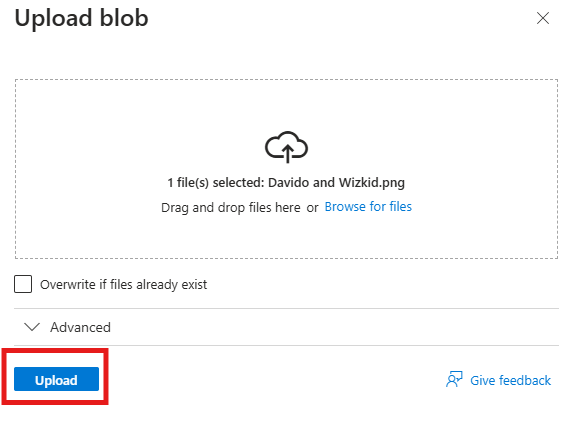
Open the container and click Upload to add your confidential document.
Ensure the document is uploaded successfully.
Step 2: Generate a SAS Token for the Document
- Inside the container, locate your uploaded document.

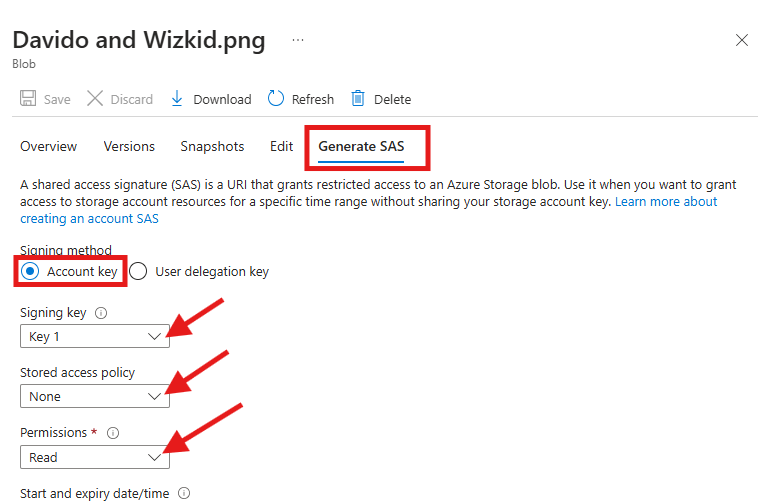
Double click on the document name to open its details.
Select the Generate SAS option at the top.
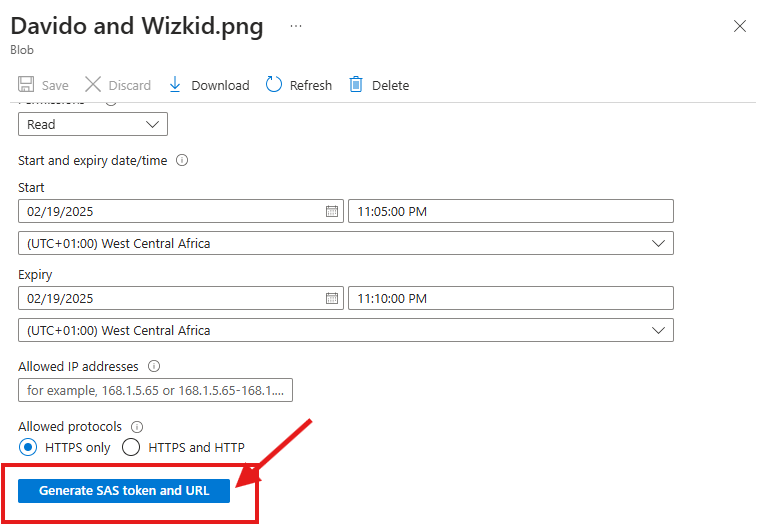
Configure the SAS settings:
Permissions: Select Read (for download access only).
Start and Expiry Date/Time: Set a 5-minute window from the current time
Allowed IP Addresses: (Optional) Restrict access to specific IP addresses.
Protocol: Choose HTTPS only for secure access.
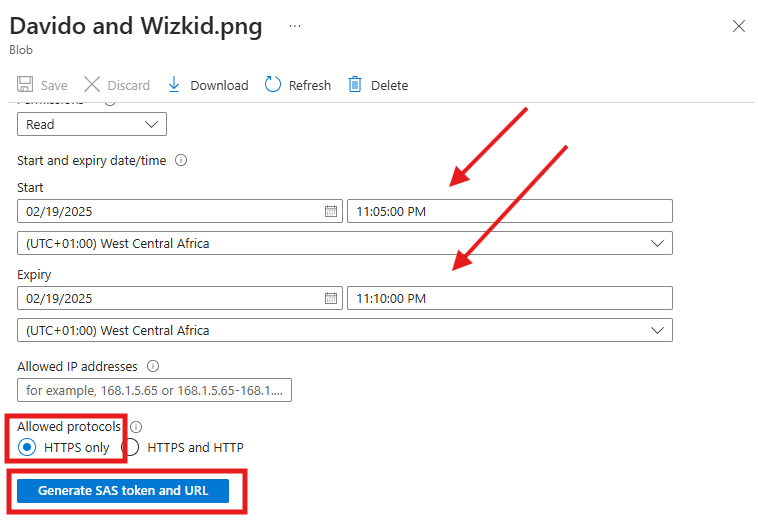
Click Generate SAS token and URL.
Copy the Blob SAS URL.

Step 3: Share the SAS URL with the External User
Send the SAS URL securely (e.g., via email or a messaging platform).
Inform the user that the link will expire after 5 minutes.
When the external user accesses the SAS URL, they can view and download the document, but they cannot modify, delete, or access other files.
The screenshot below shows how an external user accesses the file within the specified time frame.

After the 5 minutes elapse, access to the file is denied, as shown in the screenshot below.

Step 4: Verify and Monitor Access (Optional)
Return to the Azure Portal.
Navigate to your Storage Account.
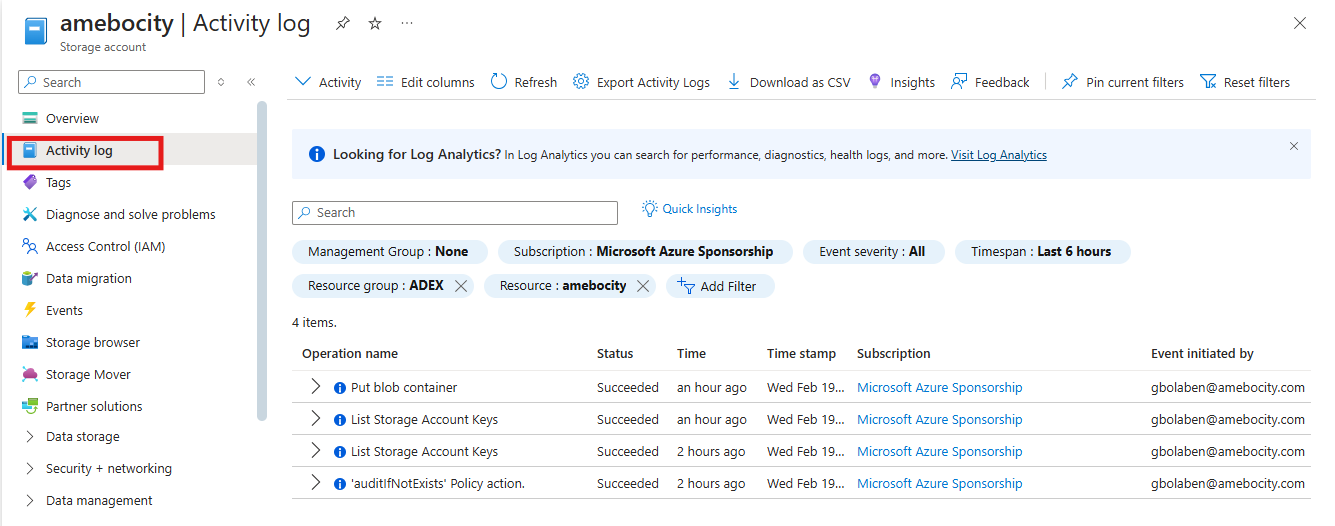
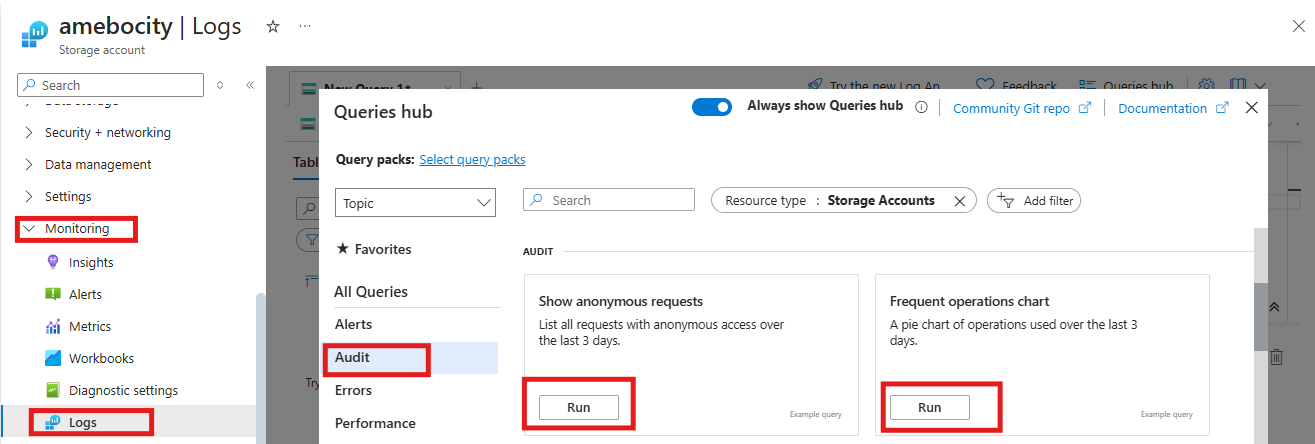
Go to Activities Logs to check for SAS access and usage. or go to Monitoring > Logs.
Best Practices for Sharing Confidential Data
Use HTTPS for all SAS links to protect data in transit.
Limit permissions to the minimum required (e.g., read-only).
Restrict access to specific IP ranges when possible.
Review logs to track access and usage.
Final Thought
In today’s world, where data breaches and leaks are common, protecting sensitive information is more important than ever. By using Azure Blob Storage and SAS URLs, you can share confidential documents safely and control who has access to them and for how long. This not only protects your company’s data but also helps maintain the trust of your customers.
With the steps i have outlined in this guide, you can confidently store sensitive files in Azure and share them securely when needed. Always follow best practices, like using HTTPS and limiting access time, to keep your data as safe as possible.
By managing access carefully and monitoring usage, you reduce the risk of accidental exposure while still allowing external users to view important information. Take charge of your data’s security—because every piece of information matters.
Subscribe to my newsletter
Read articles from Benjamin Gbolaru directly inside your inbox. Subscribe to the newsletter, and don't miss out.
Written by
