MySQL Fundamentals: Learn the Basics
 Isuri Balasooriya
During our previous SQL lessons, we used sqlite to run our queries. In this article I’m going to talk further about SQL by using MySQL. Since the last time we discussed this topic, I’ve learned a thing or two about SQL, especially its history which I thought I would share with you in this article. I always thinks its a good idea to further explore different things about a topic, once you have the basic knowledge about it.
As we discussed in our previous articles, Structured Query Language (SQL) is the backbone of modern database management, powering everything from small applications to enterprise systems. Its origins trace back to a groundbreaking paper by Edgar F. "Ted" Codd in 1970, which laid the foundation for relational databases.
In 1970, Ted Codd, a researcher at IBM, published his seminal paper, "A Relational Model of Data for Large Shared Data Banks." In this paper, he introduced the relational model, which organized data into tables (relations) consisting of rows (tuples) and columns (attributes). His work revolutionized database management by replacing hierarchical and network models with a more structured and mathematically sound approach.
Building on Codd’s ideas, IBM researchers Donald D. Chamberlin and Raymond F. Boyce developed Structured English Query Language (SEQUEL) in the early 1970s. SEQUEL aimed to make database interaction more intuitive by allowing users to retrieve and manipulate data using simple English-like commands. Due to trademark issues, SEQUEL was later renamed SQL (Structured Query Language). IBM continued refining SQL, integrating it into System R, one of the first relational database management systems (RDBMS), in the late 1970s.
By the 1980s, SQL gained significant traction, with companies like Oracle, IBM, and Microsoft incorporating it into their database systems. In 1986, the American National Standards Institute (ANSI) standardized SQL, making it the official language for relational databases. An updated version, SQL-89, followed, and SQL-92 further improved the language by adding new functionalities such as joins, subqueries, and set operations.
With the rise of the internet and data-driven applications, SQL became even more crucial. New iterations, such as SQL:1999, SQL:2003, and later versions, introduced advanced features like recursive queries, XML support, and analytical functions. Companies like MySQL, PostgreSQL, and Microsoft SQL Server expanded SQL’s capabilities, making it indispensable for web applications, cloud computing, and big data analytics.
Despite the emergence of NoSQL databases for handling unstructured data, SQL remains dominant due to its reliability, scalability, and widespread adoption. Modern developments like NewSQL, which combines traditional SQL with NoSQL scalability, ensure that SQL continues to evolve alongside the ever-changing landscape of data management.
Whether you are a DB administrator, data scientist or an aspiring tech enthusiast, understanding SQL is essential for navigating the digital age. As an aspiring data scientist and an AI enthusiast, learning SQL was the first stepping stone in my journey. I love that its simple, elegant and reliable for data analytics related tasks.
Now we have an idea what SQL is, but how exactly can we use SQL to manage our data? Before we get to the answer, its crucial to know another thing. That is RDBMS (Relational Database Management System). In our previous article we talked about the two different types of databases, relational and non relational. We know that SQL deals with relational databases.
A Relational Database Management System (RDBMS) is a software system that manages relational databases using SQL as its standard query language. RDBMS allows data to be stored, retrieved, and manipulated efficiently while ensuring consistency, integrity, and security.
There are various RDBMS in the market such as MySQL, PostgreSQL, Microsoft SQL Server, and Oracle Database. MySQL is one of the most popular open-source RDBMS solutions, widely used in web development, enterprise applications, and cloud computing. Originally developed by MySQL AB in 1995, it was later acquired by Sun Microsystems and subsequently by Oracle Corporation. MySQL is known for its performance, reliability, and ease of use, making it a preferred choice for developers and businesses.
MySQL is the trusted DBMS for many high profile companies like Facebook, Airbnb, Shopify, Uber, Netflix, Booking.com, and Slack.
Lets recap our previous SQL foundation knowledge by using MySQL. Firstly, you need to install MySQL. Installing MySQL is straightforward and depends on the operating system you are using. For Windows, MySQL can be installed using the MySQL Installer, which provides an easy-to-use setup wizard. During installation, you will need to set important parameters like database port, root password, and network access. Once installed, you can connect to your MySQL server using a MySQL client like the MySQL Workbench or command-line tools. In my case I always use MySQL Workbench as its user friendly.
Once everything is installed, you can open your MySQL Workbench which will look like this,
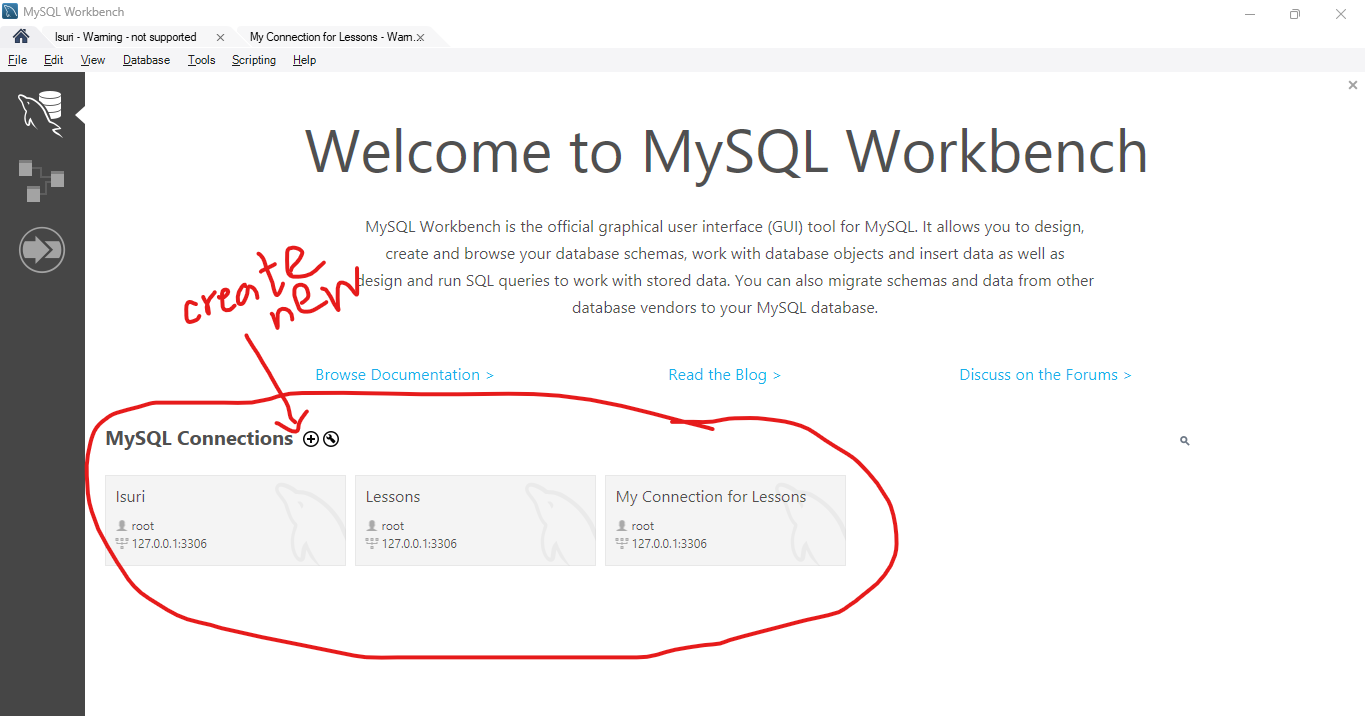
First thing we have to do is to create a new connection. When you create a new connection, you must remember and put your root password which you created at the time of installation.
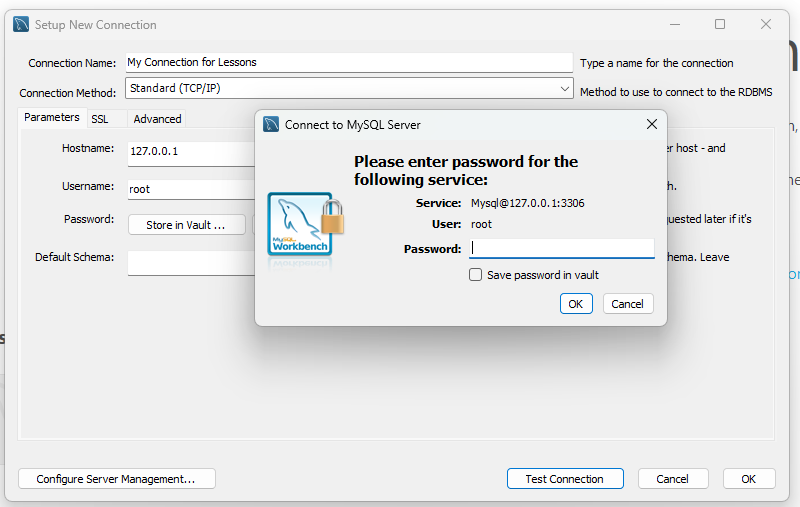
Once that is set up your SQL editor will open where you can write SQL queries and execute them to manage your database. One important thing at this stage is to setup your schema. A MySQL schema is a logical container for database objects such as tables, views, indexes, and stored procedures. It defines the structure and organization of data within a MySQL database. While the terms "schema" and "database" are often used interchangeably in MySQL, a schema primarily refers to the blueprint or structure of the database. Schemas help maintain data integrity, enforce relationships between tables, and improve query efficiency. They can be created using the CREATE SCHEMA statement or as part of the CREATE DATABASE command, depending on the database design requirements.
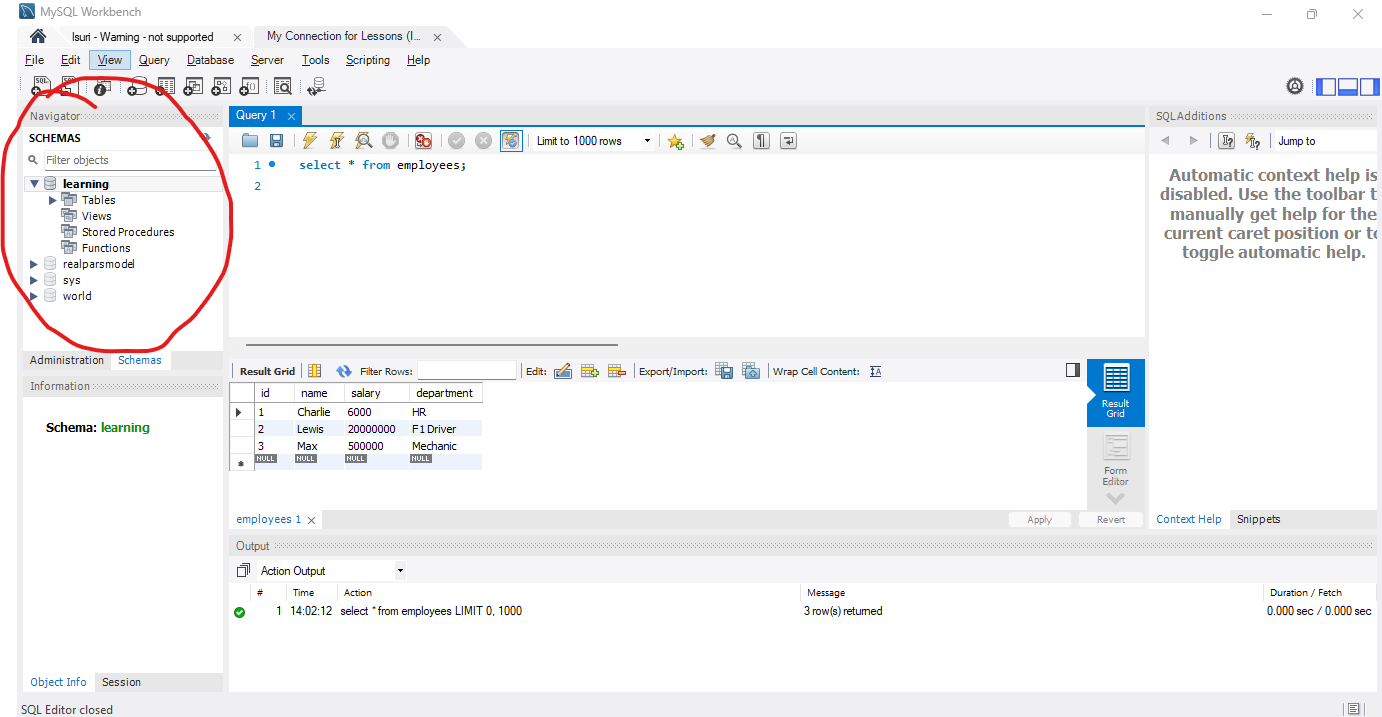
You can right click on the schemas section as shown above an create a new schema. Once your schema is created, double click on the schema name to make it active.
Now we have MySQL ready to go. Next step would be to design your database, how many tables you are going to have, what are the attributes and data types and what are the relationships between tables. These are the basic information that we should have in any database design. In order to create our database design, I’m going to use a tool called drawsql.app/. This is a free online tool which enables you to create your database diagrams. For our article I’m going to take a simplified version of Netflix database. Below are the tables I’m going to have in my database,
User
- Attributes - UserID (PK), Name, Email, Password, Country, SubscriptionID (FK), CreatedAt
Subscription
- Attributes - SubscriptionID (PK), PlanName, Price, Duration, Features
Content
- Attributes - ContentID (PK), Title, ReleaseYear, Type, GenreID (FK), Duration, Language, Rating
Genre
- Attributes - GenreID (PK), GenreName
WatchHistory
- Attributes - HistoryID (PK), UserID (FK), ContentID (FK), WatchedOn, Progress
Reviews
- Attributes - ReviewID (PK), UserID (FK), ContentID (FK), Review, ReviewDate
I know there are no user reviews on Netflix, but for the purpose of this exercise I have added a Reviews table. Now we have our tables and attributes laid out, lets define our relationships,
One-to-Many (User - Subscription)
A User has one Subscription (One-to-One).
A Subscription can belong to many Users (One-to-Many).
Many-to-Many (User - Content)
A User can watch multiple Movies/Shows, and each Movie/Show can be watched by many users (Many-to-Many)
This relationship is captured in the Watch History table.
One-to-Many (Content - Genre)
Each Movie/Show belongs to one Genre.
A Genre can have multiple Movies/Shows.
Many-to-Many (Reviews - Users - Content)
A User can rate/review multiple Movies/Shows, and each Movie/Show can have multiple reviews
This is handled through the Reviews table.
Now we have our tables with primary keys and other attributes defined, and our relationships between tables and foreign keys defined. This whole thing is called a database schema. Now that we have our database schema defined, lets go ahead and draw our ER diagram.
Using drawsql.app, lets create our diagram now. Its very easy to create your tables and attributes and assign primary key, unique values and even indicate if an attribute is nullable or not.
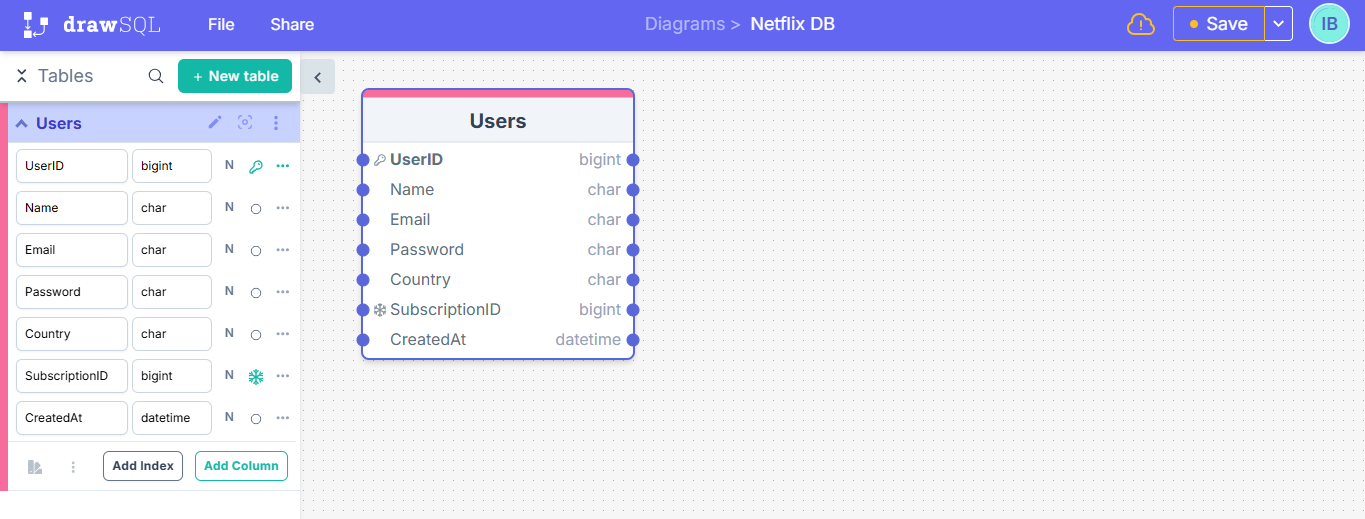
Once the table are created you can link two tables by dragging a line between two tables and defining the type of relationship. Its very easy and self explanatory, but one thing you need to remember is when you are starting and ending the line it has to be from and to the specific attribute that you are going to link which is going to act as the foreign key. Now my ER diagram is complete.
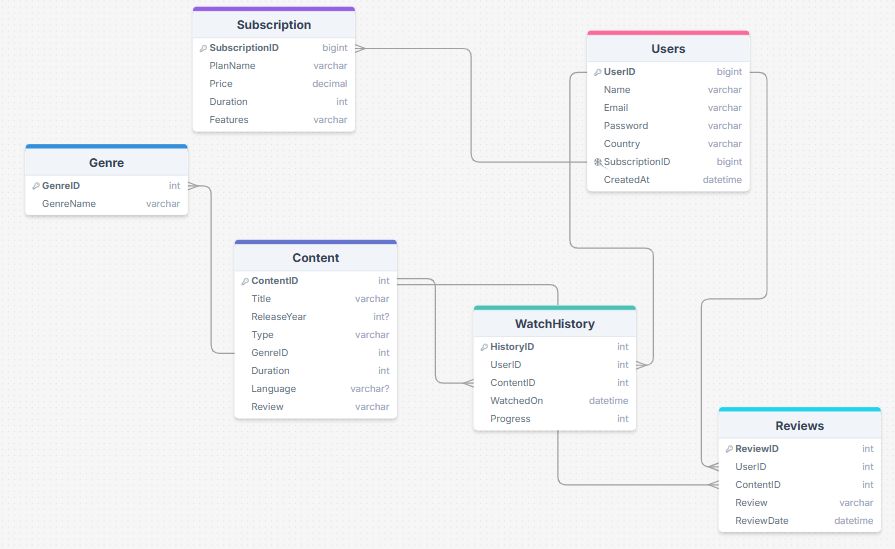
Once the diagram is complete I’m going to export it as DDL. Then I’m going to go to my MySQL Workbench and import it by going to File > Open SQL Script. This is such an easy way to import your database schema to MySQL Workbench without writing any queries. Before executing the script, double check if everything is right and as you wanted and then execute the script. Your tables and relationships will be created in MySQL
These Once all these steps are done, we are finally ready to write some SQL queries.
Lets recap what we learned so far. Now we created our tables, lets insert some data. I hope you remember the INSERT query,

Okay now I have my database all ready. Lets do some basic querying to refresh our memory. Please refer to this article to go through some basic querying - https://themathlab.hashnode.dev/exploring-sql-concepts-for-beginners
Lets try some aggregate functions and grouping. Lets say we want to find out how many reviews are received for the movie Interstellar.
Select count(*) from reviews
where ContentID = (select ContentID from content where Title="Interstellar");
This one covers aggregate functions and subqueries both in one. lets take an example where we get to use grouping. Lets say we want to find out the total number of content under each genre.
select count(*) AS count from content group by GenreID;
Now the problem with the above query is it only returns the count for each genre, if you want to present your results in a nice way with the genre name and the count in front, we need to refer to the genre table to retrieve the genre name. This can be done with joins, which is another important thing we covered in our basic SQL lessons.
SELECT g.GenreName, COUNT(*) AS count
FROM Content c
JOIN Genre g ON c.GenreID = g.GenreID
GROUP BY g.GenreID;
Now this will give your results in a nice way,

That’s all for todays article, I hope you got a good idea on how to use MySQL for your database management requirements, and we got the opportunity to refresh our memory on basic SQL functions.
Subscribe to my newsletter
Read articles from Isuri Balasooriya directly inside your inbox. Subscribe to the newsletter, and don't miss out.
Written by

Isuri Balasooriya
Isuri Balasooriya
👋 Hi, I'm Isuri!🚀 Aspiring Data Analyst | Future AI Expert | Passionate about Space & Tech📊 Learning Data Science, Data Analytics, and AI📚 Exploring Machine Learning & Data Analytics Projects🌍 Dream: To work in Space Tech & AI📬 Let's connect!