How to Set Up Two EC2 Instances on an EFS Easily
 Emmanuel Eniade
You are all welcome to my blog and many. Today I would like to share with you steps by steps guide on how to deploy EC2 instances on EFS and I hope this guide will help you understand the easiest steps to follow.
Amazon Elastic File System (Amazon EFS) provides serverless, fully elastic file storage so that you can share file data without provisioning or managing storage capacity and performance. Amazon EFS is built to scale on demand to petabytes without disrupting applications, growing and shrinking automatically as you add and remove files. Because Amazon EFS has a simple web services interface, you can create and configure file systems quickly and easily. The service manages all the file storage infrastructure for you, meaning that you can avoid the complexity of deploying, patching, and maintaining complex file system configurations.
Amazon EFS supports the Network File System version 4 (NFSv4.1 and NFSv4.0) protocol, so the applications and tools that you use today work seamlessly with Amazon EFS. Amazon EFS is accessible across most types of Amazon Web Services compute instances, including Amazon EC2, Amazon ECS, Amazon EKS, AWS Lambda, and AWS Fargate.
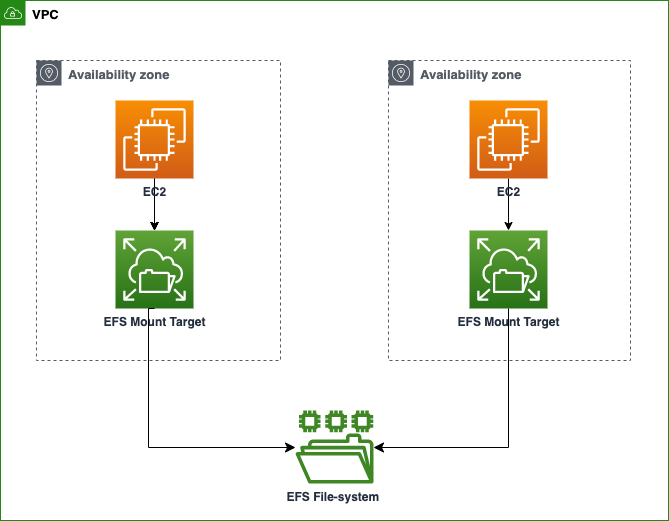
In this tutorial, you first create a new file system, then mount it to a new EC2 instance at the launch using the wizard, verify that file system is mounted on the EC2 instance and please the architectural design of what am talking about below;
PREREQUISITES:
A. AWS account
B. Amazon EFS
C. Two Instances EC2
D. Security Group
Let’s get started
A. AWS Account
Before getting started, please create free account on the portal or use pay as you go subscription to sign in to the AWS portal with your credentials as root user and then create a IAM user to be able to create resources on the portal.
B. Creating Amazon Elastic File System (EFS)
Type EFS on the search bar as shown and click on EFS highlighted in ‘Red’

Click on create

Give a unique to the file

Leave step 1 and 2 and move to the next step 3.

Under the policy options, check the encryption as highlighted and click the ‘next’

Under review and create, click next and create then you will see a success as shown as well as the unique name chosen earlier. So EFS is now created.

C. EC2 instance creation
Type EC2 on the search bar and click on EC2 as highlighted in ‘Red’

Click on Launch as shown

Give your EC2 a unique name and choose Amazon Linux default option for the AMI

Under description, leave the architecture as default. Then choose t3 option under instance type

Under key pair, select create, give it a name and click create.

Under Network settings, click edit, give your security group a unique name and leave others as default then click on launch

EC2 is successfully created then click on the instance in ‘red’

Follow the same step on EC2 created above to create the second EC2 and Once created, click on refresh button as shown then you will see all the instances created as shown below.

D. Creating Security Group
From the far left of the page, scroll down and click on security group to start creating it.

2. Once clicked, you will see three security group
i. Default security group was created for the EFS
ii. MyEC2-server1-SG was created for the first instance
iii. MyEC2-server2-SG was created for the second instance

Select the default security group and click on edit ‘inbound rules’.
Click Add Rule.
Under Type, Click the drop-down arrow and select NFS. Also, select the security group name created for first instance (MyEC2-server1-SG) and also for second instance ( MyEC2-server2-SG) as shown in the diagram.

Once created, the default Security group will look like below;

E. Mounting EFS and connecting EC2 instances to the EFS
Select the first instance as shown, click on connect.

Upon opening, click on SSH client and copy the command in red then open your command prompt or powershell since you have created the key pair.

Open command prompt and SSH with your key pair and below command in the terminal.

Install Amazon utilities with the following command;
sudo dnf install -y amazon-efs-utils

Next, create a directory by using the command mkdir efs

Type EFS on the search bar and click on name of the file as shown.

Click on attach as shown

Under attach, leave as shown and copy EFS mount helper command as shown

9. Paste the command, click enter and confirm that you have successfully mounted the EFS, run the df -T command

10. Use below command to gain permission to execute any command as the user.

Type cd (directory name) to get into your directory.
Next, you can create or put any type of files inside the directory. To create a file, use the touch command + filename. I created a file named Dragonfly and also dropped a WordPress document in the directory.
Afterwards, I ran the ls command to confirm the files I have in my directory as seen below.

12. Now, let’s connect the second instance and see if we can view the same files in the directory that has been mounted on the EFS by the first EC2 instance.
13. Type the same commands as you did when you connected the previous EC2 instance.
sudo dnf install -y amazon-efs-utils
make directory (give it the same name as the one in the first EC2 instance).
sudo mount (using the EFS mount helper)
df -T to confirm the mount
From the diagram below, you would notice the EFS has been mounted.
Cd into your directory

14. You will see that upon typing ls command, you will see file created on instance 1 on instance 2 saved on EFS.
I hope this step-by-step tutorial helps you with how to mount EFS on multiple EC2 instances
Thank you.
Subscribe to my newsletter
Read articles from Emmanuel Eniade directly inside your inbox. Subscribe to the newsletter, and don't miss out.
Written by