Step-by-Step Guide to PostgreSQL Streaming Replication using RepMgr
 Shridhar Khanal
Table of contents
- Overview of the Setup
- Replication: What is it?
- Step 1: Install PostgreSQL on All Standby Servers
- Step 2: Create a Data Directory for the Cluster
- Step 3: Initialize the PostgreSQL Cluster on the Standby Node
- Step 4: Edit PostgreSQL Configuration
- Step 5: Configure pg_hba.conf for Replication Access on the standby servers
- Step 6: Create a Replication User on the Primary Node
- Step 7: Install RepMgr on All Nodes
- Step 8: Create the RepMgr User and Database on the Primary Node
- Step 9: Configure pg_hba.conf to allow RepMgr access on the standby servers
- Step 10: Create RepMgr Configuration Files
- Step 11: Register the Primary Node in RepMgr
- Step 12: Verify Cluster Status with RepMgr
- Step 13: Perform a Dry Run for the Standby Clone
- Step 14: Clone the Primary Node on the Standby Node
- Step 15: Register the Standby Node with RepMgr
- Step 16: Final Verification
- Conclusion
Streaming replication in PostgreSQL ensures high availability and scalability by maintaining multiple copies of a database and continuously synchronizing standby nodes with the primary node. This guide walks you through setting up asynchronous streaming replication using RepMgr, making it applicable to various PostgreSQL versions.
Overview of the Setup
The objective is to configure asynchronous streaming replication between a primary node and multiple standby nodes to enhance efficiency and reliability. This setup ensures that changes are copied from the primary node to standby nodes without waiting for confirmation, improving performance.
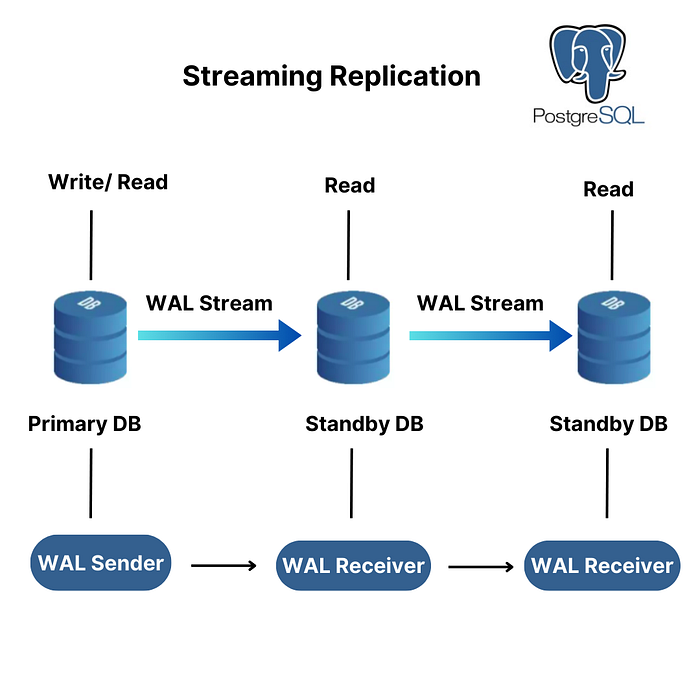
Fig: Streaming Replication in PostgreSQL
Replication: What is it?
Replication in PostgreSQL is the process of maintaining synchronized copies of a database. It is essential for high availability, load balancing, and disaster recovery. PostgreSQL supports two primary replication methods:
Physical (Streaming) Replication: Real-time data replication from the primary to standby databases. The primary handles both read and write operations, while standbys serve as read-only replicas.
Logical Replication: Uses a publish-subscribe model, allowing selective replication of tables, rows, or columns across different PostgreSQL versions.
In this guide, we will focus on asynchronous streaming replication for high performance.
Step 1: Install PostgreSQL on All Standby Servers
Before setting up replication, install PostgreSQL on all the standby nodes.
a. Add the PostgreSQL Repository
sudo sh -c 'echo "deb http://apt.postgresql.org/pub/repos/apt/ $(lsb_release -cs)-pgdg main" >> /etc/apt/sources.list.d/pgdg.list'
wget -q https://www.postgresql.org/media/keys/ACCC4CF8.asc -O - | sudo apt-key add -
b. Install PostgreSQL
sudo apt-get update
sudo apt install postgresql
c. Verify Installation
Ensure that the standby nodes have the same version of PostgreSQL as the primary node to maintain compatibility and consistency.
psql --version
Step 2: Create a Data Directory for the Cluster
Create a dedicated directory on all standby servers for the PostgreSQL cluster.
sudo mkdir -p /<DATA_PATH>/<CLUSTER_NAME>
Note: Replace <DATA_PATH> with the base directory and <CLUSTER_NAME> with a name for the cluster.
Step 3: Initialize the PostgreSQL Cluster on the Standby Node
Initialize a new PostgreSQL cluster on the standby node.
sudo pg_createcluster <VERSION> -p <CUSTOM_PORT> -d <DATA_PATH> <CLUSTER_NAME>
Note: Replace <CUSTOM_PORT> with the desired port number and replace<VERSION> with the PostgreSQL version.
Step 4: Edit PostgreSQL Configuration
Modify postgresql.conf on both primary and standby nodes.
File location:
/etc/postgresql/<VERSION>/<CLUSTER_NAME>/postgresql.conf
Adjust key parameters:
listen_addresses = '*'
port = <CUSTOM_PORT>
wal_level = 'hot_standby'
Note: If the PostgreSQL version is 9 or lower, set wal_level to ‘hot_standby’. For versions 10 and above, set wal_level to ‘replica’.
Customize additional settings (e.g., shared_buffers, work_mem) based on your workload.
Step 5: Configure pg_hba.conf for Replication Access on the standby servers
Modify pg_hba.conf to allow trusted connections for replication.
File location:
/etc/postgresql/<VERSION>/<CLUSTER_NAME>/pg_hba.conf
Add entries for primary and standby nodes:
host replication <REPLICATION_USER> <PRIMARY_NODE_IP>/32 md5
host replication <REPLICATION_USER> <STANDBY_NODE_IP>/32 md5
Step 6: Create a Replication User on the Primary Node
Create a dedicated replication user.
sudo -u postgres createuser -s replicator -p <CUSTOM_PORT>
sudo -u postgres psql -p <CUSTOM_PORT> -c "ALTER USER replicator WITH PASSWORD '<YOUR_PASSWORD>';"
Step 7: Install RepMgr on All Nodes
a. Add the RepMgr Repository
curl https://dl.2ndquadrant.com/default/release/get/deb | sudo bash
b. Install RepMgr
sudo apt install postgresql-repmgr
c. Verify Installation
/usr/lib/postgresql/<VERSION>/bin/repmgr --version
Step 8: Create the RepMgr User and Database on the Primary Node
Set up a RepMgr-specific user and database.
sudo -u postgres createuser -s repmgr -p <CUSTOM_PORT>
sudo -u postgres createdb repmgr -O repmgr -p <CUSTOM_PORT>
Step 9: Configure pg_hba.conf to allow RepMgr access on the standby servers
File location:
/etc/postgresql/<VERSION>/<CLUSTER_NAME>/pg_hba.conf
Add entries for primary and standby nodes:
host repmgr <REPLICATION_USER> <PRIMARY_NODE_IP>/32  md5
host repmgr <REPLICATION_USER> <STANDBY_NODE_IP>/32 md5
Step 10: Create RepMgr Configuration Files
Prepare a RepMgr configuration file on each node.
Master Node Configuration
File: /etc/postgresql/repmgr/<CLUSTER_NAME>.conf
node_id=1
node_name='master-node'
conninfo='host=<MASTER_IP> port=<CUSTOM_PORT> user=repmgr dbname=repmgr connect_timeout=2'
data_directory='<DATA_PATH>'
pg_bindir='/usr/lib/postgresql/<VERSION>/bin/'
log_file='/var/log/repmgr/<CLUSTER_NAME>_repmgr.log'
Standby Node Configuration
File: /etc/postgresql/repmgr/<CLUSTER_NAME>.conf
node_id=2
node_name='standby-node'
conninfo='host=<STANDBY_IP> port=<CUSTOM_PORT> user=repmgr dbname=repmgr connect_timeout=10'
data_directory='<DATA_PATH>'
pg_bindir='/usr/lib/postgresql/<VERSION>/bin/'
log_file='/var/log/repmgr/<CLUSTER_NAME>_repmgr.log'
use_replication_slots=true
tablespace_mapping='/source_path=/target_path'
Step 11: Register the Primary Node in RepMgr
sudo -u postgres /usr/lib/postgresql/<VERSION>/bin/repmgr -f /etc/postgresql/repmgr/<CLUSTER_NAME>.conf cluster show
Step 12: Verify Cluster Status with RepMgr
sudo -u postgres /usr/lib/postgresql/<VERSION>/bin/repmgr -f /etc/postgresql/repmgr/<CLUSTER_NAME>.conf cluster show
Step 13: Perform a Dry Run for the Standby Clone
sudo -u postgres /usr/lib/postgresql/<VERSION>/bin/repmgr -h <MASTER_IP> -p <CUSTOM_PORT> -U repmgr -d repmgr -f /etc/postgresql/repmgr/<CLUSTER_NAME>.conf standby clone --dry-run
Step 14: Clone the Primary Node on the Standby Node
sudo -u postgres /usr/lib/postgresql/<VERSION>/bin/repmgr -h <MASTER_IP> -p <CUSTOM_PORT> -U repmgr -d repmgr -f /etc/postgresql/repmgr/<CLUSTER_NAME>.conf standby clone
Step 15: Register the Standby Node with RepMgr
sudo -u postgres /usr/lib/postgresql/<VERSION>/bin/repmgr -f /etc/postgresql/repmgr/<CLUSTER_NAME>.conf standby register
Step 16: Final Verification
sudo -u postgres /usr/lib/postgresql/<VERSION>/bin/repmgr -f /etc/postgresql/repmgr/<CLUSTER_NAME>.conf cluster show
Conclusion
This setup enables high availability and seamless failover for PostgreSQL streaming replication. Adapt these steps based on your PostgreSQL version and system requirements.
Also, feel free to share this guide with your network on LinkedIn or reach out for further discussion on streaming replication best practices.
Subscribe to my newsletter
Read articles from Shridhar Khanal directly inside your inbox. Subscribe to the newsletter, and don't miss out.
Written by