🚀 Setting Up Next.js with Supabase & Prisma: Creating a User Model from Scratch
 Michael Okolo
Table of contents
- 🛠 Prerequisites (a.k.a. "Things You Should Probably Have")
- 🎬 Step 1: Setting Up Your Next.js Project
- 🚀 Step 2: Deploying to Vercel & Setting Up a Postgres Database
- 🔑 Step 3: Setting Up Your Environment Variables
- 📦 Step 4: Installing Prisma
- 🏗 Step 5: Defining Our Database Schema
- 🔨 Step 6: Creating Our Database Tables
- 🎯 Wrapping Up

🛠 Prerequisites (a.k.a. "Things You Should Probably Have")
Before we dive into the magical world of Next.js, Prisma, and Supabase, let’s make sure you have everything ready:
✅ Node.js (because JavaScript isn’t going to run itself!)
✅ A Vercel Account (we’ll use it to set up a free Postgres database and deploy our app)
✅ A GitHub Account (because version control is like having an undo button for your code)
🎬 Step 1: Setting Up Your Next.js Project
First, let’s create our Next.js project by running:
npx create-next-app@latest
This command will ask you a bunch of questions, but don't worry—just follow the automatic installation guide: Next.js Docs
👉 Pro Tip: If you name your project something like super-awesome-app, you have legally committed to making something cool. No pressure. 😆
🚀 Step 2: Deploying to Vercel & Setting Up a Postgres Database
Since we’re going to use a free Postgres database hosted on Vercel, let’s get things in order:
- Push your Next.js project to GitHub (because real devs commit their code! 😎):
git init
git add .
git commit -m "Initial commit"
git branch -M main
git remote add origin https://github.com/YOUR_USERNAME/YOUR_REPO.git
git push -u origin main
To deploy your project to Vercel using the Vercel platform from GitHub, follow these steps:
Go to Vercel and log in. Click on the "Add New Project" button. If you haven’t already, grant Vercel permission to access your GitHub repositories.
Select the project repository you pushed to GitHub in Step 2.
Click "Import" and follow the setup instructions. Once deployed, Vercel will provide a live URL for your project. 🚀
On your Vercel Dashboard, select your project, go to the Storage tab, and click Create Database.
Choose Supabase as the database provider and select the Free Plan (because we love free stuff!).
Name your database (e.g.,
Ridora-DatabaseorI-Love-Postgres🤷♂️), then click Create.
🔑 Step 3: Setting Up Your Environment Variables
Now that you have your Supabase database ready, let’s make sure our Next.js app can talk to it.
Create a
.envfile in the root of your project.After this, click Connect to access your database details.
Example:
 POSTGRES_URL="************"
 POSTGRES_PRISMA_URL="*******************"
 SUPABASE_URL="************"
 NEXT_PUBLIC_SUPABASE_URL="************************"
 POSTGRES_URL_NON_POOLING="************************"
 SUPABASE_JWT_SECRET="*******************"
 POSTGRES_USER="*************"
 NEXT_PUBLIC_SUPABASE_ANON_KEY="*****************************"
 POSTGRES_PASSWORD="*****************"
 POSTGRES_DATABASE="*****************"
 SUPABASE_SERVICE_ROLE_KEY="*************************"
 POSTGRES_HOST="*************"
 NEXT_PUBLIC_SUPABASE_ANON_KEY="*****************"
👉 IMPORTANT: Ensure you click on the show secret before copying the secrets. Also, add .env to your .gitignore file so you don’t accidentally expose your secrets to the world!
📦 Step 4: Installing Prisma
Prisma is going to be our ORM (Object-Relational Mapper), making database interactions smooth like butter. Install it with:
npm install prisma --save-dev
👉 Pro Tip: If you’re using VS Code, install the Prisma extension for better syntax highlighting. Because looking at plain text SQL is like watching a movie in 144p. 🥴
🏗 Step 5: Defining Our Database Schema
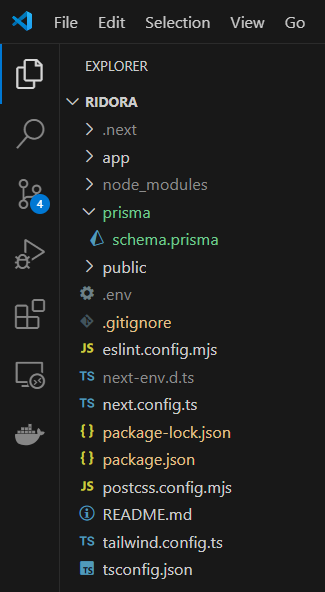
We’ll now create a prisma folder and add a schema.prisma file. Your project should look like this:

Inside prisma/schema.prisma, add the following:
// schema.prisma

generator client {
    provider = "prisma-client-js"
}

datasource db {
    provider  = "postgresql"
    url       = env("POSTGRES_PRISMA_URL") // uses connection pooling
    directUrl = env("POSTGRES_URL_NON_POOLING") // uses a direct connection
}

model User {
    id        String   @id @default(cuid())
    username  String?  @unique
    email     String?  @unique
    createdAt DateTime @default(now()) @map(name: "created_at")
    updatedAt DateTime @updatedAt @map(name: "updated_at")

    @@map(name: "users")
}
This schema defines a User model with:
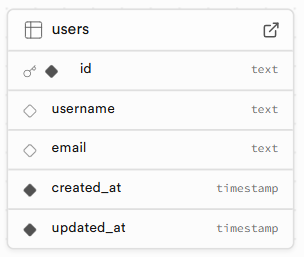
id: A unique identifiername: (optional) Name of the useremail: (optional but unique)createdAt: Stores the creation dateupdatedAt: Updates automatically when the record changes
🔨 Step 6: Creating Our Database Tables
Now that we’ve defined our database structure, let’s create the actual tables in Supabase. Run:
npx prisma db push
🎉 Boom! Your database now has a users table.

🎯 Wrapping Up
You’ve just set up Next.js, Supabase, and Prisma—like a pro! 🚀
✅ Created a Next.js project
✅ Set up a free Postgres database on Vercel (via Supabase)
✅ Connected Prisma to manage our database
✅ Defined and pushed our schema
From here, you can start adding API routes to interact with your database. Want to insert and fetch users? Stay tuned for my next post! 😉
🔥 Final Thoughts 🔥
If you followed along and didn’t break your computer in frustration—congrats! 🎉 You’re officially on your way to building full-stack Next.js apps like a champ. 🏆
Got questions? Drop a comment below, and let’s figure it out together. Happy coding! 🚀😃
Subscribe to my newsletter
Read articles from Michael Okolo directly inside your inbox. Subscribe to the newsletter, and don't miss out.
Written by
