Comprehending Web Authentication: JSON Web Token
 Roshan C
Introduction
Authentication is a key part of web development. It confirms users' identities and keeps sensitive data safe from unauthorized access. Most of the people may understand authentication and authorisation as same thing but whereas they are two sides of the same coin when it comes to web security, as they serve distinct purposes. When developing secure web applications, it’s essential to grasp the distinct roles of authentication and authorization.
When I built my own web app, I faced both challenges. Initially, I only focused on getting users authenticated, but I soon realized the importance of proper authorization to protect user data. This led me down the path of exploring various authentication methods, eventually discovering the power of JWT (JSON Web Tokens).
In this article, we’ll go through different authentication methods that already exist, dive deep into JWT, and see how you can apply them to your own projects.
Types Of Authentications
Before diving deep into the concepts of authentication, let’s explore some basic and core level authentications used across the world to secure their applications. My go to and most used method of authentication was always JWT (JSON Web Tokens), I will tell you why choose that as my primary resource for securing my application but as we know it is not the only good option available there are plenty of good and widely used methods that I came across that I will share some of them here as an overview.
Basic Authentication
This is one of the simplest methods, where the user’s credentials (usually a username and password) are sent with each request. These credentials are encoded in Base64 but not encrypted, making it a less secure option. Think of a simple login form where you enter your username and password. Every time you make a request, these credentials are sent to the server for verification.
Pros: Easy to implement and doesn't require cookies or session management. Cons: it's not secure on its own since credentials are exposed without encryption, so it's typically used over HTTPS for added security.
Session-Based Authentication
After a user logs in, the server creates a session and stores the session ID on the server. The client receives a session cookie, which is sent with each request to verify the user's identity. When you log into a website, a session is created, and a cookie is stored in your browser. This cookie allows you to stay logged in as you navigate through the site. To make it more clear, even though this is used only after a user logs in but often we can see this type of authentication where you can access the part of website’s features without even logging so session ID is what carried along with request whenever you make a call for an information or data on that website.
Pros: More secure than basic authentication and allows the server to track user activity. Cons: requires server-side storage for sessions, which can be resource-intensive and doesn't scale well for large applications.
Token-Based Authentication
Instead of maintaining sessions on the server, the server generates a token after verifying the user’s credentials. This token is sent back to the client and included in each subsequent request. Imagine logging into a web app, receiving a token, and using that token for all further interactions with the server.
Pros: Scales better because tokens are stateless and don't need server storage and works well for distributed systems and microservices. Cons: Tokens can be intercepted if not handled securely and require careful token management to ensure security.
| Session Based Authentication | Token Based Authentication |
| Server-Side Storage | Client-Side Storage |
| The client only stores the session ID | The Client Browser’s local storage stores the Token |
| Resource-Intensive | Resource Efficient |
| Moves session ID as Cookie | Moves token in authorization header of HTTP |
OAuth
OAuth is a protocol that allows third-party applications to access a user’s data without exposing their credentials. It involves token exchange and is commonly used by platforms like Google and Facebook for login purposes. You must have logged into an app using your Google account? That’s OAuth in action, where you grant limited access to your data without sharing your Google credentials.
Pros: Users don't need to share their credentials with third-party apps, and it allows granular access control. Cons: it can be complex to implement and requires an understanding of token flow and scope management.
JWT (JSON Web Tokens)
JWT is a token-based authentication method where the server issues a JSON Web Token after successful login. The token contains claims (user information and metadata) and is signed to ensure integrity. Upon logging into a web app, you receive a JWT. This token is stored on the client-side and sent with each request to authenticate the user.
Pros: Stateless and scalable with self-contained tokens that have embedded contents. Cons: Token size can be larger due to the information it carries and requires secure handling to prevent exposure or misuse.
Multi-Factor Authentication (MFA)
This adds an extra layer of security by requiring multiple forms of verification. This could include something you know like password, or a verification through phone or a simple fingerprint. Additional security before any authentication significantly increases security and protects against compromised credentials. But even though it adds security It may be inconvenient for users.
Deep Dive into JWT
Let’s explore JWT in details on how I Understood and grasped the knowledge around authentication especially in JWT. As you already know JWT is JSON Web Tokens, it is a compact, self-contained token format used to securely send information between parties as a JSON object.
Ok now enough of what is JWT as more of that explained above. Now let’s know how it works in details.
Here’s how JWT works in a typical authentication process:
Login Request: The client (from a frontend app) sends the user’s credentials (username and password) to the server.
Token Issuance: If the credentials are valid, the server generates a JWT, signs it with a secret key, and sends it back to the client.
Storage on the Client: The client stores the JWT, usually in local storage.
Subsequent Requests: For every subsequent request, the client includes the JWT (in an Authorization header).
Verification: The server verifies the token’s signature and checks its validity. If valid, the user’s request is processed.
This process eliminates the need for server-side session storage, making JWT a stateless authentication method.
One might question what Token signature is, it is nothing, but a cryptographic element added to a token that acts as a unique identifier. When a client sends the token to the server, the server re-calculates the signature using the same secret key and compares it to the received signature. If they match, the token is considered valid.
Structure of JWT
A JSON Web Token is made up of three parts: a header, a payload, and a signature. The parts are separated by dots and encoded using Base64-URL.
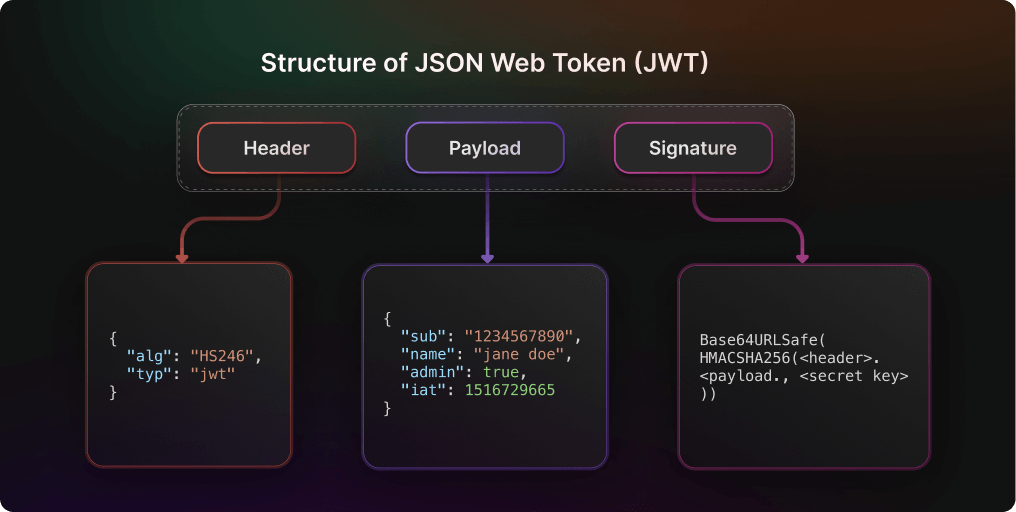
Header:
Contains metadata about the token, specifies the type of token, which is usually "JWT", specifies the signing algorithm, such as HMAC SHA256 or RSA SHA256, contains metadata about the token, such as the cryptographic algorithms used.
Payload:
Contains the data being transmitted, such as user ID, roles, and token expiration time. It’s Base64-encoded but not encrypted, so it’s readable by anyone who has the token.
Signature:
A cryptographic signature created by hashing the header and payload together with a secret key. It ensures the token’s integrity.
As JWTs are self-contained and don't need server-side session storage, making them great for apps with many users or distributed systems. JWTs are small and can be sent through HTTP headers, which is perfect for mobile and web apps. They can be used across different programming languages because they use JSON, allowing easy integration between, for example, a JavaScript frontend and a Python backend. Also, I came to know that JWTs are used in microservice architecture to transfer user level data between services, and this allows many APIs to use JWT for authenticating clients in frontend apps or third-party integrations.
One of the examples I can give here is, recently I came across a wallet app where it tracks my bank’s transactions automatically that makes my money management easier, here the third-party app does not login to your bank account to get the data, JWT is integrated with API that is allowing the Wallet app to fetch the required data.
Challenges and Best Practices with JWT
Personally, If I want to say I have never faced any challenges yet there are some scenarios where JWT may look like a powerful tool, but improper usage can introduce serious security vulnerabilities and performance issues. Due to a lack of awareness about its limitations, JWT can be misused, so it's important to know some best practices before using it.
1. Avoid Storing JWTs in Local Storage
Many beginners store JWTs in local Storage because it's easy to access from JavaScript. However, this exposes tokens to cross-site scripting (XSS) attacks. Alternatively use HTTP-only cookies for storing JWTs. This prevents JavaScript from accessing the token directly.
2. Failing to Set an Expiry Time
Some developers generate JWTs without an expiration time, making them valid indefinitely. If a user's JWT is compromised, it cannot be automatically expired, increasing the security risk the longer it remains valid. Set short expiration times for access tokens (e.g. 15 minutes) and use refresh tokens so users can obtain a new token when the old one expires.
3. Avoid Using JWT for Everything
JWT is great for authentication, but it's not the best choice for storing session-related data. Some developers use JWTs to store user settings, roles, or preferences, which increases token size and wastes bandwidth as the token is sent with every request.
4. Use Strong Token Signing Algorithms
JWTs can be signed using different algorithms like:
HS256 (HMAC + SHA-256) – Symmetric encryption (faster but requires key sharing).
RS256 (RSA + SHA-256) – Asymmetric encryption (more secure, but slower).
5. Signing JWTs with Weak or Public Keys
JWTs are signed to prevent tampering. But if you use a weak secret key, attackers can easily brute-force it and forge their own tokens.
const SECRET_KEY = "12345"; // Very weak!
Use long and complex secret keys (at least 32+ characters).
Store the secret key in environment variables, not in your code.
Conclusion: Wrapping It All Up
If you’ve made it this far, you now have a solid understanding of how authentication and especially JWT plays a crucial role in securing web applications.
So, why is JWT a powerful choice for modern applications?
✅ It is stateless, reducing database dependency and improving scalability.
✅ It works well with distributed systems (like microservices and serverless apps).
✅ It supports secure API authentication without maintaining session state on the server.
Authentication is a key part of secure web applications. Knowing the different auth methods and picking the right one can protect you from security problems and scaling issues later. Whether you’re a beginner or an intermediate developer, understanding authentication will make you a better backend developer and help you create more secure apps.
So, dive in, learn, and start using authentication in your projects!
Comprehending Web Authentication
Subscribe to my newsletter
Read articles from Roshan C directly inside your inbox. Subscribe to the newsletter, and don't miss out.
Written by