Setting Up an Offline Root CA and Intermediate CA with GPO Distribution
 Mike Becker
Mission Objective
The Mainframe79 control deck is online, tasked with constructing a bulletproof Public Key Infrastructure (PKI) within an existing Windows Server domain. Our mission: deploy an Offline Root Certificate Authority (CA) and an Intermediate CA, then configure a Group Policy Object (GPO) to distribute the Root and Intermediate certificates, enabling automated computer certificate enrollment. We’re diving into the circuits!
Gear Check
Before we boot up, ensure your virtual toolkit is primed:
A dedicated Windows Server (e.g., 2019 or 2022) VM for the offline root CA, created in Hyper-V, kept air-gapped.
Another Windows Server (e.g., 2022) VM for the intermediate CA, domain-joined with static IP and DC DNS (e.g., 172.16.2.5), also in Hyper-V.
Domain controller VM with Active Directory and DNS operational.
Shared virtual drive (e.g., Hyper-V VHDX) for certificate transfers between VMs.
Hyper-V console access, Server Manager, Certification Authority console, and PowerShell.
Backup storage (e.g., VHDX snapshot or cloud with lock) and admin credentials.
Hyper-V snapshots of VMs pre-setup for rollback. All systems green?
Step 1: Booting Up the Offline Root CA
The Offline Root CA is your PKI’s unassailable fortress, kept air-gapped to safeguard the trust anchor. Here’s the build:
Prep the VM: Create a new Windows Server VM in Hyper-V, name it OFFLINEROOTCA (no domain join—solo mode!). Configure it via the Hyper-V console, disable networking to keep it isolated.
Install the AD CS Role:
Fire up Server Manager in the Hyper-V console, hit Manage > Add Roles and Features.
Choose Role-based or feature-based installation, select your VM, and add Active Directory Certificate Services.
Pick Certification Authority only, skip extras.
Configure the Standalone Root CA:
In the post-install wizard, select Standalone CA and Root CA.
Create a new private key: 2048-bit RSA, SHA256 hash, exportable.
Name it "Offline Root CA" (or your generic choice), set a 10-year validity.
Save request and database to defaults, then configure.
Issue the First CRL:
Open certsrv.msc via the Hyper-V console, right-click Revoked Certificates > All Tasks > Publish.
Select New CRL, set a 2-year interval, save as rootca.crl to the shared virtual drive.
Backup and Power Down:
Export the certificate (rootca.cer) and private key (rootca.pfx) with a strong password, save to the shared virtual drive.
Back up the CA database to the virtual drive, store offline (e.g., VHDX snapshot or cloud with lock).
Shut down the VM and secure it.
Step 2: Wiring the Intermediate CA
The Intermediate CA links the offline root to your online domain, issuing certificates for ops. Here’s the setup:
Prep the VM: Create a new Windows Server VM in Hyper-V, name it INTERMEDIATECA, join it to your domain via the Hyper-V console, set a static IP with DC DNS (e.g., 172.16.2.5).
Install AD CS Role:
In Server Manager, add Active Directory Certificate Services.
Select Certification Authority, proceed.
Configure the Enterprise Subordinate CA:
In the wizard, choose Enterprise CA and Subordinate CA.
Create a new private key: 2048-bit RSA, SHA256, exportable.
Name it "Intermediate Issuing CA", save a request file (e.g., intermediatereq.req) to the shared virtual drive.
Sign the Request on Offline Root CA:
Transfer intermediatereq.req from the shared virtual drive to OFFLINEROOTCA via Hyper-V console.
In certsrv.msc, submit the request, issue it, and export as intermediateca.cer to the shared drive.
Import and Start the Intermediate CA:
Move intermediateca.cer from the shared drive to INTERMEDIATECA via Hyper-V console.
In certsrv.msc, right-click the CA > All Tasks > Install CA Certificate, import intermediateca.cer.
Start the service.
Set Up CRL and Template:
Create C:\CRL on the VM, set permissions for NETWORK SERVICE (Modify) and SYSTEM (FullControl) via PowerShell.
    New-Item -Path "C:\CRL" -ItemType Directory -Force
    $acl = Get-Acl "C:\CRL"
    $rule = New-Object System.Security.AccessControl.FileSystemAccessRule("NETWORK SERVICE", "Modify", "ContainerInherit, ObjectInherit", "None", "Allow")
    $acl.AddAccessRule($rule)
    $rule = New-Object System.Security.AccessControl.FileSystemAccessRule("SYSTEM", "FullControl", "ContainerInherit, ObjectInherit", "None", "Allow")
    $acl.AddAccessRule($rule)
    Set-Acl -Path "C:\CRL" -AclObject $acl
Copy rootca.crl and intermediateca.crl from the shared drive to C:\CRL.
Configure CDP:
In certsrv.msc, right-click CA > Properties > Extensions.
Select CRL Distribution Point, remove LDAP/HTTP.
Add: [file://localhost/CRL/MPMDICA01.crl](file://localhost/CRL/MPMDICA01.crl) (publish), [file://localhost/CRL/MP_Materials_DMZ_Root_CA.crl](file://localhost/CRL/MP_Materials_DMZ_Root_CA.crl) (read-only).
For IntermediateCA, select “Publish CRL's to this location” and “Include in the CDP extension of issued certificates." Uncheck any other options
For RootCA, enable “Include in the CDP extension of issued certificates." Uncheck any other options
Click Apply, OK.
Publish CRL: Right-click Revoked Certificates > Publish > New CRL.
Create Computer Template:
Open certsrv.msc > Certificate Templates > Manage.
Duplicate "Computer", name "CompanyComputer" (display "CompanyComputer").
Set: Compatibility (CA: Server 2003, Recipient: XP/2003), Validity: 1 year, Renewal: 6 weeks.
Subject Name: Build from AD, Format: FQDN, SAN: DNS.
Security: Domain Admins and Domain Computers with Read/Enroll/Autoenroll.
Publish: Right-click Certificate Templates > New > Certificate Template to Issue > Select "CompanyComputer".
Publish the template.
Create Web Server Template:
Open certsrv.msc > Certificate Templates > Manage.
Duplicate "Web Server", name "WebServerV2" (display "WebServerV2").
Set: Compatibility (CA: Server 2008 R2, Recipient: Win7/2008 R2), Validity: 2 year, Renewal: 6 weeks.
Subject Name: Supply In The Request
Security: Domain Admins with Read, Write, Enroll. Admin_Ring_2 (or your otherwise named Server Administrators Group) with Read, Write, Enroll. Authenticated Users with Read.
Publish: Right-click Certificate Templates > New > Certificate Template to Issue > Select "WebServerV2".
Create Code Signing Template:
Open certsrv.msc > Certificate Templates > Manage.
Duplicate "Code Signing", name "CompanyCodeSigning" (display "Company Code Signing").
Set: Compatibility (CA: Server 2012 R2, Recipient: Win8/2012 R2), Validity: 5 year, Renewal: 6 weeks.
Subject Name: Build from AD, Format: FQDN, SAN: UPN
Cryptography: Category: Key Storage Provider, 3072 Key Size, SHA 256 Request Hash
Security: Domain Admins with Read, Write, Enroll. Code Signing Certificate Requesters with Read, Enroll, AutoEnroll. Authenticated Users with Read.
Publish: Right-click Certificate Templates > New > Certificate Template to Issue > Select "Company Code Signing".
Step 3: Crafting the GPO for Certificate Distribution and Auto-Enrollment
Let’s automate trust and enrollment with a GPO for all domain computers.
Create the GPO:
Open gpmc.msc on the DC VM or via RSAT Tools.
Right-click Group Policy Objects > New, name it "PKI Certificate Distribution".
Distribute Root and Intermediate Certs:
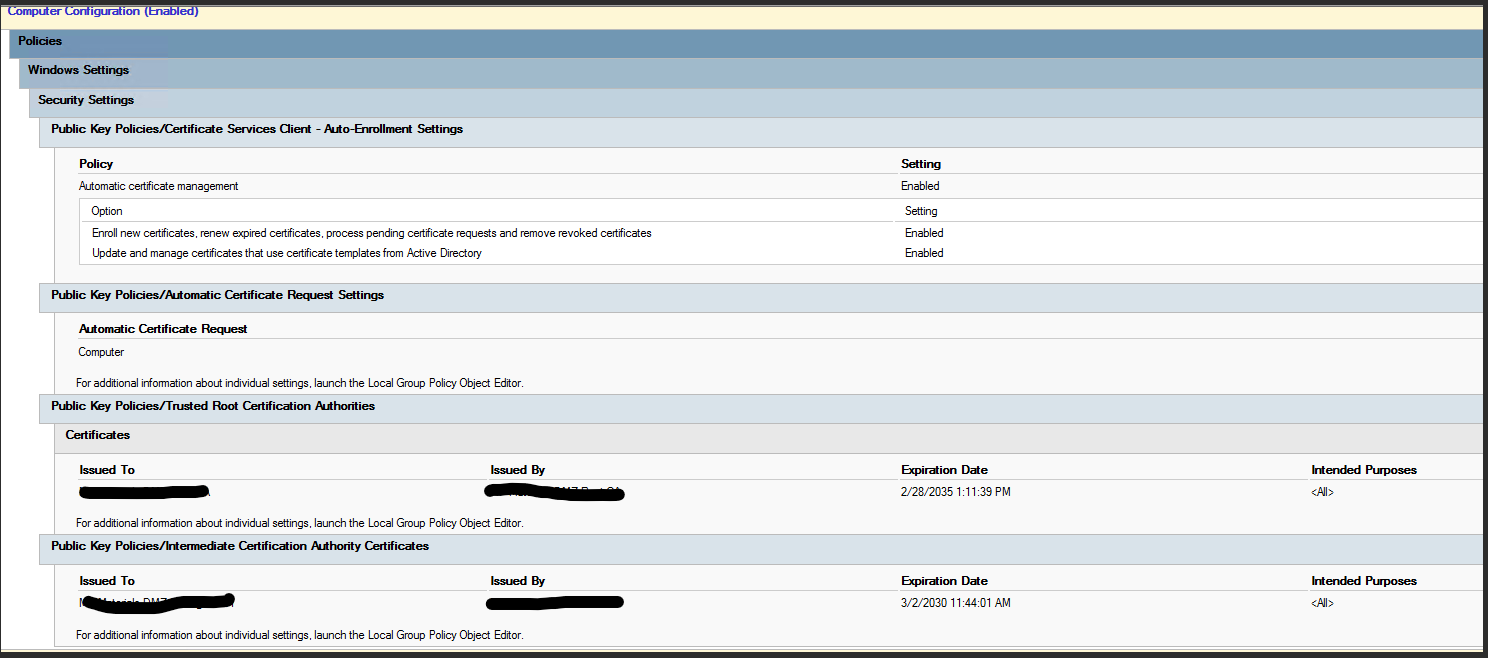
Edit the GPO, go to Computer Configuration > Policies > Windows Settings > Security Settings > Public Key Policies.
Right-click Trusted Root Certification Authorities, Import rootca.cer from the shared virtual drive.
Right-click Intermediate Certification Authorities, Import intermediateca.cer from the shared drive.
Enable Auto-Enrollment:
Navigate to Public Key Policies.
Double-click Certificate Services Client - Auto-Enrollment, check Enroll certificates automatically, enable renewal and updates.
Link and Filter:
Link to the domain or a specific OU (e.g., "Member Servers").
Set Security Filtering to Authenticated Users (should be default option).
Apply and Test:
On a client VM, run gpupdate /force && certutil -pulse via Hyper-V console, reboot if needed.
Check certlm.msc for the "CustomComputer" certificate.
Final Thoughts from the Mainframe
Mission accomplished—your PKI is live with an offline root CA, an intermediate CA, and a GPO to distribute trust and automate enrollment. Keep the root VM offline, monitor CRLs, and tweak as needed. Secure from Cobra. Yo, Joe!
Subscribe to my newsletter
Read articles from Mike Becker directly inside your inbox. Subscribe to the newsletter, and don't miss out.
Written by