Linux Training : Section 7 (Part-3)
 Aditya Dev Shrivastava
Table of contents
Advance Package Management
In this lesson, we will learn about the packages installation using dnf and rpm command. And will perform the activities like- Installation of package, deletion, updation, checking all the details of a package (when it got installed, what are the files associated with the package), source and location information.
In this we will use Korn-Shell package as a example-
check it is available or not-

Let’s install the package using the root login access-

Check package is installed or not-

Now, delete the package

Now, verify the information of a package-

Now, delete a package using rpm command-

List all the configuration files related to this package-

Find out which command belongs to which package-

Rollback Updates and Patches
Rollback a package or patch
yum install <package_name>yum historyyum history undo <task_id_from_history>yum update= Update will preserve themyum upgrade= Upgrade will delete obsolete packagesyum history undo <task_id_from_history>
SSH & TELNET
Telnet » Un-secured connection between computer
SSH » Secured

ssh process is running, so that we are able to login in the linux machine using putty session. If we stop this, we will not be able to login-
systemctl stop sshdsystemctl start sshd
Telnet uses port 23, designed specifically for local area networks, whereas SSH runs on port 22 by default.
DNS: Download, Install & Configure
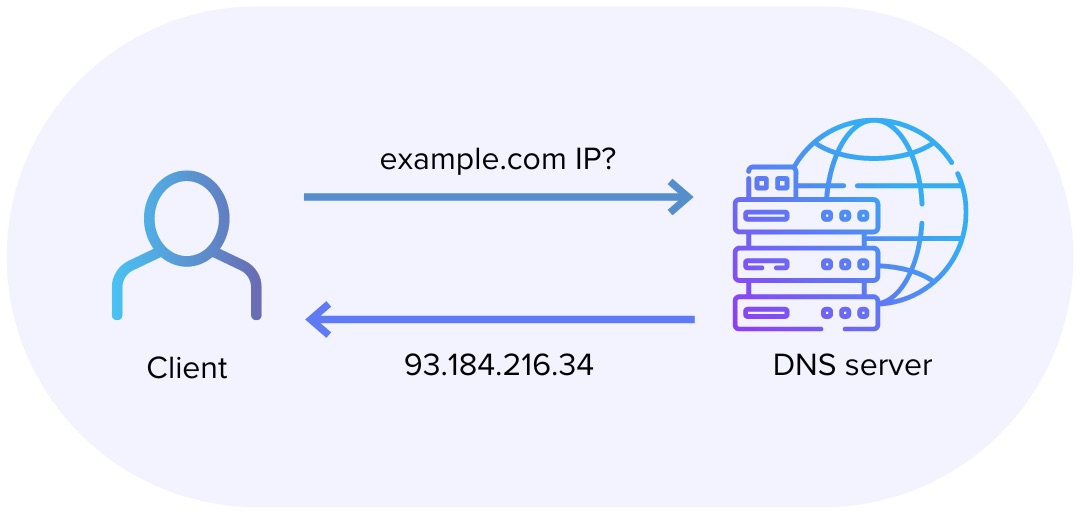
DNS stands for Domain Name Systems, which is a system that translates domain names into IP addresses. This allows users to access websites by communicating with origin servers.
The Domain Name System (DNS) is the phonebook of the Internet. Humans access information online through domain names, like ww.google.com …etc, Web browsers interact through Internet Protocol (IP) addresses. DNS translates domain names to IP addresses so browsers can load Internet resources.
Hostname-
PTR Record » IP to Hostname
A Record » Hostname to IP
CNAME Record » Hostname to Hostname
Files-
/etc/named.cnf
/var/named
Service-
- systemctl restart named
Lab-
Use a screenshot for further crash and install a bind package-


Let’s edit the file /etc/named.conf
- Add the IP address as below-

Add few lines at the bottom as below-
Before-

After-

Create 2 zone files under /var/named-

Add the below data in forward.lab-

Add the below data in reverse.lab-

Restart the service-

Again, facing above issue, due to this, not able to proceed further.
But capturing all the commands over here for further lab.
systemctl start namedsystemctl enable namedNow, disable the firewall-
systemctl stop firewalldsystem disable firewalldChange the ownership
chgrp named -R /var/namedchown -v root:named /etc/named.confrestorecon -rv /var/namedrestorecon /etc/named.confTo check for any issues in the configuration file use below cmd-
named-checkconf /etc/named.confnamed-checkzone lab.local /var/named/forward.labnamed-checkzone lab.local /var/named/reverse.labAdd DNS Server Information to network file
vi /etc/sysconfig/network-scripts/ifcfg-enp0s3DNS=192.168.100.153Restart Network service
systemctl restart NetworkManagerModify
/etc/resolv.conf# nameserver 192.168.100.153Test DNS Server
# dig masterdns.lab.local# nslookup masterdns.lab.local# nslookup clienta.lab.local# nslookup clientb.lab.local# nslookup 192.168.1.240# nslookup 192.168.1.241
Hostname/IP Lookup
Command used for DNS lookup
nslookup

NOTE: the Non-Authoritative answer means that the details are not present in the local repo, if it is present then it will not come.
dig

NOTE: nslookup is a old command, whereas dig is the latest one and it also provide a lot of information. Mostly, people are using this only.
Network Time Protocol (NTP)-
An NTP (Network Time Protocol) server is a computer that synchronizes the clocks of devices on a network. It does this by getting time from accurate sources like atomic clocks and GPS.
Purpose-
Time Synchronization
File-
/etc/ntp.confService-
systemctl restart ntpdCommand-
ntpqLAB-
NOTE: Since, package is not getting installed in CentOS10 using
yum install ntp, not able to continue with the lab work.
Remember NTP Port: #123
chronyd (New Version of NTP)-
Chrony is a flexible Network Time Protocol implementation (NTP). It can sync the system clock with NTP servers, reference clocks (such as a GPS receiver), and manual input via wristwatch and keyboard.
Purpose-
Time Synchronization
Package Name-
chronydConfiguration File-
/etc/chronyd.confLog File-
/var/log/chronyService-
systemctl start/restart chronydCommand-
chronycLab-
Check for the package-

Now, edit the configuration file-

Check for the service status-

using
chronyccommand, check for thesourcesand you will find that8.8.8.8i.e., google dns details under this-
NOTE: chronyd and ntpd are the same, and it seems like ntpd is removed from CentOS10, due to this we were not able to do the lab work.
New System Utility Command (timedatectl)
The
timedatectlcommand is a new utility for RHEL/CentOS10 based distributions, which comes as a part of the systemd system and service manager.It is a replacement for old traditional
datecommandThe
timedatectlcommand shows/change date, time and timezoneIt synchronize the time with NTP server as well
You can ither use
chronydorntpdand make the ntp setting intimedatectlasyesOr you can use
systemd-timesyncddaemon to synchronize time which is a replacement for ntpd and chronyd
NOTE: Redhat/CentOS hoes not provide this daemon in its standard repo. You will have to download it separately.
LAB-
To check time status-

To view all available time zones-
timedatectl list-timezones
To set the time zones-
timedatectl set-timezone “Asia/Kolkata“
To set date
timedatectl set-time YYYY-MM-DD
To set date and time
timedatectl set-time ‘YYYY-MM-DD HH:MM:SS’
To start automatic time synchronization with a remote NTP server
timedatectl set-ntp true
Mail Servers in Linux
A Linux mail server is a software program installed in the Linux Operating System that is primarily configured for mailing purposes such as Sending, receiving, and storing mail. A Linux mail server is essential for managing email communication within an organization.
Purpose» Storage, Processing and Delivery of emails
Multiple Server, it offers-
POSTFIX » Secure MTA, Simplicity, CentOS10, , Ease of configuration, Excellent performance, Active community support
SENDMAIL » CentOS7, Configurable, Complex
EXIM » Flexible, Configurable
QMAIL » Secure, Reliable
OpenSMTPD » Lightweight, Easy to configure
DOVECOT » IMAP, POP3, Performance, Security
Courier » IMAP, POP3
Zimbra » Collaboration Suite
SpamAssassin
ClamAV
Configuration File-
/etc/postfix/etc/postfix/main.cf
Service-
systemctl restart postfix
Does not ‘d’ (
httpd)mail -s option
CTRL+D to complete the mail
LAB-
Check for package-

Also, install s-nail package because» here, s-nail is the postman, who will deliver the mail and postfix is the post office-

Check for the service-

Send a mail-

Web Server Apache (httpd)
The Apache HTTP Server, or Apache, is a free, open-source web server that delivers content from websites. It's one of the most widely used web servers in the world.
Purpose= Serve Webpages
Service or package name=
httpdFiles
/etc/httpd/conf/httpd.conf/var/www/html/index.html
Service
systemctl restart httpdsystemctl enable httpd
Log File
/var/log/httpd
LAB-
Check for the package-

Go to path-

Create a index.html file-

add the content in that file-

Now, Stop the firewall-

Now, restart the httpd service-

Now, Check for the IP address in the web browser, note: please use the Linux machine for this-

Thanks for going through this blog, Happy Learning !! 😁
Subscribe to my newsletter
Read articles from Aditya Dev Shrivastava directly inside your inbox. Subscribe to the newsletter, and don't miss out.
Written by