Understanding Kubernetes Pods: The Heart of Your Containers 🚀
 Nikitha Jain
Kubernetes has revolutionized how we manage and deploy applications in containers. At the heart of Kubernetes lies the concept of Pods. If you're diving into Kubernetes, it's essential to understand what Pods are, how they work, their lifecycle, and the key conditions that affect them. So, grab a cup of coffee ☕, and let’s walk through the fundamentals in an easy-to-understand way!
What is a Kubernetes Pod? 🧩
Imagine a pod as a container “home” where your app lives, and it’s a comfortable space for your containerized application to run and interact with others. 🏡
Smallest deployable unit in K8s.
POD is a group of 1 or more tightly coupled containers that are deployed together on the same host.
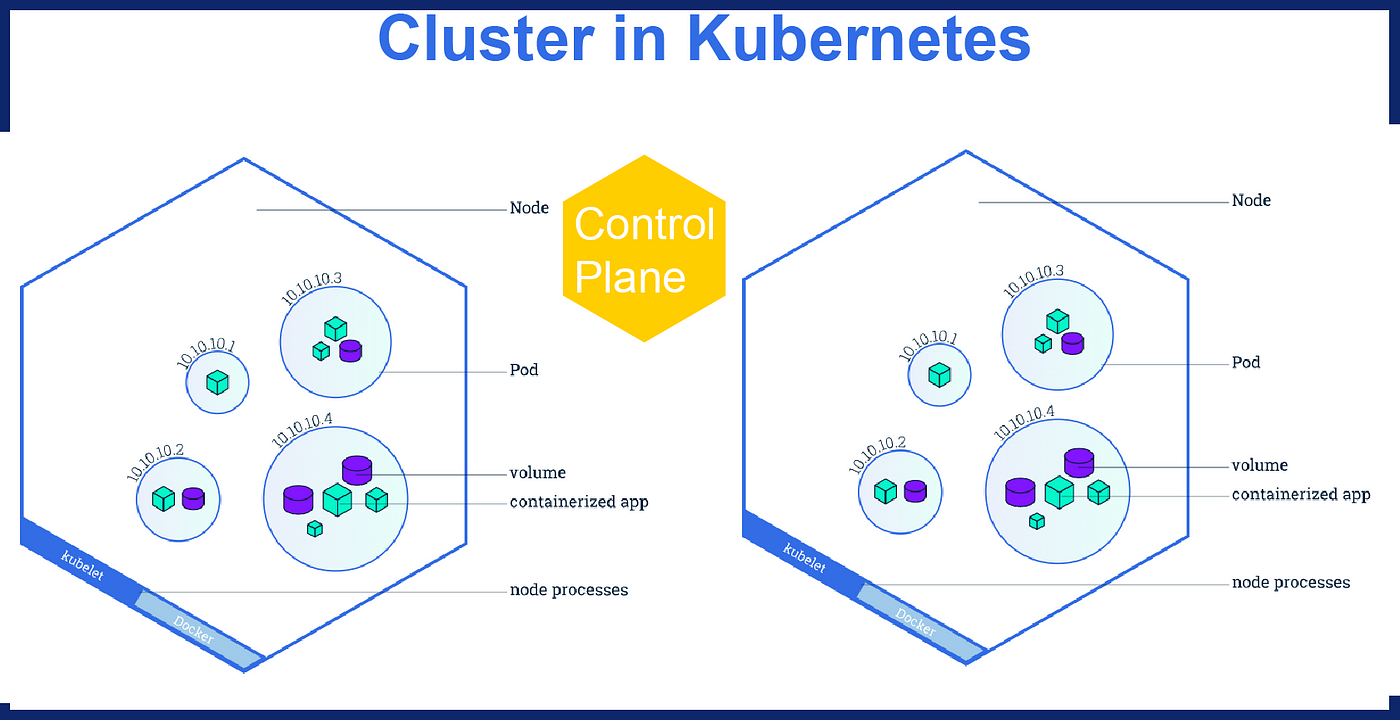
A cluster is a group of nodes.
A cluster has at-least 1 worker & master node.
In k8s, the control unit is Pod not containers.
One pod usually contains one container.
We cannot start container without POD.
Pods run on nodes, which is controlled by Master.
K8s only knows about PODS (doesn’t know about individual container).

Think of Pods as:
Single-container Pods: Just one container inside the Pod doing all the work. 🦸♂️
Multi-container Pods: More than one container working together within the same Pod. These containers share things like storage and networking. 🤝


MULTIPLE-CONTAINER PODS:📌
Shares access to memory space, Same volume.
Connect to each other using localhost. (Container port).
Containers within pod are deployed in an all-or-nothing manner.
Entire pod is hosted on the same node (Scheduler will decide about which node).
Limitations:
No Auto-healing or Auto-scaling
POD crashes.
How Do Pods Work? 🔧
Imagine your app as a party, and each guest is a container. 🎉 The Pod is the venue where all the guests (containers) hang out. They share food (storage), a place to chat (networking), and generally operate together smoothly.
Here’s how Pods fit into Kubernetes’ orchestration:
Pod Creation: A Pod is created when you deploy a containerized app using YAML or Helm charts in Kubernetes.
Pod Networking: All containers in a Pod share an IP address and port space, allowing them to communicate effortlessly.
Scheduling: Kubernetes’ scheduler places Pods on nodes in the cluster based on resource requirements and availability.
Scaling: Pods can be scaled up or down based on demand. More Pods mean more resources and higher availability.
The Kubernetes Pod Lifecycle 🔄
A Pod doesn't live forever! It goes through several stages during its lifetime.
The phase of a pod is a simple, summary of where the pod is in its lifecycle.
PENDING -> RUNNING -> SUCCEEDED -> FAILED -> COMPLETED -> UNKNOWN
Pending ⏳: The Pod is waiting for resources (like CPU, memory) to be assigned.
Running 🏃: The Pod’s containers are up and running.
Succeeded ✔️: The Pod’s containers have finished successfully (in the case of short-lived jobs).
Failed ❌: One or more containers in the Pod have failed and won’t restart.
Unknown 🤔: Kubernetes can’t determine the Pod’s status due to an issue.

Pod conditions:
Kubernetes Pods don’t just go through the basic lifecycle states. They also have certain conditions that determine how they behave. Some common Pod conditions include:
Using kubectl describe pod <podname> → you can get condition of a pod
PodScheduled 📅: The Pod has been scheduled to run on a specific node.
Ready ✅: All containers in the Pod are healthy and ready to serve traffic.
Initialized 🛠️: The Pod’s initialization process has completed.
ContainersReady 🌟: All containers in the Pod are up and running smoothly.
PodReady 🏅: The Pod itself is ready and able to serve requests.
Fundamentals of pods:
When a pod gets created, it is scheduled to run on a node in your cluster.
The pod remains on that node until the process is terminated, the pod object is deleted, the pod is evicted for lack of resources, or the node fails.
If a pod is scheduled to a node that fails or if the scheduling operation itself fails, the pod is deleted.
A given pod (UID) is not re-scheduled to a new node, instead it will be replaced by an identical pod, with even the same name if desired, but with a new UID
Volume in a “POD” will exist as long as that POD exist if that pod is deleted for any reason, Volume is also destroyed & created as a new volume on new pod.
A Controller can create & manage multiple pods, Handling replication, Rollout & providing self-healing capabilities.
Ways to delete PODS:
By the Name of pod → kubectl delete pod testpod
By the name of yml file → kubectl delete -f pod2.yml
By the name of label → kubectl delete pod env!=development
Conclusion:
In conclusion, Kubernetes Pods serve as the fundamental building blocks for deploying and managing containerized applications in a Kubernetes cluster. A Pod is the smallest and simplest unit in Kubernetes, designed to run one or more containers that share network and storage resources. Pods offer flexibility in application deployment, allowing single-container or multi-container configurations depending on the use case.
Understanding Pods is critical for leveraging the full power of Kubernetes, and they form the foundation of creating scalable, self-healing, and containerized applications in modern infrastructure.
Subscribe to my newsletter
Read articles from Nikitha Jain directly inside your inbox. Subscribe to the newsletter, and don't miss out.
Written by