AWS VPC servers Project Used in Production Environment
 Amit singh deora
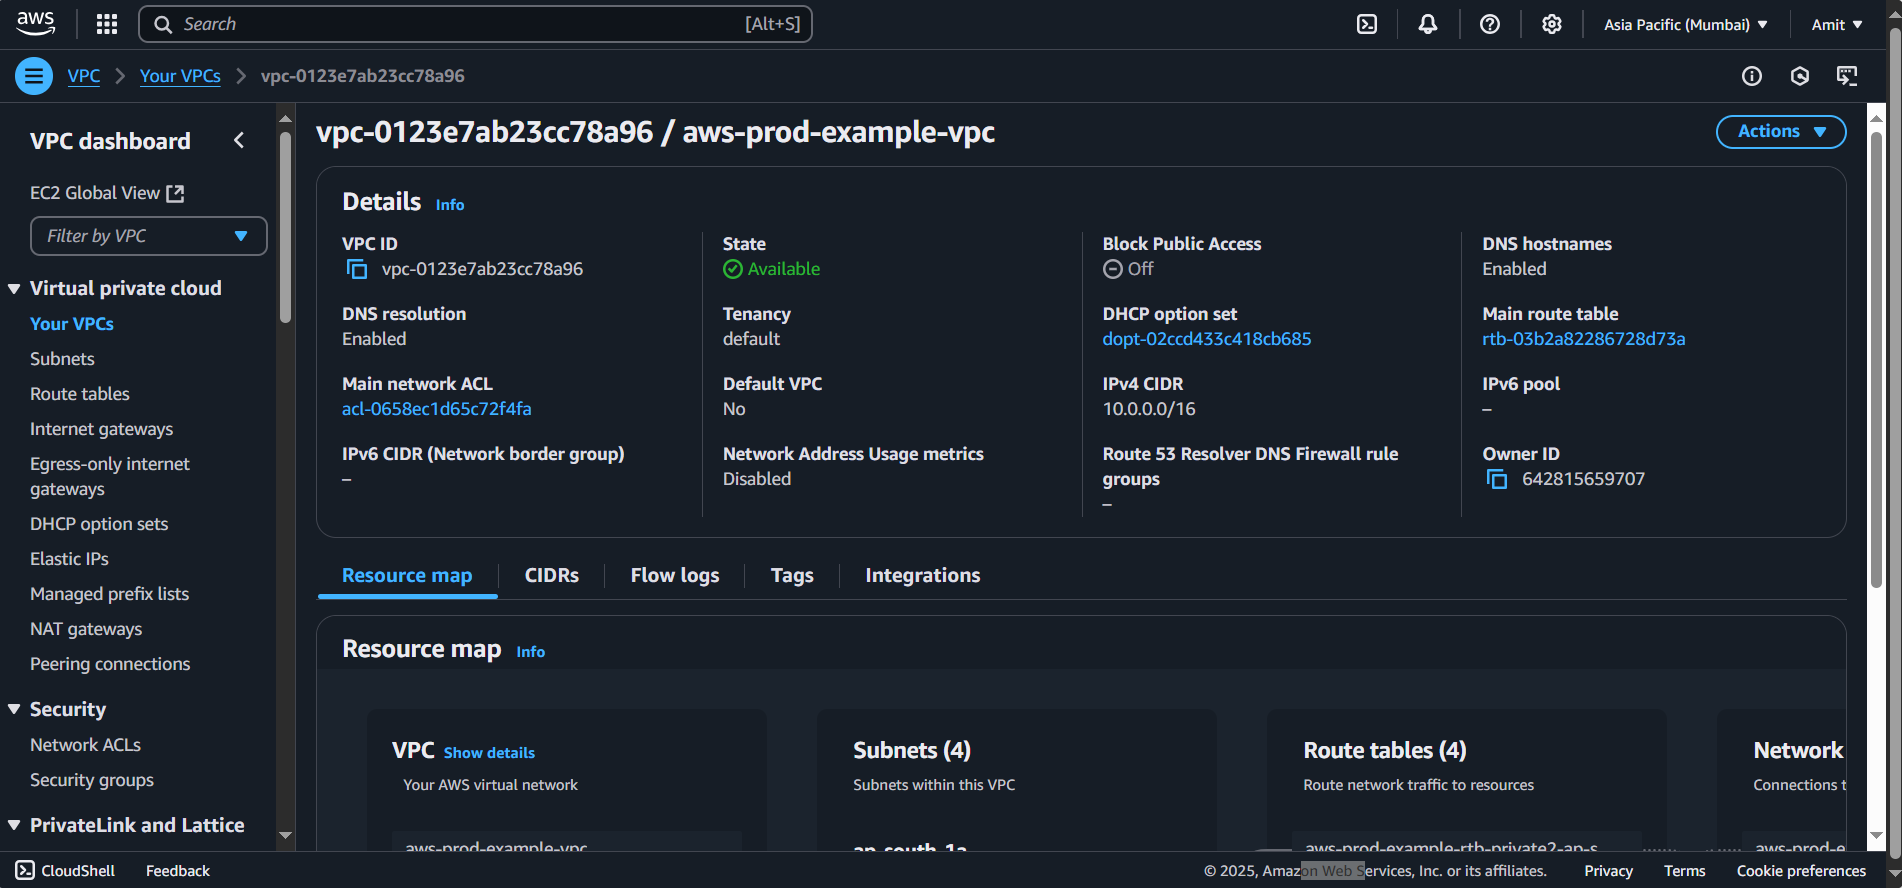
Creating a VPC that you can use for servers in a production environment. To improve resiliency, you deploy the servers in two Availability Zones, by using an Auto Scaling group and an Application Load Balancer. For additional security, you deploy the servers in private subnets. The servers receive requests through the load balancer. The servers can connect to the internet by using a NAT gateway. To improve resiliency, you deploy the NAT gateway in both Availability Zones.

Steps to Setup VPC
Step 1: Log in to the AWS Management Console
Open your browser and go to the AWS Management Console.
Log in using your credentials.
Step 2: Access the VPC Dashboard
- In the top search bar, type VPC and click on the VPC option that appears under Services.
Step 3: Start the VPC Creation
In the VPC Dashboard, on the left-hand side, click on Create VPC.
A page will appear asking you to either Create VPC only or Create VPC and more.
Create VPC only: You’ll need to manually configure everything (subnets, route tables, etc.).
Create VPC and more (select): This option is pre-configured with common settings (public/private subnets, route tables, etc.). For simplicity, select Create VPC and more.
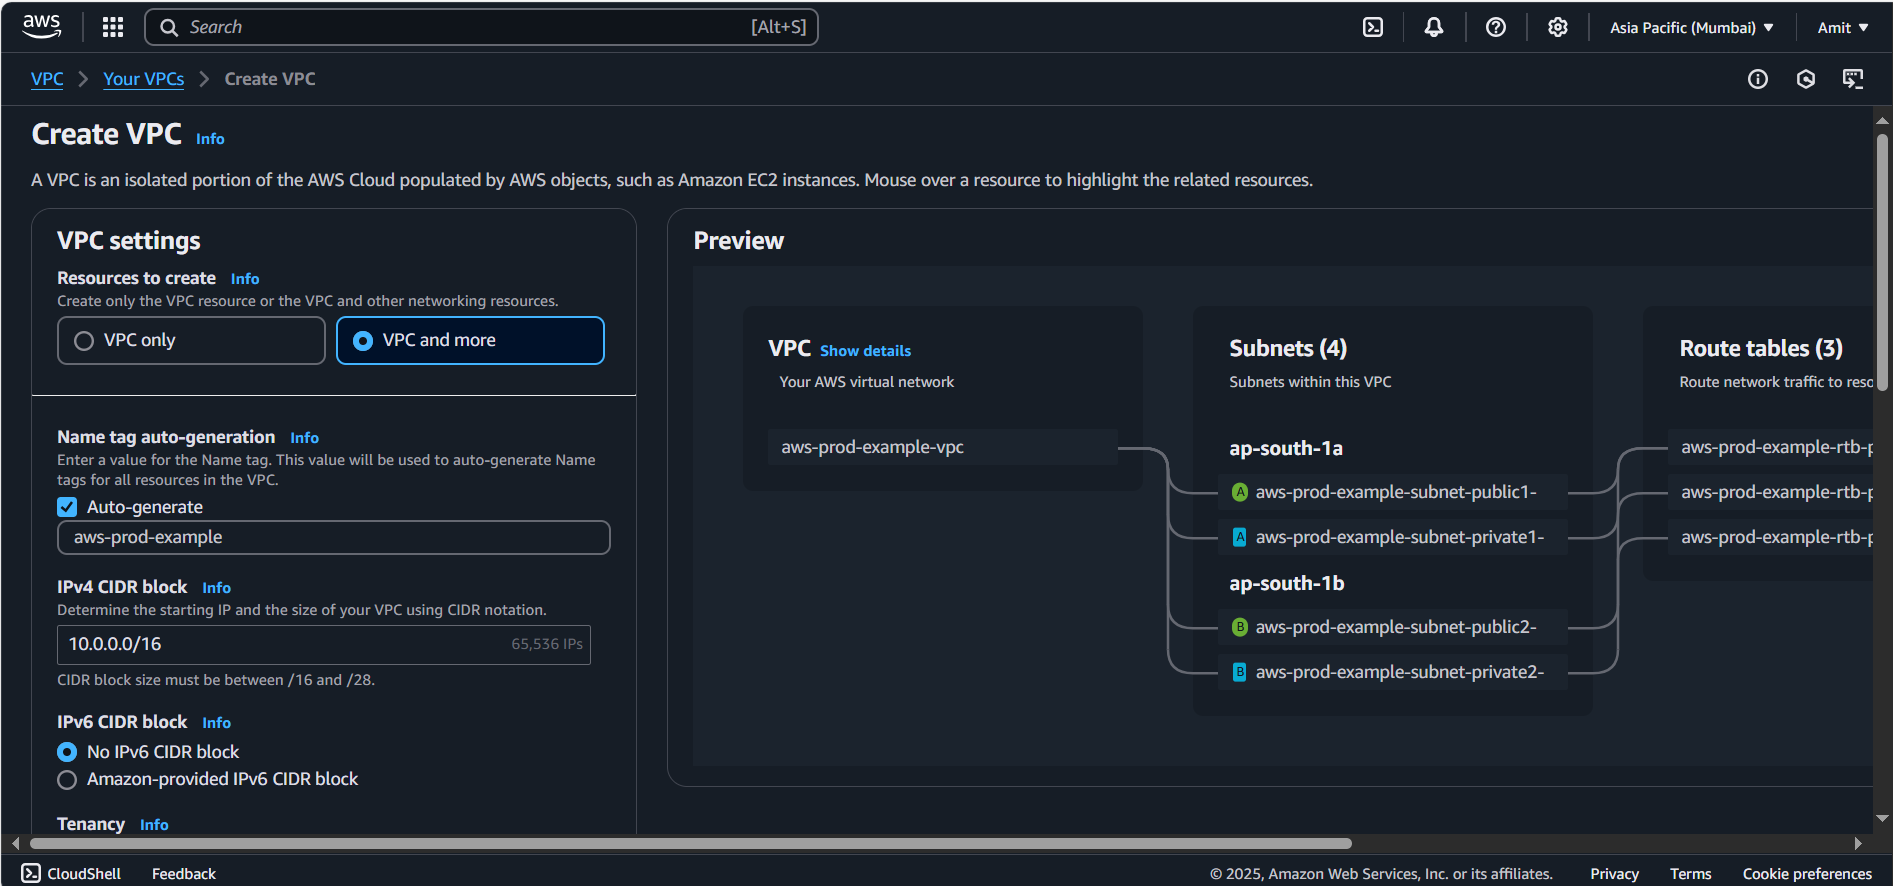
Step 4: Configure the VPC Settings
VPC Name: Type a name for your VPC (e.g.,
AWS-Prod-Example).IPv4 CIDR block: Choose an IP range. For example,
10.0.0.0/16(which gives you 65,536 IP addresses).IPv6 CIDR block: Select No IPv6 CIDR Block unless you plan to use IPv6.
Tenancy: Choose Default (unless you want to set it to dedicated or host).
Key Point: The CIDR block defines the range of IP addresses that will be assigned within this VPC. A /16 block means 65,536 IP addresses.
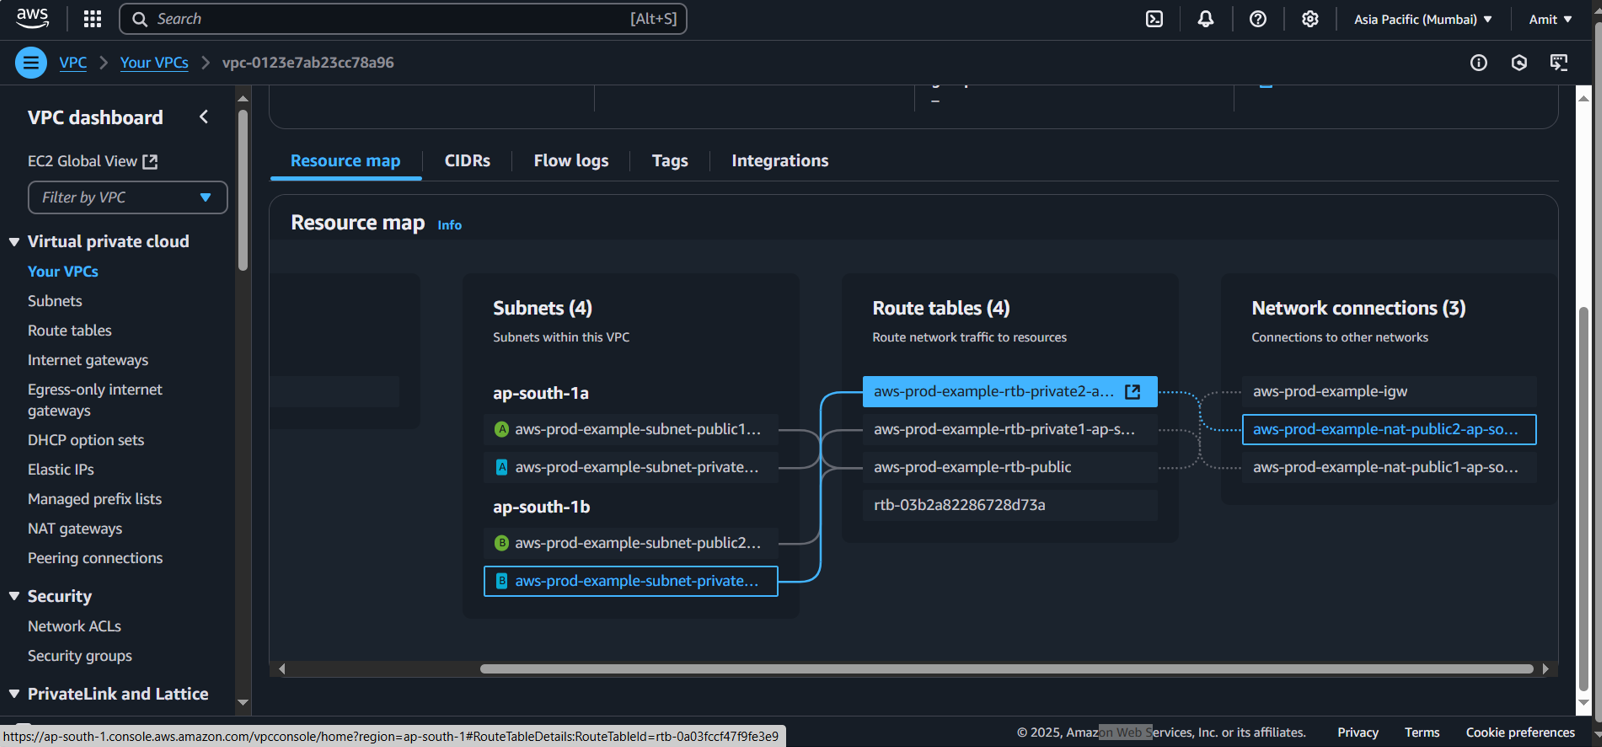
Step 5: Configure Subnets
In this section, you will create both public and private subnets across multiple availability zones.
Number of Availability Zones: Choose 2 high availability (this is for redundancy).
Number of Public Subnets: Choose 2, you will have a public subnet in each availability zone (one per Availability Zone).
Number of Private Subnets: Choose 2, you will have private subnets in each availability zone (one per Availability Zone).
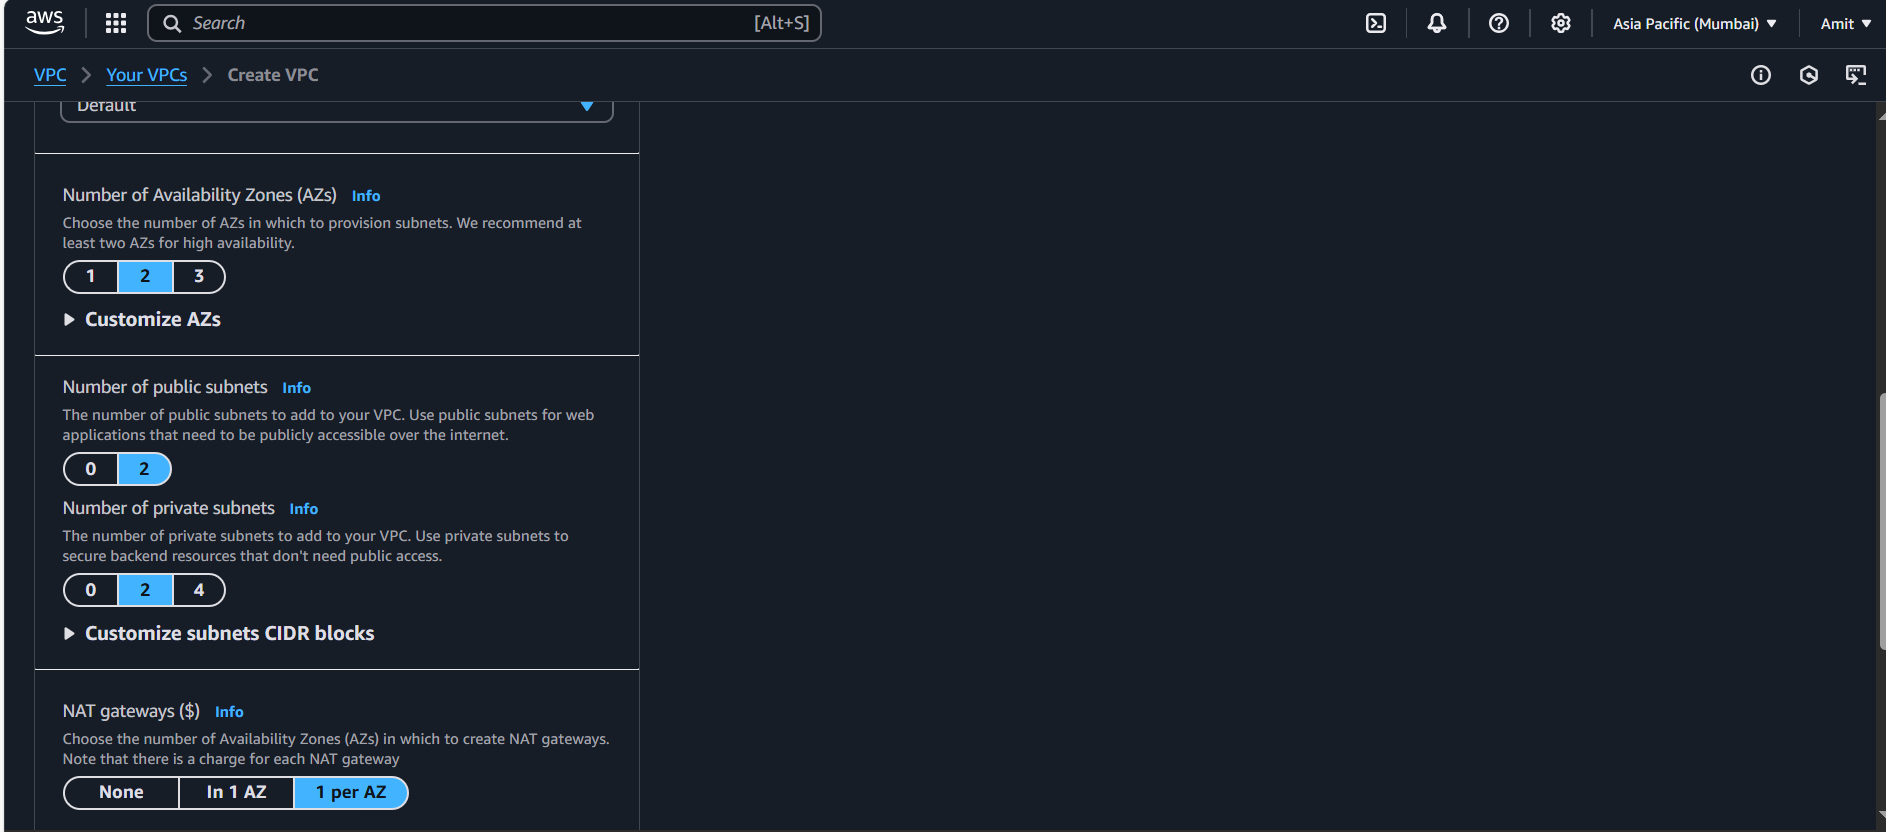
Step 6: Set up NAT Gateway
NAT Gateway: Choose 1 NAT Gateway per Availability Zone. This will help instances in private subnets access the internet.
In this setup, the NAT Gateway will be placed in the public subnet, which allows instances in private subnets to use the NAT Gateway to access external resources securely.
Step 7: Configure Route Tables
Public Subnets: The public subnets must be attached to a route table that has a route to the Internet Gateway (IGW) for internet access.
- AWS auto-generates route tables for you, attaching a route to the Internet Gateway for the public subnets. This allows resources in the public subnets to access the internet.
Private Subnets: The private subnets should be attached to a route table that has a route to the NAT Gateway.
- The NAT Gateway acts as a bridge, allowing private resources to access the internet without exposing their IP addresses.
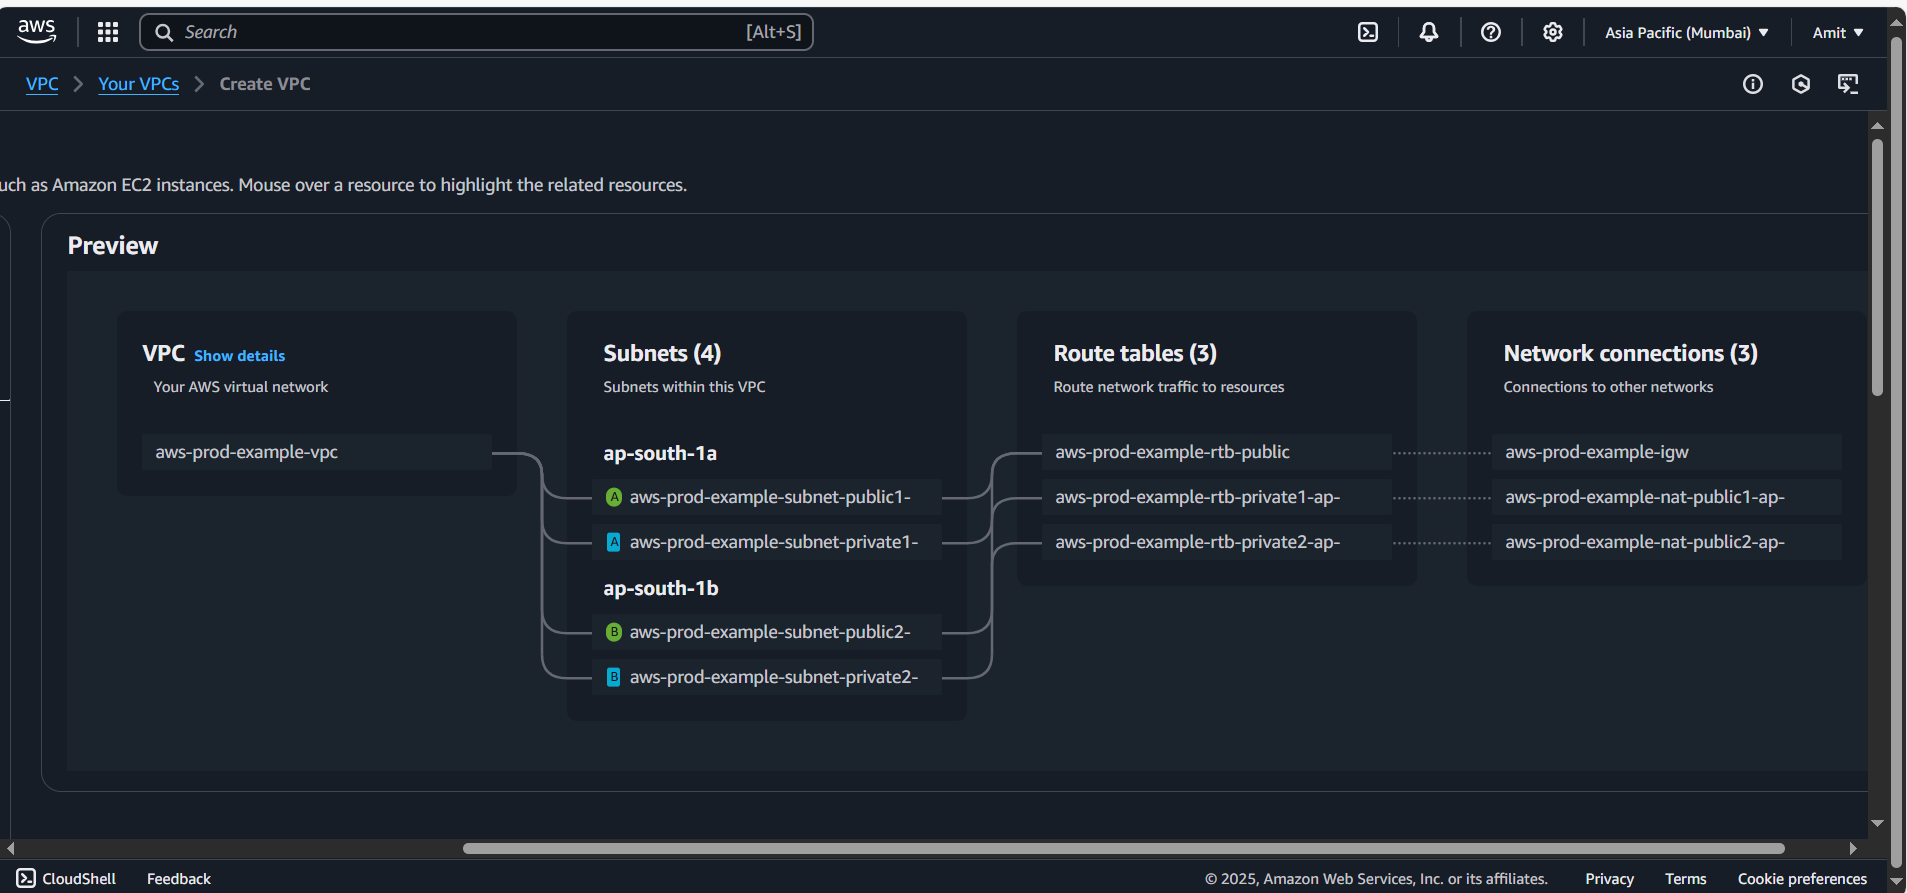
Step 8: Check the VPC Creation Preview
Review the preview to ensure AWS is creating:
A VPC with the name you provided.
2 Public Subnets (in different Availability Zones).
2 Private Subnets (in different Availability Zones).
1 NAT Gateway.
Appropriate Route Tables and Internet Gateway for the public subnets.
If everything looks good, click Create VPC.
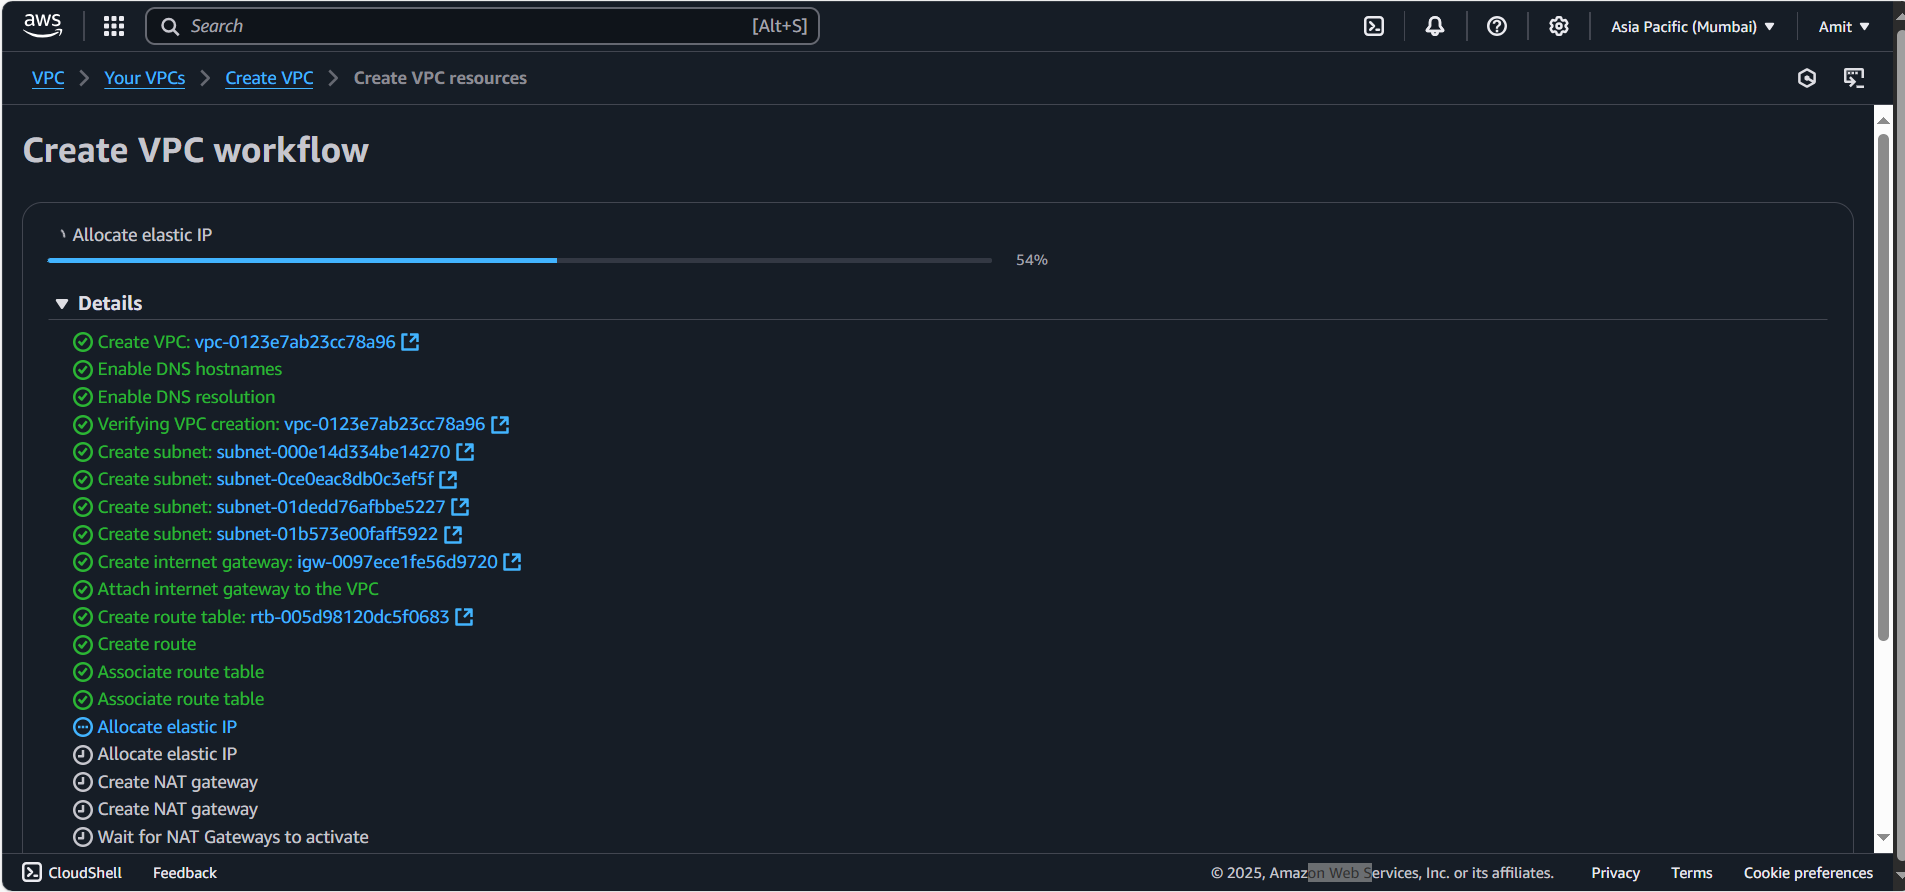
The NAT Gateway will use an Elastic IP for internet access.
Validate VPC Creation
Check if all the resources are created:
VPC.
Subnets (both public and private).
Route Tables.
Elastic IP for the NAT Gateway.
NAT Gateway (check if it’s created in the Public Subnet).
Verify Route Tables
Go to the Route Tables section in the VPC dashboard.
The Public Subnets should have a route to the Internet Gateway.
The Private Subnets should have a route to the NAT Gateway for internet access.
Create the Launch Template for Auto Scaling
Launch temp: we can use this launch temp across multiple ASG’s.
Create the Launch Template for Auto Scaling:
Now, let’s move on to creating the Launch Template that you’ll use to define the configuration of EC2 instances in the Auto Scaling Group:
Go to EC2 Console and scroll down to Launch Templates.
Create a Launch Template with the following configuration:
Name:
AWS-Prod-Launch-Template.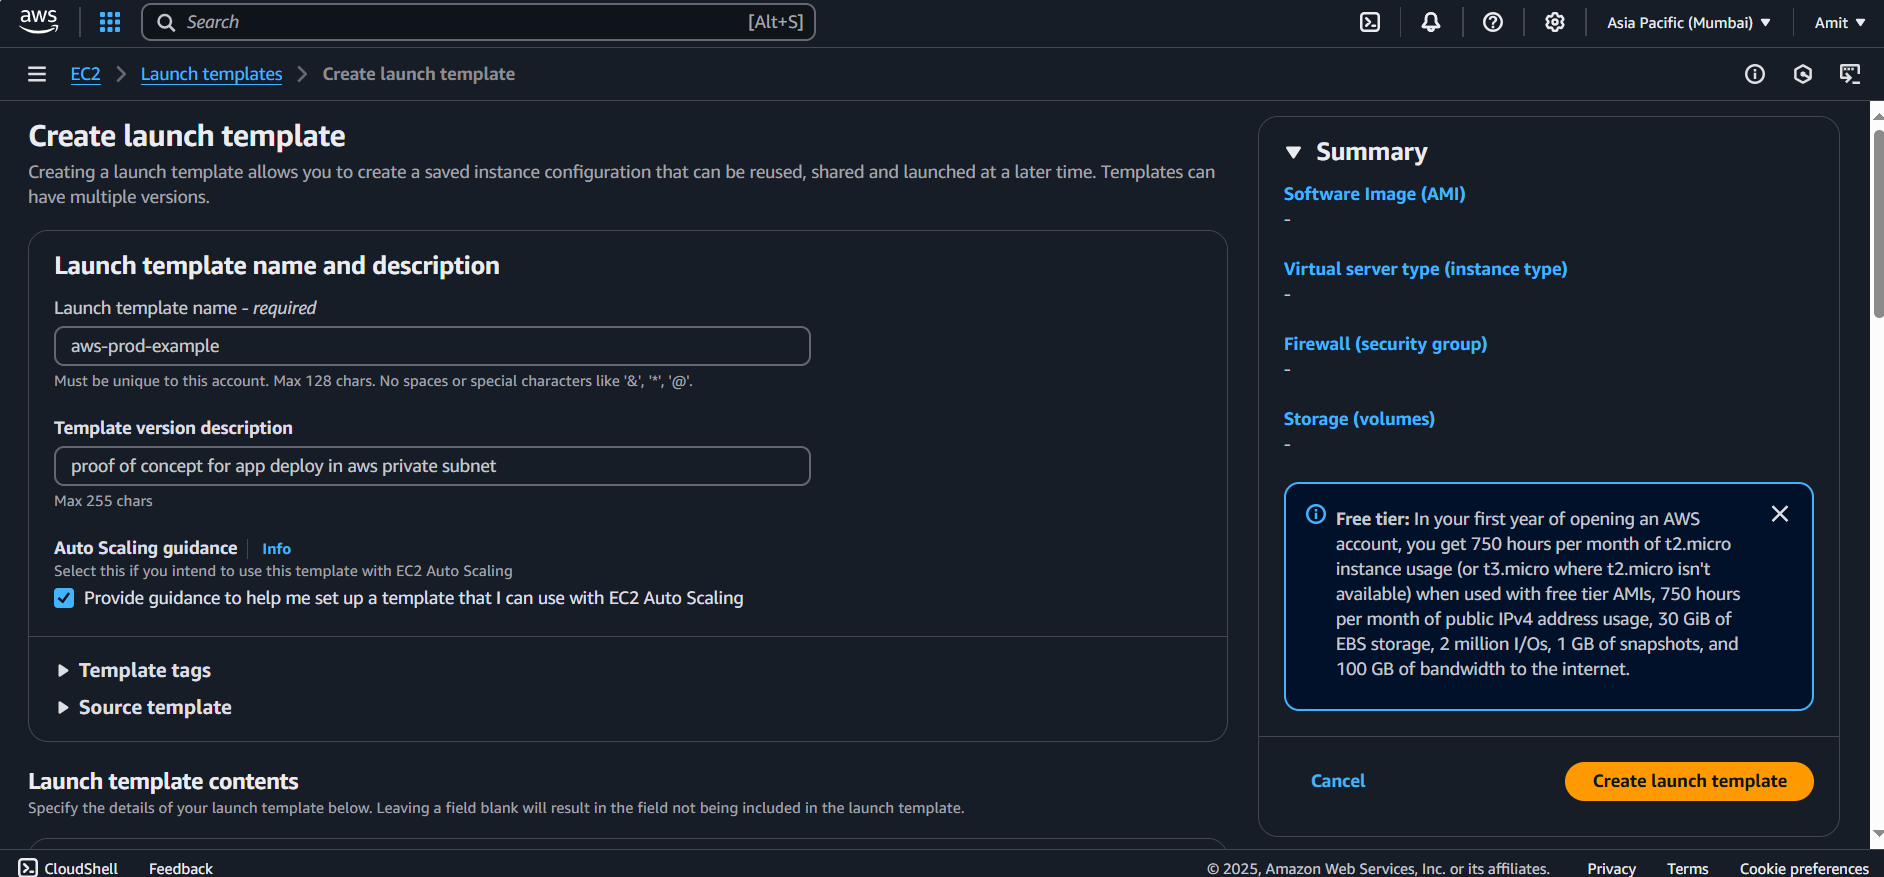
AMI: Select your preferred AMI (e.g.,
Ubuntu).Instance Type:
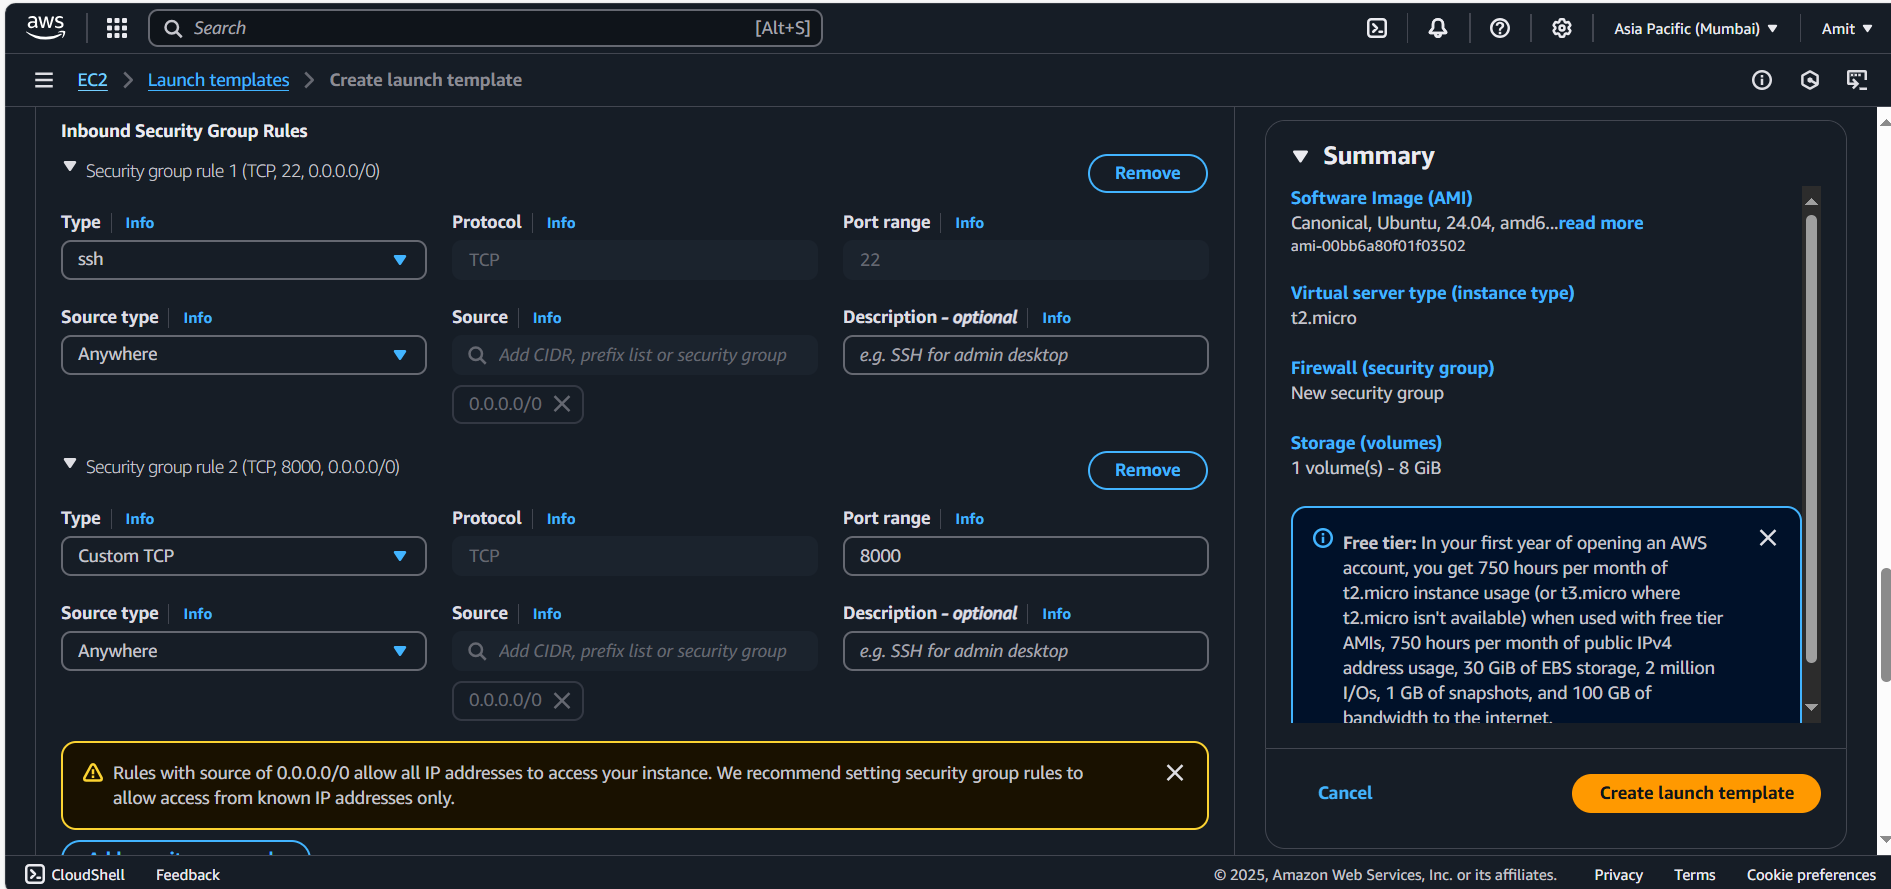
t2.micro(or your preferred type).Security Group: Create a security group allowing SSH (port 22) and any necessary ports (e.g.,
8000for your app).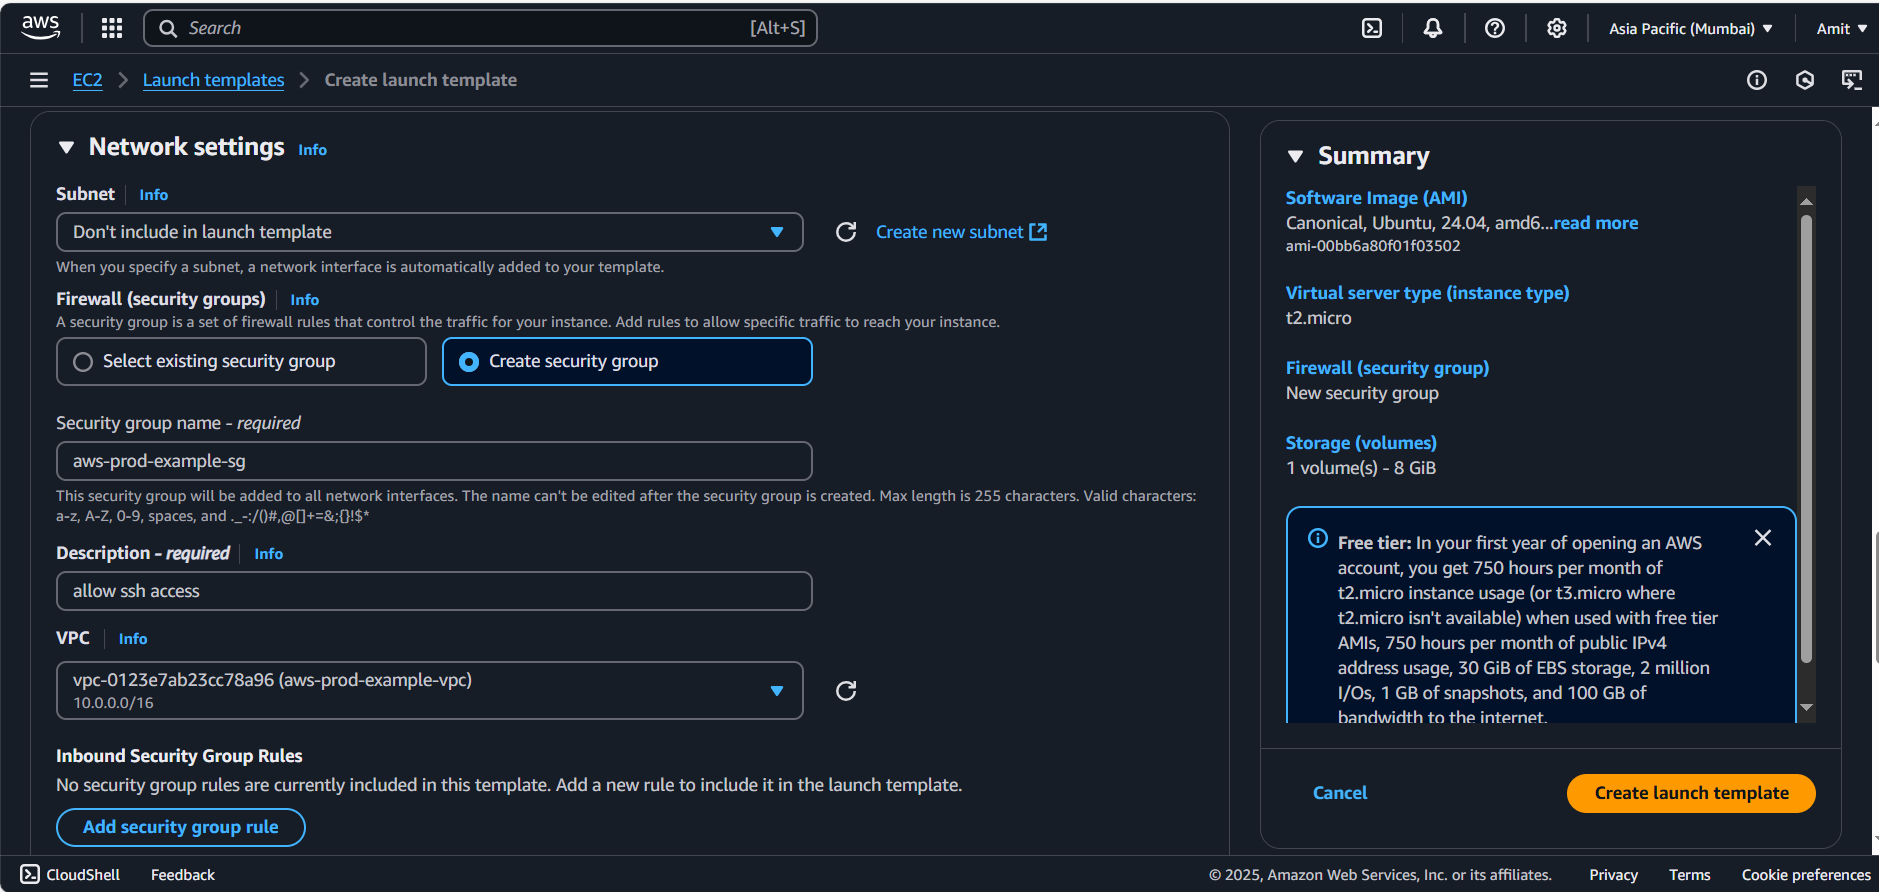
Key Pair: Select or create a key pair for SSH access.
Create the template.
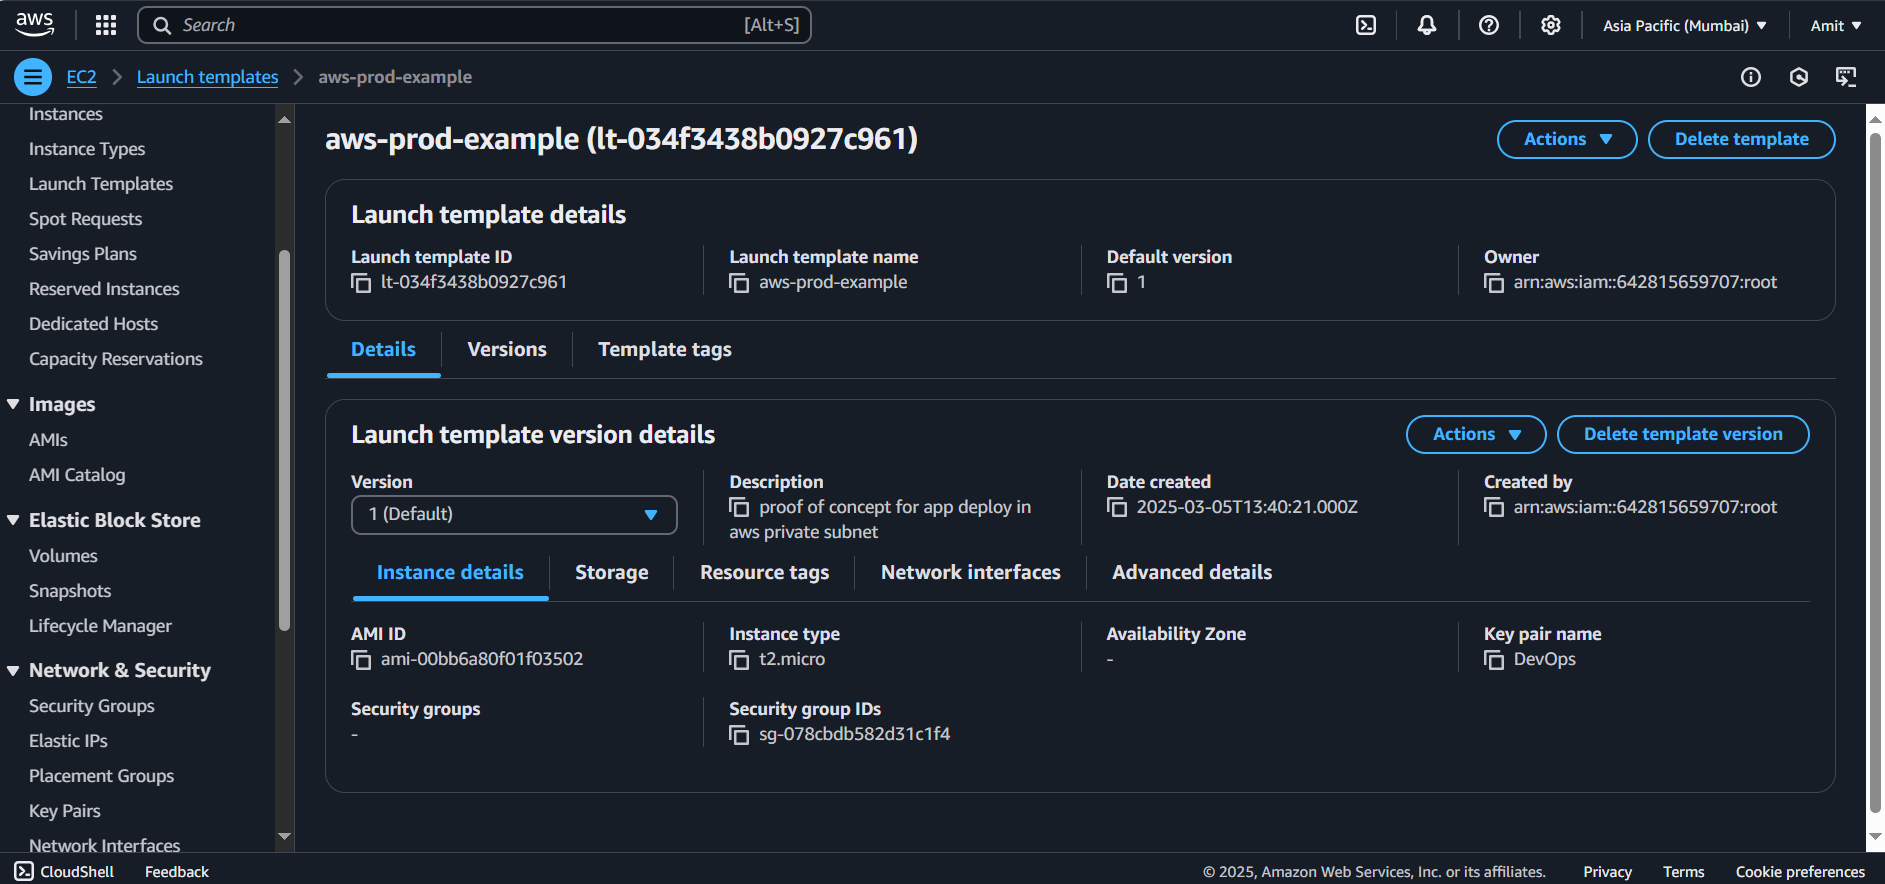
We have successfully created our ASG - launch template, and we can use this template in our ASG to scale EC2 instances. Yes, ASG configurations is similar to the EC2 instance setup.
Now add the template to our ASG
Create an Auto Scaling Group:
This is where you'll create your Auto Scaling Group that will use the Launch Template:
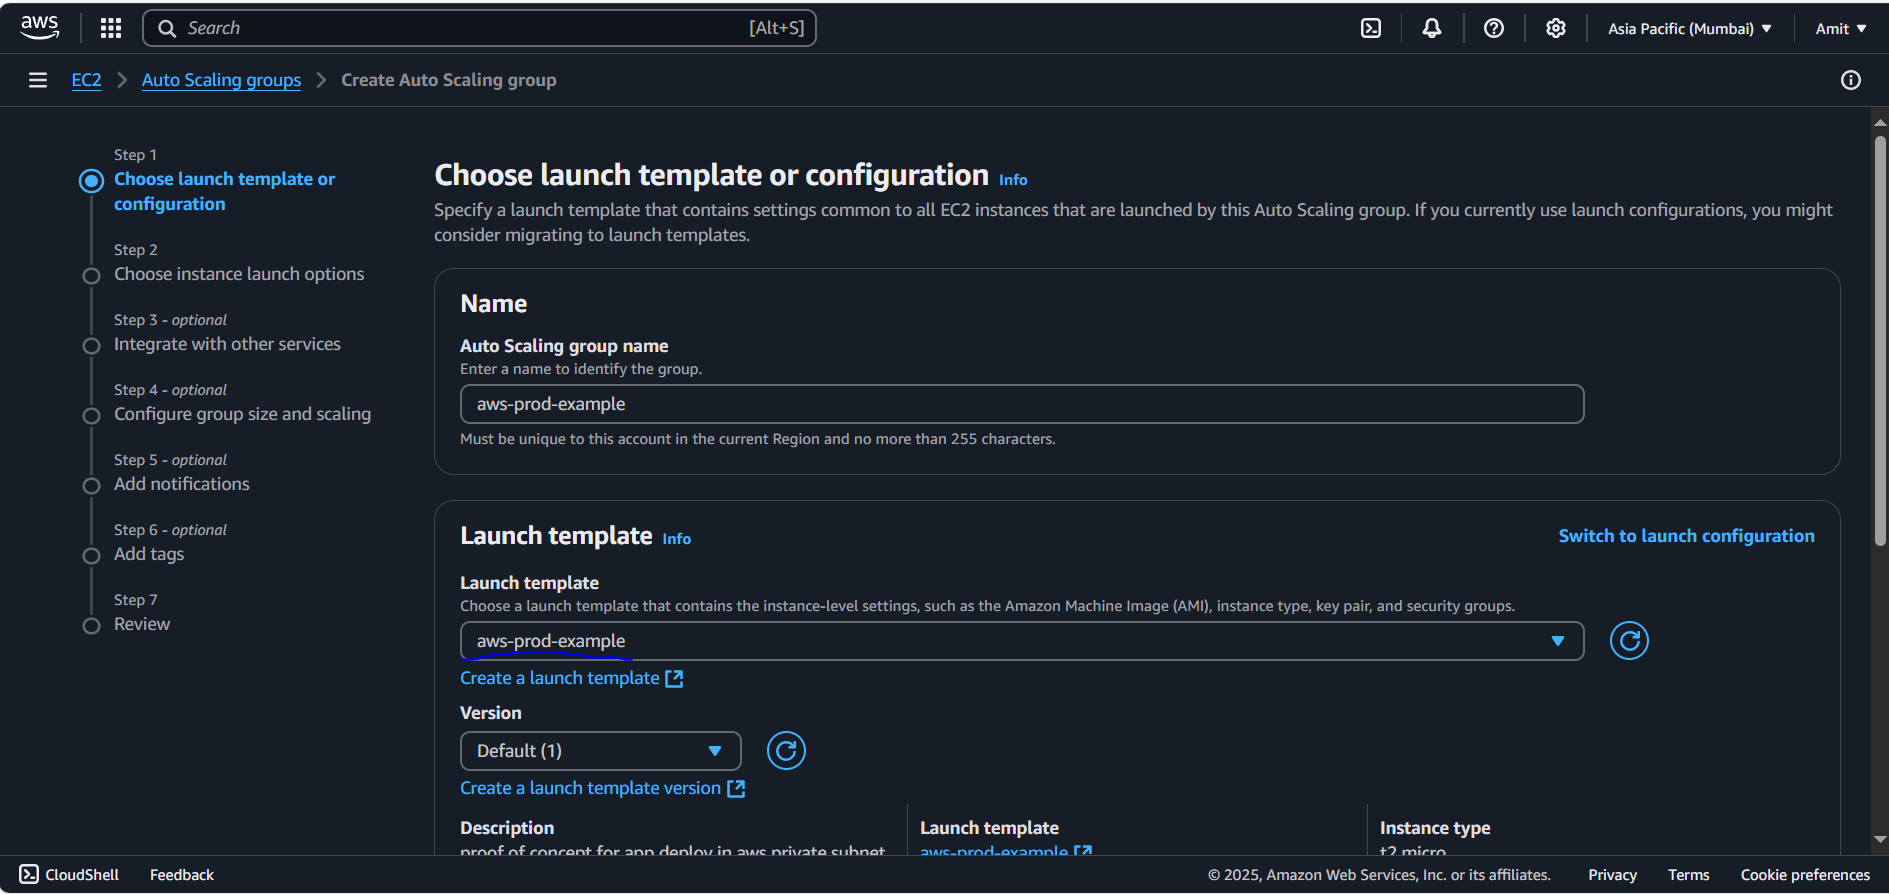
Go to EC2 Console → Auto Scaling Groups.
Create Auto Scaling Group:
Name:
AWS-prod-exampleSelect the Launch Template you just created.
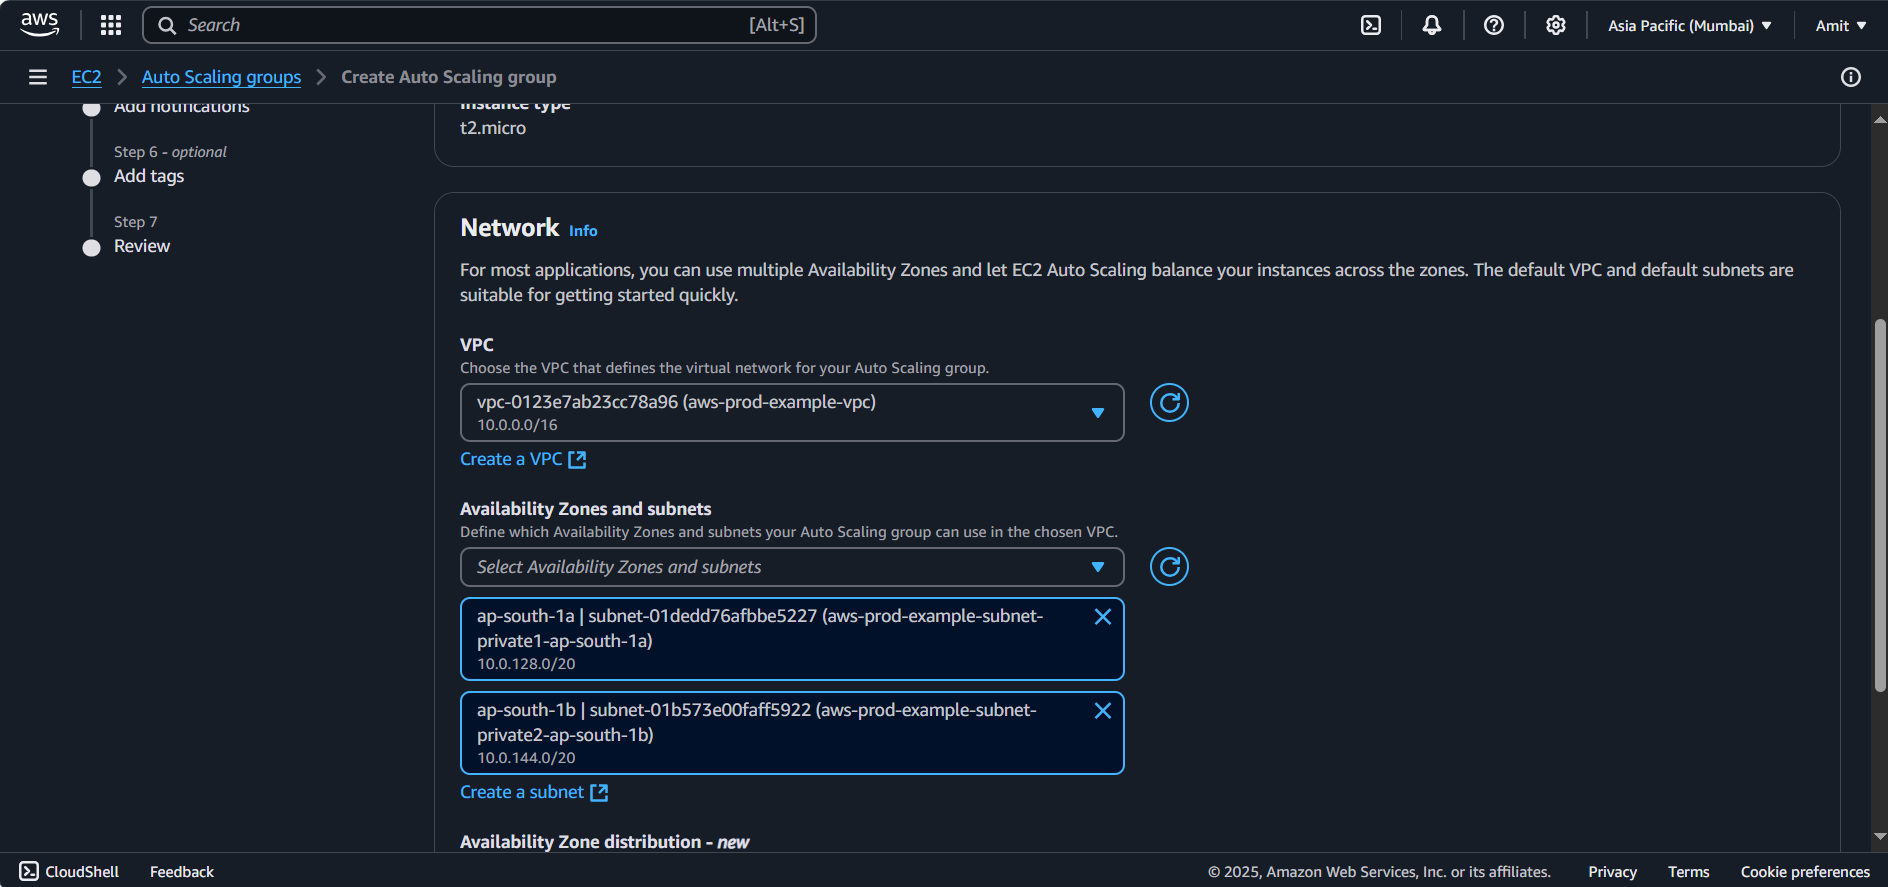
VPC: Choose the VPC you created earlier.
Subnets: Choose the private subnets for the EC2 instances to launch in. Choosing 2 private subnet.
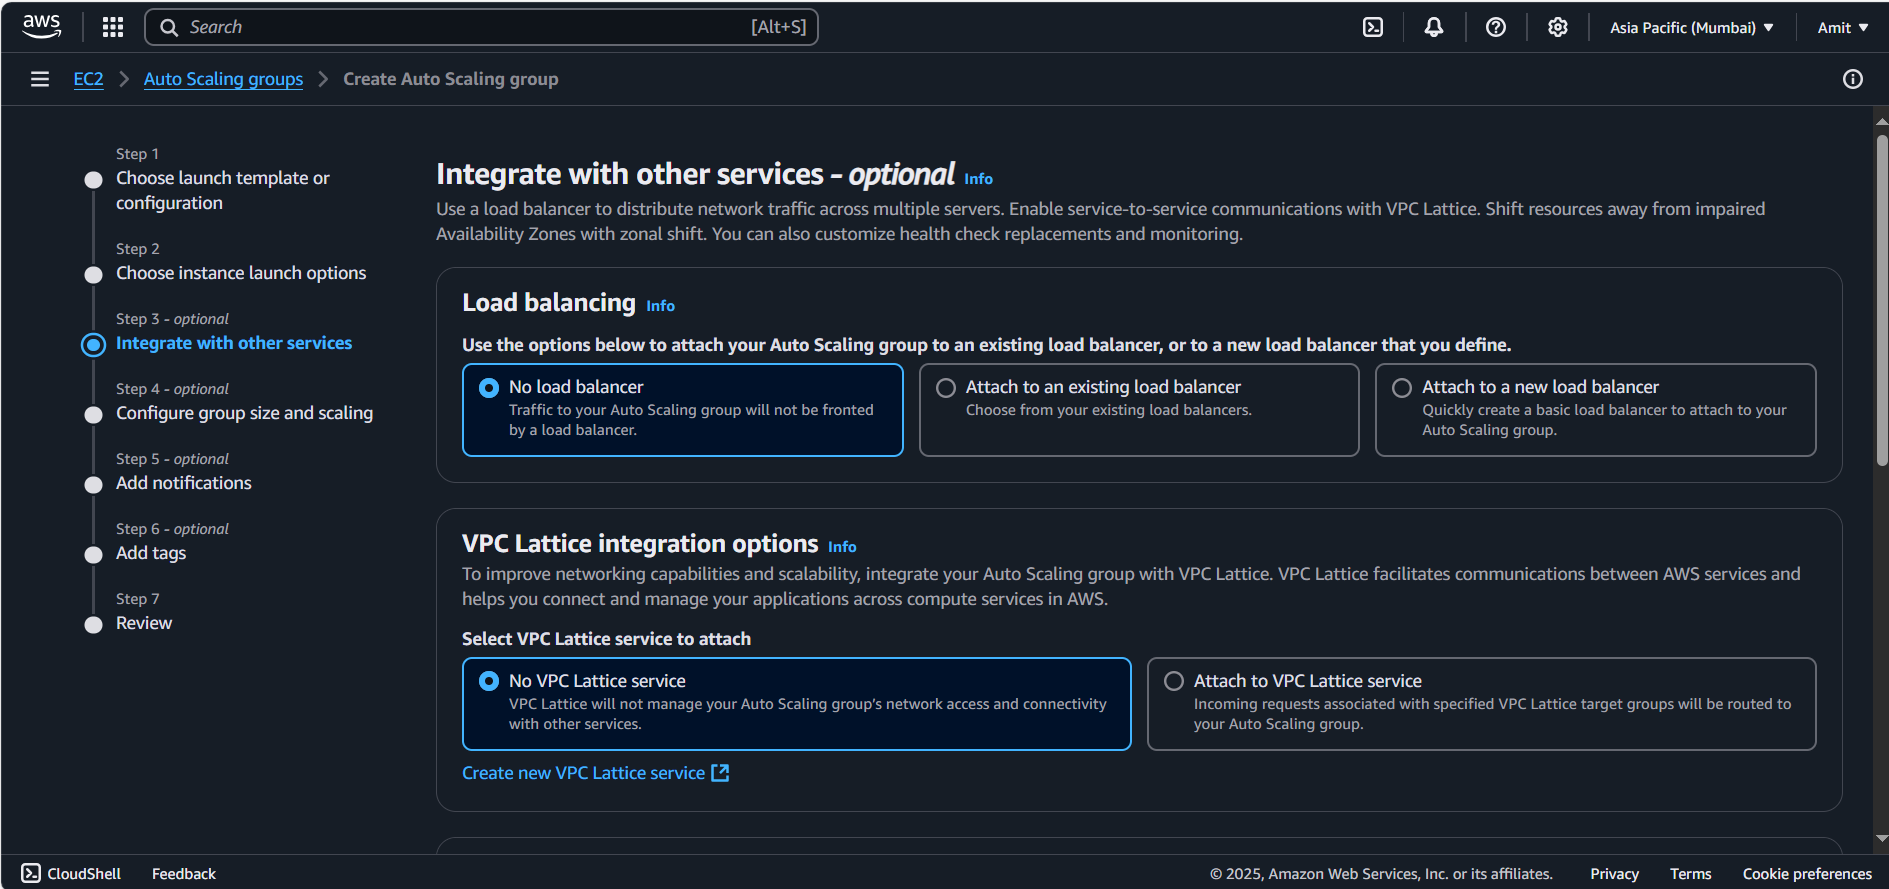
No Load Balancer: We have our load balancer inside public subnet for now, For private subnet ASG: we don’t require the load balancer.
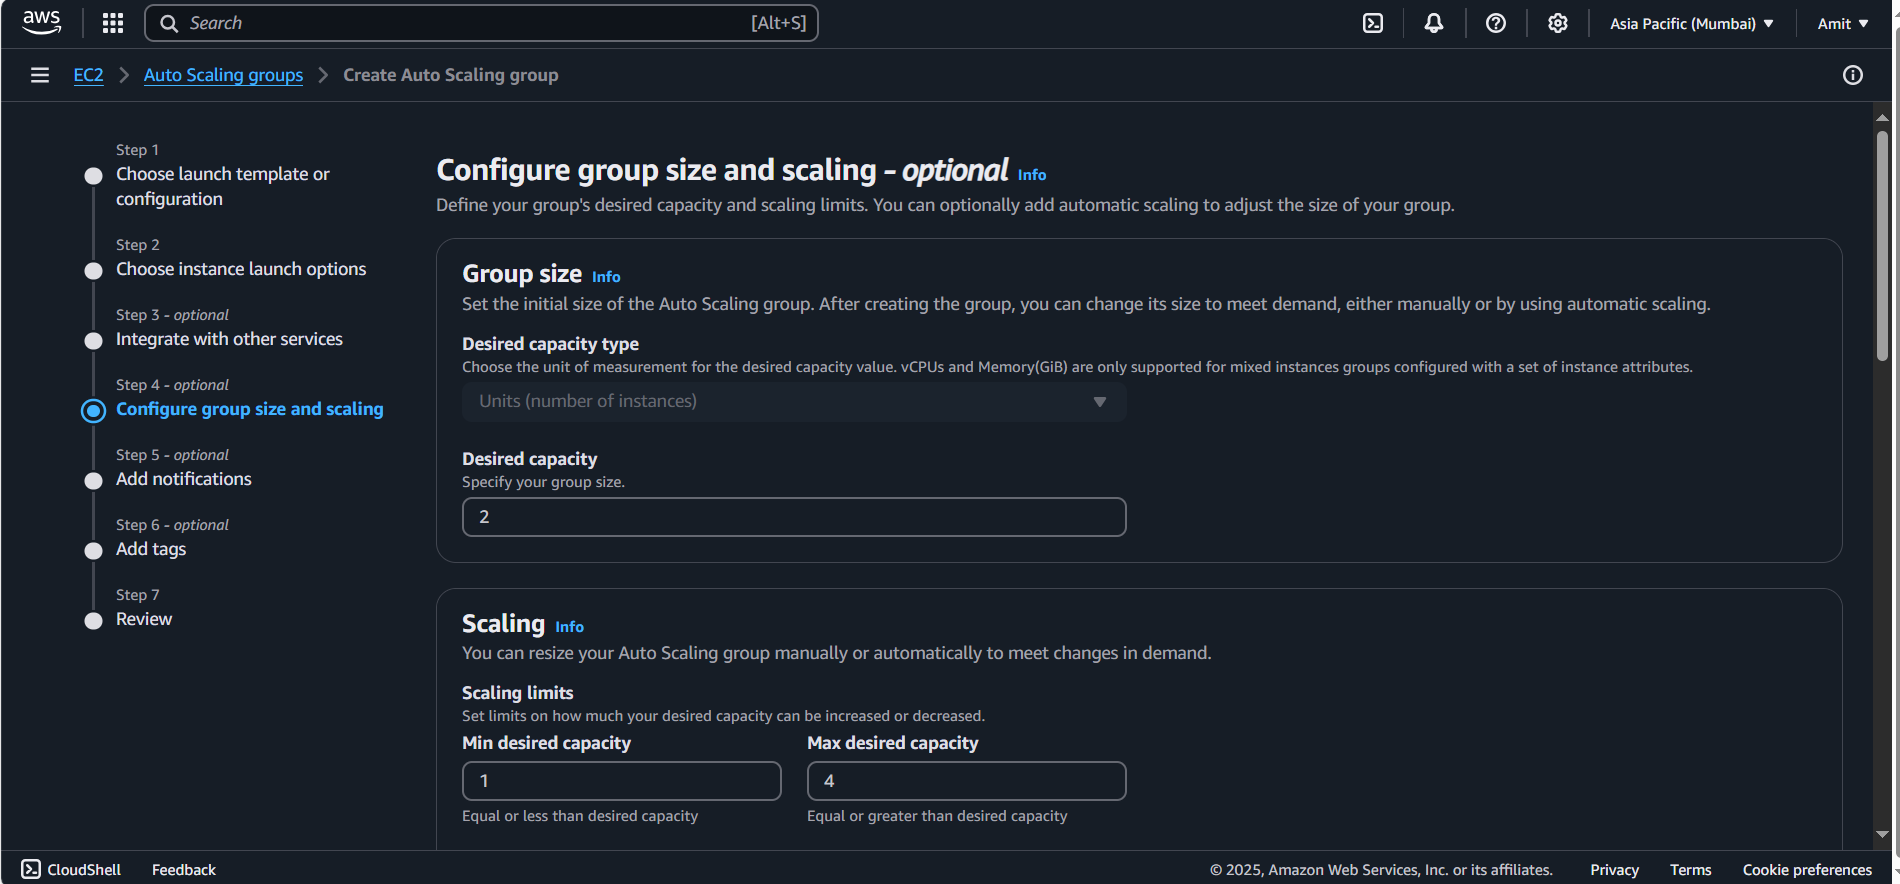
Desired Capacity: Set this to
2Minimum Capacity: Set this to 1 (or your minimum desired number of instances).
Maximum Capacity: Set the maximum capacity based on your traffic needs (e.g., 4).
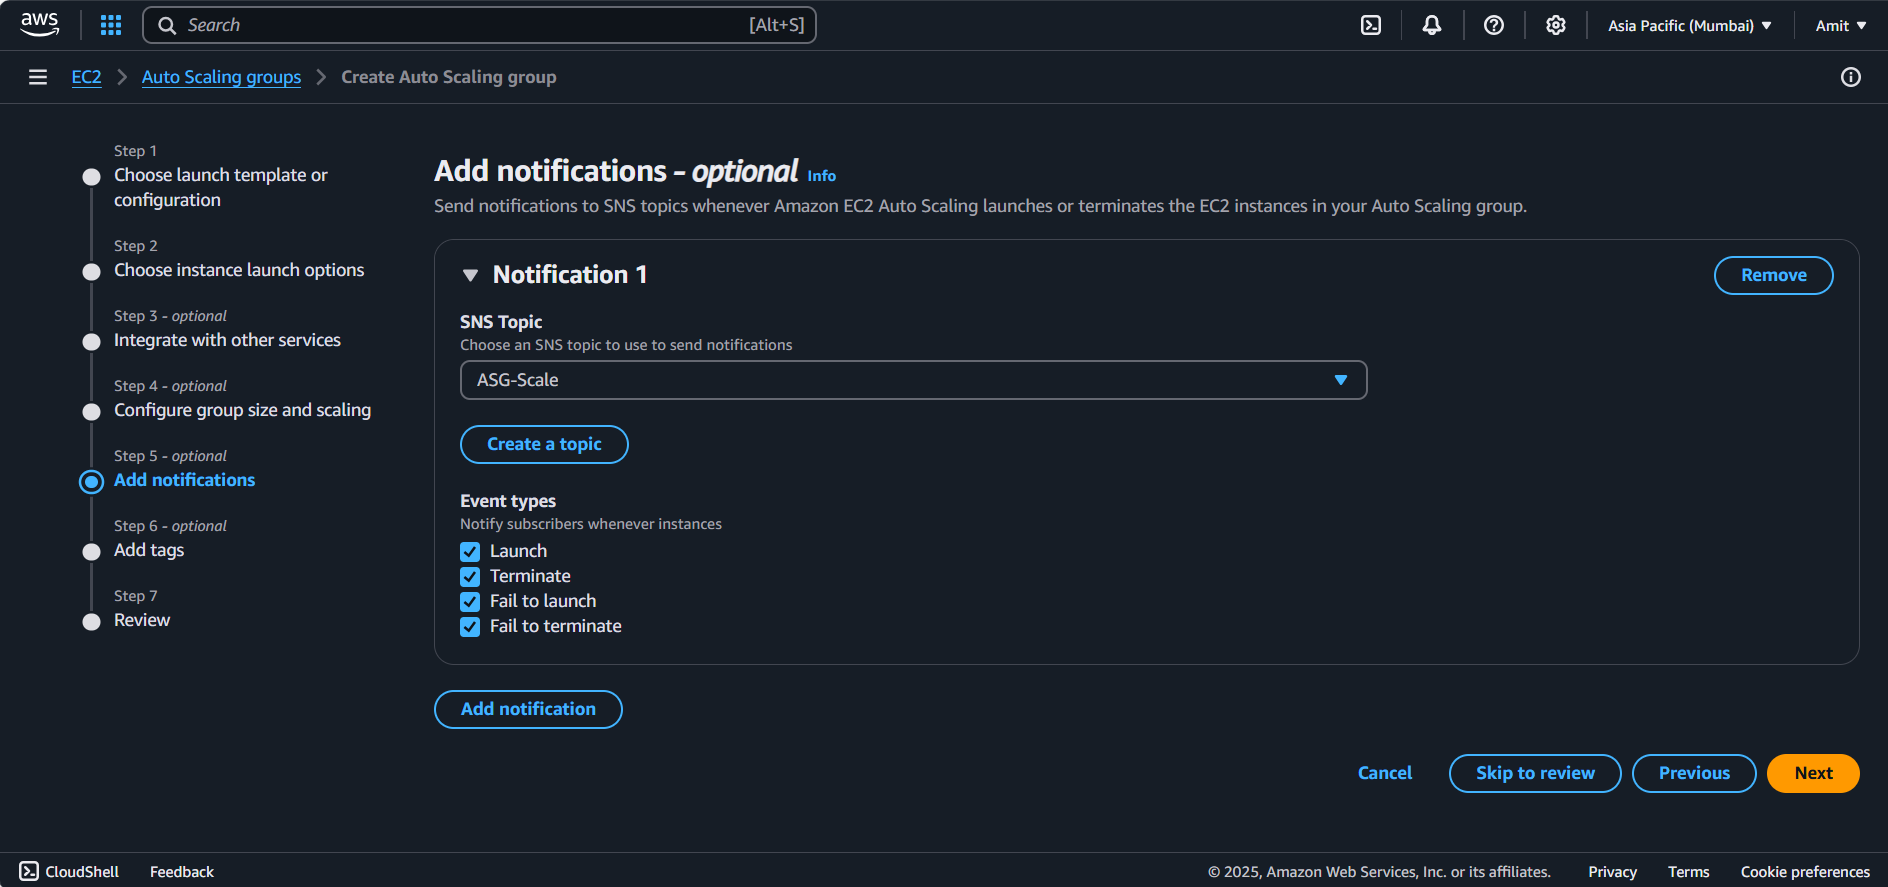
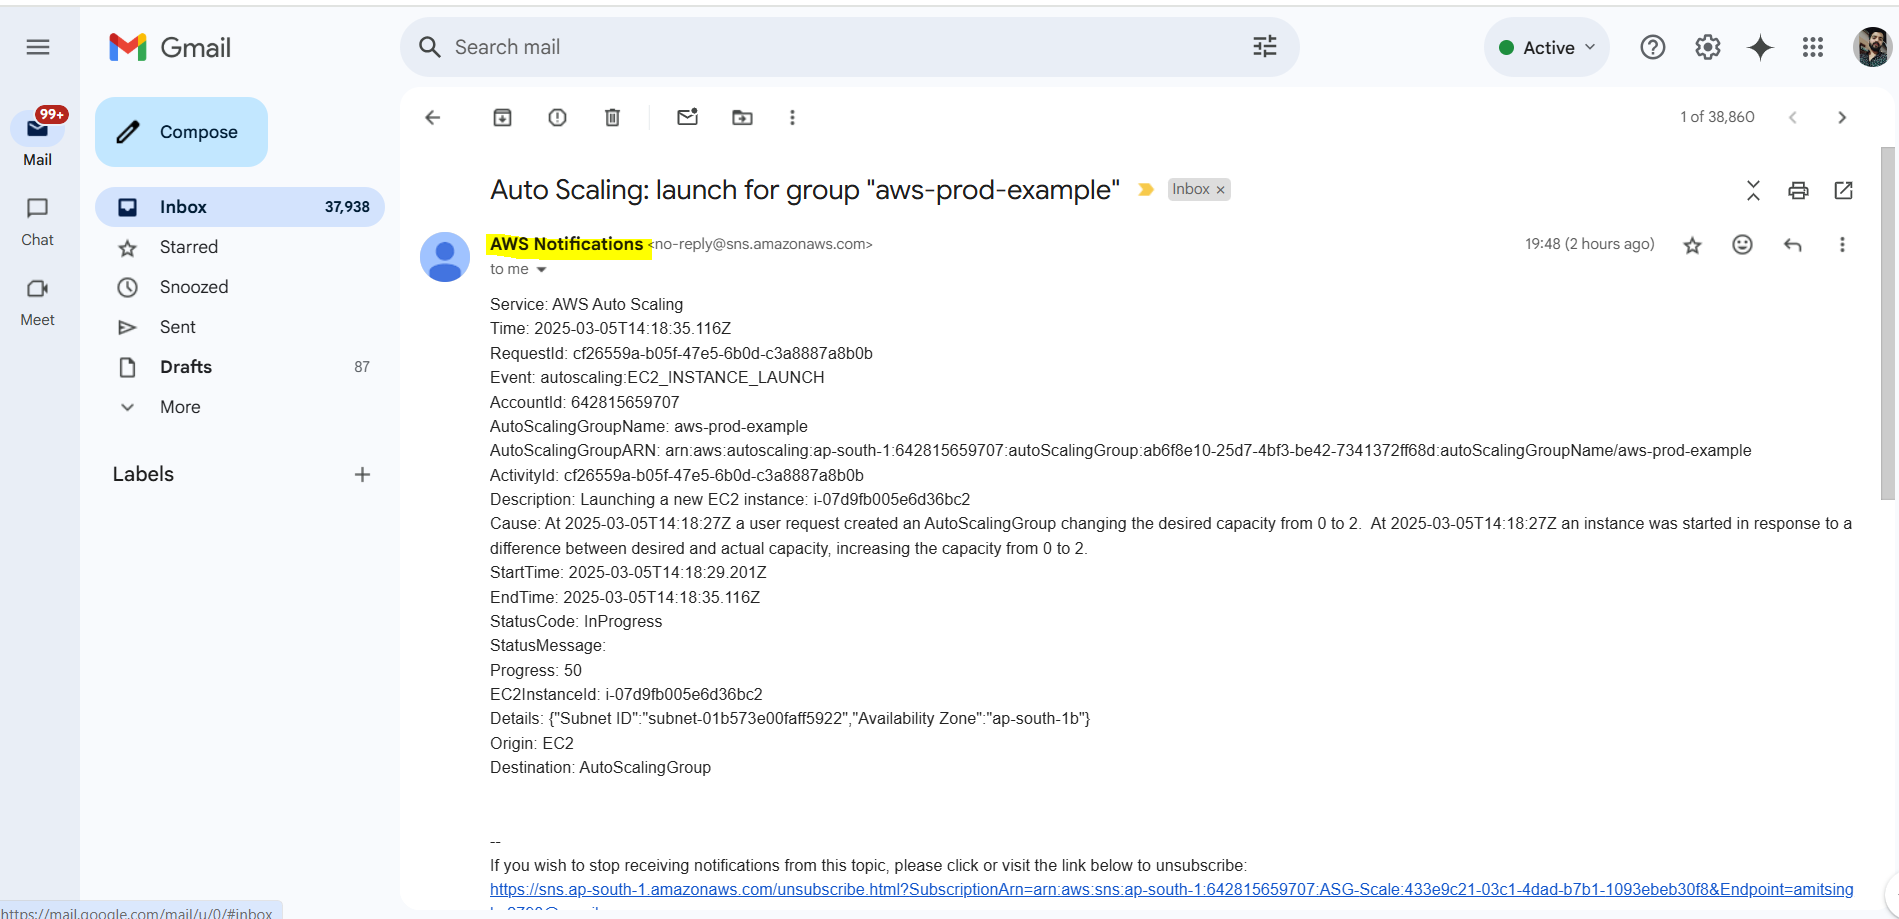
We tried to setup SNS (SNS Created)

Added SNS as topic for ASG Scale notifications

Health Checks: Set to EC2 health checks to ensure the instances are properly monitored.
Advanced Configuration: Leave as default for now (you can adjust scaling policies later based on CPU or other metrics).
Launch The ASG
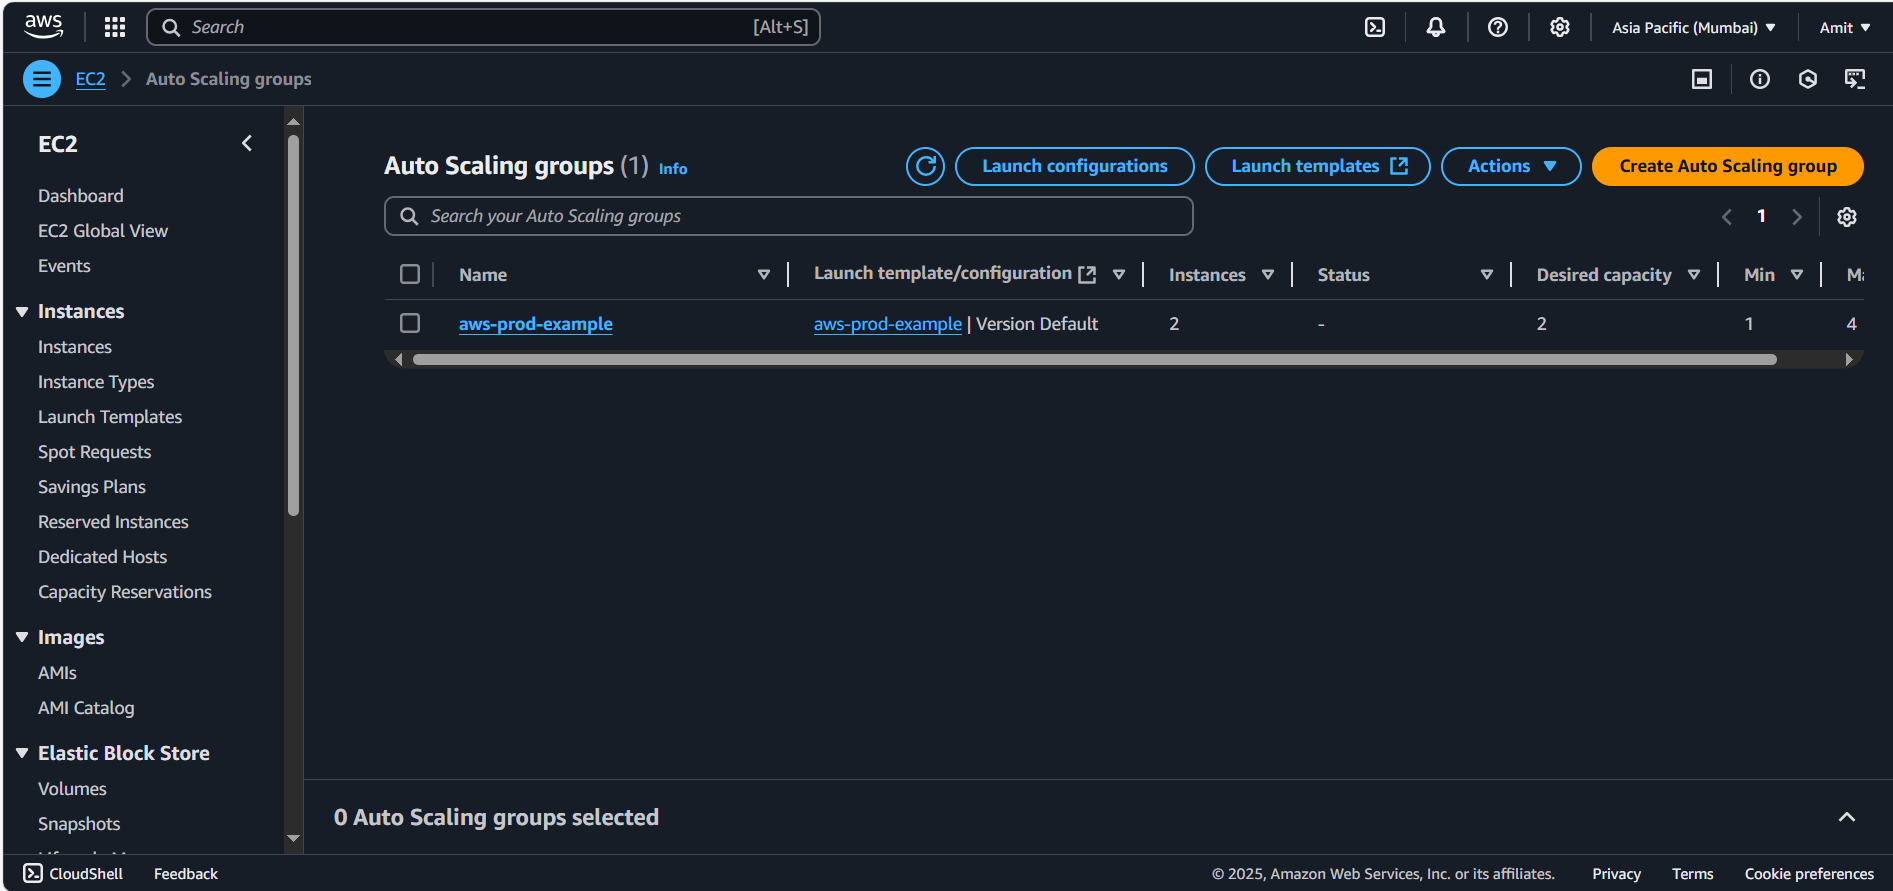
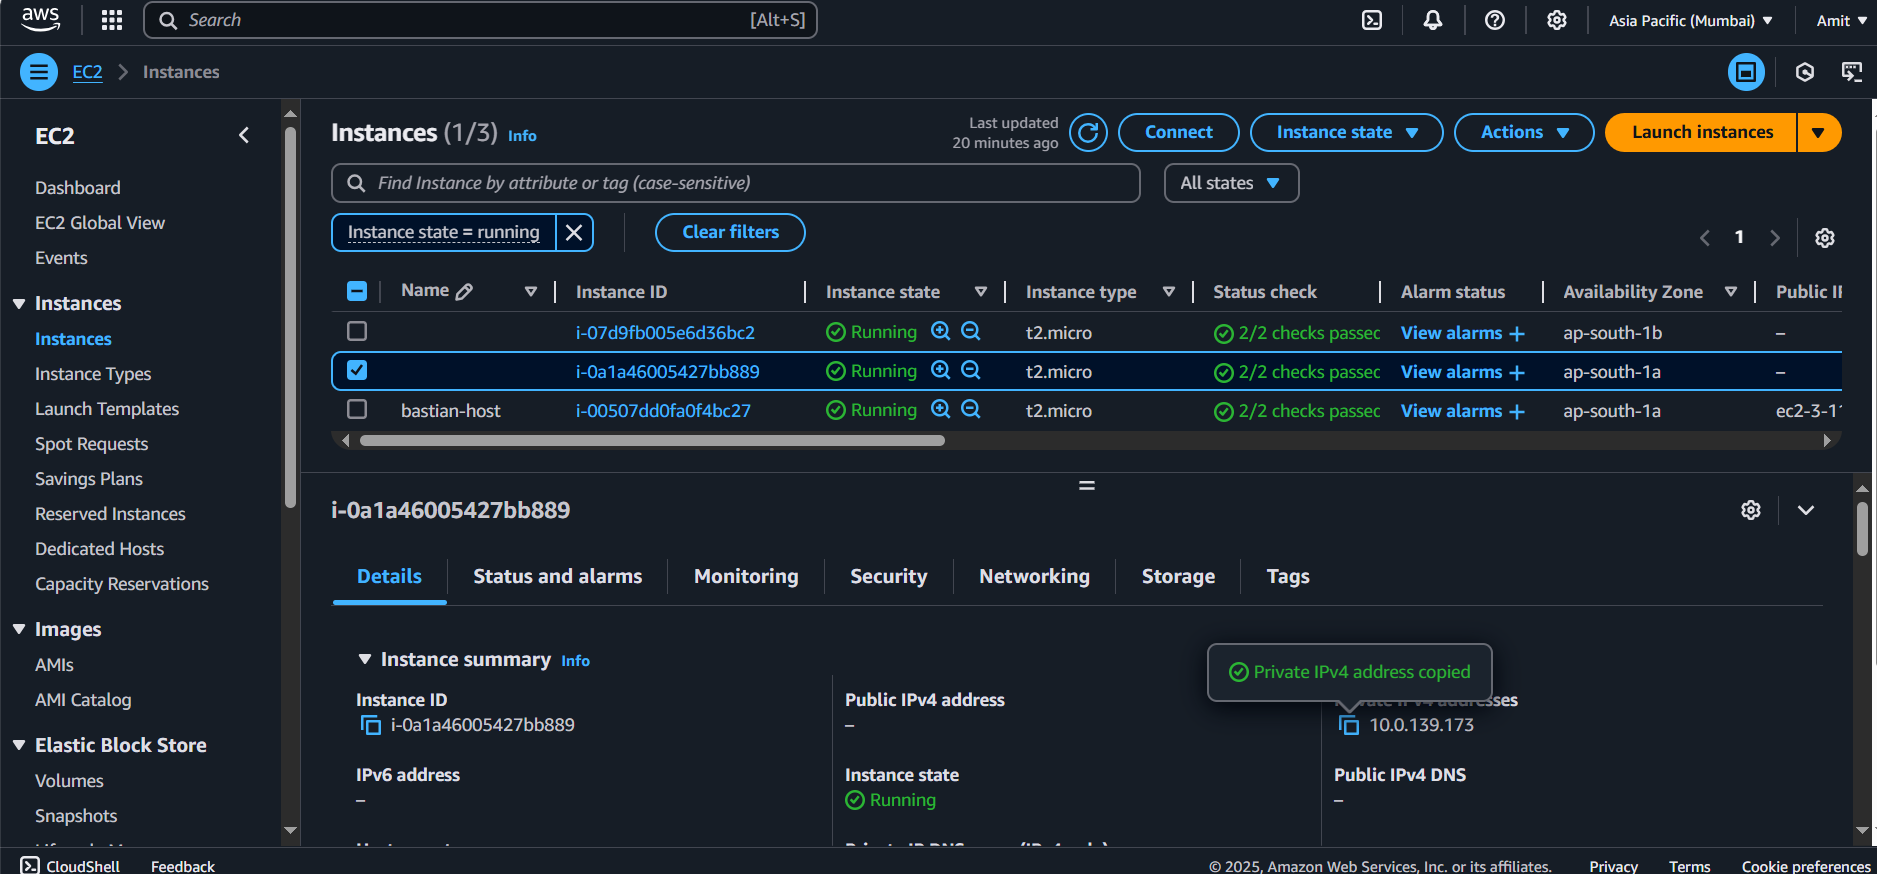
Since our desired capacity is 2, let’s check the EC2 that ASG have created or not:
Auto Scaling Group- EC2 instances:
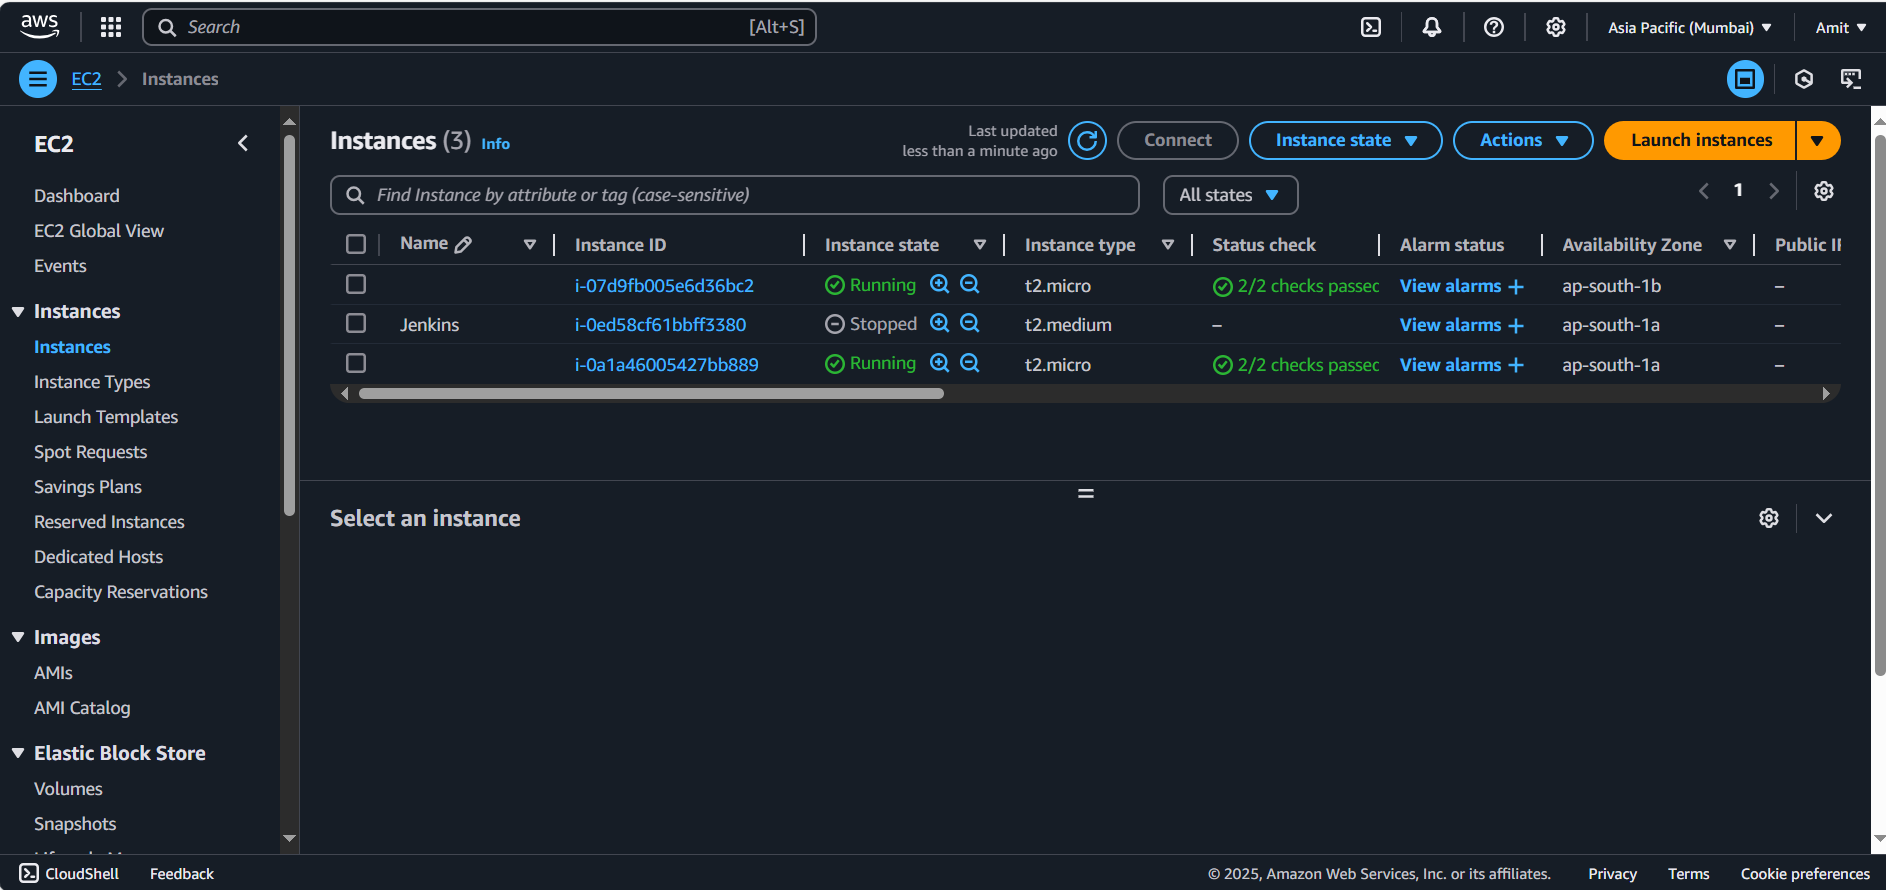
Well, they have been created and running.
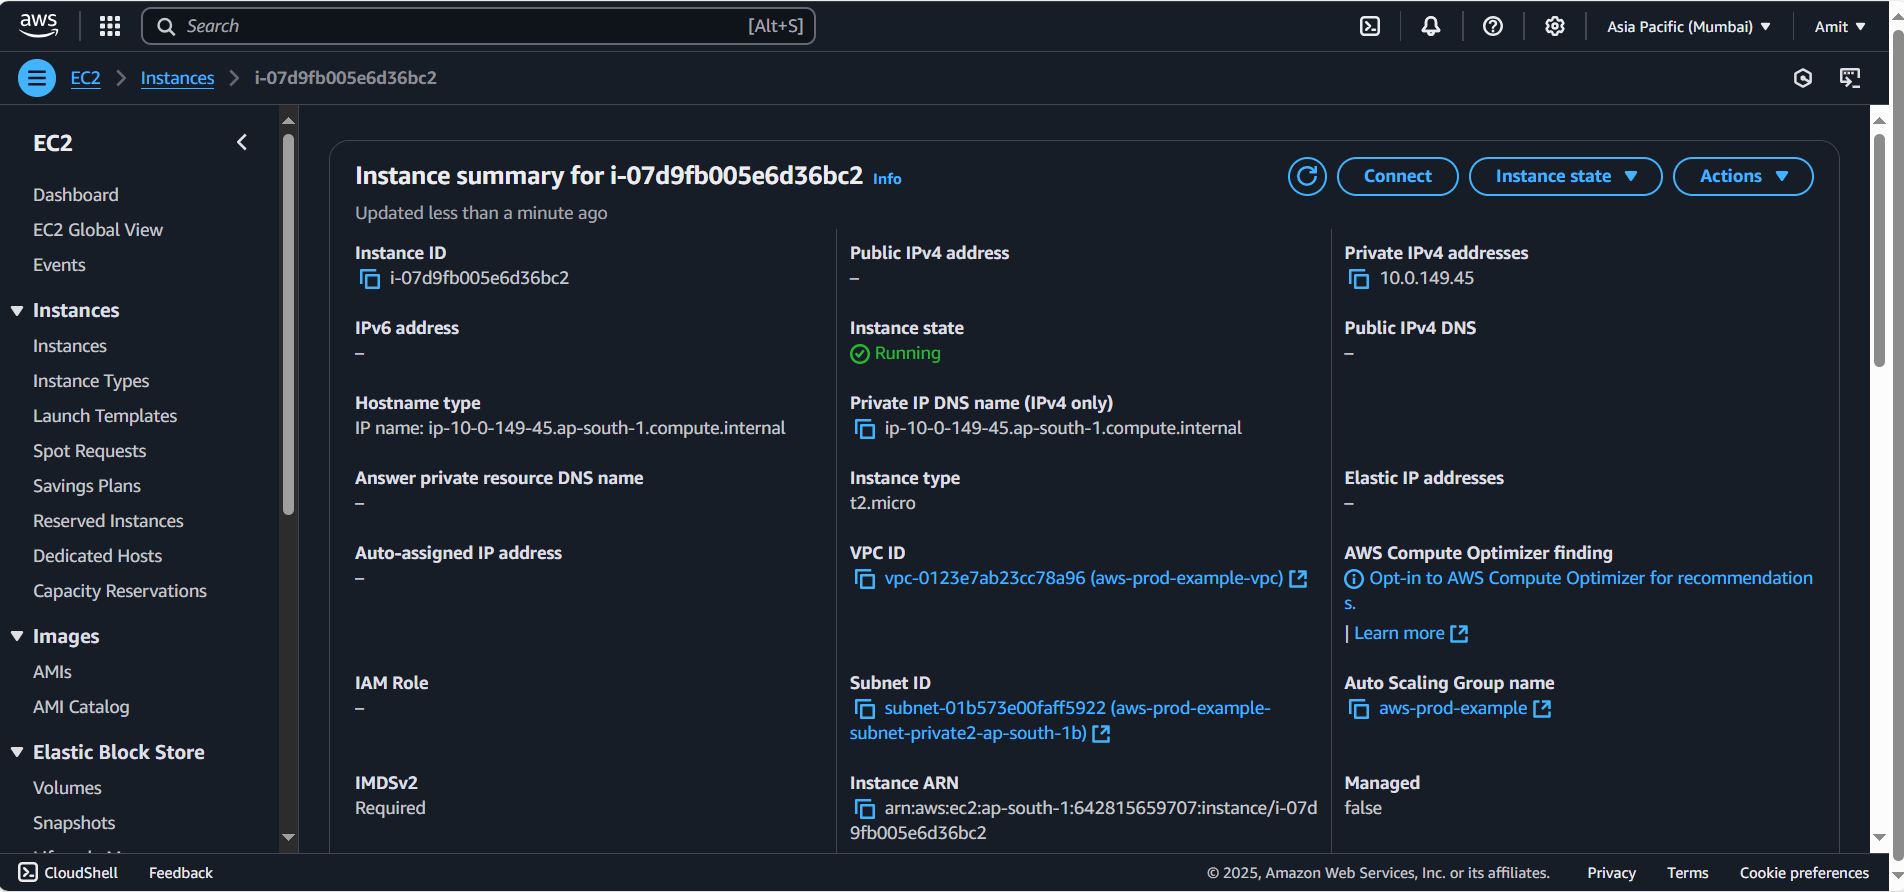
Also check, these instance don’t have Public IP Addresses. Since these instances are inside private subnet. And only accessible via public subnet through bastian host (jump server).
Create and Deploy the Application on EC2 Instances:
After launching your Auto Scaling Group, you'll need to install your application on the EC2 instances. But first, remember these instances will be in private subnets, so you won’t have direct access to them.
Create a Bastion Host
To SSH into your private instances, you’ll need to create a Bastion Host (or Jump Host) in one of your public subnets:
Launch an EC2 Instance:
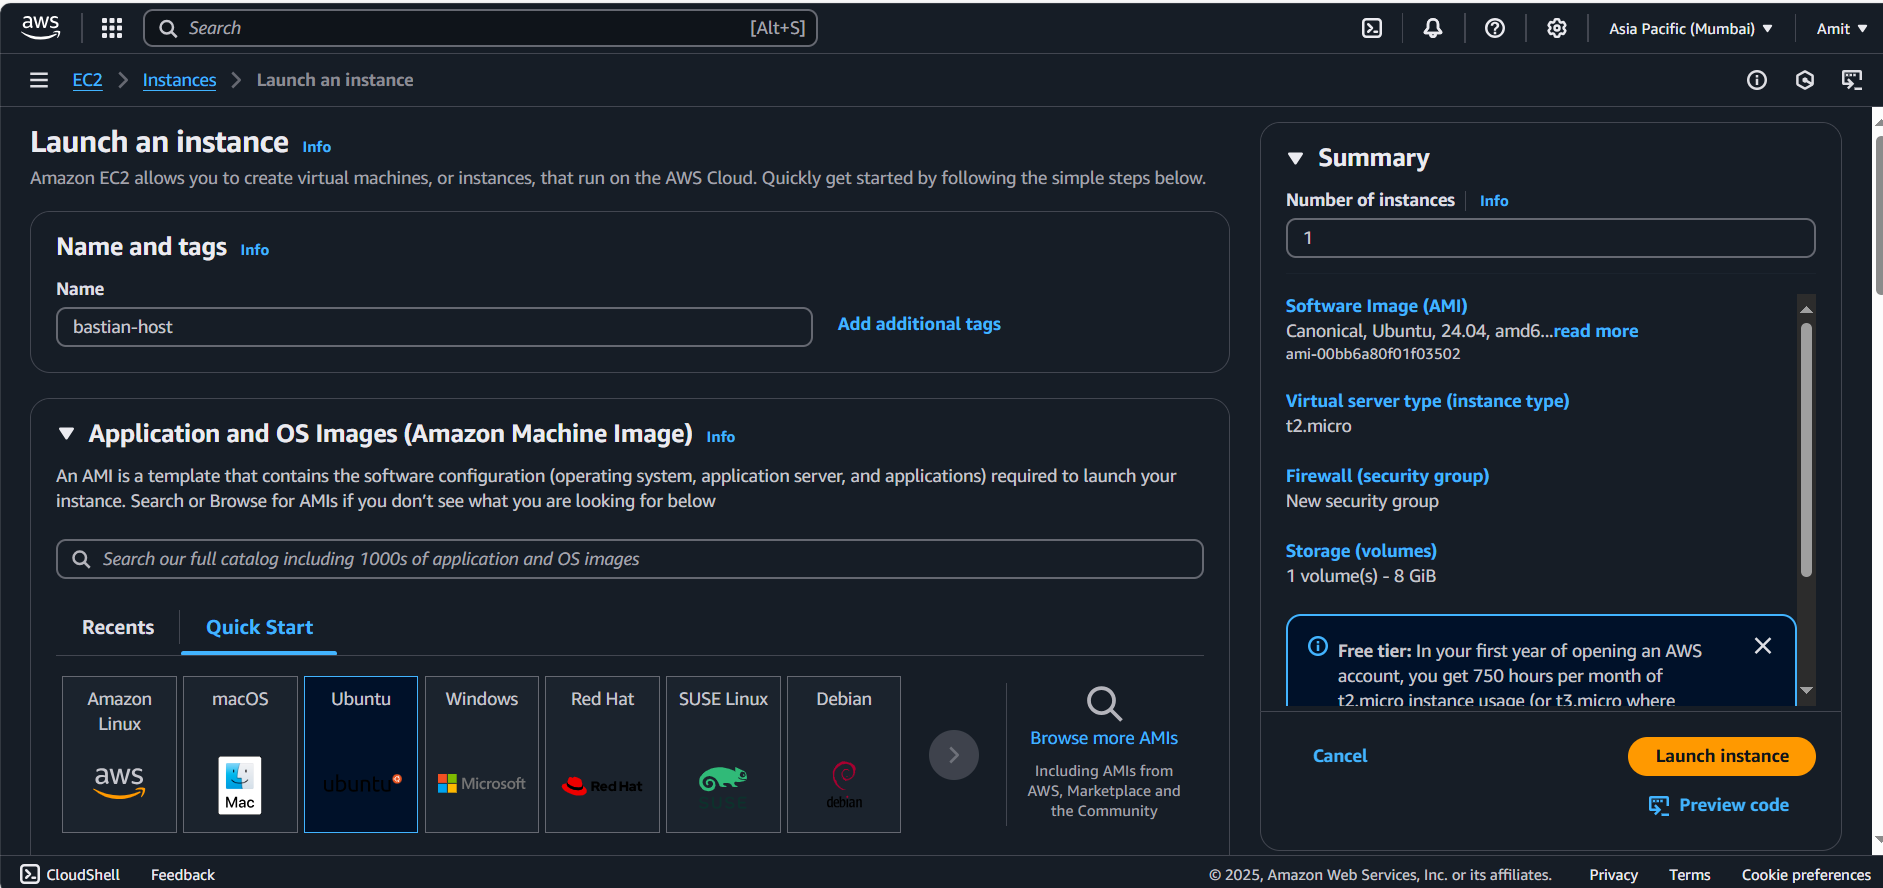
AMI: Choose
Ubuntuor your preferred OS.Instance Type:
t2.micro(or based on your needs).Security Group: Create a security group allowing SSH access (port
22) from your IP.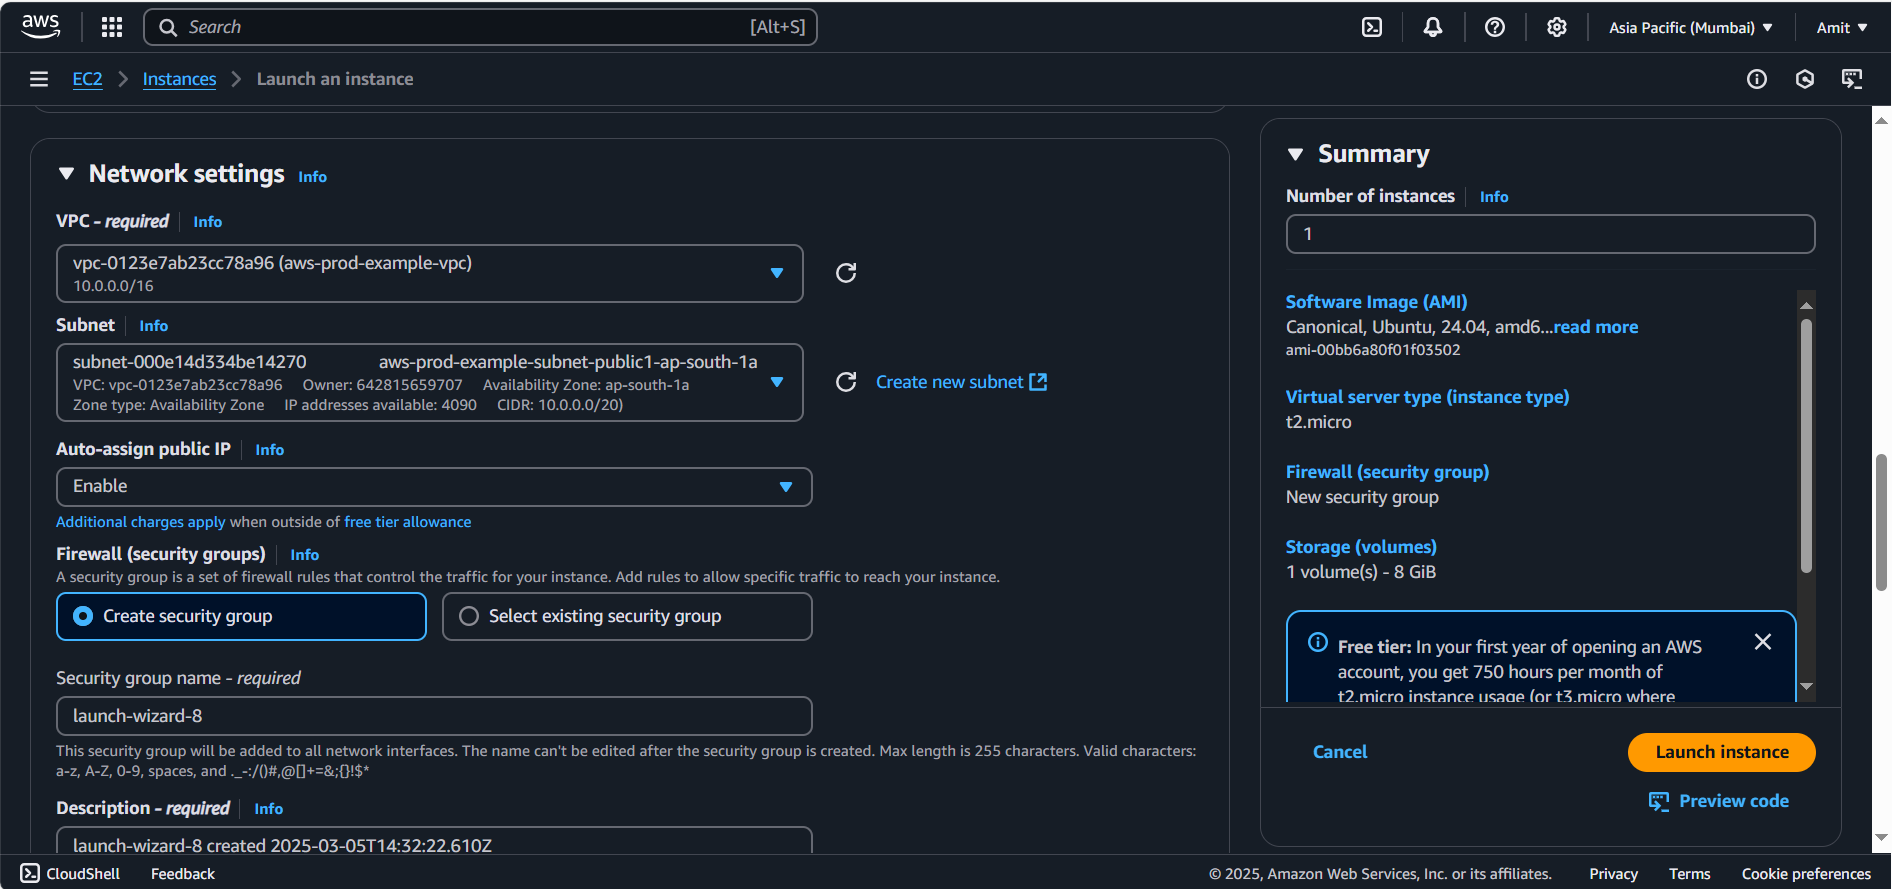
Select VPC: Same custom VPC you have selected in ASG, otherwise bastian host won’t be able to ssh into your private subnet ec2 instances.
Subnet: Choose one of your public subnets and make Public IP available.
Key Pair: Use the same key pair used in your Auto Scaling Group for SSH access.

Launch Instance
Use the Bastion Host to SSH into private EC2 instances by accessing them via their private IP addresses.
Get the Bastion Host Public IP after it’s launched.
Key Point: The Bastion Host should have public IP access (via Internet Gateway) but should be isolated with strict security rules.
SSH to EC2 Instances through Bastion Host:
Since your private instances don’t have public IPs, you’ll need to go through the Bastion Host to SSH into them:
We will copy our ssh key from system to bastian host ec2 instance.
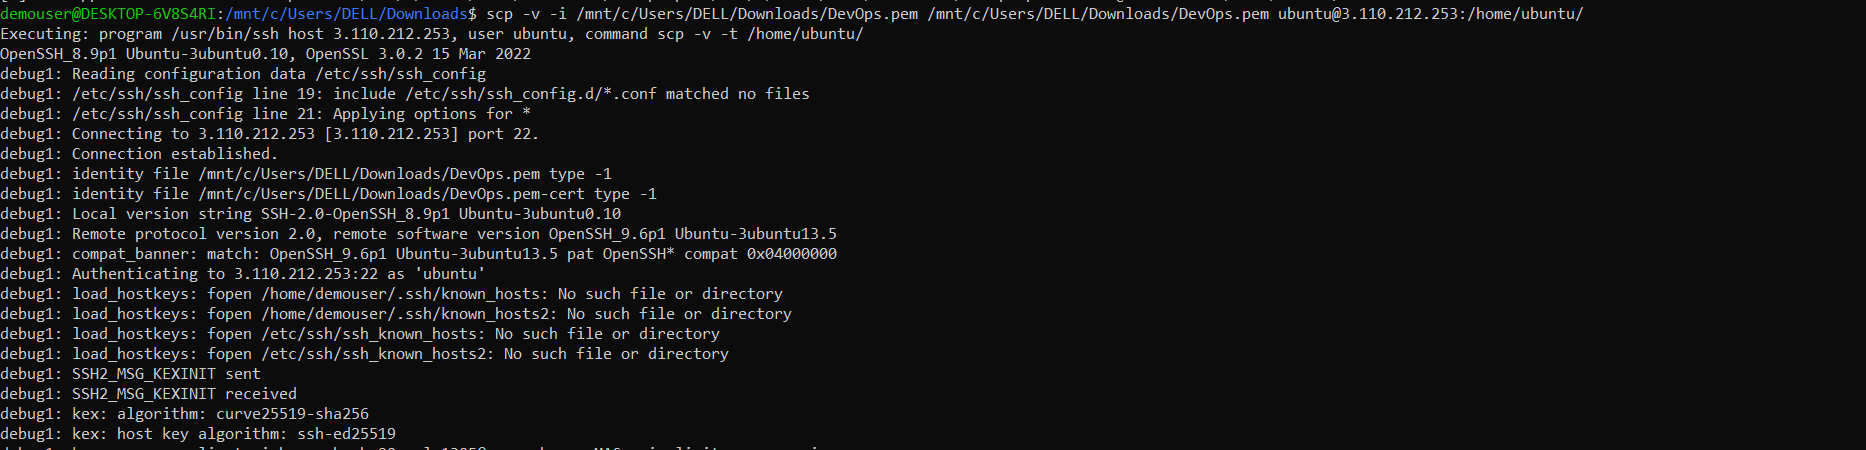
scp -v -i /mnt/c/Users/DELL/Downloads/DevOps.pem /mnt/c/Users/DELL/Downloads/DevOps.pem ubuntu@3.110.212.253:/home/ubuntu/
I have copied my pem file to bastian host from my local system where pem key is stored: named “DevOps.pem”

cp /mnt/c/Users/DELL/Downloads/DevOps.pem ~/DevOps.pem
chmod 400 ~/DevOps.pem
ssh -i DevOps.pem ubuntu@3.110.212.253
scp -v -i /mnt/c/Users/DELL/Downloads/DevOps.pem /mnt/c/Users/DELL/Downloads/DevOps.pem ubuntu@3.110.212.253:/home/ubuntu/
scp -v  ~/DevOps.pem  ~/DevOps.pem ubuntu@3.110.212.253:/home/ubuntu/
ls ~/DevOps.pem
scp -v -i /home/demouser/DevOps.pem /home/demouser/DevOps.pem ubuntu@3.110.212.253:/home/ubuntu/
ssh -i ~/DevOps.pem ubuntu@3.110.212.253
Here we can see our DevOps.pem file inside our bastian EC2 instance, successfully copied.
- SSH into Bastion Host:
Use the public IP of the Bastion Host:
ssh -i "DevOps.pem" ubuntu@<Bastion-Host-Public-IP>
NOTE: If we don’t copy our pem key into the Bastian host ec2 instance, then we won’t be able to ssh into our private instances also inside private subnet. So, it’s important
- SSH into Private Instances from Bastion Host:
Once inside the Bastion Host, SSH into the private EC2 instances using their private IP addresses (private subnet ec2 instances):
ssh -i DevOps.pem ubuntu@<Private-Instance-IP>
ssh -i DevOps.pem ubuntu@10.0.139.173
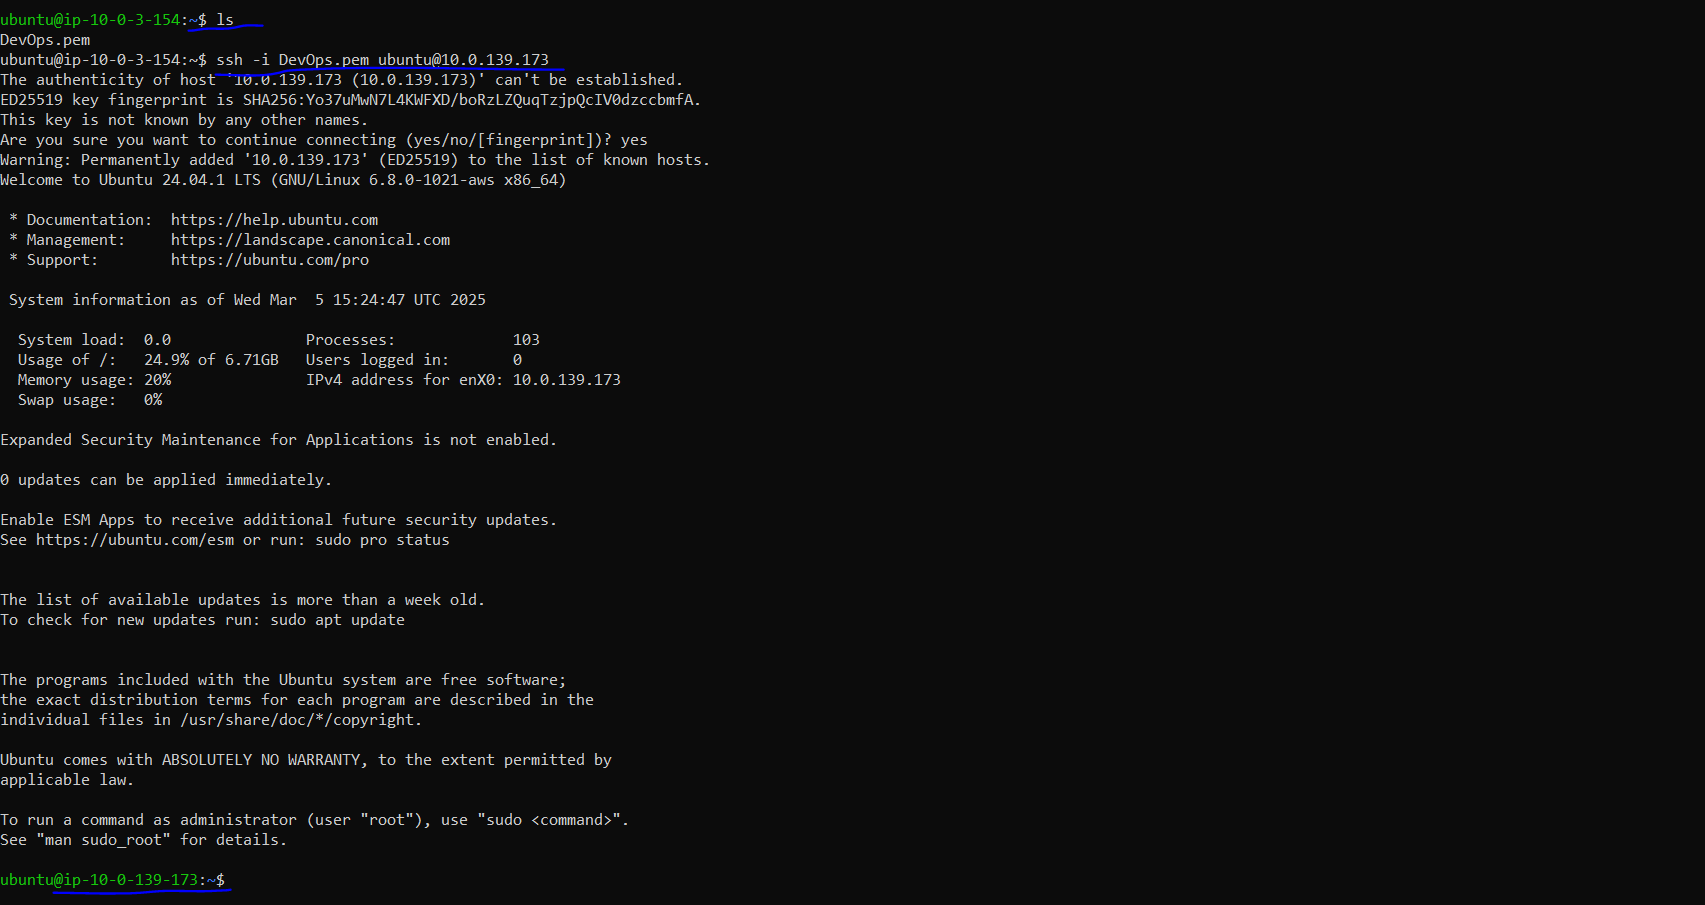
We have successfully sshd inside our private ec2 instance from bastion host as they got same pem file inside same VPC Network we have created.
Install the Application on the Private EC2 Instances:
On each private EC2 instance, you’ll install your application (e.g., a Python web app):
Inside our private instance we have created an index.html page
vim index.html
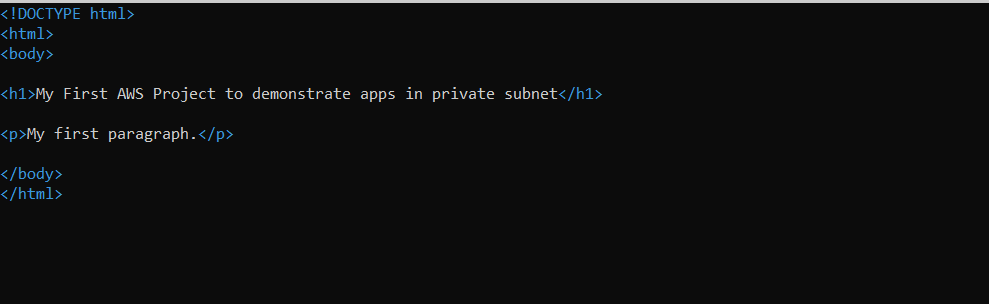

Run that page with help of python. Note: Python is pre installed in AWS EC2 instance.
python3 -m http.server 8000
NOTE: Since now we have setup only 1 private ec2 instance so that we can see our ALB is forwarding traffic to each private instance properly from public subnet. Just to verify only.
Set Up Application Load Balancer (ALB): Final Stage
After your instances are ready, you can set up an Application Load Balancer (ALB) to distribute traffic across your private instances:
Choose Load Balancer Type:
Go to the EC2 dashboard and navigate to Load Balancers.
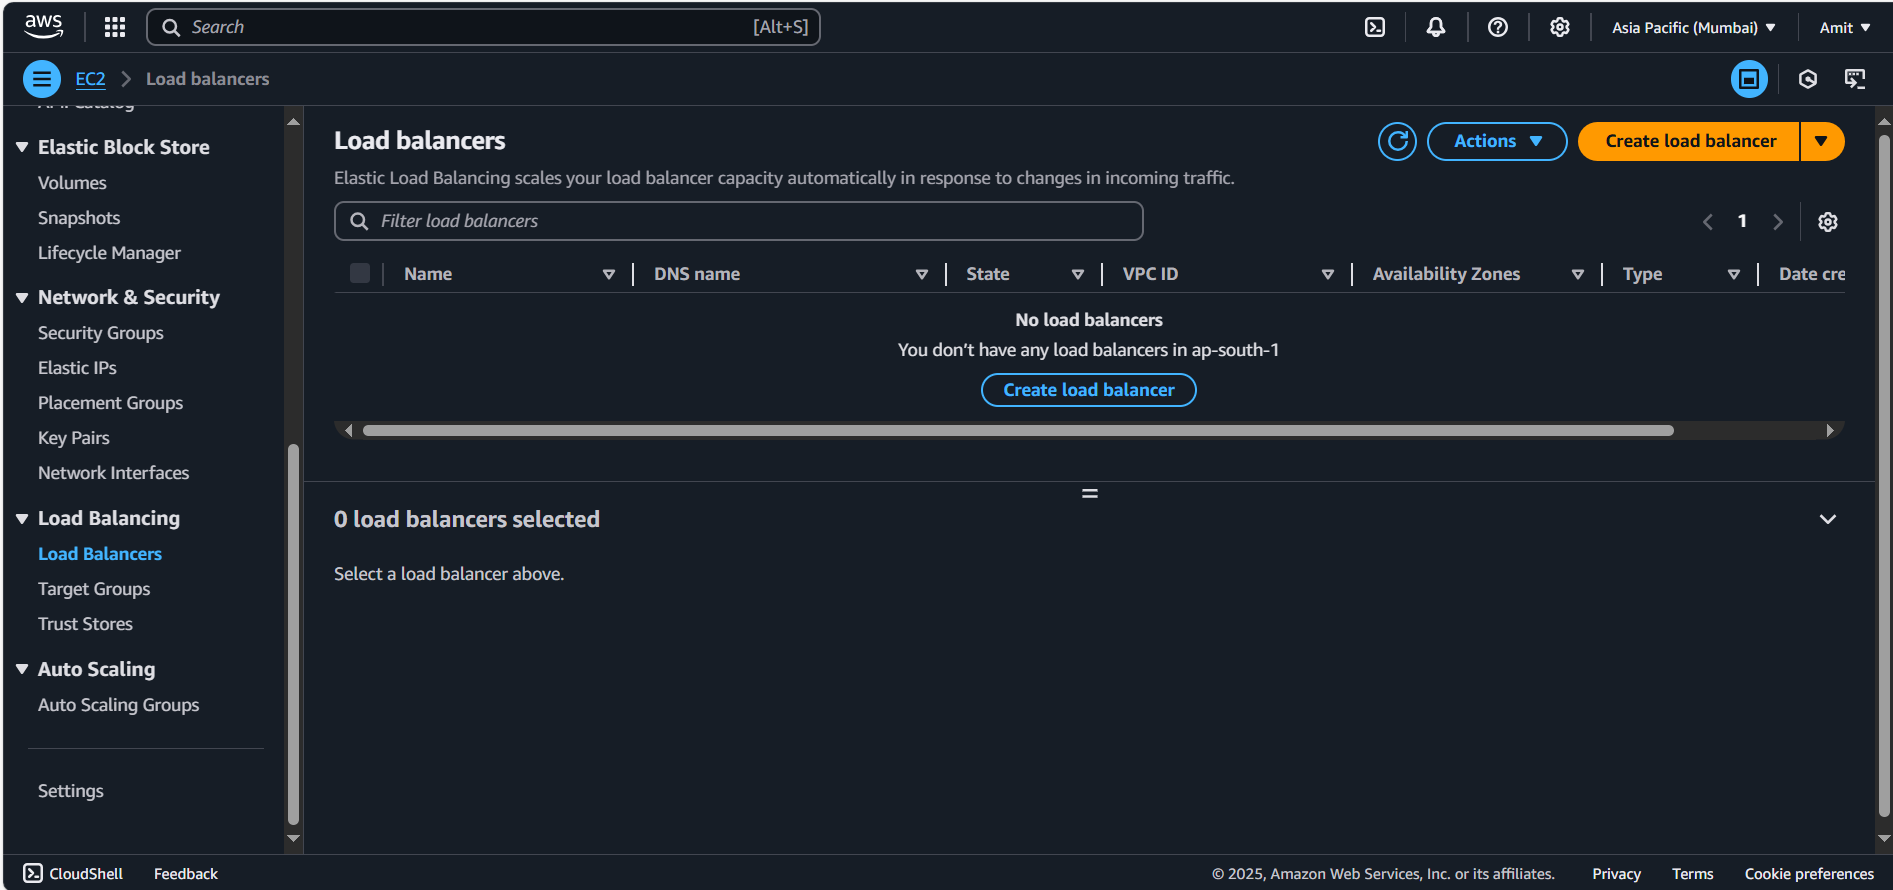
Choose an Application Load Balancer (ALB), as it operates at layer 7 (HTTP/HTTPS) and will route traffic based on HTTP requests.
Configure Load Balancer:
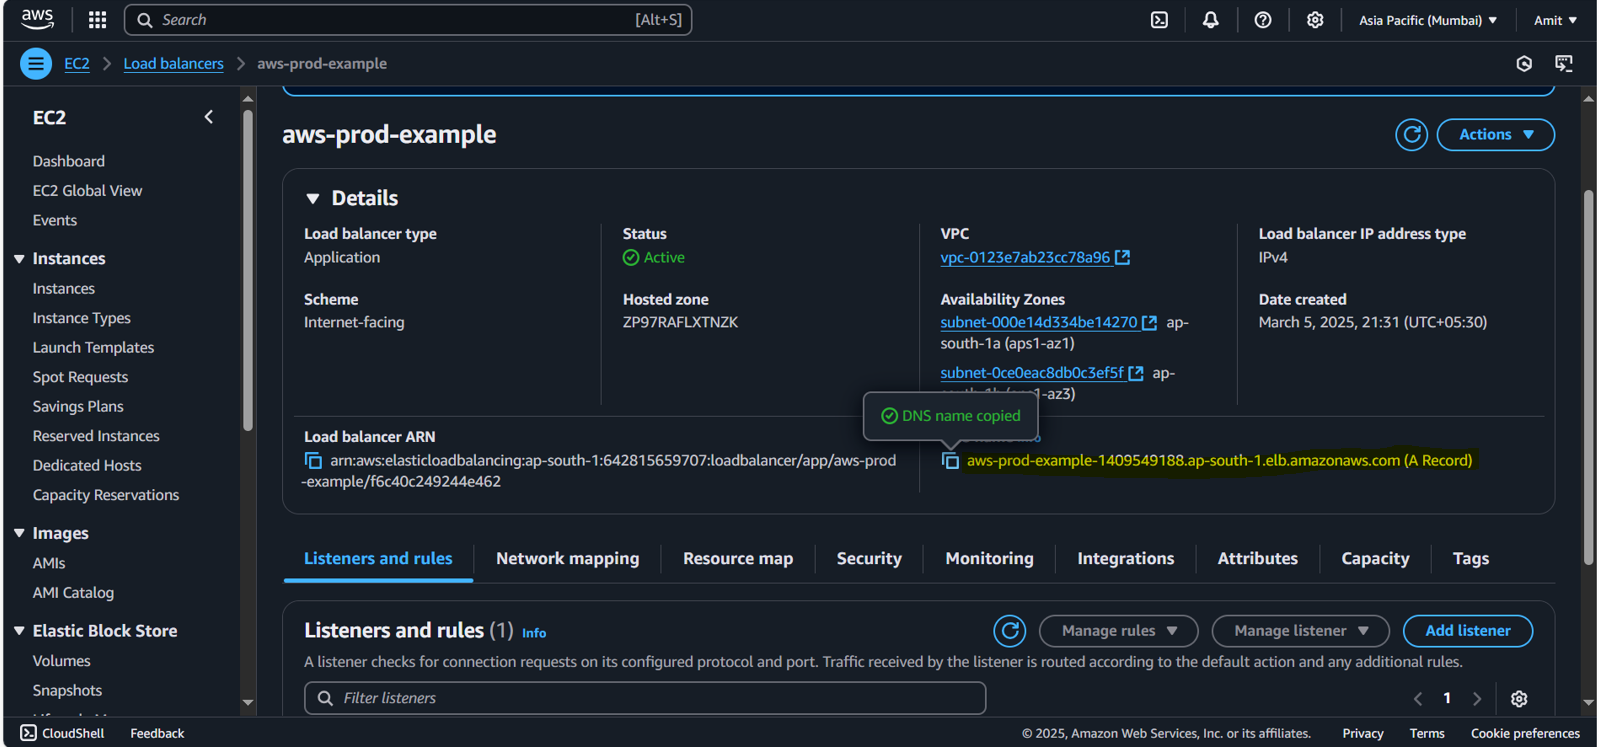
Provide a name for the load balancer (e.g.,
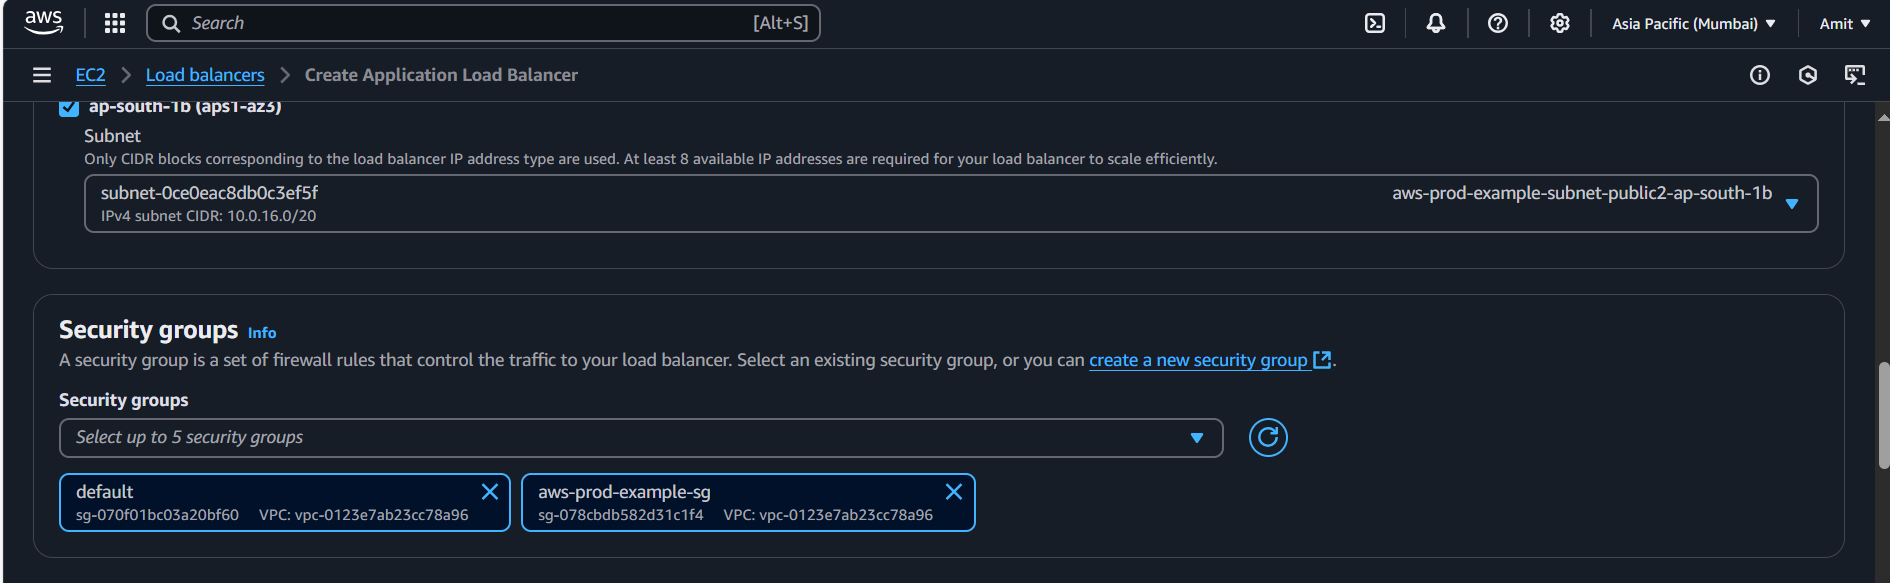
aws-prod-example).Select Internet-facing and assign it to the public subnet.
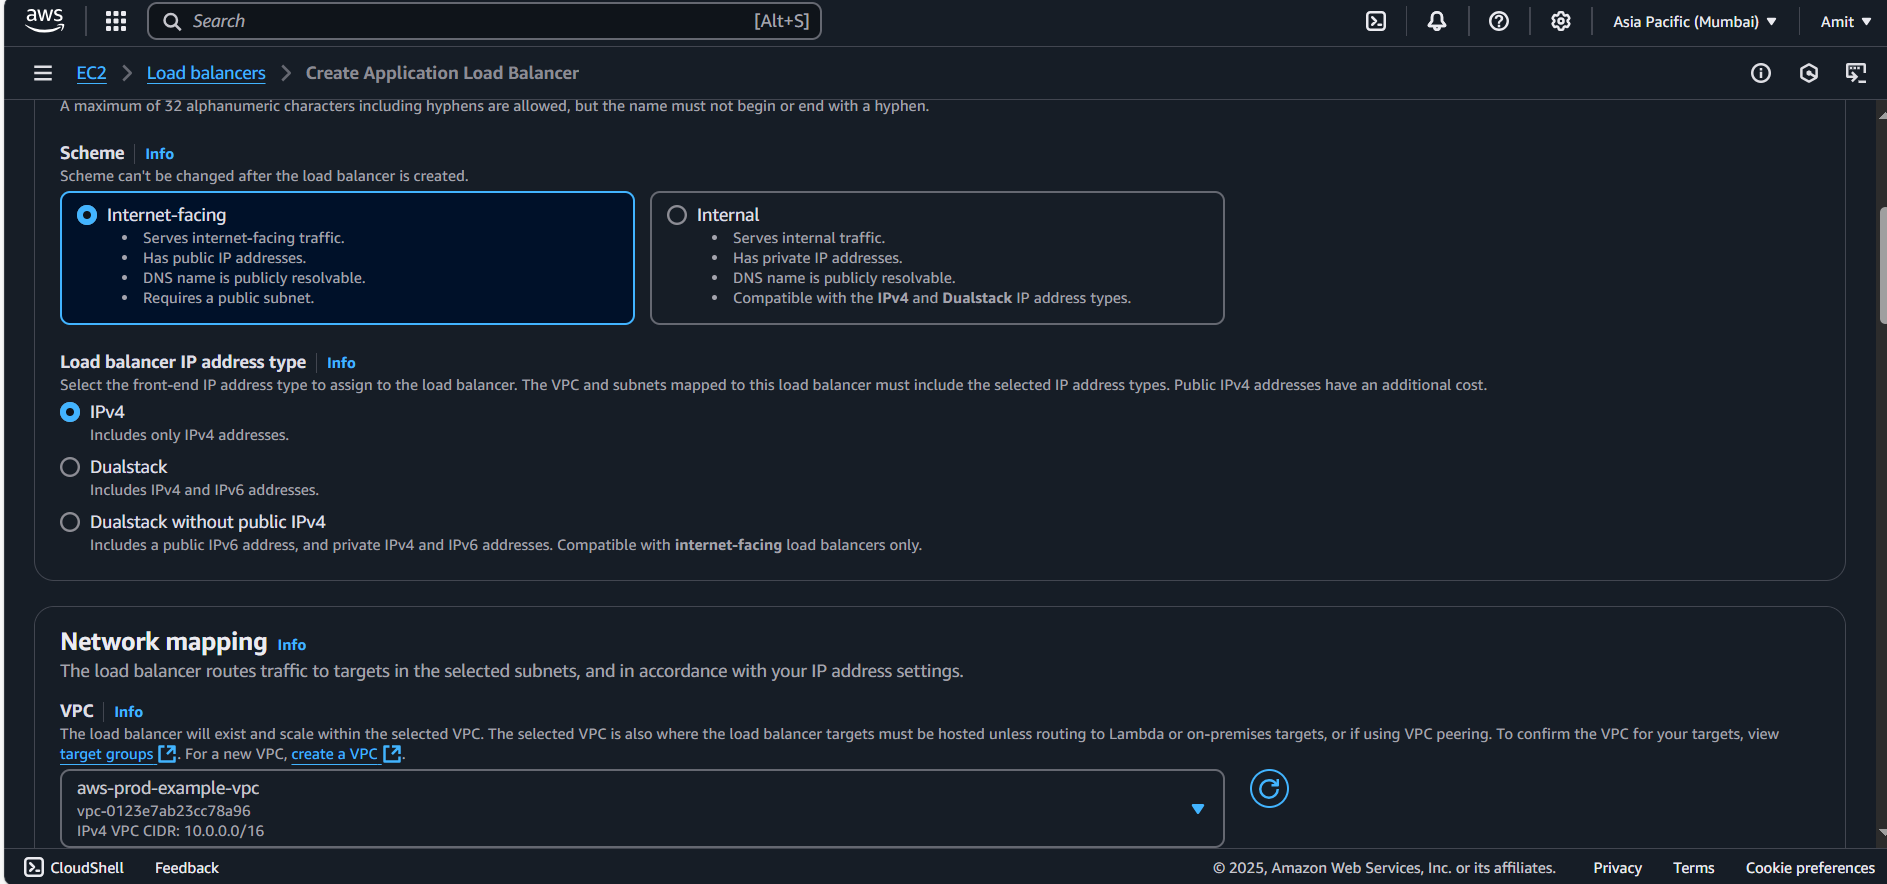
Choose your Custom VPC and configure subnets (ensure the subnets are public). Private subnet will give error
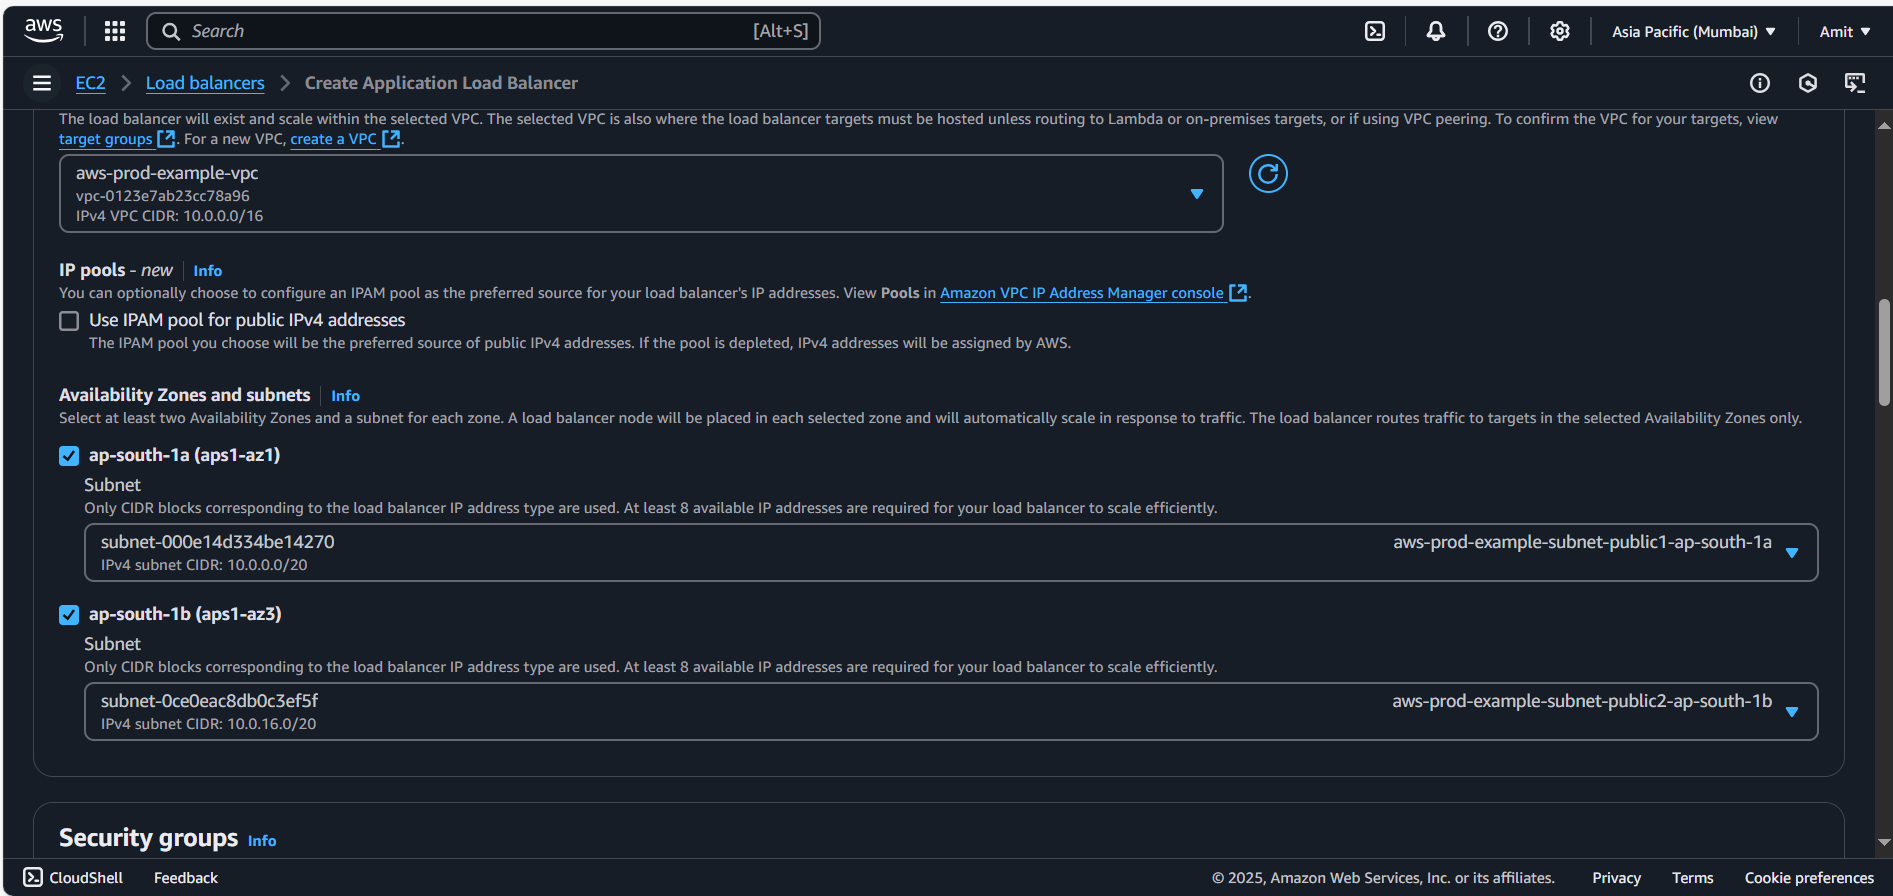
Load balancer should be in Public Subnet and should be accessible via Internet Gateway.
Set Security Groups:
Create or select a security group that allows inbound traffic on port 80 (HTTP) to the load balancer.
Ensure the load balancer’s security group allows HTTP access (port 80) from any source.
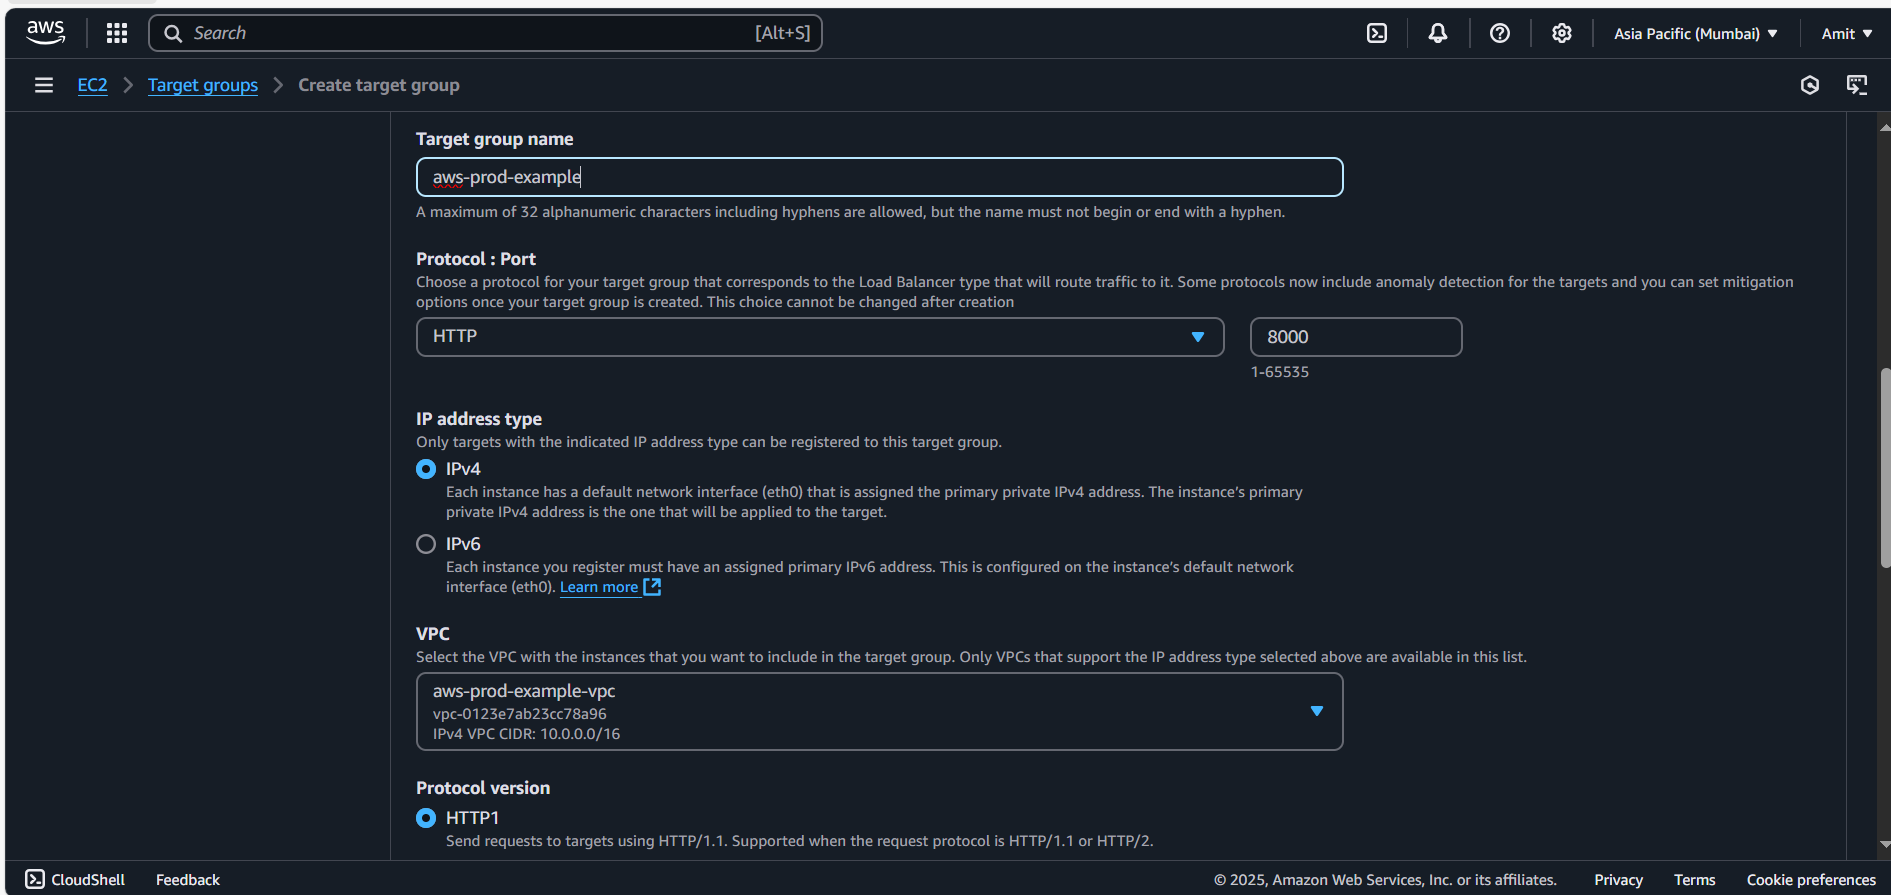
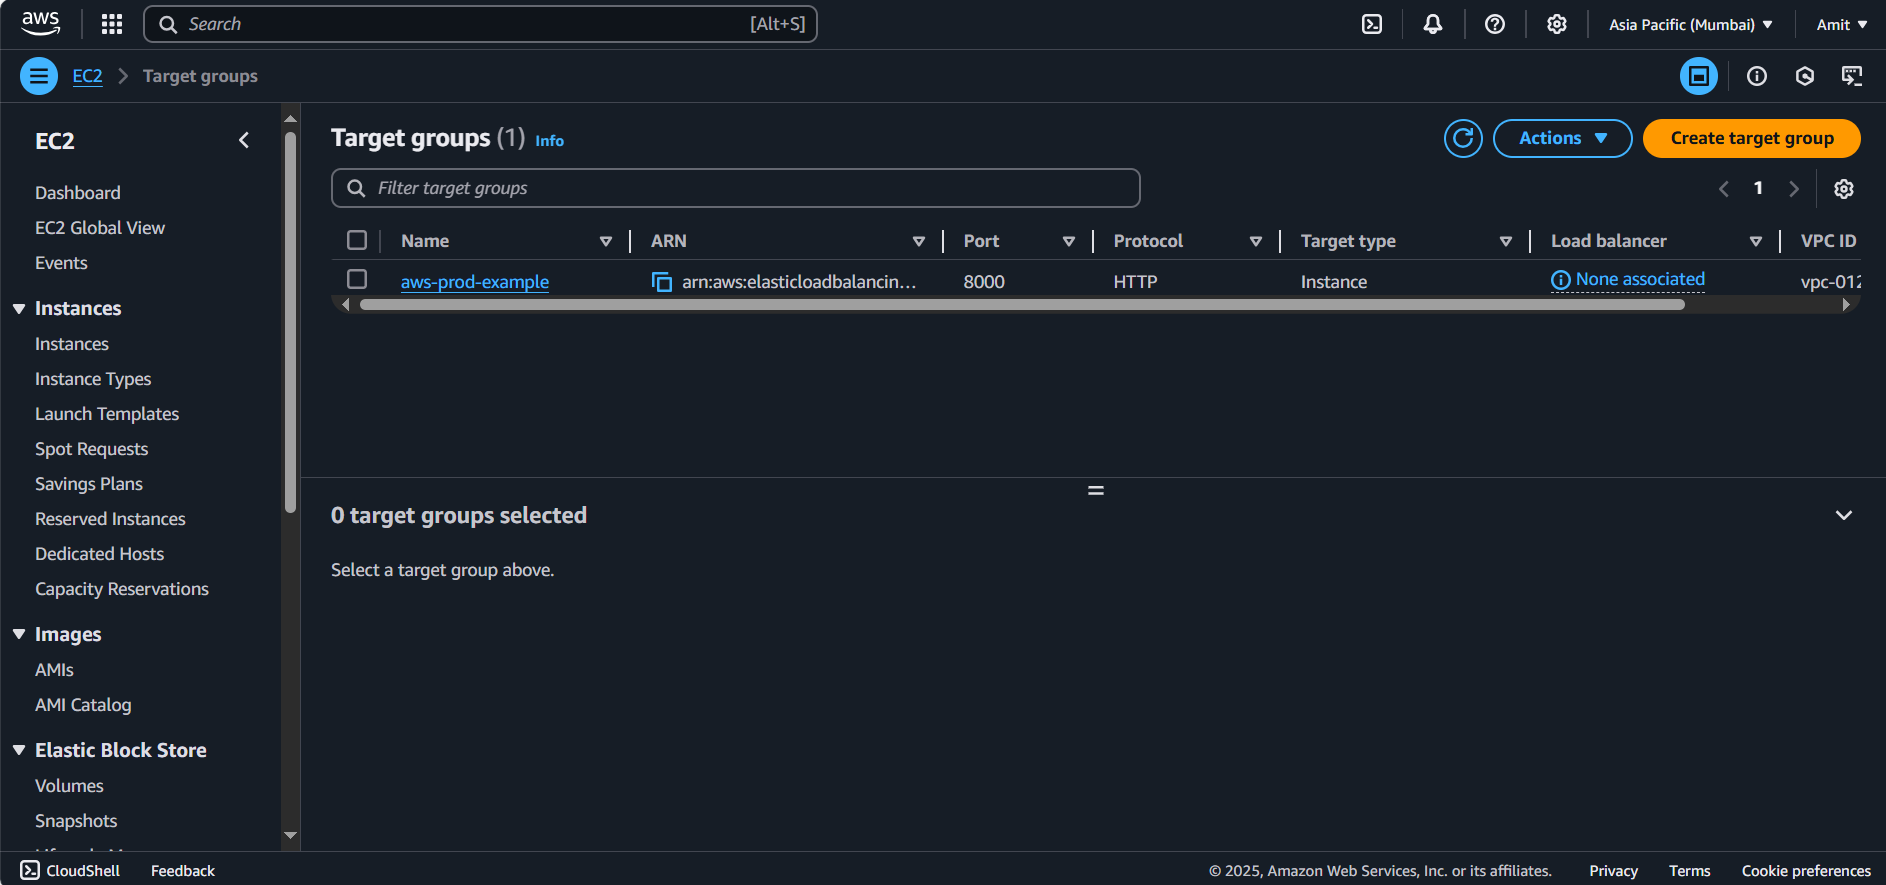
Create Target Group
Create a Target Group for EC2 Instances:
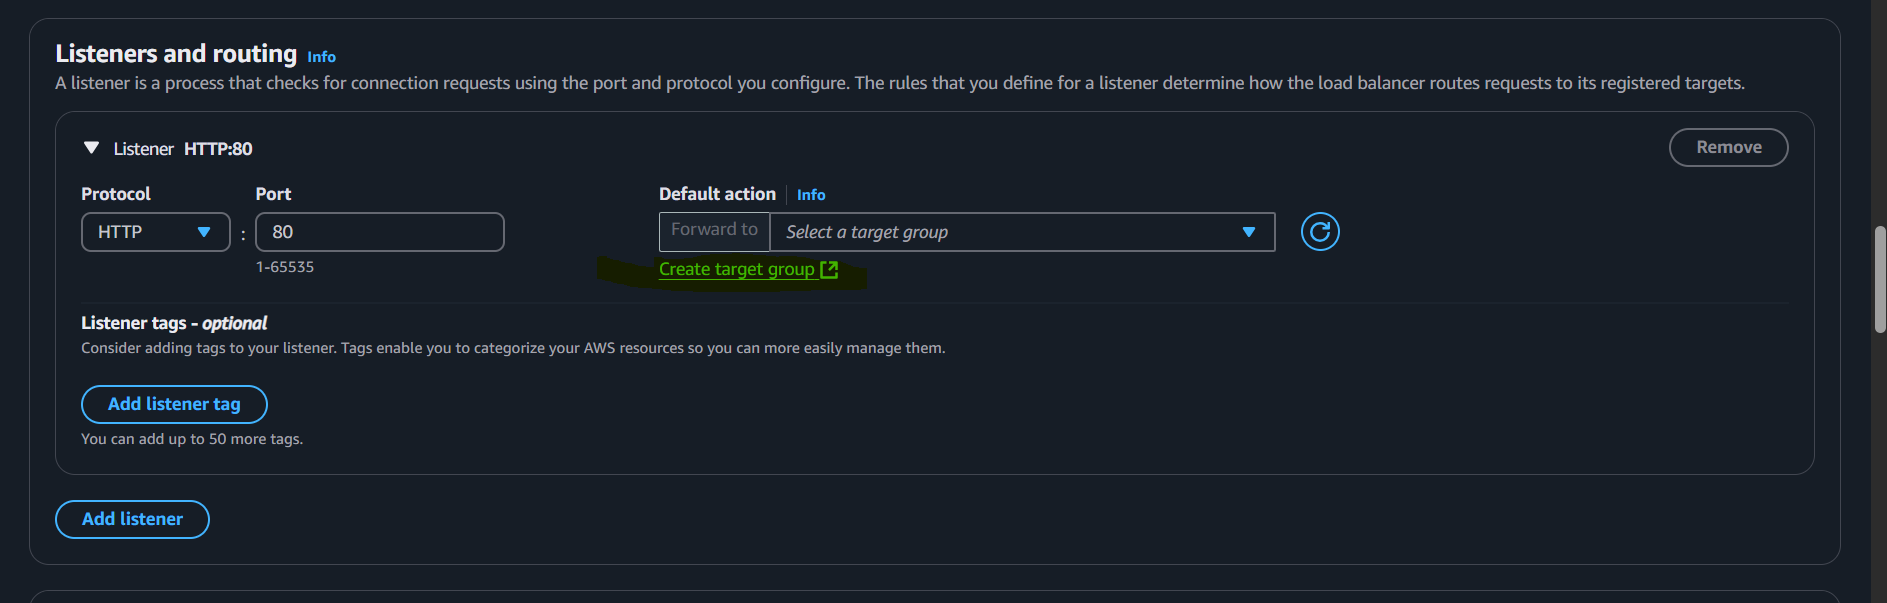
We can access Load balancer on port 8000 also, but for demonstration we are using port 80 where load balancer listens. default.
In the Load Balancer section, create a Target Group and select the instances that you want to be accessed through the load balancer.
Set the protocol to HTTP and specify port 8000 as that is where your Python app is running.
Add Targets to the Target Group:
Add both the EC2 instances (one with the Python app running and the other without) to the target group.
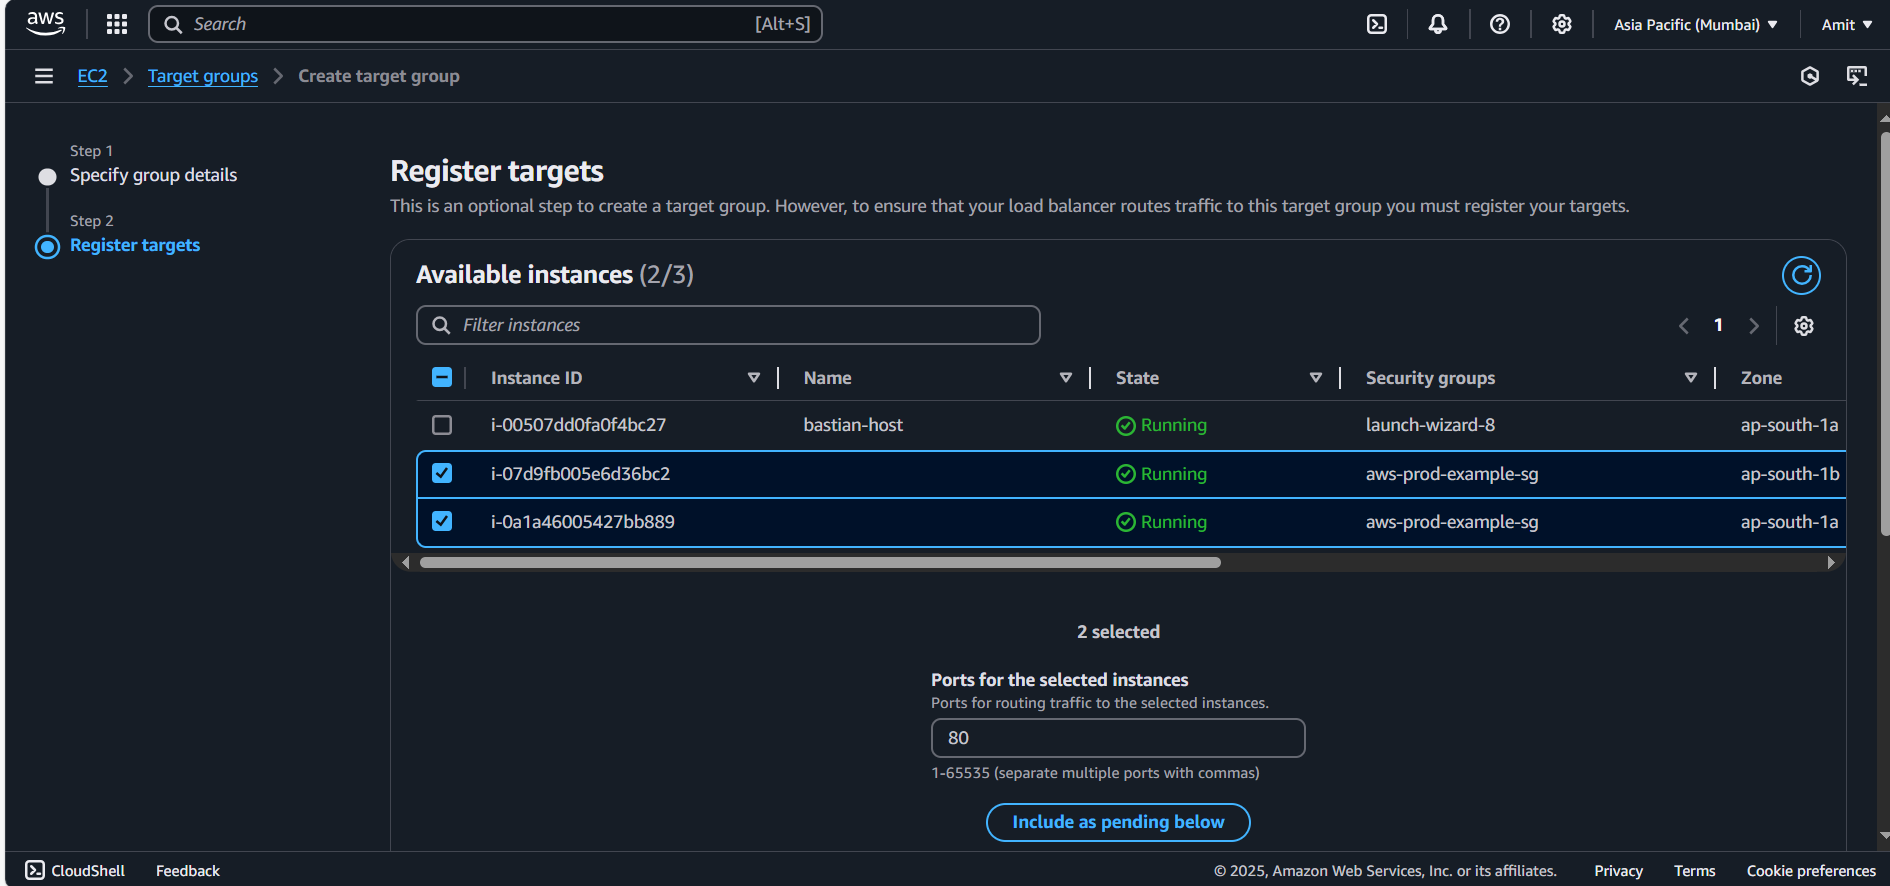

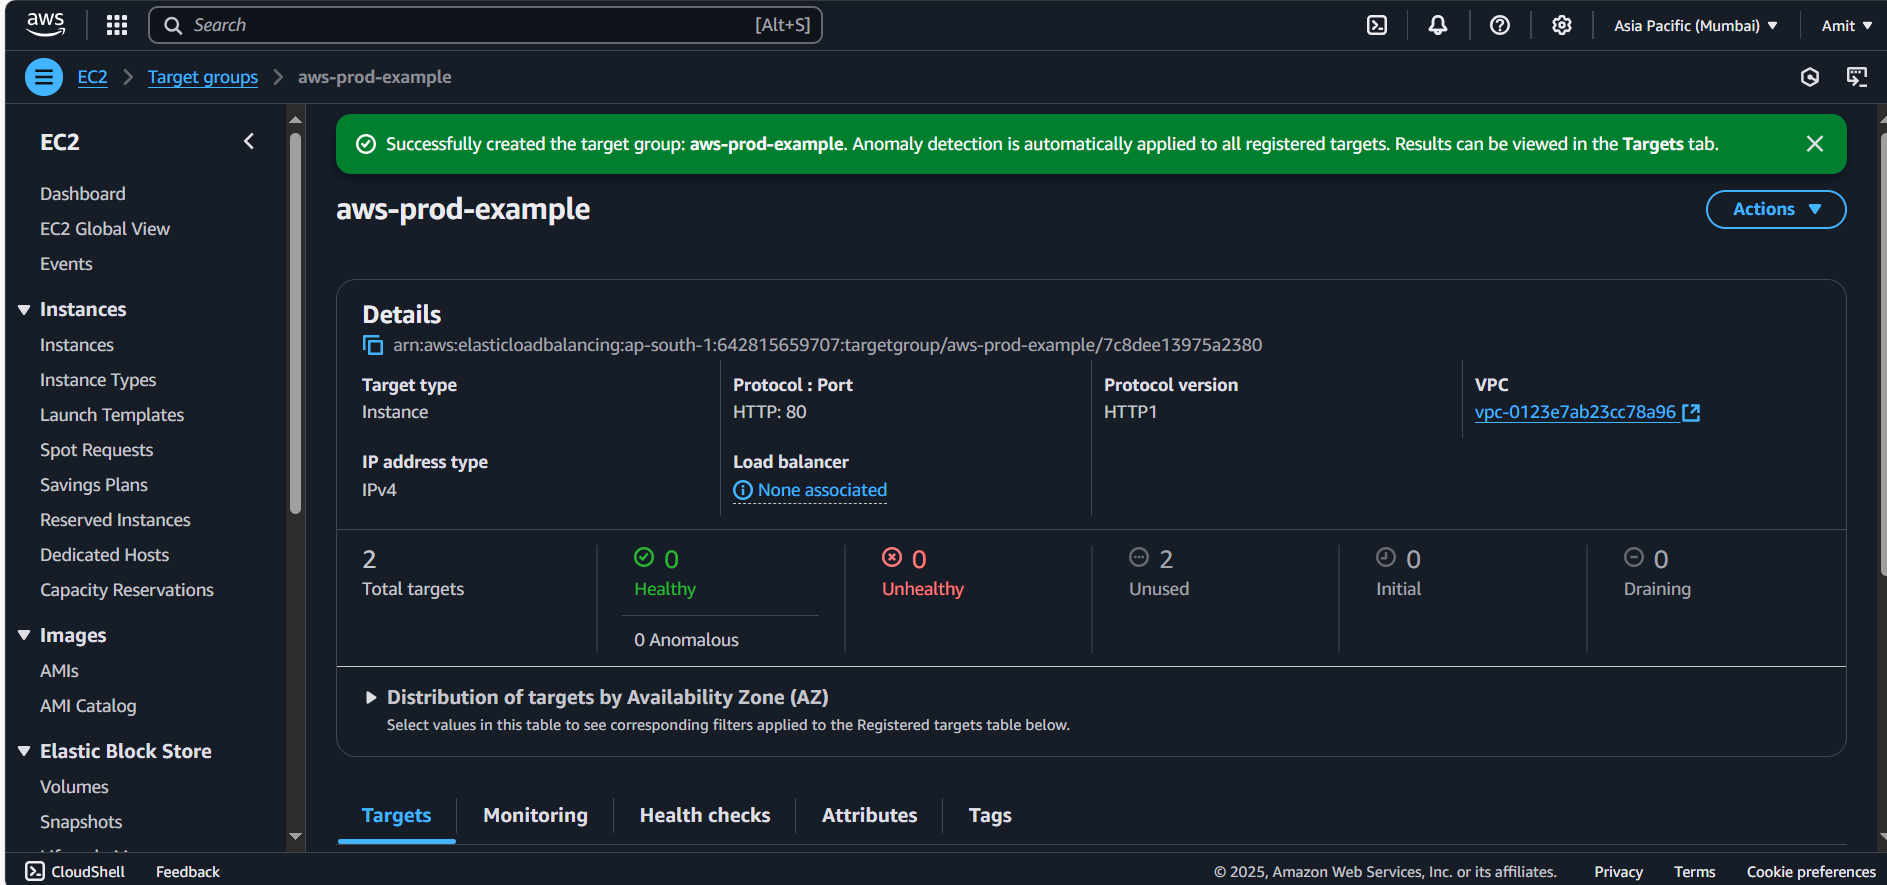
Target group has been created
Target group is verifying two ec2 instances on port 8000
Add the Target group in Load balancer config > Launch Load Balancer
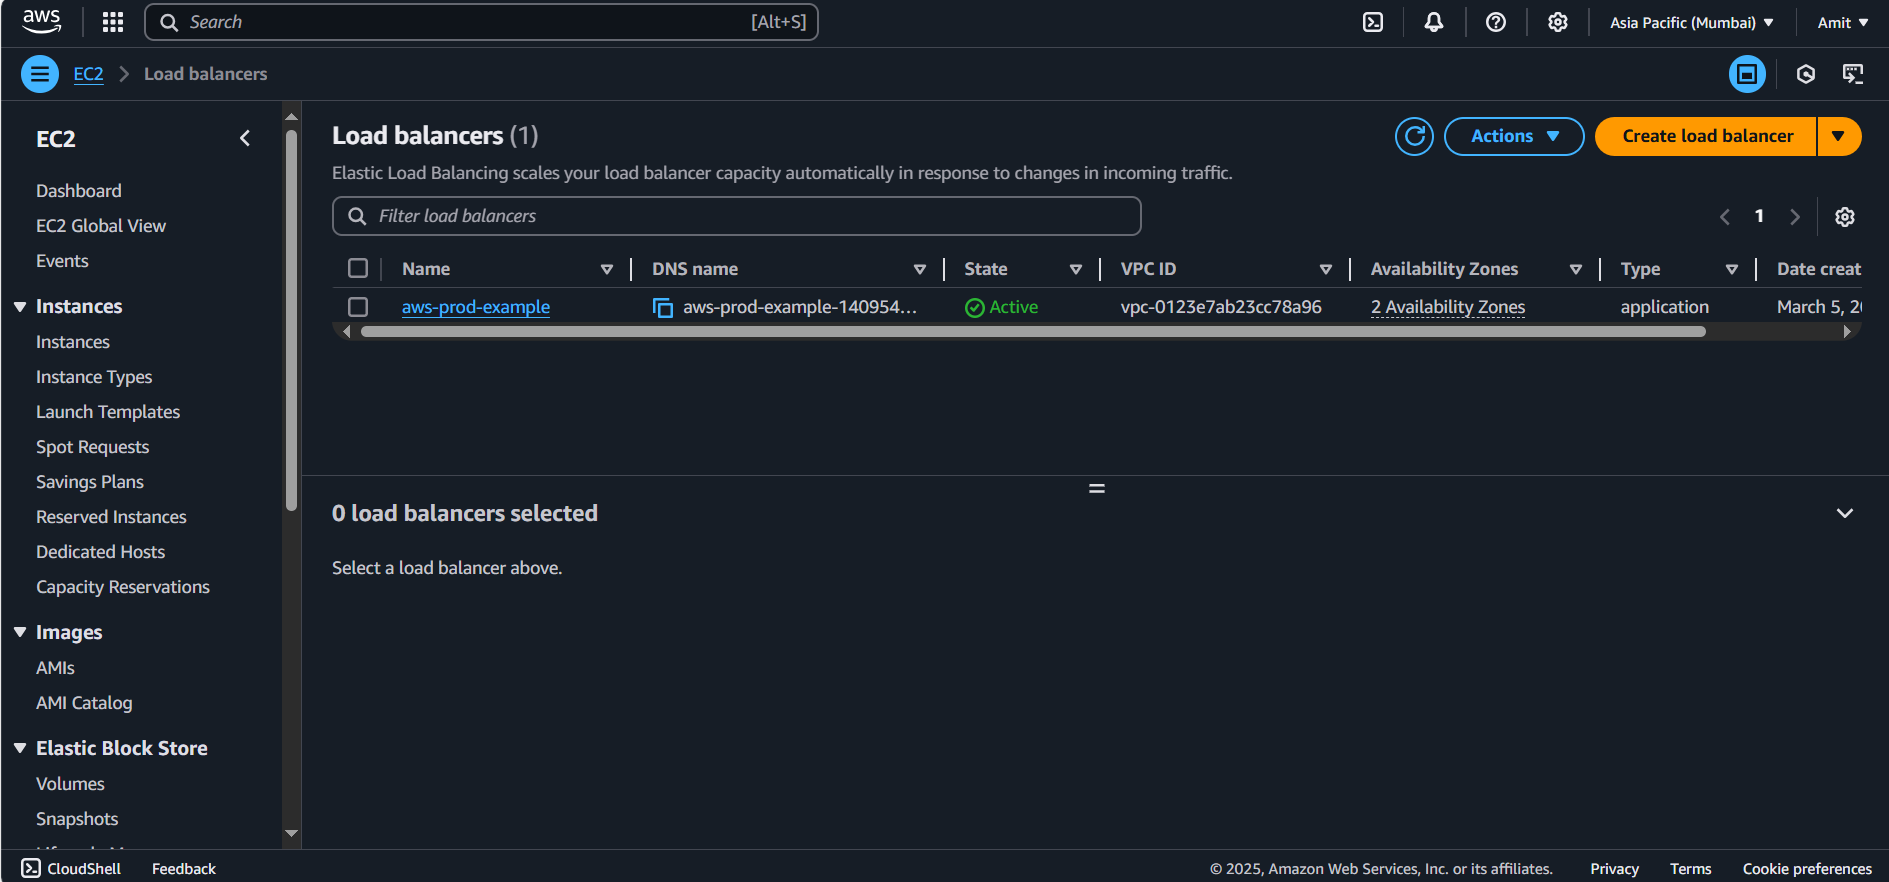
Verifying load balancer
As we can see our Load balancer isn’t accessible to port 80 because we haven’t configured in Security Group. Go to security and add port 80 for the load balancer.

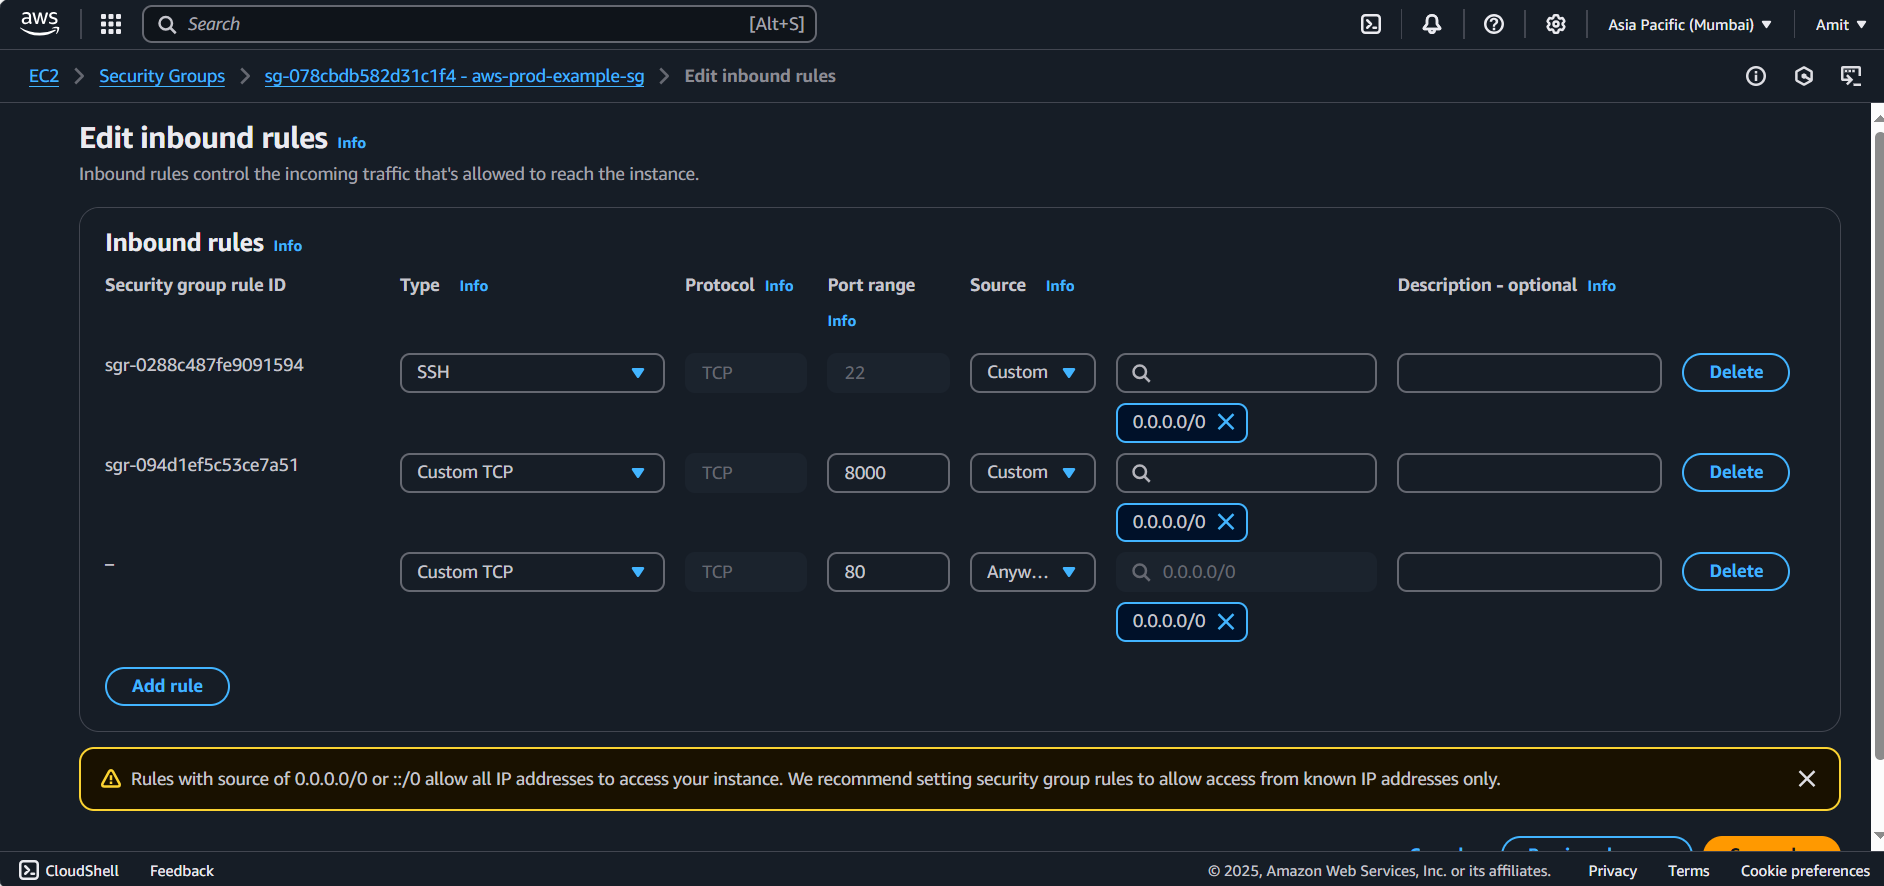
We have successfully added port 80 in our security group of VPC.
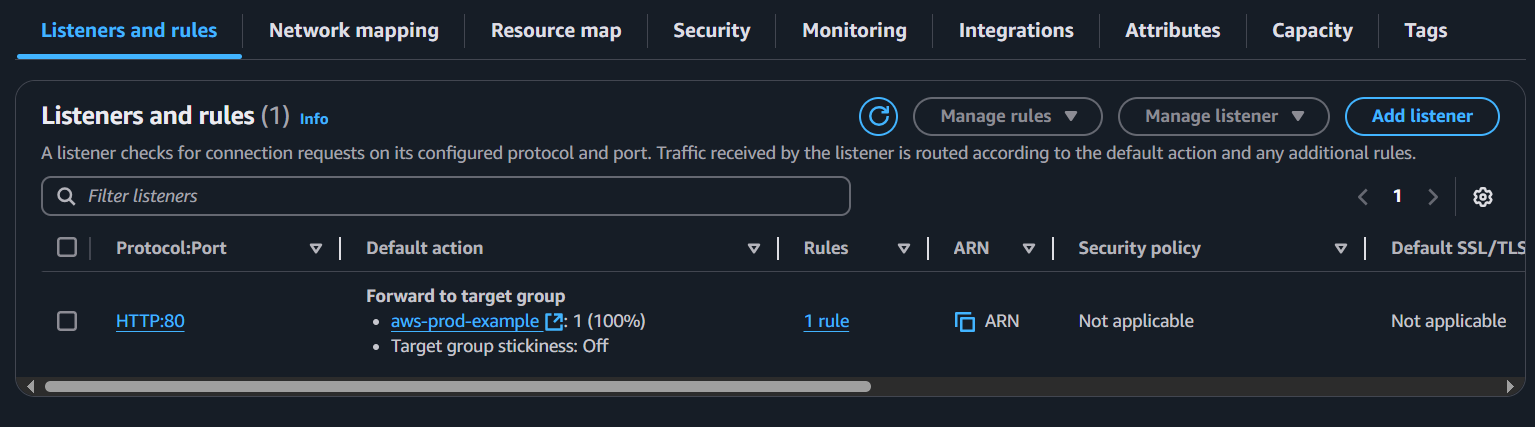
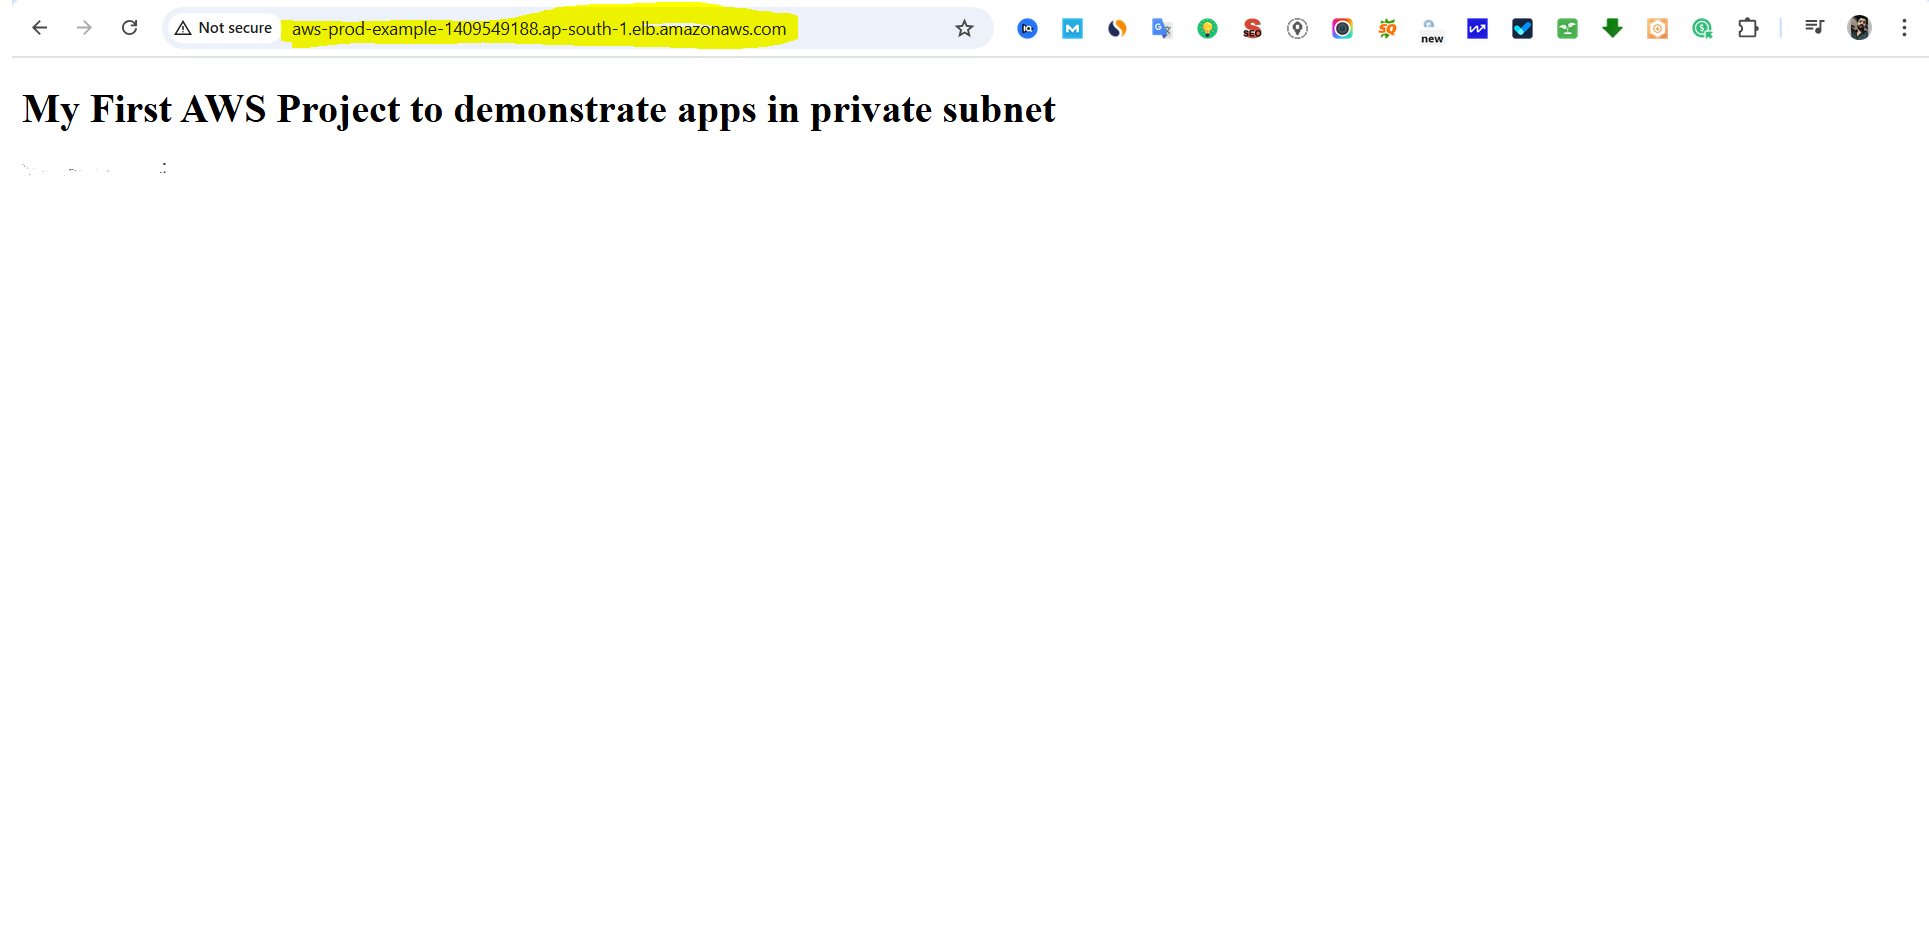
Go to the ALB's DNS name and verify if traffic is being correctly routed to your instances.
Test Load Balancing
Test Traffic Distribution:
Since you have configured two instances in the target group, 50% of the traffic should go to one instance and the other 50% should go to the second instance.
One instance should show the application (HTML page), and the other might show an error (depending on whether the application is running on that instance).
Validate Health Check Behavior:
The load balancer routes traffic based on health checks. If an instance is unhealthy (i.e., the application isn’t responding), the traffic won’t be routed to that instance.
You can configure the health check settings in the target group and test by turning off the Python app on one of the instances and seeing how the load balancer reroutes traffic.
Final Configuration
Modify Security Groups (If Needed):
- If there are any issues with connectivity (e.g., access to port 80), modify the security group to open the necessary ports.
Add Application to Both Instances (Optional):
- To see the load balancing behavior more clearly, you can deploy the same Python application on both instances. This way, when traffic is routed, you’ll see the same application on both instances.
By following this detailed process, you have successfully:
Created a Bastion host.
Set up a private subnet with EC2 instances.
Deployed a simple Python app on one EC2 instance.
Configured a load balancer to distribute traffic.
Tested the load balancer functionality, including health checks and routing to multiple EC2 instances.
I Got SNS Email too:

Subscribe to my newsletter
Read articles from Amit singh deora directly inside your inbox. Subscribe to the newsletter, and don't miss out.
Written by
Amit singh deora
Amit singh deora
DevOps | Cloud Practitioner | AWS | GIT | Kubernetes | Terraform | ArgoCD | Gitlab