How to Deploy a 3-Tier Application: DevOps Project
 Bittu Sharma
Deploying a 3-tier application is a cornerstone of modern software development, particularly in environments where scalability, security, and efficiency are paramount. Leveraging DevOps practices in this context allows for the creation of a highly automated and consistent deployment pipeline, which is essential for maintaining high standards across the development lifecycle.
Before diving into this blog, I want to mention that I’ve used a bit of help from ChatGPT to organize my thoughts. Given the complexity and length of the content, I thought it would be beneficial to ensure all the critical steps are clearly explained. This blog is based on a DevOps project that I recently completed, focusing on deploying a 3-tier Node.js application. Let’s explore the deployment process together!
What is the 3-Tier Architecture in Application Development?
Before delving into the technical details of deployment, it’s important to understand what a 3-tier architecture entails. This architecture is a common model in web application development and is designed to separate concerns within the application, enhancing both manageability and scalability.

**Presentation Tier (Frontend):
**▶ The Presentation Tier is the topmost layer of the application, responsible for interacting with the user. This is where the user interface (UI) lives, and it’s typically built using web technologies such as HTML, CSS, and JavaScript.
▶ In a Node.js application, this tier might also involve frameworks like React, Angular, or Vue.js to create dynamic and responsive user interfaces. The primary function of this tier is to present data to the user and to capture user inputs.
▶ This tier communicates with the Logic Tier to fetch and display data, ensuring that the user experience is seamless and interactive.**Application Tier (Backend):
**▶ The Application Tier is the middle layer and acts as the brain of the application. It’s responsible for processing user inputs, making logical decisions, and interacting with the data tier.
▶ In a Node.js application, this tier is typically built using Express.js or another Node.js framework. It handles everything from API requests, data processing, business logic execution, to managing user sessions.
▶ The Logic Tier is crucial for maintaining the integrity and consistency of the application, ensuring that all operations are executed correctly and efficiently. This tier often interacts with external services and databases to fetch, update, and delete data as needed.**Data Tier (Database):
**▶ The Data Tier is the bottom layer of the architecture, where all the data management happens. This includes storing, retrieving, and updating data that the application requires.
▶ In this project, the Data Tier could involve databases like MySQL, MongoDB, or PostgreSQL, depending on the specific needs of the application. The choice of database is often based on factors such as data structure, scalability requirements, and performance considerations.
▶ The Logic Tier communicates with the Data Tier through a database management system (DBMS), executing queries and managing transactions to ensure data consistency and reliability.
This layered approach offers several advantages:
Separation of Concerns: Each tier handles a specific aspect of the application, making it easier to manage, maintain, and scale each component independently.
Scalability: Since each tier can be scaled independently, you can allocate resources more efficiently. For instance, if your application experiences a spike in user activity, you can scale the presentation tier without necessarily scaling the backend or database tiers.
Security: By isolating each tier, you can implement security measures specific to each layer, reducing the attack surface and enhancing overall security.
Project Overview: Deploying the 3-Tier Application
The primary objective of this project was to deploy a Node.js application within a 3-tier architecture using a fully automated CI/CD pipeline. The emphasis was on ensuring that the deployment process was consistent, secure, and scalable across the various environments — development, testing, and production.
In this setup:
Development Environment: The focus is on rapid iteration and testing. Developers commit code to a shared repository, where automated builds and tests are triggered.
Testing Environment: This environment mirrors production as closely as possible. It’s used for running more extensive tests, including integration and system tests, ensuring that the application behaves as expected under real-world conditions.
Production Environment: This is the live environment where the application is accessible to end users. The production environment is optimized for performance and stability, with all code passing through rigorous testing and quality gates before deployment.
The pipeline was designed to streamline the process of moving code from development to production. Automation was key, with tools like Jenkins, Docker, and Kubernetes used to handle tasks that would otherwise require manual intervention. This not only increased efficiency but also reduced the risk of human error, making the deployment process more reliable.
This project showcases the power of DevOps practices in managing complex deployments, highlighting the importance of automation, security, and scalability in modern software development. The following sections will dive deeper into each phase of the deployment process, detailing the specific tools and strategies used to achieve these goals.
Detailed Step-by-Step Guide
Step 1: Creating AWS Instance for Local Deployment
I am using Terraform IaC to launch an EC2 instance on AWS rather than doing traditionally, so I assume you know how to set up AWS CLI and use a Terraform. Create a main.tf file with the following Terraform configuration to provision an AWS EC2 instance:
provider "aws" {
  region = "ap-south-1" # Specify your desired AWS region
}

resource "aws_instance" "local" {
  ami           = "ami-0c55b159cbfafe1f0" # Replace with the latest Ubuntu AMI for your region
  instance_type = "t2.medium"
  key_name      = "devopskey" # Ensure this key already exists and is downloaded

  security_groups = ["DevOps"] # Ensure this security group exists

  tags = {
    Name = "local"
  }
}

output "instance_id" {
  value = aws_instance.local.id
}

output "instance_public_ip" {
  value = aws_instance.local.public_ip
}

output "instance_public_dns" {
  value = aws_instance.local.public_dns
}
Instructions:
Install Terraform: If you haven’t already, download and install Terraform.
Initialize Terraform: In the directory where your Terraform file is saved, run
terraform initthrough AWS Console to initialize the configuration.Apply the Configuration: Run
terraform apply. Terraform will create the instances as defined in the configuration file.Connect to Instances: After deployment, you can SSH into both instances using their public IP addresses.
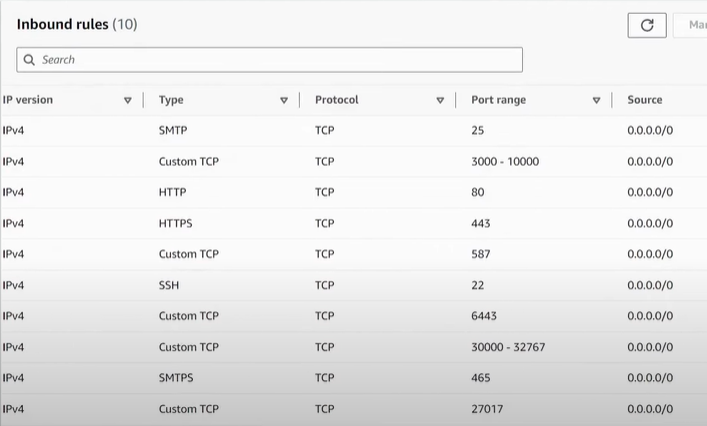
Security Group Configuration:
Security groups in AWS act as virtual firewalls for your instances, controlling inbound and outbound traffic. Here’s a summary of the security group rules used in this project:
SSH (Port 22): Allows SSH access to the instances.
HTTP (Port 80): Open for web traffic to the application.
HTTPS (Port 443): Secure web traffic.
Custom TCP (Port 6443): Often used for Kubernetes API server, but can be adjusted based on your application’s needs.
Custom TCP (Ports 30000–32767): These ports are typically used for dynamic applications that require a range of ports (e.g., Node.js, custom applications).
SMTP (Ports 25 and 465): For email services.
Custom TCP (Port 27017): Commonly used by MongoDB but can be adapted for other databases or services.
Here’s an example of the security group configuration:
Using AWS Console (Manual Method)
Login to AWS Console:
• Navigate to the EC2 Dashboard.
• Click on Launch Instance.Configure the Monitoring Instance:
• Choose an Amazon Machine Image (AMI), such as Amazon Linux 2 or Ubuntu.
• Select an instance type (t3.mediumfor more resources).
• Configure instance details, ensuring the instance is in a VPC with proper networking and security groups.
• Add storage as needed.
• Assign a name tag likeLocal.
• Review and launch the instance.
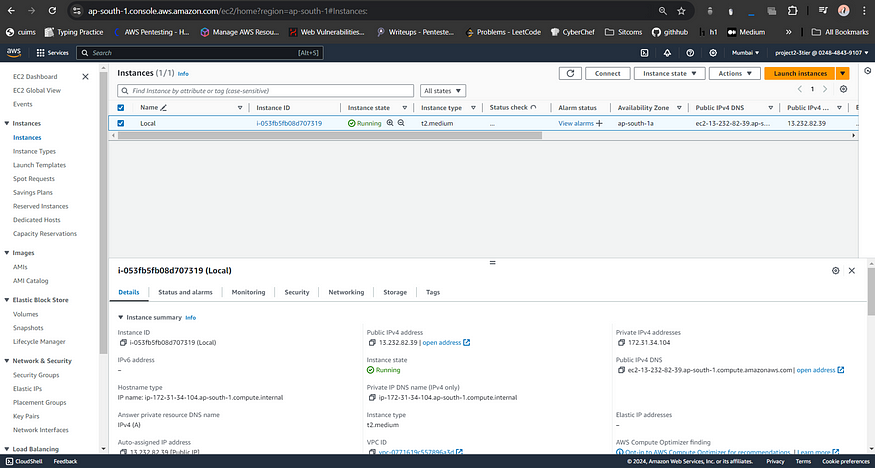
After the instance is created, you can use the output provided by Terraform to access your instance using SSH:
ssh -i path/to/devopskey.pem ubuntu@<instance_public_ip> # For terminal
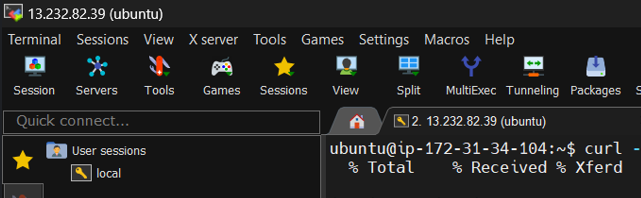
or you can use MobaXterm to connect easily:
▶ Just click on Session->SSH
▶ Enter Host (public ip of ec2)
▶ Enter UserName (ubuntu)
▶ Import the keypair (.pem file)
▶ OK
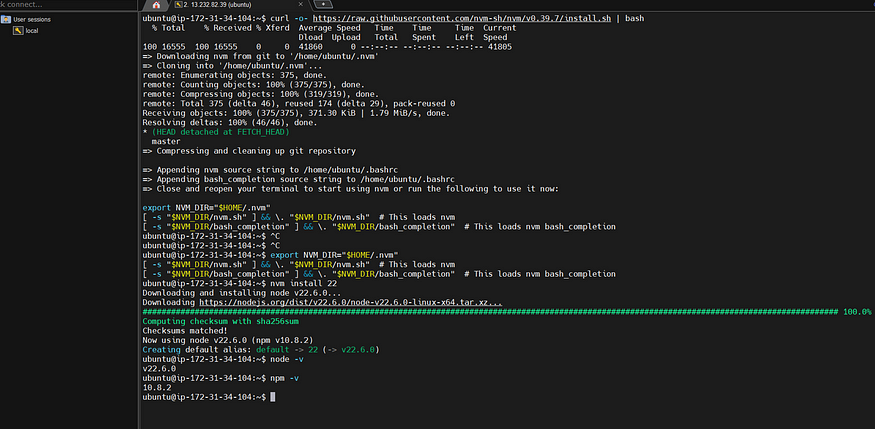
Once your AWS EC2 instance is up and running, the next step is to install Node.js. Here’s how you can do it:
use update command to update the ec2 instance:
sudo apt update # Important
Node.js: https://nodejs.org/en/download/package-manager
# installs nvm (Node Version Manager)
curl -o- https://raw.githubusercontent.com/nvm-sh/nvm/v0.40.0/install.sh | bash

# download and install Node.js (you may need to restart the terminal)
nvm install 20

# verifies the right Node.js version is in the environment
node -v # should print `v20.16.0`

# verifies the right npm version is in the environment
npm -v # should print `10.8.1`
Clone your repo or use the one which I use in this project, but if you are using this one then you have to set-ups some env variables and connect to mongo db:
Edit app.js file to connect with your db url
And add all other variables to .env file:
CLOUDINARY_CLOUD_NAME=[Your Cloudinary Cloud Name]
CLOUDINARY_KEY=[Your Cloudinary Key]
CLOUDINARY_SECRET=[Your Cloudinary Secret]
MAPBOX_TOKEN=[Your Mapbox Token]
DB_URL=[Your MongoDB Atlas Connection URL]
SECRET=[Your Chosen Secret Key] # This can be any value you prefer
Git Link: https://github.com/bittush8789/3-Tier-Full-Stack.git
After proper configuration use npm commands to up the website:
npm install
npm start
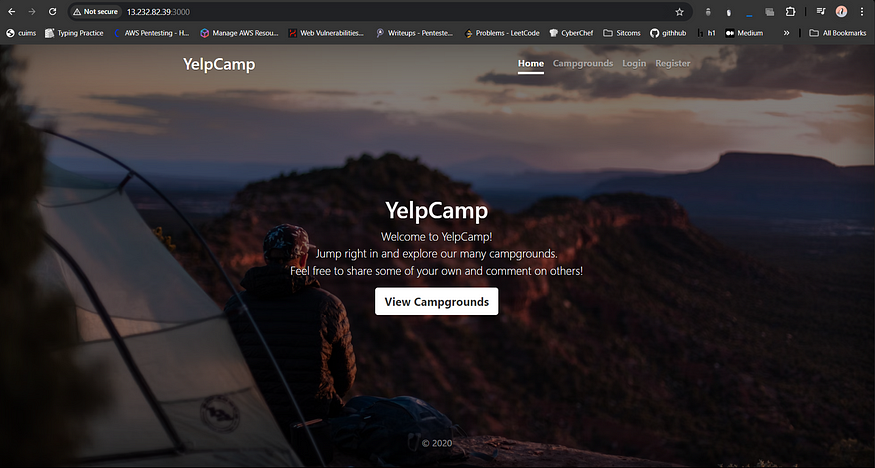
Play with the portal and cross-check with your db to verify the configurations that we have done.
Step 2: Creating AWS Instances for Dev Deployment
Use Terraform or manually create a AWS EC2 Instance for Dev deployment.
Jenkins: Automating CI/CD Pipelines
Jenkins is a powerful automation server that plays a central role in CI/CD pipelines. It automates the process of building, testing, and deploying applications, ensuring that every code change is automatically validated and integrated into the project. With Jenkins, you can set up continuous integration (CI) and continuous deployment (CD) pipelines that automate the entire software delivery process, from code commit to production deployment.
Why Jenkins?
Automated Builds: Jenkins automatically triggers builds whenever code changes are pushed to the repository, ensuring that the codebase is always in a deployable state.
Integration with Tools: Jenkins integrates seamlessly with a wide range of tools and technologies, including GitHub, Docker, Kubernetes, and more, making it a versatile choice for CI/CD.
Extensibility: Jenkins has a vast library of plugins that allow you to extend its functionality, enabling customized workflows tailored to your specific needs.
Scalability: Jenkins can be configured to run builds on multiple nodes, allowing it to scale to meet the demands of larger projects.
In this project, Jenkins will be used to automate the build and deployment process of the Node.js application, ensuring that every change is tested and deployed consistently across development, testing, and production environments.
To set-up Jenkins*:*
provider "aws" {
  region = "ap-south-1" # Specify your desired AWS region
}

resource "aws_instance" "jenkins" {
  ami           = "ami-0c55b159cbfafe1f0" # Replace with the latest Ubuntu AMI for your region
  instance_type = "t2.large"
  key_name      = "devopskey" # Ensure this key already exists and is downloaded
  security_groups = ["DevOps"] # Ensure this security group exists

  tags = {
    Name = "Jenkins"
  }
}

output "instance_id" {
  value = aws_instance.jenkins.id
}

output "instance_public_ip" {
  value = aws_instance.jenkins.public_ip
}

output "instance_public_dns" {
  value = aws_instance.jenkins.public_dns
}
SonarQube: Ensuring Code Quality
SonarQube is an open-source platform that helps maintain high code quality by performing static code analysis. It scans your codebase for bugs, vulnerabilities, code smells, and other issues, providing detailed reports that help developers improve the maintainability and security of their code.
Why SonarQube?
Static Code Analysis: SonarQube analyzes your code without executing it, identifying potential issues early in the development process.
Quality Gates: You can define quality gates in SonarQube, which enforce minimum standards for code quality before code can be promoted to the next stage of the pipeline.
Wide Language Support: SonarQube supports a broad range of programming languages, making it a versatile tool for projects involving multiple languages.
Integration with CI/CD: SonarQube integrates with Jenkins and other CI/CD tools, allowing automated code quality checks as part of the build process.
In this project, SonarQube will be integrated with Jenkins to ensure that every code change meets the defined quality standards before it is deployed. This integration helps maintain a high level of code quality throughout the development lifecycle, reducing the risk of introducing defects into the production environment.
To set-up SonarQube*:*
provider "aws" {
  region = "ap-south-1" # Specify your desired AWS region
}

resource "aws_instance" "sonarqube" {
  ami           = "ami-0c55b159cbfafe1f0" # Replace with the latest Ubuntu AMI for your region
  instance_type = "t2.medium"
  key_name      = "devopskey" # Ensure this key already exists and is downloaded
  security_groups = ["DevOps"] # Ensure this security group exists

  tags = {
    Name = "SonarQube"
  }
}

output "instance_id" {
  value = aws_instance.sonarqube.id
}

output "instance_public_ip" {
  value = aws_instance.sonarqube.public_ip
}

output "instance_public_dns" {
  value = aws_instance.sonarqube.public_dns
}
You can also write a combine code for both instance*.*
provider "aws" {
  region = "ap-south-1" # Specify your desired AWS region
}

# Jenkins Instance
resource "aws_instance" "jenkins" {
  ami           = "ami-0c55b159cbfafe1f0" # Replace with the latest Ubuntu AMI for your region
  instance_type = "t2.large"
  key_name      = "devopskey" # Ensure this key already exists and is downloaded
  security_groups = ["DevOps"] # Ensure this security group exists

  tags = {
    Name = "Jenkins"
  }
}

# SonarQube Instance
resource "aws_instance" "sonarqube" {
  ami           = "ami-0c55b159cbfafe1f0" # Replace with the latest Ubuntu AMI for your region
  instance_type = "t2.medium"
  key_name      = "devopskey" # Ensure this key already exists and is downloaded
  security_groups = ["DevOps"] # Ensure this security group exists

  tags = {
    Name = "SonarQube"
  }
}

# Outputs for Jenkins Instance
output "jenkins_instance_id" {
  value = aws_instance.jenkins.id
}

output "jenkins_instance_public_ip" {
  value = aws_instance.jenkins.public_ip
}

output "jenkins_instance_public_dns" {
  value = aws_instance.jenkins.public_dns
}

# Outputs for SonarQube Instance
output "sonarqube_instance_id" {
  value = aws_instance.sonarqube.id
}

output "sonarqube_instance_public_ip" {
  value = aws_instance.sonarqube.public_ip
}

output "sonarqube_instance_public_dns" {
  value = aws_instance.sonarqube.public_dns
}
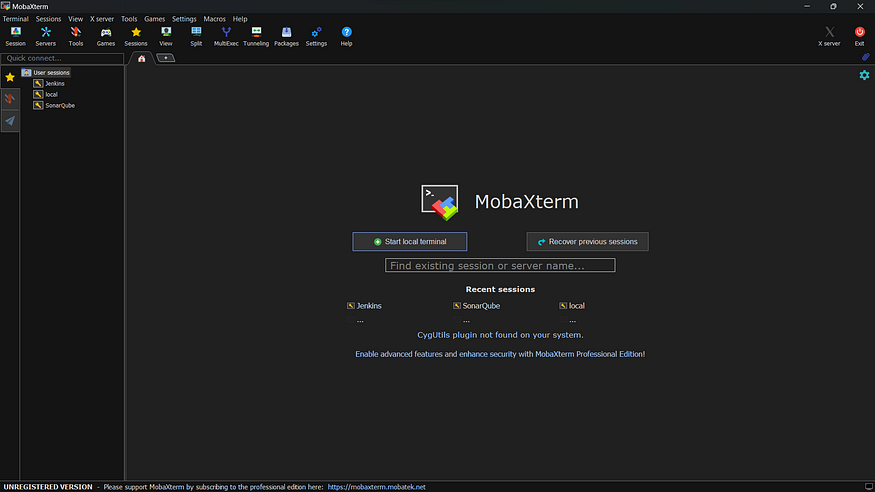
Use MobaXterm to easily connect both instances to continue the process.
Update both instances when you connect it to first time:
sudo apt update
Now install jenkins on Jenkins session
Use the below script to install:
#!/bin/bash
# Install OpenJDK 17 JRE Headless
sudo apt install openjdk-17-jre-headless -y

# Download Jenkins GPG key
sudo wget -O /usr/share/keyrings/jenkins-keyring.asc \
 https://pkg.jenkins.io/debian-stable/jenkins.io-2023.key

# Add Jenkins repository to package manager sources
echo deb [signed-by=/usr/share/keyrings/jenkins-keyring.asc] \
 https://pkg.jenkins.io/debian-stable binary/ | sudo tee \
 /etc/apt/sources.list.d/jenkins.list > /dev/null

# Update package manager repositories
sudo apt-get update

# Install Jenkins
sudo apt-get install jenkins -y
nano install_jenkins.sh
chmod +x install_jenkins.sh
./install_jenkins.sh
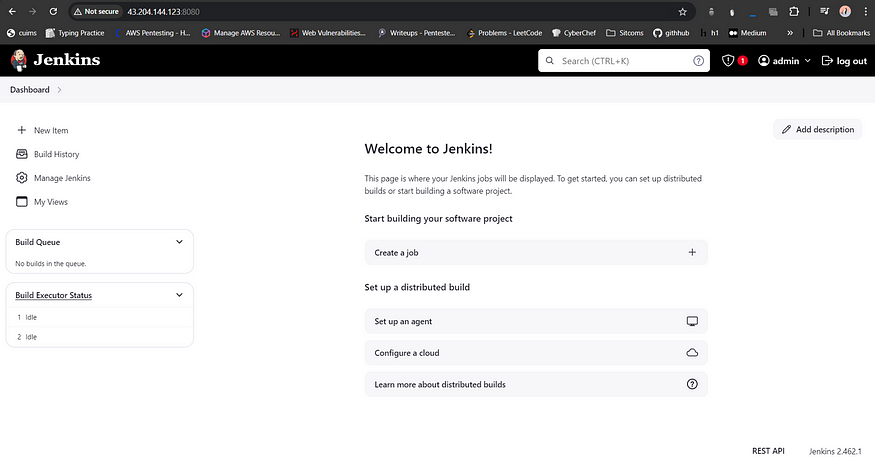
This will execute the script and install Jenkins on your server. Once installed, Jenkins will typically be accessible via port 8080 on your instance’s public IP address.
Set-up the configurations of “Getting-Started” sections, then you can see your Jenkins dashboard:
Now Install Docker for Future Use on both Instance (Jenkins and SonarQube):
Script file:
#!/bin/bash
# Update package manager repositories
sudo apt-get update

# Install necessary dependencies
sudo apt-get install -y ca-certificates curl

# Create directory for Docker GPG key
sudo install -m 0755 -d /etc/apt/keyrings

# Download Docker's GPG key
sudo curl -fsSL https://download.docker.com/linux/ubuntu/gpg -o /etc/apt/keyrings/docker.asc

# Ensure proper permissions for the key
sudo chmod a+r /etc/apt/keyrings/docker.asc

# Add Docker repository to Apt sources
echo "deb [arch=$(dpkg --print-architecture) signedby=/etc/apt/keyrings/docker.asc] https://download.docker.com/linux/ubuntu \
$(. /etc/os-release && echo "$VERSION_CODENAME") stable" | \
sudo tee /etc/apt/sources.list.d/docker.list > /dev/null

# Update package manager repositories
sudo apt-get update

# Install Docker
sudo apt-get install -y docker-ce docker-ce-cli containerd.io dockerbuildx-plugin docker-compose-plugin
sudo chmod 666 /var/run/docker.sock
nano install_docker.sh
chmod +x install_docker.sh
./install_docker.sh
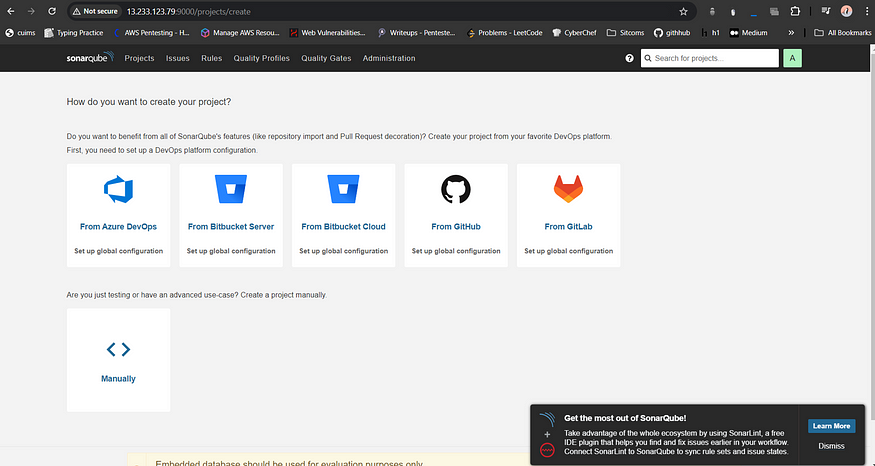
Install SonarQube on SonarQube Session:
Install docker from above script & run below command to setup SonarQube:
docker run -d --name sonar -p 9000:9000 sonarqube:lts-community
Now our SonarQube is up and running.
Enter username and password, click on login and change password
username: admin
password: admin
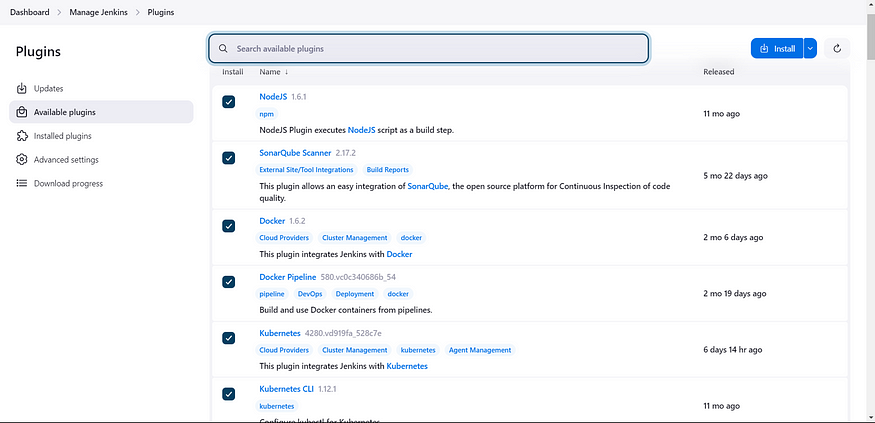
Install required plugins for Jenkins:
▶ NodeJS
▶ SonarQube Scanner
▶ Docker
▶ Docker Pipeline
▶ Kubernetes
▶ Kubernetes CLI
Install Trivy on Jenkins session:
sudo apt install wget apt-transport-https gnupg lsb-release -y
wget -qO - https://aquasecurity.github.io/trivy-repo/deb/public.key | sudo apt-key add -
echo deb https://aquasecurity.github.io/trivy-repo/deb $(lsb_release -sc) main | sudo tee -a /etc/apt/sources.list.d/trivy.list
sudo apt update -y
sudo apt install trivy -y
Once Jenkins is up and running, it’s essential to configure it with the necessary tools to support your CI/CD pipeline. For this project, you’ll need to configure SonarQube, Node.js, and Docker within Jenkins and to connect SonarQube to Jenkins with the help of token.
I won’t go into the details of these configurations, as they are standard procedures and assume you’re already familiar with them. Setting up these tools in Jenkins involves installing the relevant plugins and pointing Jenkins to the correct paths for Node.js and Docker installations. If you’re comfortable with Jenkins, you should be able to configure these tools quickly. This will help keep the focus on the critical steps of the project without unnecessarily increasing the length of the blog.
Add all the variables in base-64 encoded form which we created earlier, if you are using same git-repo:
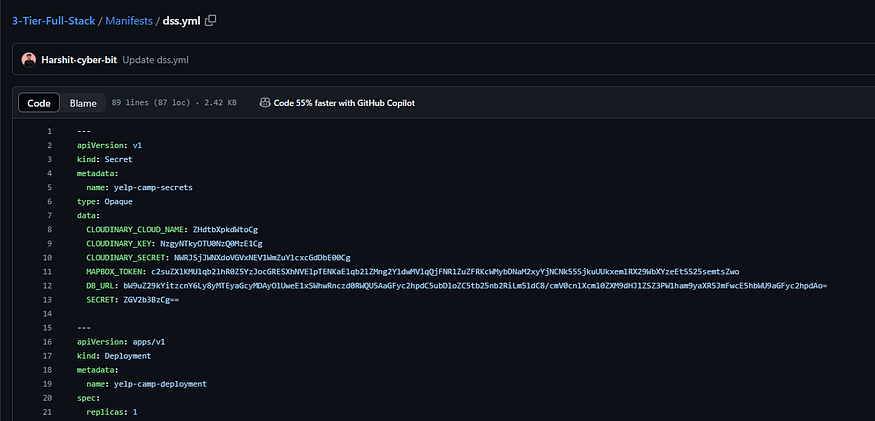
Configure this dss file, if you are using this repo and edit and add your credentials where require like docker username.
Step 3: Create a Pipeline for Dev-Env in Jenkins
Use the below pipeline, and configure with your credentials and understand properly to make it work. Don’t hesitate to use ChatGPT, if you stuck somewhere.
pipeline {
    agent any

    tools {
        nodejs 'node21'
    }

    environment {
        SCANNER_HOME = tool 'sonar-scanner'
    }

    stages {
        stage('Git Checkout') {
            steps {
                git clone 'https://github.com/Harshit-cyber-bit/DevOps-Shack-3Tier.git'
            }
        }

        stage('Install Package Dependencies') {
            steps {
                sh "npm install"
            }
        }

        stage('Unit Tests') {
            steps {
                sh "npm test"
            }
        }

        stage('Trivy FS Scan') {
            steps {
                sh "trivy fs --format table -o fs-report.html ."
            }
        }

        stage('SonarQube') {
            steps {
                withSonarQubeEnv('sonar') {
                    sh "$SCANNER_HOME/bin/sonar-scanner -Dsonar.projectKey=Campground -Dsonar.projectName=Campground"
                }
            }
        }

        stage('Docker Build & Tag') {
            steps {
                script {
                    withDockerRegistry(credentialsId: 'docker-cred', toolName: 'docker') {
                        sh "docker build -t harshitgupta21/camp:latest ."
                    }
                }
            }
        }

        stage('Trivy Image Scan') {
            steps {
                sh "trivy image --format table -o fs-report.html harshitgupta21/camp:latest"
            }
        }

        stage('Docker Push Image') {
            steps {
                script {
                    withDockerRegistry(credentialsId: 'docker-cred', toolName: 'docker') {
                        sh "docker push harshitgupta21/camp:latest"
                    }
                }
            }
        }

        stage('Docker Deploy To Local') {
            steps {
                script {
                    withDockerRegistry(credentialsId: 'docker-cred', toolName: 'docker') {
                        sh "docker run -d -p 3000:3000 harshitgupta21/camp:latest"
                    }
                }
            }
        }
    }
}
Build the pipeline:
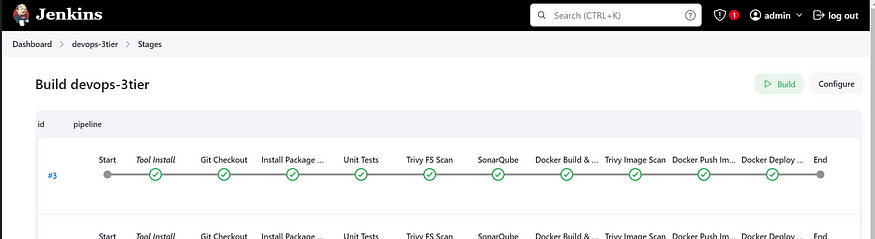
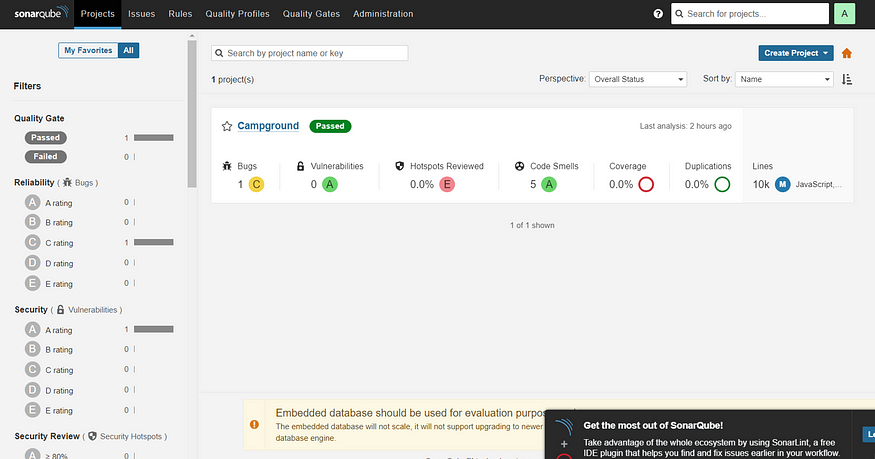
SonarQube Result
Step 4: Creating a Prod Deployment Environment
For a production deployment using Amazon EKS (Elastic Kubernetes Service), we’ll set up a managed Kubernetes cluster to handle container orchestration at scale. EKS automates cluster management tasks such as patching and scaling, allowing us to focus on deploying and managing our applications. We’ll configure node groups for automatic scaling and use Kubernetes manifests to deploy our services. EKS integrates with AWS tools for load balancing and security, ensuring your application is highly available, scalable, and secure.
Setting up EKS on Jenkins session:
▶ Make a script file with below contents:
nano ctl.sh
# AWS CLI
curl "https://awscli.amazonaws.com/awscli-exe-linux-x86_64.zip" -o
"awscliv2.zip"
sudo apt install unzip
unzip awscliv2.zip
sudo ./aws/install
aws configure

# Kubectl Installation
curl -o kubectl https://amazon-eks.s3.us-west-2.amazonaws.com/1.19.6/2021-
01-05/bin/linux/amd64/kubectl
chmod +x ./kubectl
sudo mv ./kubectl /usr/local/bin
kubectl version --short --client

# EKSctl Installation
curl --silent --location
"https://github.com/weaveworks/eksctl/releases/latest/download/eksctl_$(una
me -s)_amd64.tar.gz" | tar xz -C /tmp
sudo mv /tmp/eksctl /usr/local/bin
eksctl version
sudo chmod +x ctl.sh
./ctl.sh
Make a new IAM user in AWS console from root account, I am going to use terraform again to create a user name “eks-user”:
provider "aws" {
  region = "ap-south-1"  # Adjust this as needed
}

# Create IAM user
resource "aws_iam_user" "eks_user" {
  name = "eks-user"
}

# Attach managed policies to the user
resource "aws_iam_user_policy_attachment" "eks_user_policies" {
  for_each = {
    "AmazonEC2FullAccess"            = "arn:aws:iam::aws:policy/AmazonEC2FullAccess"
    "AmazonEKS_CNI_Policy"           = "arn:aws:iam::aws:policy/AmazonEKS_CNI_Policy"
    "AmazonEKSClusterPolicy"         = "arn:aws:iam::aws:policy/AmazonEKSClusterPolicy"
    "AmazonEKSWorkerNodePolicy"      = "arn:aws:iam::aws:policy/AmazonEKSWorkerNodePolicy"
    "AWSCloudFormationFullAccess"    = "arn:aws:iam::aws:policy/AWSCloudFormationFullAccess"
    "IAMFullAccess"                  = "arn:aws:iam::aws:policy/IAMFullAccess"
  }

  user       = aws_iam_user.eks_user.name
  policy_arn = each.value
}

# Inline policy document for eks-req
data "aws_iam_policy_document" "eks_req" {
  statement {
    actions   = ["eks:*"]
    resources = ["*"]
    effect    = "Allow"
  }
}

# Attach the inline policy to the IAM user
resource "aws_iam_user_policy" "eks_req_policy" {
  name   = "eks-req"
  user   = aws_iam_user.eks_user.name
  policy = data.aws_iam_policy_document.eks_req.json
}
Use the Access Key credentials of this “eks-user” to configure AWS CLI which we install recently on Jenkins session.
Now use the below commands to create EKS Cluster:
eksctl create cluster --name=my-eks22 \
  --region=ap-south-1 \
  --zones=ap-south-1a,ap-south-1b \
  --without-nodegroup

eksctl utils associate-iam-oidc-provider \
  --region ap-south-1 \
  --cluster my-eks22 \
  --approve

eksctl create nodegroup --cluster=my-eks22 \
  --region=ap-south-1 \
  --name=node2 \
  --node-type=t3.medium \
  --nodes=3 \
  --nodes-min=2 \
  --nodes-max=3 \
  --node-volume-size=20 \
  --ssh-access \
  --ssh-public-key=devopskey \
  --managed \
  --asg-access \
  --external-dns-access \
  --full-ecr-access \
  --appmesh-access \
  --alb-ingress-access
Run kubectl cmd to verify:
kubectl get nodes
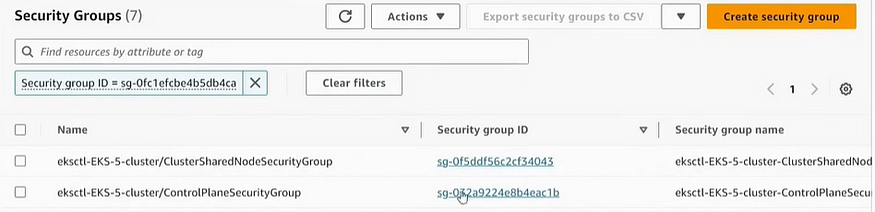
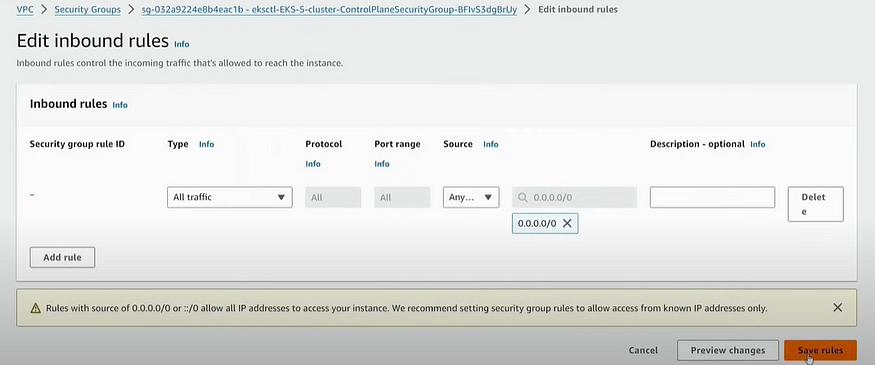
Now go to security group of AWS EKS through console, to add one specific policy for the cluster:

Now on Jenkins Session:
kubectl create namespace webapps
Creating Service Account
nano svc.yml
apiVersion: v1
kind: ServiceAccount
metadata:
  name: jenkins
  namespace: webapps
kubectl apply -f svc.yml
Create Role
nano rol.yml
apiVersion: rbac.authorization.k8s.io/v1
kind: Role
metadata:
  name: app-role
  namespace: webapps
rules:
  - apiGroups:
        - ""
        - apps
        - autoscaling
        - batch
        - extensions
        - policy
        - rbac.authorization.k8s.io
    resources:
      - pods
      - secrets
      - componentstatuses
      - configmaps
      - daemonsets
      - deployments
      - events
      - endpoints
      - horizontalpodautoscalers
      - ingress
      - jobs
      - limitranges
      - namespaces
      - nodes
      - pods
      - persistentvolumes
      - persistentvolumeclaims
      - resourcequotas
      - replicasets
      - replicationcontrollers
      - serviceaccounts
      - services
    verbs: ["get", "list", "watch", "create", "update", "patch", "delete"]
kubectl apply -f rol.yml
Bind the role to service account
nano bind.yml
apiVersion: rbac.authorization.k8s.io/v1
kind: RoleBinding
metadata:
  name: app-rolebinding
  namespace: webapps
roleRef:
  apiGroup: rbac.authorization.k8s.io
  kind: Role
  name: app-role
subjects:
- namespace: webapps
  kind: ServiceAccount
  name: jenkins
kubectl apply -f bind.yml
To create secret token:
nano sec.yml
apiVersion: v1
kind: Secret
type: kubernetes.io/service-account-token
metadata:
  name: mysecretname
  annotations:
    kubernetes.io/service-account.name: jenkins
kubectl apply -f sec.yml -n webapps
kubectl describe secret mysecretname -n webapps
SAVE the token in Jenkins Credentials as “k8-token” for future use.
Step 5: Create a Pipeline for Prod-Env in Jenkins
Use the below pipeline, and configure with your credentials and understand properly to make it work. Don’t hesitate to use ChatGPT, if you stuck somewhere.
pipeline {
    agent any

    tools {
        nodejs 'node21'
    }

    environment {
        SCANNER_HOME = tool 'sonar-scanner'
    }

    stages {
        stage('Git Checkout') {
            steps {
                git clone 'https://github.com/Hashit-cyber-bit/DevOps-Shack-3Tier.git'
            }
        }

        stage('Install Package Dependencies') {
            steps {
                sh "npm install"
            }
        }

        stage('Unit Tests') {
            steps {
                sh "npm test"
            }
        }

        stage('Trivy FS Scan') {
            steps {
                sh "trivy fs --format table -o fs-report.html ."
            }
        }

        stage('SonarQube') {
            steps {
                withSonarQubeEnv('sonar') {
                    sh "$SCANNER_HOME/bin/sonar-scanner -Dsonar.projectKey=Campground -Dsonar.projectName=Campground"
                }
            }
        }

        stage('Docker Build & Tag') {
            steps {
                script {
                    withDockerRegistry(credentialsId: 'docker-cred', toolName: 'docker') {
                        sh "docker build -t harshitgupta21/campa:latest ."
                    }
                }
            }
        }

        stage('Trivy Image Scan') {
            steps {
                sh "trivy image --format table -o fs-report.html harshitgupta21/campa:latest"
            }
        }

        stage('Docker Push Image') {
            steps {
                script {
                    withDockerRegistry(credentialsId: 'docker-cred', toolName: 'docker') {
                        sh "docker push harshitgupta21/campa:latest"
                    }
                }
            }
        }

        stage('Deploy To EKS') {
            steps {
                withKubeCredentials(kubectlCredentials: [[caCertificate: '', clusterName: 'my-eks22', contextName: '', credentialsId: 'k8-token', namespace: 'webapps', serverUrl: 'https://0CB794B1E81785AF1D98888B0FB36B19.gr7.ap-south1.eks.amazonaws.com']]) {
                    sh "kubectl apply -f Manifests/"
                    sleep 60
                }
            }
        }

        stage('Verify the Deployment') {
            steps {
                withKubeCredentials(kubectlCredentials: [[caCertificate: '', clusterName: 'my-eks22', contextName: '', credentialsId: 'k8-token', namespace: 'webapps', serverUrl: 'https://0CB794B1E81785AF1D98888B0FB36B19.gr7.ap-south1.eks.amazonaws.com']]) {
                    sh "kubectl get pods -n webapps"
                    sh "kubectl get svc -n webapps"
                }
            }
        }
    }
}
Edit with your EKS-serverURL in the pipeline.
▶ Build the pipeline.
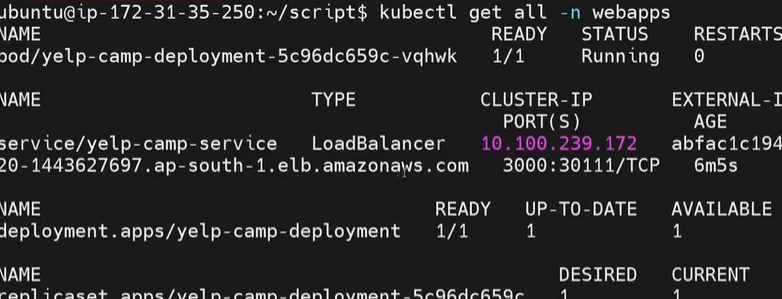
Check the logs in backend on Jenkins Session to verify the build:
kubectl get all -n webapps

THATS IT!
Congratulations on completing your project and getting everything up and running smoothly! Your 3-tier DevOps pipeline is now fully operational, integrating CI/CD, code quality, security scanning, and containerization.
As you wrap up, you have two options:
Continue Monitoring and Iterating: Keep the environment active to monitor performance, make further improvements, or handle additional deployments.
Disable Resources: If you’re done with the project or need to avoid AWS billing, consider terminating the resources you created. This includes EC2 instances, EKS clusters, and other services. Be sure to double-check for any additional services or resources that might incur costs.
Feel free to reach out.
Conclusion
In this project, you successfully implemented a comprehensive 3-tier DevOps CI/CD pipeline for a Node.js application. By leveraging tools like Jenkins, SonarQube, Docker, Trivy, and Amazon EKS, you created an automated, secure, and scalable deployment process that ensures efficient development and reliable production deployments.
From configuring your AWS infrastructure to integrating essential tools and setting up rigorous security and quality checks, you’ve laid a solid foundation for continuous integration and deployment. As you move forward, you can either continue optimizing and monitoring your setup or clean up resources to manage costs effectively. Congratulations on completing this robust pipeline and achieving a streamlined, effective deployment strategy!
Follow me on Github: https://github.com/bittush8789
Follow me on LinkedIn: https://www.linkedin.com/in/bittu-kumar-54ab13254/
Subscribe to my newsletter
Read articles from Bittu Sharma directly inside your inbox. Subscribe to the newsletter, and don't miss out.
Written by
Bittu Sharma
Bittu Sharma
I am Bittu Sharma, a DevOps & AI Engineer with a keen interest in building intelligent, automated systems. My goal is to bridge the gap between software engineering and data science, ensuring scalable deployments and efficient model operations in production.! 𝗟𝗲𝘁'𝘀 𝗖𝗼𝗻𝗻𝗲𝗰𝘁 I would love the opportunity to connect and contribute. Feel free to DM me on LinkedIn itself or reach out to me at bittush9534@gmail.com. I look forward to connecting and networking with people in this exciting Tech World.