DOM - (Document Object Model)
 Shivam Verma
You've probably heard countless times that JavaScript powers web interfaces,, making them interactive—think pop-ups, form validations, and dynamic content. But have you ever wondered how it all works?
Well, under the hood of JavaScript, DOM (a programming interface for web documents) is able to manipulate websites.
It’s the cornerstone for dynamic web development.
In this article— we will profoundly explore DOM, shadow DOM, it's structure, and my learnings from 10 intriguing DOM challenges.
Source code » https:www.github.com/
All live here » https://theadroitdev.github.io/adroitdev.fun/
Introduction and Prerequisites
Well, starting from scratch what is a DOM really is? because before moving the into the coding section let’s understand it’s theory (not really) first.
Demystifying DOM
Document Object Model (or DOM) is a programming interface or representation of any XML or HTML document in a form of a logical tree,
Where each element, attribute of it represents (in a way that programming languages can interact with the page) as a node which is an object that holds it’s properties.
In other words; The browser creates a representation of that document known as Document Object Model (DOM). This document enables JavaScript to access and manipulate or tweak the elements and styles of a website and also add functionality to our page.
A web page is a document that can be either displayed in the browser window or as the HTML source. In both cases, it is the same document but the Document Object Model (DOM) representation allows it to be manipulated.
As an object-oriented representation of the web page, it can be modified with a scripting language such as JavaScript.
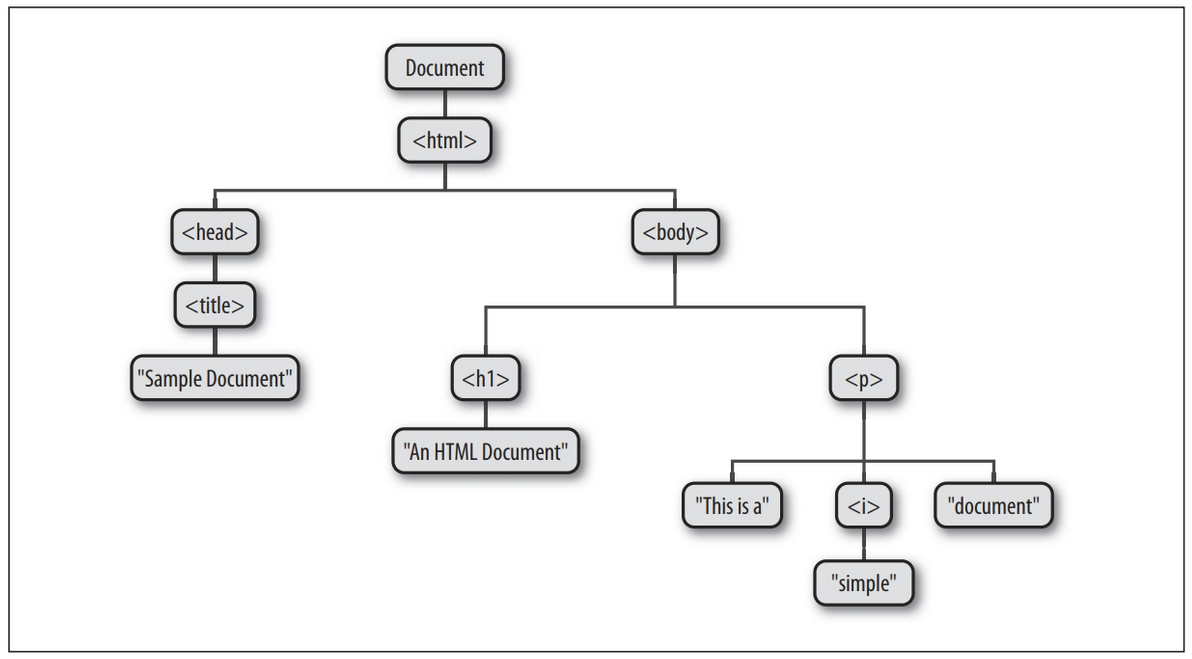
This image represents the Document Object Model (DOM) tree structure of an HTML document. It visually depicts how different elements of an HTML document are structured in a hierarchical manner.
Example to this:
The paragraph (
<p>) element has nested text nodes and an<i>(italic) tag.The text content is stored as text nodes inside elements.
Think of it like in this way: Imagine you have a physical book. If you want to highlight a sentence, you must find the correct page and section. Similarly, the DOM helps web developers find and modify specific parts of a webpage.
it’s Prominence?
Like, I have mention earlier it’s the cornerstone for the web.
If i conclude DOM in one word it would be dynamicity.
Think of a website devoid of any responsiveness. Imagining any webpage that has no web interactions might be quite stagnant?.
Over the years webpages have evolved, websites no longer needed to reload entire pages to update content. Instead, they could fetch data in the background and update the DOM dynamically.
This forms the basis of modern websites and applications.
Consider Instant search suggestions (e.g., Google’s autocomplete).
A webpage can switch themes (light mode to dark mode) by modifying the DOM.
What is DOM Traversing?
DOM traversing refers to the process of navigating through the Document Object Model (DOM) tree to access and manipulate elements based on their relationships with other elements.
DOM Manipulation: Accessing the DOM
DOM manipulation refers to the process of dynamically modifying the structure, content, or style of a web page using JavaScript.
The DOM (Document Object Model) represents the structure of an HTML or XML document as a tree of objects, and JavaScript provides methods and properties to interact with and modify this tree.
One of the most commonly used methods of the document object is the getElementById() method.
This method allows developers to access a specific element on the web page by its unique ID.
For example: we have a button with id btn
<button id="btn">Click Me</button>
and after we have some JavaScript, which looks like this (We'll look at this in more detail in the next section), but for now we can just say: we have attached an eventListener() to it; button.
Which has ‘‘click‘‘ event and a callback function which updates button’s HTML on being clicked.
 const button = document.getElementById('btn')
        button.addEventListener('click', () => {
            button.innerHTML = 'Clicked'
        })
When you click on button with id btn it’s HTML will be change from click to Clicked.
This is a basic example of how you can manipulates webpages through DOM.
Before moving onto the Events part let me introduce you some of methods from which you can access any of node of DOM
getElementsById()
The getElementById() method is a part of the JavaScript document object and it allows developers to access a specific element on a web page by its unique ID.
This method returns the first element that matches the specified ID, or null if no such element is found.
The getElementById() method is a convenient way to access a specific element on a web page, as it saves developers from having to traverse the entire DOM tree to find the element.
This method is especially useful when working with large and complex web pages, as it allows developers to quickly and easily access the elements they need.
It's important to note that the ID of an element must be unique within the web page, as the getElementById() method only returns the first element that matches the specified ID.
Also, the getElementById() method is case-sensitive, meaning that "myDiv" and "mydiv" are considered to be different IDs.
However, it's important to keep in mind that the ID of an element must be unique within the web page and the method is case-sensitive.
getElementsByClassName()
The getElementsByClassName() method is a part of the JavaScript document object and it allows developers to access multiple elements on a web page by their class name. This method returns a live HTML Collection of elements with the given class name, or an empty HTML Collection if no such elements are found.
For example, consider the following HTML code:
<div class="myClass">This is my div</div>
<div class="myClass">This is my div</div>
<div class="myClass">This is my div</div>
The following JavaScript code can be used to access the elements with the class name "myClass" and change their text:
let elements = document.getElementsByClassName("myClass");
for (let i = 0; i < elements.length; i++) {
    elements[i].innerHTML = "This is my new text";
}
A fascinating thing about getElementsByClassName is that it returns a live HTMLCollection, meaning it automatically updates when elements with the specified class are added or removed from the DOM.
const items = document.getElementsByClassName("item");
console.log(items.length); // Output: 3 (Assume 3 items exist)

const newItem = document.createElement("div");
newItem.className = "item";
document.body.appendChild(newItem);

console.log(items.length); // Output: 4 (Updated automatically!)
querySelector()
This method returns only the first element that matches the given CSS selector. If multiple elements match, it selects the first one in document order. If no match is found, it returns null.
When targeting unique elements and when only the first occurrence matters. It will be beneficial as we will see onwards
const firstItem = document.querySelector(".item");
console.log(firstItem); // Logs the first element with class "item"
querySelectorAll()
This method returns all elements that match the given CSS selector as a NodeList (a static list of elements).
Unlike querySelector, which selects just one, this method finds every matching element in the document.
Returns a collection of elements, even if only one element matches.
Does not update automatically when the DOM changes (unlike
getElementsByClassName).
const allItems = document.querySelectorAll(".item");
console.log(allItems); // Logs a NodeList of all elements with class "item"
Events
addEventListener()
As we saw in the last example (button click), objects that can fire events have an addEventListener() method, and this is the recommended mechanism for adding event handlers.
Also In the first DOM challenge you will see a greater use of that.
Likewise,
toggleButton.addEventListener('click', () => {
     if (toggleButton.innerHTML === "Turn On") {
            // turn off
        }
      else {
            // turn on
        }
}
NOTE: Here I have not provided the full code, if you wish please refer this link
In this challenge I have to make a togglable functionality more like a dark and light Theme toggler.
The addEventListener allows you to listen for events on elements and execute a callback function when the event occurs.
Event handler properties
Manipulating the elements
You can change any element’s inner HTML as DOM gives you that power.
But you can do even more than that, In one challenge I had to show when user gives input it should display in another element’s HTML
To achieve this I had used one of the basic but vital handler property which is ‘input’
const nameInput = document.getElementById('nameInput');
const nameDisplay = document.getElementById('nameDisplay');
nameInput.addEventListener('input', () => {
    nameDisplay.innerHTML = nameInput.value
})
In this nameInput is an HTML input tag and nameDisplay is a para tag.
When user interacts with the input in case of this nameInput an event got fired which has input event.
Unlike the change event, which only triggers when the input loses focus, the input event updates the DOM instantly as the user types.
Inserting and Removing elements through DOM
One of the core concept Document Object Model is appending and removing elements at dynamicity level
For example;
document.createElement('div')
NOTE: This Does not insert the element into the DOM until explicitly added. or you will find yourself debugging number of days
You can create various elements using this method.
I have an interesting DOM challenge a Todo List app where I have asked to create a simple todo app which supports basic functionalities like creating a task and removing it
Since, you are in JavaScript and you have that power to create and even append elements though a script.
Examples to this are;
appendChild()
Appends a single child node to a parent element.
Moves the element if it already exists in the DOM.
Only accepts one node and returns the appended node.
const parent = document.getElementById("container"); // Get a parent element
const newParagraph = document.createElement("p");
newParagraph.textContent = "This is a paragraph.";
parent.appendChild(newParagraph); // Add paragraph to container
append()
Appends multiple child nodes (elements, text, or both).
Can append text directly without creating a text node.
const parent = document.getElementById("container");
const span = document.createElement("span");
span.textContent = "This is a span.";

// Append multiple elements at once
parent.append(span, " And some text!");
You got the understanding of inserting but you can also remove elements dynamically
Likewise, if you want to delete a task
taskList.removeChild(task)
You can also use this,
document.getElementById("taskList").remove();
Some event objects add extra properties that are relevant to that particular type of event. For example, the keydown event fires when the user presses a key.
Its event object is a KeyboardEvent, which is a specialized Event object with a key property that tells you which key was pressed:
Look at this intriguing code below:
taskInput.addEventListener("keydown", (event) => {
    if (event.key === "Enter") {
        addTasks();
    }
});
If the user clicks enter after typing the task it will works as the same as addTodoButton does.
Demystifying Dynamicity
Image Carousel in JavaScript (with AutoPlay and Navigation)
I had a challenge which is Image Sliding and also to build a auto slider functionality in it.
Instead of hardcoding images in HTML, I used an array of objects in JavaScript. This makes the carousel dynamic—I can add new images without modifying HTML.
const images = [
  { url: 'image1.jpg', caption: 'Beautiful Mountain Landscape' },
  { url: 'image2.jpg', caption: 'Ocean Sunset View' },
  { url: 'image3.jpg', caption: 'Autumn Forest Path' },
  { url: 'image4.jpg', caption: 'Urban City Skyline' },
];
Each image object has a url (for the image source) and a caption (for description).
To display images dynamically, I created a simple HTML template
After that, Instead of manually adding <div> elements for each image, I let JavaScript handle it:
function populateCarousel() {
  images.forEach((image, index) => {
    const slide = document.createElement('div');
    slide.classList.add('carousel-slide');
    slide.style.backgroundImage = `url(${image.url})`;
    document.getElementById('carouselTrack').appendChild(slide);
  });
}
populateCarousel();
This ensures that new images added to the array automatically appear in the carousel.
Auto-Play with Pause on Hover
A good carousel should automatically slide images every few seconds, but it should also pause when the user hovers over it.
I wanted to add a smooth auto-play feature that would automatically slide images every few seconds. But there was a catch—I didn’t want it to annoy users.
The images should auto-slide every few seconds.
The images should auto-slide every few seconds.
The carousel should pause when the user hovers over it (so they can view an image without it disappearing).
At first, I thought, "I can just use setInterval() to change images and clearInterval() to stop it." But the real challenge was toggling auto-play on button clicks and ensuring it resumes correctly after hover.
I first created a function to start the slideshow and update the button text:
let autoPlayInterval;
const timeLeft = 3000; // 3 seconds

function startAutoPlay() {
  autoPlayInterval = setInterval(nextSlide, timeLeft);
  document.getElementById('autoPlayButton').textContent = 'Stop Auto Play';
}
Then, I needed a function to stop the slideshow and reset the button text:
function stopAutoPlay() {
  clearInterval(autoPlayInterval);
  document.getElementById('autoPlayButton').textContent = 'Start Auto Play';
}
Now, I just needed a way to toggle between starting and stopping auto-play when the button is clicked.
document.getElementById('autoPlayButton').addEventListener('click', () => {
  if (autoPlayInterval) {
    stopAutoPlay();
    autoPlayInterval = null;
  } else {
    startAutoPlay();
  }
});
document.getElementById('carouselTrack').addEventListener('mouseenter', stopAutoPlay);
document.getElementById('carouselTrack').addEventListener('mouseleave', startAutoPlay);
So, whenever the user hovers over the carousel, stopAutoPlay() runs, pausing the slideshow.
When they move their mouse away, startAutoPlay() restarts it.
Sliding Menu
This challenge involves writing verbose code to achieve a simple functionality.
Similarly, I want to create a slide-out menu panel that opens from the right side when the user clicks the Open button.
Here’s how I tackled it:
mainButton.addEventListener('click', () => {
    if (panel.classList.contains('active')) {
        panel.classList.remove('active')
    } else {
        panel.classList.add('active')
    }
})

closeBtn.addEventListener('click', () => {
    if (panel.classList.contains('active')) {
        panel.classList.remove('active')
    }
})
NOTE: Here I have not provided the full code, if you wish please refer this link
However, you can achieve the same functionality more efficiently using the classList.toggle() method:
mainButton.addEventListener('click', () => {
    panel.classList.toggle('active')
})
closeBtn.addEventListener('click', () => {
    panel.classList.remove('active')
})
Did you notice how much shorter and cleaner the code is? Yet, it works exactly the same as the previous version.
Conclusion
After All, it’s all about from static to DYNAMIC
Subscribe to my newsletter
Read articles from Shivam Verma directly inside your inbox. Subscribe to the newsletter, and don't miss out.
Written by
Shivam Verma
Shivam Verma
Hello, I am Shivam Verma a software builder and fullstack developer with a passion for converting complex ideas into robust applications