Deploying a Microservices E-Commerce App: A Comprehensive Guide to Containerizing and Orchestrating with Docker, Kubernetes and AWS EKS
 Tim Richardson
TL;DR: Discover how to deploy CloudMart, a microservices-based e-commerce application, using Docker and Kubernetes on AWS EKS. This guide includes steps for containerization, storing images in AWS ECR, managing with Amazon EKS, and implementing infrastructure automation and security best practices.
Keywords
Docker, Kubernetes, AWS EKS, Infrastructure Automation, Microservices, CI/CD, Security Best Practices
1. Introduction
In this guide, we will walk you through deploying a microservices-based e-commerce application, using Docker, Kubernetes, and AWS Elastic Kubernetes Service (EKS). We'll start by containerizing the CloudMart backend and frontend using Docker, storing the Docker images in AWS Elastic Container Registry (ECR), and then deploying and managing the application on a production-grade Kubernetes cluster with EKS. Along the way, we’ll cover essential security practices, automation workflows, and cost management strategies, ensuring a smooth, secure, and scalable deployment.
1.1 Architecture Overview
The CloudMart application implements a modern microservices architecture deployed on Amazon EKS.
This infrastructure leverages AWS's multi-AZ capability for high availability, with the application load balancer distributing traffic across private subnets in three availability zones. The EKS worker nodes are strategically placed in private subnets for enhanced security, while maintaining public accessibility through the ALB."
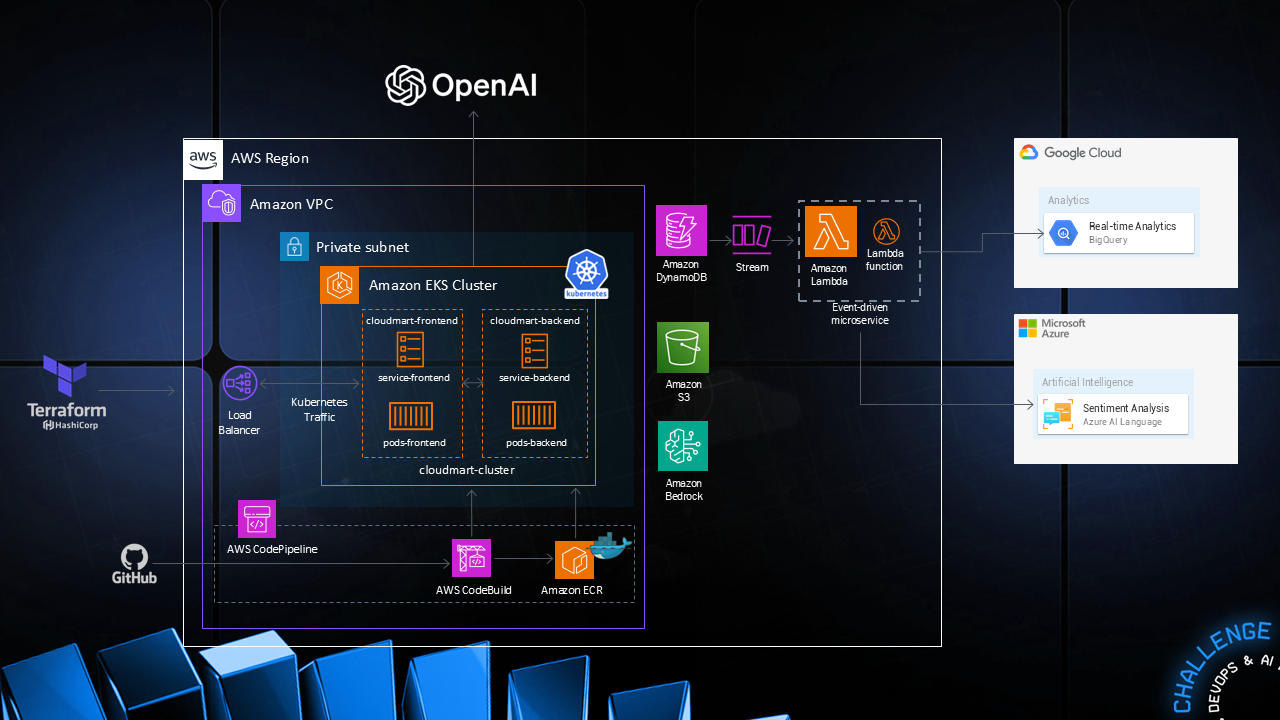
Before we begin the deployment, let's understand our implementation approach. We'll start with containerization using Docker, packaging both our frontend and backend applications. This containerization ensures consistency across environments and simplifies our deployment process. Once our applications are containerized, we'll move on to orchestrating them with Kubernetes on AWS EKS.
2. Docker
In Part 2, we begin by setting up Docker on an EC2 instance, which serves as our foundation for containerization. We then create Docker images for both components of our two-tier application. The backend, built on Node.js, requires specific configurations for AWS services like Bedrock and includes environment variables for API keys and service endpoints. The frontend, a React application, is containerized using a multi-stage build process to optimize the final image size and performance. Both services are configured with specific ports - 5000 for the backend and 5001 for the frontend.
2.1 Install Docker on EC2
Execute the following commands to install and configure Docker on your EC2 instance:
sudo yum update -y
sudo yum install docker -y
sudo systemctl start docker
sudo docker run hello-world
sudo systemctl enable docker
docker --version
sudo usermod -aG docker $(whoami)
newgrp docker
Success Indicator: Docker should be installed and running.
Verification Command:
docker --version
2.2 Create Docker Images for CloudMart
Backend
- Create a backend folder and download the source code:
mkdir -p cloudmart/backend && cd cloudmart/backend
wget https://tcb-public-events.s3.amazonaws.com/mdac/resources/day2/cloudmart-backend.zip
unzip cloudmart-backend.zip
Success Indicator: The backend folder should contain the source code files.
Verification Command:
ls
2. Create a .env file
nano .env
Success Indicator: The
.envfile should be present in the backend folder.Verification Command:
ls
3. Add the following environment variables to the .env file
PORT=5000
AWS_REGION=us-east-1
BEDROCK_AGENT_ID=<your-bedrock-agent-id>
BEDROCK_AGENT_ALIAS_ID=<your-bedrock-agent-alias-id>
OPENAI_API_KEY=<your-openai-api-key>
OPENAI_ASSISTANT_ID=<your-openai-assistant-id>
4. Create a Dockerfile
nano Dockerfile
Success Indicator: Dockerfile should be present in the backend folder.
Verification Command:
ls
5. Add the following containerization configuration to the Dockerfile
FROM node:18
WORKDIR /usr/src/app
COPY package*.json ./
RUN npm install
COPY . .
EXPOSE 5000
CMD ["npm", "start"]
Frontend
- Create a frontend folder and download the source code
cd ..
mkdir frontend && cd frontend
wget https://tcb-public-events.s3.amazonaws.com/mdac/resources/day2/cloudmart-frontend.zip
unzip cloudmart-frontend.zip
Success Indicator: The frontend folder should contain the source code files.
Verification Command:
ls
2. Create a Dockerfile
nano Dockerfile
Success Indicator: Dockerfile should be present in the frontend folder.
Verification Command:
ls
3. Add the following containerization configuration to the Dockerfile
FROM node:16-alpine as build
WORKDIR /app
COPY package*.json ./
RUN npm ci
COPY . .
RUN npm run build

FROM node:16-alpine
WORKDIR /app
RUN npm install -g serve
COPY --from=build /app/dist /app
ENV PORT=5001
EXPOSE 5001
CMD ["serve", "-s", ".", "-l", "5001"]
With our applications successfully containerized, we can now focus on setting up our production environment using AWS EKS. This section will guide you through creating a production-grade Kubernetes cluster and deploying our containerized applications with proper networking, security, and scaling configurations.
3. Kubernetes
We start by setting up a production-grade cluster with the necessary tooling: eksctl for cluster management and kubectl for Kubernetes operations. The cluster is configured with t3.medium nodes and OIDC authentication, along with IAM integration for pod-level AWS service access. This setup is crucial for services like DynamoDB and Bedrock that our application depends on.
The deployment process begins with the backend, using Amazon ECR for container image hosting. The Kubernetes configuration includes specific pod specifications with service account integration for AWS service access, environment variable configuration, and a LoadBalancer service type for external accessibility. The frontend deployment follows a similar pattern but requires additional configuration to dynamically connect with the backend service.
3.1 Setting Up a Cluster on AWS Elastic Kubernetes Service (EKS)
- Create an admin-privileged user named eksuser and authenticate using its credentials.
aws configure
Success Indicator: User created and authenticated.
Verification Command: AWS Management Console or CLI commands to list users.
2. Install the CLI tool eksctl
curl --silent --location "https://github.com/weaveworks/eksctl/releases/latest/download/eksctl_$(uname -s)_amd64.tar.gz" | tar xz -C /tmp
sudo cp /tmp/eksctl /usr/bin
eksctl version
Success Indicator: eksctl installed.
Verification Command:
eksctl version
3. Installthe CLI tool kubectl
curl -o kubectl https://amazon-eks.s3.us-west-2.amazonaws.com/1.18.9/2020-11-02/bin/linux/amd64/kubectl
chmod +x ./kubectl
mkdir -p $HOME/bin && cp ./kubectl $HOME/bin/kubectl && export PATH=$PATH:$HOME/bin
echo 'export PATH=$PATH:$HOME/bin' >> ~/.bashrc
kubectl version --short --client
Success Indicator: kubectl installed.
Verification Command:
kubectl version --client
4. Create an EKS Cluster
eksctl create cluster \
  --name cloudmart \
  --region us-east-1 \
  --nodegroup-name workers \
  --node-type t3.medium \
  --nodes 1 \
  --with-oidc \
  --managed
Success Indicator: EKS Cluster created.
Verification Command:
eksctl get clusterExpected Output: List of clusters with the new cluster included.
5. Connect to the EKS cluster using the kubectl configuration
aws eks update-kubeconfig --name cloudmart
Success Indicator: Connected to the EKS cluster.
Verification Command:
kubectl get nodesExpected Output: List of nodes in the cluster.
6. Verify Cluster Connectivity
kubectl get svc
kubectl get nodes
Success Indicator: Cluster connectivity verified.
Verification Command:
kubectl cluster-infoExpected Output: Cluster information
7. Set Up IAM Roles to Enable Pod Access to AWS Services
eksctl create iamserviceaccount \
  --cluster=cloudmart \
  --name=cloudmart-pod-execution-role \
  --role-name CloudMartPodExecutionRole \
  --attach-policy-arn=arn:aws:iam::aws:policy/AdministratorAccess\
  --region us-east-1 \
  --approve
💡Remember to follow the principle of least privilege in production environments
Success Indicator: Role and Service Account created.
Verification Command:
kubectl get serviceaccountsExpected Output: List of service accounts with the new account included.
3.2 Backend Deployment on Kubernetes
- Create an ECR repository for the backend and push the Docker image to it.
Repository name: cloudmart-backend
Success Indicator: Docker image uploaded to ECR.
Verification Command: AWS Management Console or CLI commands to list images.
- Navigate to the backend folder.
cd ../..
cd challenge-day2/backend
Follow the ECR guidelines to build your Docker image.
- Create and Deploy a Kubernetes Deployment File for the Backend
Steps:
- Navigate to the backend directory:
cd ../../challenge-day2/backend
- Create or edit the deployment YAML file:
nano cloudmart-backend.yaml
- Apply the Kubernetes deployment:
kubectl apply -f cloudmart-backend.yaml
- Verify the deployed service:
kubectl get service
Success Indicator: Deployment file successfully created and applied
Verification Command: kubectl get deployments
Expected Output: A list of Kubernetes deployments, including cloudmart-backend
3.3 Deploy CloudMart Frontend
- Modify the .env file to include the backend API URI
nano .env
VITE_API_BASE_URL=http://<backend-service-url>:5000/api
Success Indicator:
.env file updated.Verification Command:
cat .envExpected Output: Updated
.env file content.
2a. Create a deployment configuration file
nano cloudmart-frontend.yaml
2b. Insert the following deployment configuration:
apiVersion: apps/v1
kind: Deployment
metadata:
  name: cloudmart-frontend
spec:
  replicas: 1
  selector:
    matchLabels:
      app: cloudmart-frontend
  template:
    metadata:
      labels:
        app: cloudmart-frontend
    spec:
      containers:
      - name: cloudmart-frontend
        image: <your-ecr-repo-url>/cloudmart-frontend:latest
Success Indicator: Deployment file successfully created.
Verification Command:
kubectl get deploymentsExpected Output: List of deployments with the new deployment included.
3. Deploy the Cloudmart Frontend application.
kubectl apply -f cloudmart-frontend.yaml
kubectl get service
Success Indicator: The application should now be running as a service in the cluster.
Verification Command:
kubectl get podsExpected Output: The frontend pods should be running, confirming a successful deployment
4. Accessing the CloudMart Dashboard
Now that the backend and frontend have been successfully deployed, the CloudMart application is ready to be accessed. Follow the steps below to navigate to the CloudMart Dashboard and verify that the application is up and running:
Obtain the Frontend Load Balancer URL:
- Run the
kubectl get servicecommand to find the EXTERNAL-IP column in the output. This IP address serves as your application URL.
- Run the
Open the CloudMart Dashboard:
- In your web browser, enter the following URL:
http://<EXTERNAL-IP>:5001
- In your web browser, enter the following URL:
Verify the Interface:
- The CloudMart web interface should load successfully, as shown below, confirming that the application is accessible.

5. Troubleshooting Guide
5.1 Troubleshooting Guide: Common Deployment Issues
- Pod Startup Failures
kubectl describe pod <pod-name> # View detailed pod information
kubectl logs <pod-name> # Check container logs
Common causes:
Missing IAM permissions
Incorrect environment variables
Resource constraints
Reference: EKS Pod Troubleshooting
- Image Pull Errors
1# Verify ECR authentication
2aws ecr get-login-password --region us-east-1 | docker login --username AWS --password-stdin <your-account>.dkr.ecr.us-east-1.amazonaws.com
Common causes:
Expired ECR authentication:
Incorrect image path:
Network connectivity issues
Reference: ECR Authentication
- Service Discovery Issues
kubectl port-forward service/<service-name> local-port:service-port # Test service connectivity locally
kubectl get endpoints <service-name> 4# Check service endpoints
Reference: EKS Networking
6. Cost Management
6.1 Resource Costs Overview
EKS Cluster: $0.10 per hour
Worker Nodes (t3.medium): ~$0.0416 per hour
Load Balancer: Starting at $0.0225 per hour
ECR Storage: $0.10 per GB-month
6.2 Cost Optimization Strategies
Cluster Management
Delete test clusters when not in use
Use appropriate instance types
Implement auto-scaling
Storage Optimization
Clean up unused ECR images
Implement image lifecycle policies
aws ecr put-lifecycle-policy --repository-name <repo-name> --lifecycle-policy-text file://lifecycle-policy.json
6.3 Monitoring Tools
7. Cleanup Resources
After completing the deployment and testing, proper resource management becomes crucial. While the EKS cluster can be maintained between sessions for continued development, users should carefully consider the cost implications. AWS charges will accrue as long as the cluster remains active, so it's important to either delete unused resources or budget for ongoing cluster availability.
The provided cleanup procedures help ensure no unnecessary resources remain active, supporting both cost efficiency and resource management best practices in your production-ready e-commerce deployment.
kubectl delete service cloudmart-frontend-service
kubectl delete deployment cloudmart-frontend
kubectl delete service cloudmart-backend-service
kubectl delete deployment cloudmart-backend
eksctl delete cluster --name cloudmart --region us-east-1
These steps ensure that all resources related to the CloudMart application are properly cleaned up from the cluster.
7. Security Best Practices
IAM and Authentication
Use least-privilege permissions for service accounts
Regularly rotate credentials and review access policies
Reference: AWS EKS Security Best Practices
-
Implement security groups and network policies
8. References
AWS Documentation
[1] Amazon EKS User Guide. Available: https://docs.aws.amazon.com/eks/latest/userguide/
[2] AWS Elastic Container Registry (ECR) Documentation. Available: https://docs.aws.amazon.com/AmazonECR/latest/userguide/
[3] AWS IAM Best Practices. Available: https://docs.aws.amazon.com/IAM/latest/UserGuide/best-practices.html
[4] AWS Load Balancer Controller. Available: https://docs.aws.amazon.com/eks/latest/userguide/aws-load-balancer-controller.html
Kubernetes Documentation
[5] Kubernetes Official Guide. Available: https://kubernetes.io/docs/home/
[6] Kubernetes Basics. Available: https://kubernetes.io/docs/tutorials/kubernetes-basics/
[7] Production Best Practices Guide. Available: https://kubernetes.io/docs/setup/best-practices/
[8] Deployment Guide. Available: https://kubernetes.io/docs/concepts/workloads/controllers/deployment/
[9] Service & Load Balancing. Available: https://kubernetes.io/docs/concepts/services-networking/service/
Docker Documentation
[10] Docker Best Practices. Available: https://docs.docker.com/develop/best-practices/
[11] Docker Development Guide. Available: https://docs.docker.com/get-started/
[12] Dockerfile Best Practices. Available: https://docs.docker.com/develop/develop-images/dockerfile_best-practices/
[13] Docker Security Guide. Available: https://docs.docker.com/engine/security/
[14] Multi-stage Builds in Docker. Available: https://docs.docker.com/develop/develop-images/multistage-build/
Subscribe to my newsletter
Read articles from Tim Richardson directly inside your inbox. Subscribe to the newsletter, and don't miss out.
Written by