A Beginner's Guide to OpenCV: Start Your Computer Vision Journey
 Devin Cortese
Welcome to this beginner-friendly tutorial on OpenCV for image processing! Whether you’re new to computer vision or looking to expand your skills, this guide will walk you through the essentials. We’ll cover:
Setting up a virtual environment to manage dependencies effectively.
Basic image processing: Loading, displaying, resizing, and converting images to grayscale.
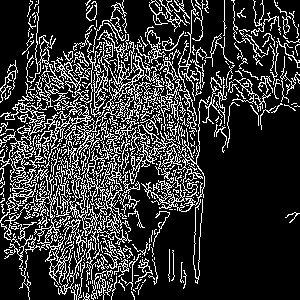
Intermediate technique: Edge detection using the Canny edge detector.
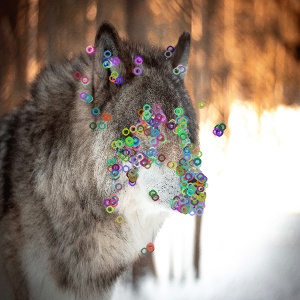
Advanced technique: Feature detection using the ORB algorithm.
You’ll need Python 3 installed on your system, along with an image file (e.g., image.jpg) in your project directory. We will be using the following image of a wolf for this demonstration. Let’s dive in!

What is OpenCV?
OpenCV (Open Source Computer Vision Library) is a powerful, open-source library designed for computer vision and image processing. It’s widely used for tasks like object detection, image manipulation, and video analysis. In this tutorial, we’ll use OpenCV with Python to perform hands-on image processing.
Setting Up a Virtual Environment
Before we start coding, let’s set up a virtual environment. This is a best practice to keep your project’s dependencies organized and avoid conflicts with other projects.
Why Use a Virtual Environment?
Dependency Management: Isolates libraries like OpenCV for each project.
Conflict Avoidance: Allows different projects to use different versions of the same package.
Portability: Makes it easier to share your setup with others.
Step-by-Step Instructions
We’ll use Python’s built-in venv module to create a virtual environment. Follow these steps:
Open your terminal or command prompt.
Navigate to your project directory:
cd path/to/your/projectCreate the virtual environment:
On Windows:
python -m venv venvOn macOS/Linux:
python3 -m venv venv
Activate the virtual environment:
On Windows:
venv\Scripts\activateOn macOS/Linux:
source venv/bin/activate
Install OpenCV:
pip install opencv-python
To confirm OpenCV is installed correctly, run this command in your terminal (with the virtual environment activated):
python -c "import cv2; print(cv2.__version__)"
Expected Output: A version number like
4.11.0.If it fails: Ensure the virtual environment is active and reinstall OpenCV with
pip install opencv-python.
Basic Image Processing
Let’s start with the basics: loading, displaying, resizing, and converting images to grayscale. You’ll need an image file (e.g., image.jpg) in your project directory.
Loading an Image
Here’s how to load an image using OpenCV:
import cv2

# Load the image
img = cv2.imread("image.jpg")
- Explanation:
cv2.imread("image.jpg")reads the image file into a NumPy array stored inimg.
Displaying an Image
To show the image in a window:
import cv2

# Load the image
img = cv2.imread("image.jpg")

# Display the image
cv2.imshow("Original Image", img)
cv2.waitKey(0) # Wait for a key press
cv2.destroyAllWindows() # Close the window
Explanation:
cv2.imshow()opens a window with the image.cv2.waitKey(0)pauses until you press a key.cv2.destroyAllWindows()closes all open windows.
Tip: If the window doesn’t close properly, press any key while the window is focused.
Resizing an Image
To resize the image to 300x300 pixels:
import cv2

# Load the image
img = cv2.imread("image.jpg")

# Resize the image
resized_img = cv2.resize(img, (300, 300))

# Display the resized image
cv2.imshow("Resized Image", resized_img)
cv2.waitKey(0)
cv2.destroyAllWindows()
- Explanation:
cv2.resize()takes the imageimgand a tuple(width, height)to adjust its size.

Converting to Grayscale
To convert the image to grayscale:
import cv2

# Load the image
img = cv2.imread("image.jpg")

# Resize the image
resized_img = cv2.resize(img, (300, 300))

# Convert to grayscale
gray_img = cv2.cvtColor(resized_img, cv2.COLOR_BGR2GRAY)

# Display the grayscale image
cv2.imshow("Grayscale Image", gray_img)
cv2.waitKey(0)
cv2.destroyAllWindows()
- Explanation:
cv2.cvtColor()converts the image from BGR (OpenCV’s default color space) to grayscale usingcv2.COLOR_BGR2GRAY.

Intermediate Technique: Edge Detection with Canny
Now, let’s explore edge detection using the Canny edge detector.
How Does the Canny Edge Detector Work?
The Canny edge detector finds edges by identifying areas where pixel intensity changes sharply (e.g., object boundaries). It’s effective because it:
Reduces noise with Gaussian smoothing.
Calculates gradients to detect intensity changes.
Thins edges with non-maximum suppression.
Applies thresholds to finalize edges (hysteresis thresholding).
For more, see the OpenCV Canny Tutorial.
Applying Canny in OpenCV
import cv2

# Load the image
img = cv2.imread("image.jpg")

# Resize the image
resized_img = cv2.resize(img, (300, 300))

# Convert to grayscale
gray_img = cv2.cvtColor(resized_img, cv2.COLOR_BGR2GRAY)

# Apply Canny edge detection
edges = cv2.Canny(gray_img, 25, 100)

# Display the edges
cv2.imshow("Edges", edges)
cv2.waitKey(0)
cv2.destroyAllWindows()
Explanation:
cv2.Canny()takes a grayscale image and two thresholds: 25 (lower) for faint edges and 100 (upper) for strong edges.

Experiment: Try adjusting the thresholds to see how it affects the edges!
Advanced Technique: Feature Detection with ORB
Let’s move to a more advanced technique: feature detection using the ORB algorithm, which identifies distinctive points in an image.
What Makes ORB Efficient?
ORB (Oriented FAST and Rotated BRIEF) is a fast, free alternative to algorithms like SIFT or SURF. It:
Uses FAST to quickly detect key points (distinctive spots like corners).
Uses BRIEF to describe these points with binary comparisons, making it computationally efficient.
Adds orientation to make it robust to rotation.
Learn more in the OpenCV ORB Documentation.
Using ORB in OpenCV
import cv2

# Load the image
img = cv2.imread("image.jpg")

# Resize the image
resized_img = cv2.resize(img, (300, 300))

# Convert to grayscale
gray_img = cv2.cvtColor(resized_img, cv2.COLOR_BGR2GRAY)

# Initialize ORB detector
orb = cv2.ORB_create()

# Detect key points and compute descriptors
keypoints, descriptors = orb.detectAndCompute(gray_img, None)

# Draw key points on the image
img_with_keypoints = cv2.drawKeypoints(resized_img, keypoints, None)

# Display the result
cv2.imshow("ORB Keypoints", img_with_keypoints)
cv2.waitKey(0)
cv2.destroyAllWindows()
Explanation:
orb.detectAndCompute()finds key points and their descriptors.cv2.drawKeypoints()overlays circles on the image at detected key points.

Putting It All Together
Here’s a complete script combining everything. Save it as a .py file (e.g., opencv_intro.py) and run it from your terminal (with the virtual environment activated):
Tip: You can save each image with the cv2.imwrite() function.
import cv2

# Load the image
img = cv2.imread("image.jpg")
cv2.imshow("Original Image", img)
cv2.waitKey(0)

# Resize the image
resized_img = cv2.resize(img, (300, 300))
cv2.imshow("Resized Image", resized_img)
cv2.waitKey(0)
cv2.imwrite('image_resized.jpg', resized_img)

# Convert to grayscale
gray_img = cv2.cvtColor(resized_img, cv2.COLOR_BGR2GRAY)
cv2.imshow("Grayscale Image", gray_img)
cv2.waitKey(0)
cv2.imwrite('image_grayscale.jpg', gray_img)

# Edge detection with Canny
edges = cv2.Canny(gray_img, 25, 100)
cv2.imshow("Edges", edges)
cv2.waitKey(0)
cv2.imwrite('image_canny.jpg', edges)

# Feature detection with ORB
orb = cv2.ORB_create()
keypoints, descriptors = orb.detectAndCompute(resized_img, None)
img_with_keypoints = cv2.drawKeypoints(resized_img, keypoints, None)
cv2.imshow("ORB Keypoints", img_with_keypoints)
cv2.waitKey(0)
cv2.imwrite('image_points.jpg', img_with_keypoints)

# Close all windows
cv2.destroyAllWindows()
Run the script with:
python opencv_intro.py
Note: Ensure your image file is in the same directory as your script, or provide the correct path.
Troubleshooting Common Issues
If you run into problems, here are some common issues and fixes:
Image not found: Ensure the image file is in your project directory and the filename matches exactly (e.g.,
image.jpg).Window not closing: Press any key while the image window is focused to close it.
OpenCV not installed: If you get an import error, verify your virtual environment is activated and install OpenCV with
pip install opencv-python.Wrong color display: OpenCV uses BGR by default, but
cv2.imshow()should display correctly. If colors look off, check your image format.
Conclusion
In this tutorial, you’ve learned how to:
Set up a virtual environment with
venv.Perform basic image processing with OpenCV: loading, displaying, resizing, and converting images.
Apply intermediate edge detection using Canny.
Explore advanced feature detection with ORB.
These skills form the foundation of computer vision. I encourage you to experiment with different images and tweak parameters (like Canny thresholds) to see how they affect the results. Keep exploring OpenCV—you’re off to a great start!
Subscribe to my newsletter
Read articles from Devin Cortese directly inside your inbox. Subscribe to the newsletter, and don't miss out.
Written by
