Automation testing of Flutter app with Appium Flutter Driver
 NonStop io Technologies
Introduction to Appium
Appium is an open-source framework that allows conducting automated app testing on different platforms like Android, iOS, and Windows.
It automates testing for:
Native Mobile Applications that are written using iOS, Android, or Windows SDKs
Mobile Web Applications that can be accessed using mobile browsers such as Safari, Chrome, or in-built native browser applications for Android devices
Hybrid Mobile Applications that have a native wrapper around the web view
Appium is a flexible cross-platform testing framework, enabling testers to write test scripts against multiple platforms such as iOS, Windows, and Android using the same API. Until recently, in order to write full end-to-end (E2E) tests or integration tests, the developer would need to learn Dart and the flutter_driver. However, it is now possible to write E2E tests for flutter apps in languages other than Dart using the package appium-flutter-driver.
Why to choose Appium Flutter Driver?
Even though Flutter comes with superb integration test support, Flutter Driver, it does not fit some specific use cases, such as
writing test in other languages than Dart
running integration test for Flutter app with embedded webview or native view, or existing native app with embedded Flutter view
running test on multiple devices simultaneously
running integration tests on device farms, such as Sauce Labs, AWS, Firebase
In this story I’ll demonstrate usingappium-flutter-driver for writing an E2E automation test for a Flutter app using Python.
In order to get up and running let’s start with the very first step i.e to install appium.
1. Installing Appium
If you want to run Appium vianpm install, you will need Node.js and NPM (use nvm, n, or brew install node to install Node.js. It is recommended to use the latest stable version, though Appium supports Node.js 12+.
npm install -g appium
Verifying the installation:
To verify that all of Appium’s dependencies are met you can useappium-doctor
For android:appium-doctor --android
For ios:appium-doctor --ios
Install it with npm install -g appium-doctor .
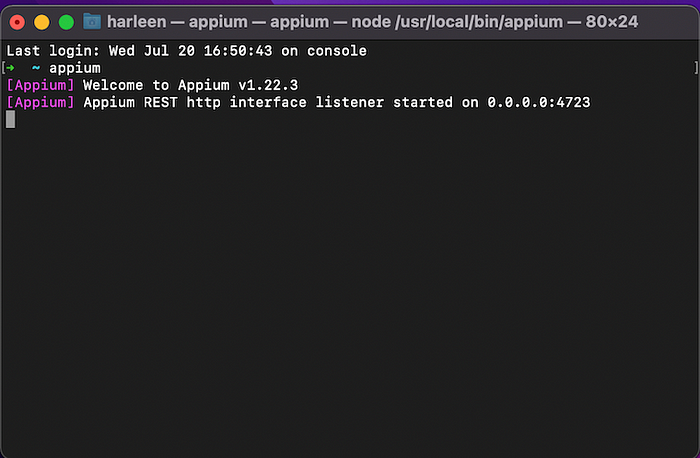
2. Starting Appium Server As the next step, you need to start your appium server from the command line by typing the command (assuming the NPM install was successful):
appium

It will give us a message showing the version of Appium and the port appium server is listening on (the default is 4723). We need to connect to Appium on this port.
3. Prepare your Flutter App
a. Open your Flutter app project.
b. Add the following dev_dependencies to the pubspec.yaml file. Flutter project:

The flutter_test and flutter_driver libraries provide functions and APIs respectively to write tests for Flutter apps.
c. Run the following command in the command-line/terminal of your Flutter project to install the dev_dependencies added in the previous step:
flutter pub get
d. Add the following code statement in the main.dart file of your Flutter project to import the flutter_driver_extension library:
import 'package:flutter_driver/driver_extension.dart';
e. Add the enableFlutterDriverExtension() method before the runApp method in main.dart file as shown in the following code snippet:

f. Since Flutter did not use native components, so we need to define keys in all the widgets we wish to include in our test and it makes our widgets visible to appium-flutter-driver (also for normal flutter testing).
TextFormField(
   key: const Key('lName'),
  hintText: 'Last Name',
  labelText: 'Last Name',
  textEditingController: _lNameTEC,
  validator: (value) => ValidatorUtil.validateEmptyCheck(value!),
),
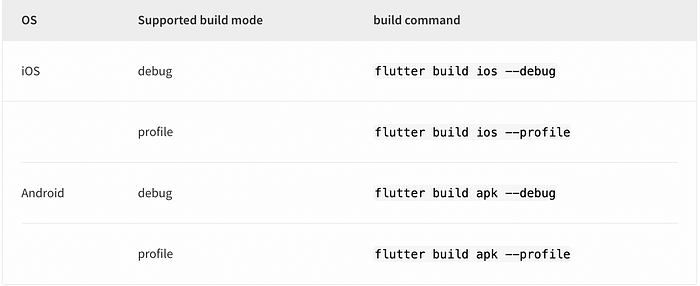
g. After the preprocessing of flutter project is completed, we need to run the build command for the Flutter app in the debug or profile mode. since Appium’s Flutter driver does not support apps built in the release mode.

4. Setting up the Appium Client For this example, we’ll use Webdriver.io as our Appium client. Create a directory for this example, then run:
npm init -y
Once the project has been initialized, install webdriverio:
npm install webdriverio
5. Installing Appium Flutter Finder
Install from PyPi, as ‘Appium-Flutter-Finder’.
pip install Appium-Flutter-Finder
6. Write a test case
Now we can create our test file, named test.py,
Session Initialization
The next thing we need to do is to start an Appium session, by defining a set of server options and Desired Capabilities, and calling webdriver.remote() with them. Desired Capabilities are just a set of keys and values that get sent to the Appium server during session initialization, which tells Appium what kind of thing we want to automate. The minimum set of required capabilities for any Appium driver should include:
platformName: the name of the platform to automateplatformVersion: the version of the platform to automatedeviceName: the kind of device to automateapp: the path to the app you want to automate (but use thebrowserNamecapability instead in the case of automating a web browser)automationName: the name of the driver you wish to use. For this example we’ll be using flutter as automationName.
here is how we begin to construct a session in our test file:
driver = Remote('http://localhost:4723/wd/hub', dict(platformName='Android',
automationName='flutter',
deviceName='emulator-5554',
appPackage= 'your app-package-name',
app='apk path'
))
This is an example of test script written in python:
What’s going on here is that after creating a session and launching our app, we’re instructing Appium to find an element in the app hierarchy by it’s unique key and clicking on that particular element, and finding an element by by its text, which is asserted to be what we expect(by printing it).
import os
import timefrom appium.webdriver import Remote
from appium_flutter_finder.flutter_finder import FlutterElement, FlutterFinderdriver = Remote('http://localhost:4723/wd/hub', dict(
    platformName='Android',
    automationName='flutter',
    deviceName='emulator-5554',      // using emulator for testing
    app='{}/../app-dev-debug.apk,))finder = FlutterFinder()text_finder = finder.by_text('You have pushed the button this many times:')
text_element = FlutterElement(driver, text_finder)
print(text_element.text)key_finder = finder.by_value_key("next_route_key")
goto_next_route_element = FlutterElement(driver, key_finder)
print(goto_next_route_element.text)
goto_next_route_element.click()time.sleep(2)        //adding 2 ms delay in betweenback_finder = finder.page_back()
back_element = FlutterElement(driver, back_finder)
back_element.click()tooltip_finder = finder.by_tooltip("Increment")
driver.execute_script('flutter:waitFor', tooltip_finder, 100)floating_button_element = FlutterElement(driver, tooltip_finder)
floating_button_element.click()counter_finder = finder.by_value_key("counter")
counter_element = FlutterElement(driver, counter_finder)
print(counter_element.text)
6. Execute the script You are now ready to execute your test example. On your local machine, open the terminal/command prompt. Navigate to the folder of the directory and run the command:
python test.py
If everything is set up correctly, you’ll see Appium begin spitting out lots of logs and eventually, the app will pop up on the screen and start behaving as if an invisible user were tapping on it!
Subscribe to my newsletter
Read articles from NonStop io Technologies directly inside your inbox. Subscribe to the newsletter, and don't miss out.
Written by

NonStop io Technologies
NonStop io Technologies
Product Development as an Expertise Since 2015 Founded in August 2015, we are a USA-based Bespoke Engineering Studio providing Product Development as an Expertise. With 80+ satisfied clients worldwide, we serve startups and enterprises across San Francisco, Seattle, New York, London, Pune, Bangalore, Tokyo and other prominent technology hubs.