Drag and Drop in Flutter: Master It without Plugin!
 NonStop io Technologies
Drag and drop functionality is a common requirement in many mobile applications. Flutter provides a powerful set of widgets and gestures that allow you to implement custom drag and drop behavior without relying on any third-party packages. In this tutorial, we will walk through the process of creating a custom drag and drop feature using Flutter.
Prerequisites
Before we begin, make sure you have Flutter installed and set up on your machine. You can follow the official Flutter documentation for installation instructions.
Project Setup
Let’s start by setting up a new Flutter project. Open your favorite code editor and create a new Flutter project. You can use the Flutter CLI command flutter create custom_drag_drop to create a new project with the name "custom_drag_drop".
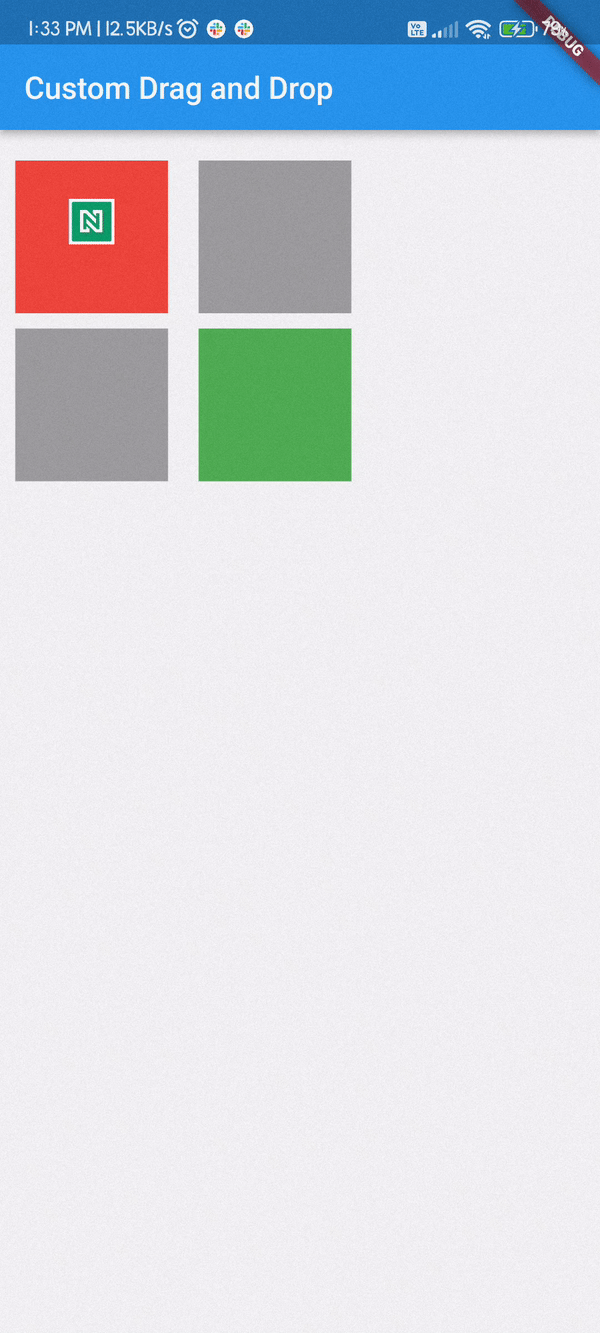
In this example we are going to create a basic Flutter application with a MyHomePage widget as the home page. The home page consists of a Stack widget that contains four colored boxes (red, green, and two grey) and a NonStopIO image widget that can be dragged and dropped.
Understanding the Code
Let’s go through the code step by step to understand how we can implement custom drag and drop functionality.
1. Initial Setup
In the _MyHomePageState class, we define a variable called position of type Offset. This variable will store the position of the NonStopIO image widget on the screen.
late Offset position;
@override
void initState() {
  super.initState();
  position = const Offset(0, 0);
}
We initialize the position variable to the initial position of (0, 0).
2. Gesture Handling
We define several methods to handle the different gestures during the drag and drop process.
void _onPanStart(BuildContext context, DragStartDetails details) {
  print(details.globalPosition.dy);
}
void _onPanUpdate(
    BuildContext context, DragUpdateDetails details, Offset offset) {
  setState(() {
    position = details.globalPosition;
  });
}
void _onPanEnd(BuildContext context, DragEndDetails details) {
  print(position);
  if (position.dy < 180 &&
      position.dy > 100 &&
      position.dx > 100 &&
      position.dx < 180) {
    setState(() {
      position = const Offset(120, 120);
    });
  } else {
    setState(() {
      position = const Offset(0, 0);
    });
  }
  print(details.velocity);
}
void _onPanCancel(BuildContext context) {
  print("Pan canceled !!");
}
_onPanStart: This method is called when the user starts dragging the NonStopIO image widget. Here, we can perform any necessary initialization or logging._onPanUpdate: This method is called continuously as the user moves their finger during the drag operation. We update thepositionvariable with the current global position of the finger._onPanEnd: This method is called when the user releases their finger after dragging the NonStopIO image widget. We check the final position of the NonStopIO image widget and determine whether it should be dropped in the green box or reset to the red box._onPanCancel: This method is called if the drag operation is canceled or interrupted.
3. Building the UI
In the build method, we define the UI elements using a Stack widget. The colored boxes and the NonStopIO image widget are positioned using the Positioned widget.
body: SafeArea(
  child: LimitedBox(
    maxHeight: MediaQuery.of(context).size.height,
    maxWidth: MediaQuery.of(context).size.width,
    child: Stack(
      children: [
        Positioned(
          top: 10,
          child: Padding(
            padding: const EdgeInsets.all(10),
            child: Container(
              height: 100,
              width: 100,
              color: Colors.red,
            ),
          ),
        ),
        // ... code for other colored boxes
        Positioned(
          top: position.dy,
          left: position.dx,
          child: Padding(
            padding: const EdgeInsets.all(10),
            child: GestureDetector(
              onPanStart: (details) => _onPanStart(context, details),
              onPanUpdate: (details) =>
                  _onPanUpdate(context, details, position),
              onPanEnd: (details) => _onPanEnd(context, details),
              onPanCancel: () => _onPanCancel(context),
              child: const SizedBox(
                height: 100,
                width: 100,
                child: Center(
                  child: Image.network("https://ns-emp-portal.firebaseapp.com/favicon.ico",
                  height: 30,
                  )
                ),
              ),
            ),
          ),
        ),
      ],
    ),
  ),
),
The Positioned widget is used to set the position of the colored boxes and the NonStopIO image widget within the Stack. The position of the NonStopIO image widget is set dynamically based on the position variable, which is updated during the drag operation.
The GestureDetector widget is used to detect the drag gestures on the NonStopIO image widget. We pass the defined gesture handling methods to the appropriate gesture callbacks.
Complete Code:
import 'package:flutter/material.dart';

void main() {
  runApp(const MyApp());
}

class MyApp extends StatelessWidget {
  const MyApp({Key? key}) : super(key: key);

  @override
  Widget build(BuildContext context) {
    return MaterialApp(
      title: 'Custom Drag and Drop',
      theme: ThemeData(
        primarySwatch: Colors.blue,
      ),
      home: const MyHomePage(),
    );
  }
}

class MyHomePage extends StatefulWidget {
  const MyHomePage({Key? key}) : super(key: key);

  @override
  State<MyHomePage> createState() => _MyHomePageState();
}

class _MyHomePageState extends State<MyHomePage> {
  late Offset position;

  @override
  void initState() {
    super.initState();
    position = const Offset(0, 0);
  }

  void _onPanStart(BuildContext context, DragStartDetails details) {
    print(details.globalPosition.dy);
  }

  void _onPanUpdate(
      BuildContext context, DragUpdateDetails details, Offset offset) {
    setState(() {
      position = details.globalPosition;
    });
  }

  void _onPanEnd(BuildContext context, DragEndDetails details) {
    print(position);
    if (position.dy < 180 &&
        position.dy > 100 &&
        position.dx > 100 &&
        position.dx < 180) {
      setState(() {
        position = const Offset(120, 120);
      });
    } else {
      setState(() {
        position = const Offset(0, 0);
      });
    }
    print(details.velocity);
  }

  void _onPanCancel(BuildContext context) {
    print("Pan canceled !!");
  }

  @override
  Widget build(BuildContext context) {
    return Scaffold(
      appBar: AppBar(
        title: const Text('Custom Drag and Drop'),
      ),
      body: SafeArea(
        child: LimitedBox(
          maxHeight: MediaQuery.of(context).size.height,
          maxWidth: MediaQuery.of(context).size.width,
          child: Stack(
            children: [
              Positioned(
                top: 10,
                child: Padding(
                  padding: const EdgeInsets.all(10),
                  child: Container(
                    height: 100,
                    width: 100,
                    color: Colors.red,
                  ),
                ),
              ),
              Positioned(
                top: 120,
                child: Padding(
                  padding: const EdgeInsets.all(10),
                  child: Container(
                    height: 100,
                    width: 100,
                    color: Colors.grey,
                  ),
                ),
              ),
              Positioned(
                top: 120,
                left: 120,
                child: Padding(
                  padding: const EdgeInsets.all(10),
                  child: Container(
                    height: 100,
                    width: 100,
                    color: Colors.green,
                  ),
                ),
              ),
              Positioned(
                top: 10,
                left: 120,
                child: Padding(
                  padding: const EdgeInsets.all(10),
                  child: Container(
                    height: 100,
                    width: 100,
                    color: Colors.grey,
                  ),
                ),
              ),
              Positioned(
                top: position.dy,
                left: position.dx,
                child: Padding(
                  padding: const EdgeInsets.all(10),
                  child: GestureDetector(
                    onPanStart: (details) => _onPanStart(context, details),
                    onPanUpdate: (details) =>
                        _onPanUpdate(context, details, position),
                    onPanEnd: (details) => _onPanEnd(context, details),
                    onPanCancel: () => _onPanCancel(context),
                    child:  SizedBox(
                      height: 100,
                      width: 100,
                      child: Center(
                        child: Image.network("https://ns-emp-portal.firebaseapp.com/favicon.ico",
                        height: 30,
                        )
                      ),
                    ),
                  ),
                ),
              ),
            ],
          ),
        ),
      ),
    );
  }
}
Testing the App
Save the changes and run the app using the Flutter CLI command flutter run. You should see the app running on your connected device or emulator.
You can now drag the NonStopIO image widget by pressing and holding it and move it around the screen. If you release the NonStopIO image widget within the boundaries of the green box (defined by the conditions in the _onPanEnd method), it will snap into place. Otherwise, it will return to its initial position in the red box.
Congratulations! You have successfully implemented custom drag and drop functionality in Flutter without using any third-party packages.
Conclusion
In this tutorial, we learned how to create a custom drag and drop feature in Flutter without relying on any third-party packages. By using the built-in Flutter widgets and gesture detection, we were able to implement a drag and drop functionality that allows the user to interact with the UI elements and perform drag and drop operations.
Feel free to customize the code and explore additional features to enhance the user experience. Happy coding!
If you have any further questions, feel free to ask!
Subscribe to my newsletter
Read articles from NonStop io Technologies directly inside your inbox. Subscribe to the newsletter, and don't miss out.
Written by
NonStop io Technologies
NonStop io Technologies
Product Development as an Expertise Since 2015 Founded in August 2015, we are a USA-based Bespoke Engineering Studio providing Product Development as an Expertise. With 80+ satisfied clients worldwide, we serve startups and enterprises across San Francisco, Seattle, New York, London, Pune, Bangalore, Tokyo and other prominent technology hubs.