AWS Smart Voice
 Keerthi Ravilla Subramanyam
AWS Smart Voice is a seamless AI-powered solution that converts speech to text and text to speech using AWS services. Whether you need to transcribe spoken words from an .mp3 file or generate natural-sounding speech from a .txt file, this project automates the entire process with minimal effort.
At its core, Amazon Transcribe accurately converts audio into text, while Amazon Polly transforms written content into lifelike speech. These services are seamlessly integrated with AWS Lambda for serverless execution and Amazon S3 for secure storage of both input and output files. A Flask-based frontend provides a user-friendly interface, allowing users to interact effortlessly with the system.
In this article, we will explore this solution, discuss the architecture and workflow, and guide you through the step-by-step implementation. By the end, you'll have a fully functional AI-driven voice processing system running on AWS. Let's dive in!
Prerequisites
AWS Account: Make sure you have an AWS account before starting. If you don't have one, you can create it here: AWS Console.
AWS CLI (Command Line Interface): Install and configure the AWS CLI to interact with AWS services from your terminal. You can download from here AWS CLI official guide.
Basic Knowledge on launching ec2 instances, creating s3 buckets and lambda functions.
Key AWS Services in this project
To build AWS Smart Voice, we utilize several AWS services that work together to provide seamless speech-to-text and text-to-speech conversion:
Amazon S3 – A cloud storage service used to store input and output files securely.
AWS Lambda – A serverless compute service that processes files and triggers necessary actions.
Amazon Transcribe – A speech-to-text service that converts audio files into readable text.
Amazon Polly – A text-to-speech service that generates natural-sounding speech from text.
Amazon EC2 – A virtual server used to host the Flask-based web application.
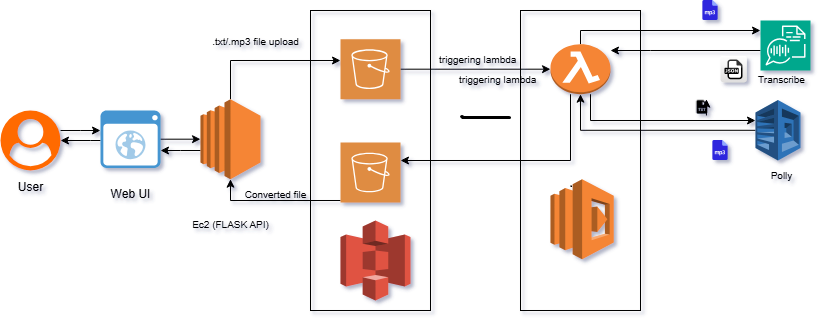
Architecture and Workflow
Let’s explore the architecture and see how various AWS services seamlessly collaborate to process and convert speech and text.
At a high level, the system follows this workflow:
User Uploads a File – Users upload either an
.mp3or.txtfile via the web interface.EC2 Backend receives the file and uploads it to Amazon S3.
The uploaded file is stored in an S3 bucket source folder, which triggers a Lambda function via an S3 event.
AWS Lambda Triggers Processing – A Lambda function detects the file type and triggers the appropriate AWS service:
If an
.mp3file is uploaded, it is sent to Amazon Transcribe for speech-to-text conversion.If a
.txtfile is uploaded, it is sent to Amazon Polly to generate a spoken version of the text.
Processed Output is Stored in S3 – Once processing is complete, the transcribed text or generated audio file is saved back in S3.
Frontend Fetches and Displays the Result – The web application retrieves the processed file and presents it to the user, either as text in a popup or an audio file for playback.
This architecture ensures a serverless, scalable, and cost-efficient solution while leveraging AWS services to handle complex speech and text processing.
Step by step implementation
Step 1: Setting Up the AWS Infrastructure
To build this project, we need to configure key AWS services that will handle file storage, processing, and execution. Follow these steps to set up the foundation:
Create an IAM role
This role gives the EC2 service permissions to access the S3 bucket. Since our EC2 instance uploads the file to the S3 bucket and retrieves the output from it, this role grants those necessary permissions.
Navigate to the AWS IAM console and click on Roles.
Click on create Role.
Under Trusted entity type, choose AWS service, and from the dropdown, select EC2 services.
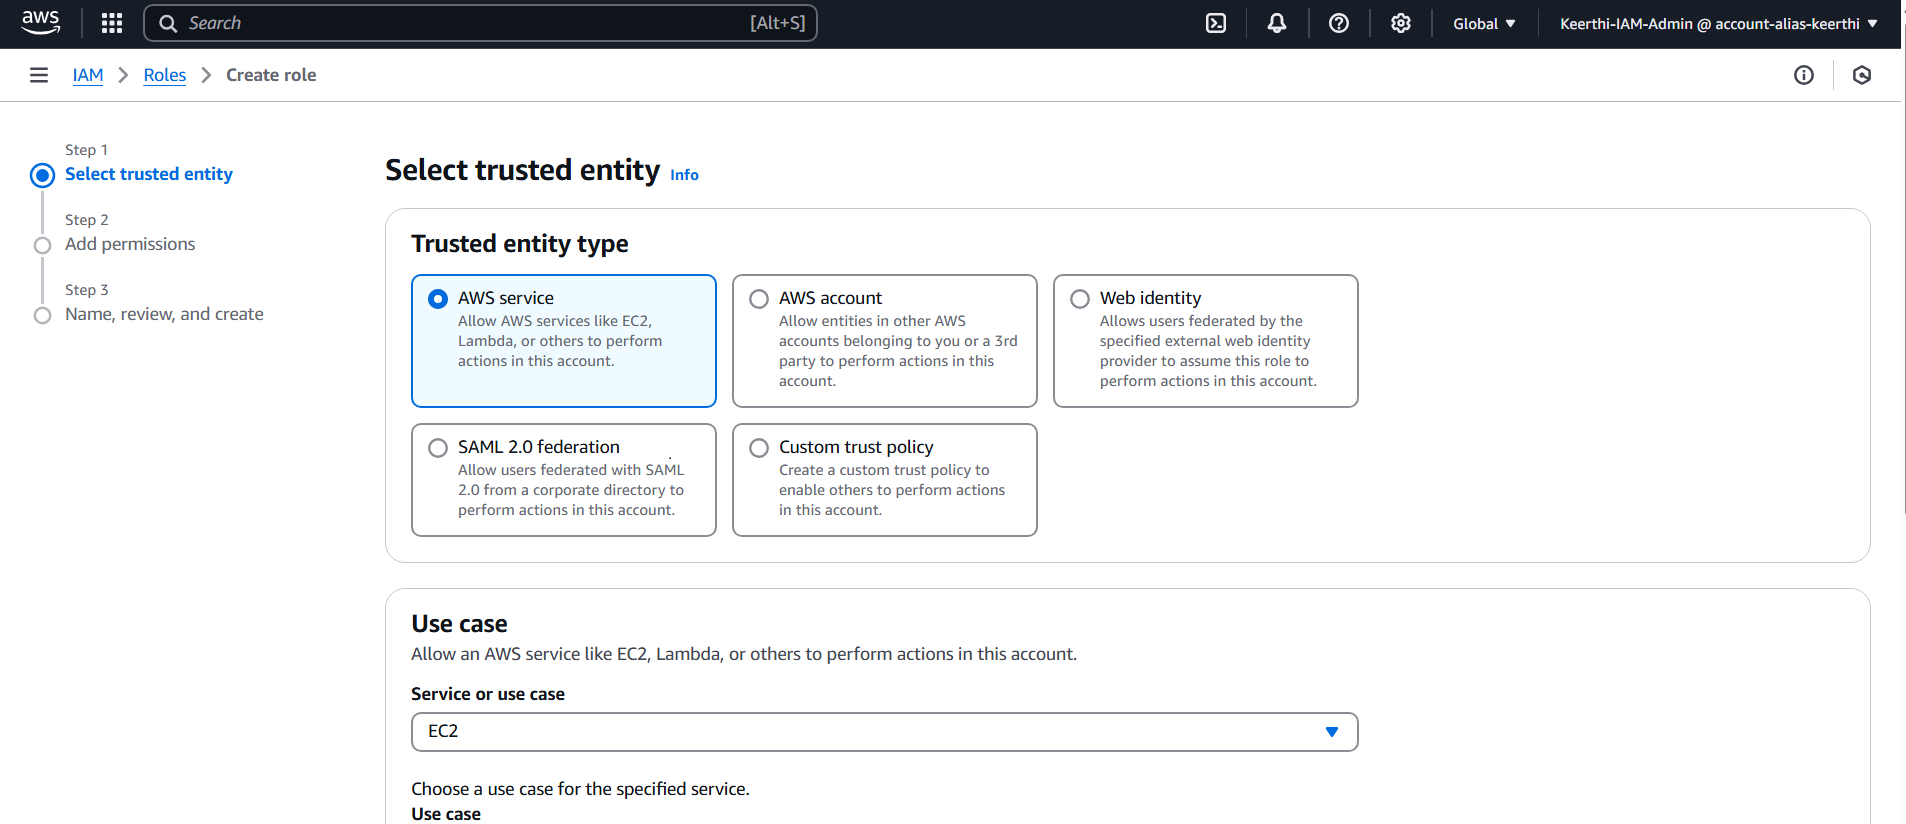
Click next, and under the add permission section, choose S3 full access.
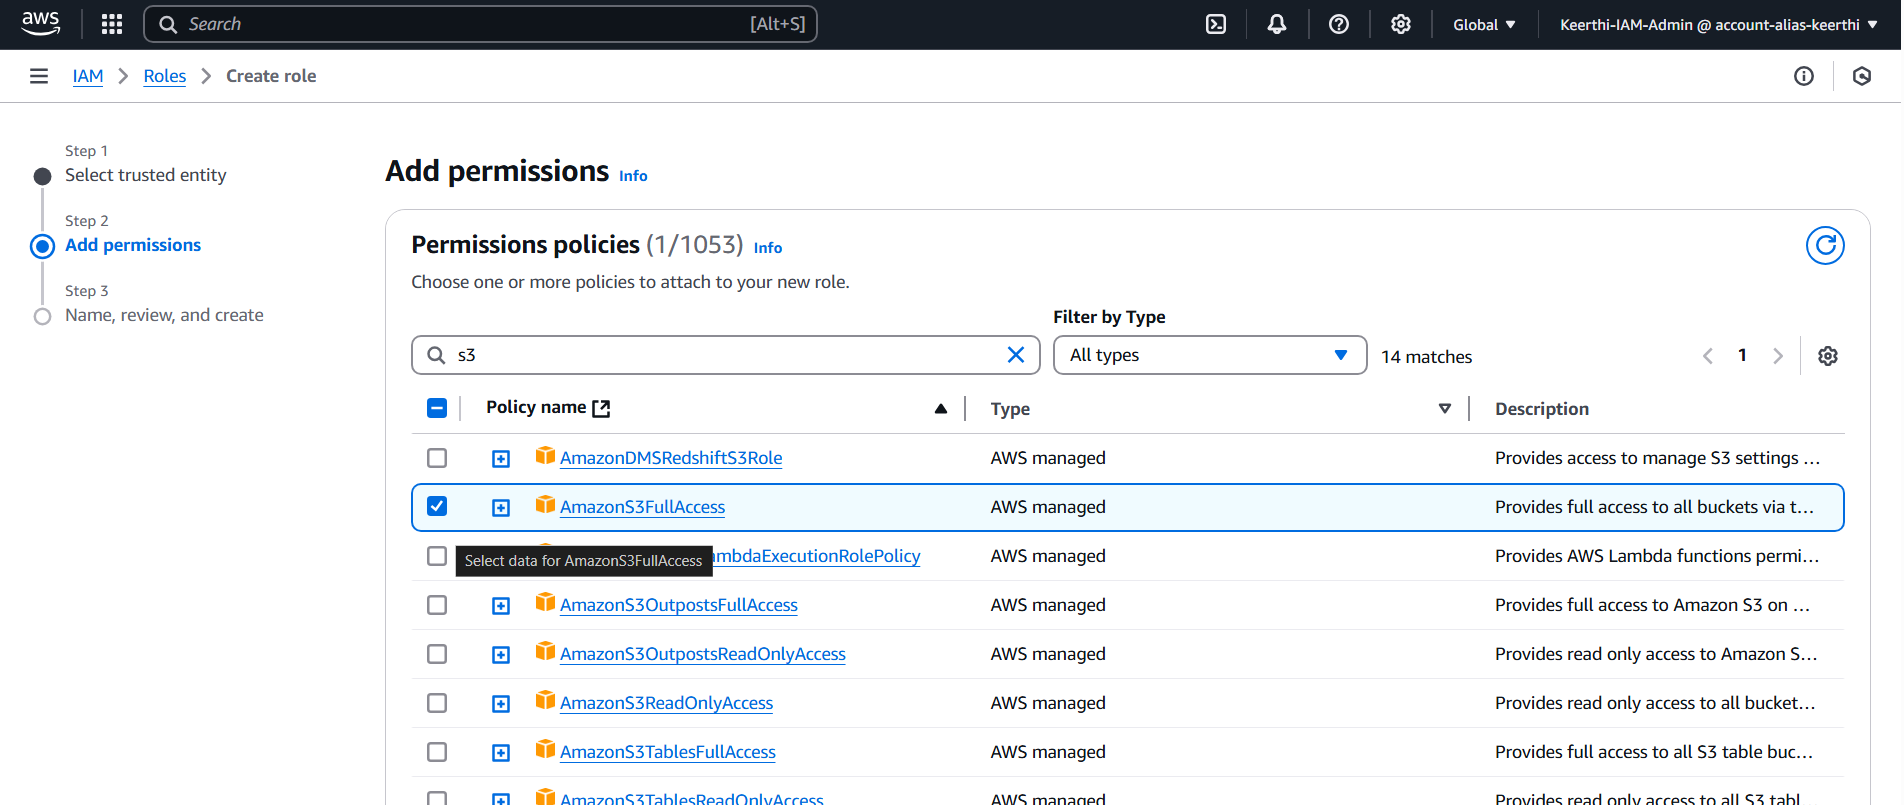
Give this Role a name like “EC2-S3-access” and create.
Launch and Configure an EC2 Instance
Navigate to the AWS EC2 Console and create a new instance (Amazon Linux 2 or Ubuntu recommended).
Configure security groups to allow SSH (port 22), HTTPS, and HTTP traffic from the internet, as well as access for the web application( port 8080).
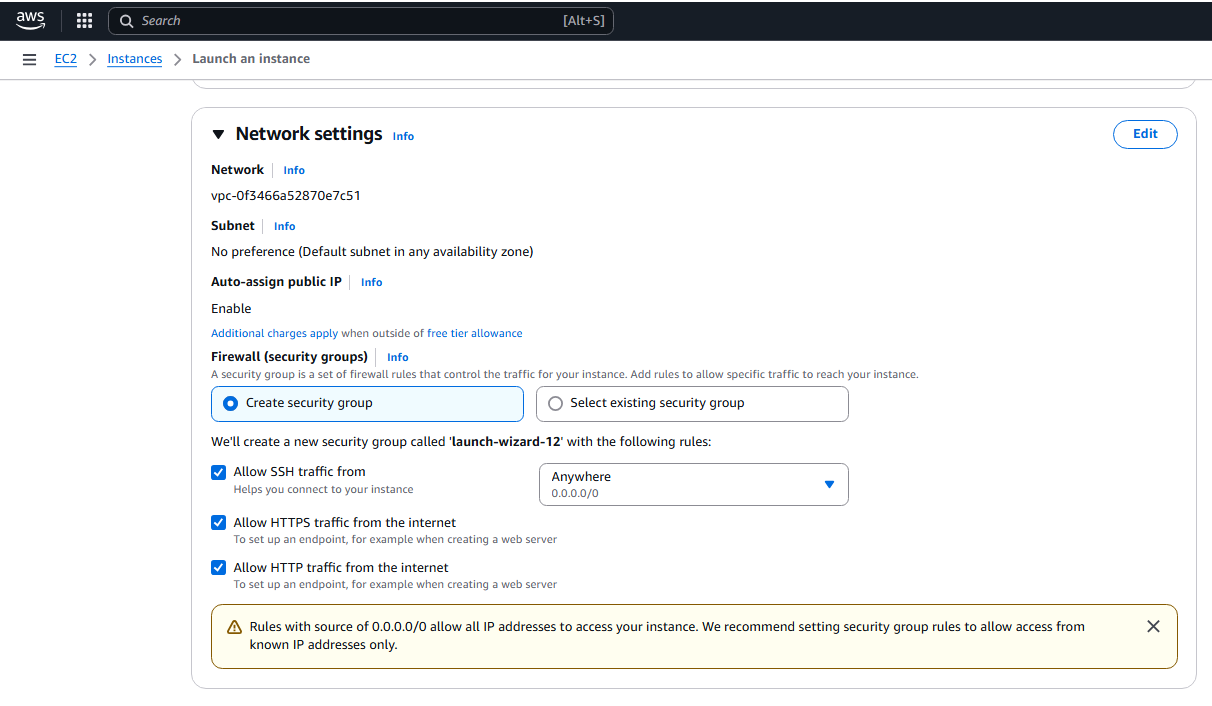
Launch the instance.
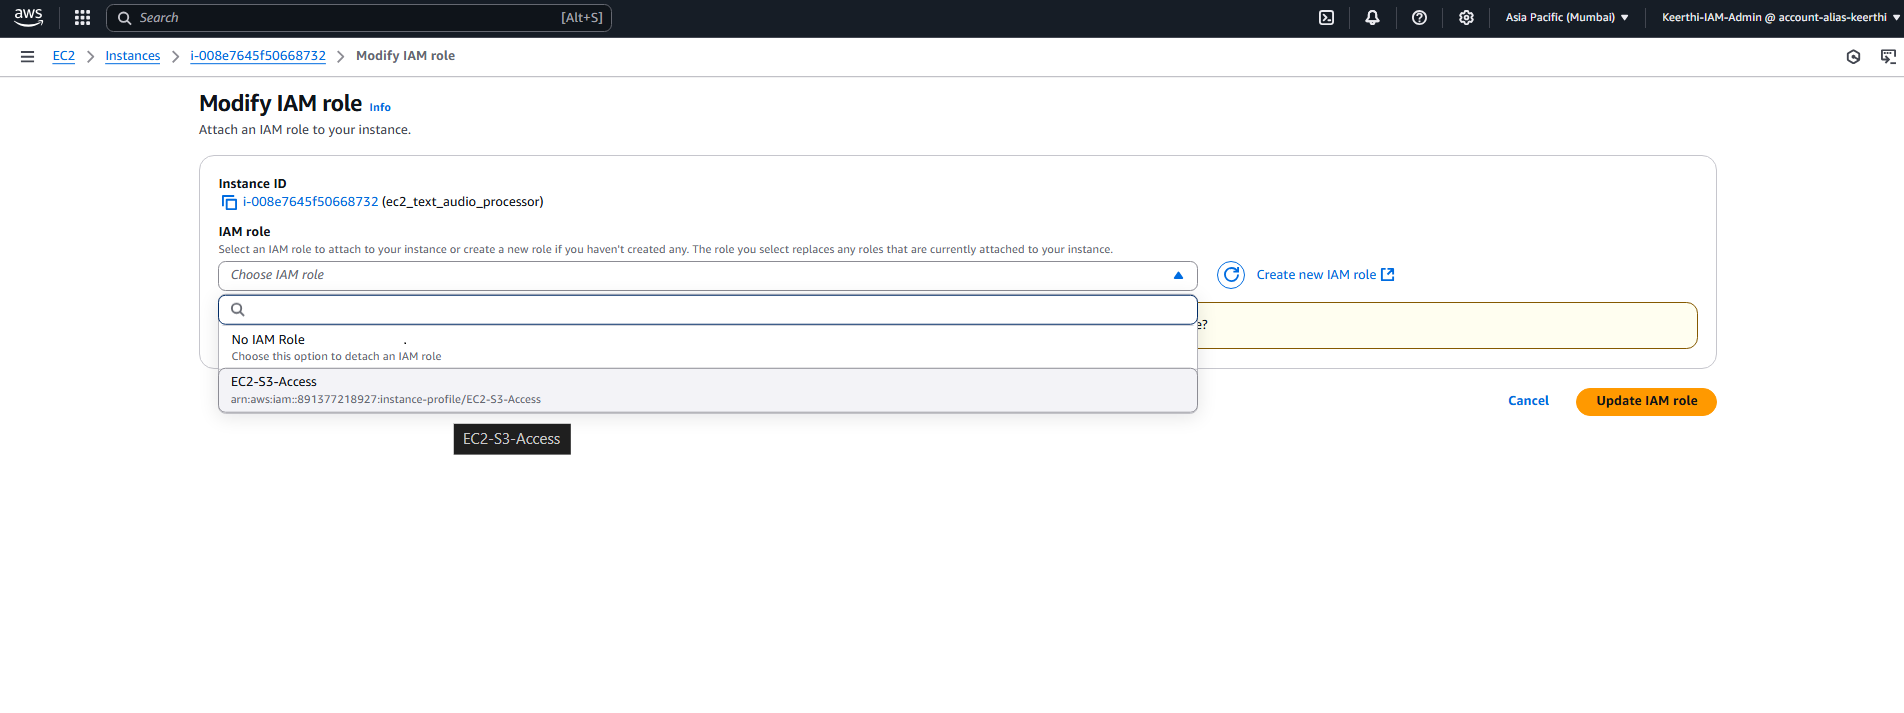
Click on your instance, then click the Actions button, select security, and choose modify IAM role.
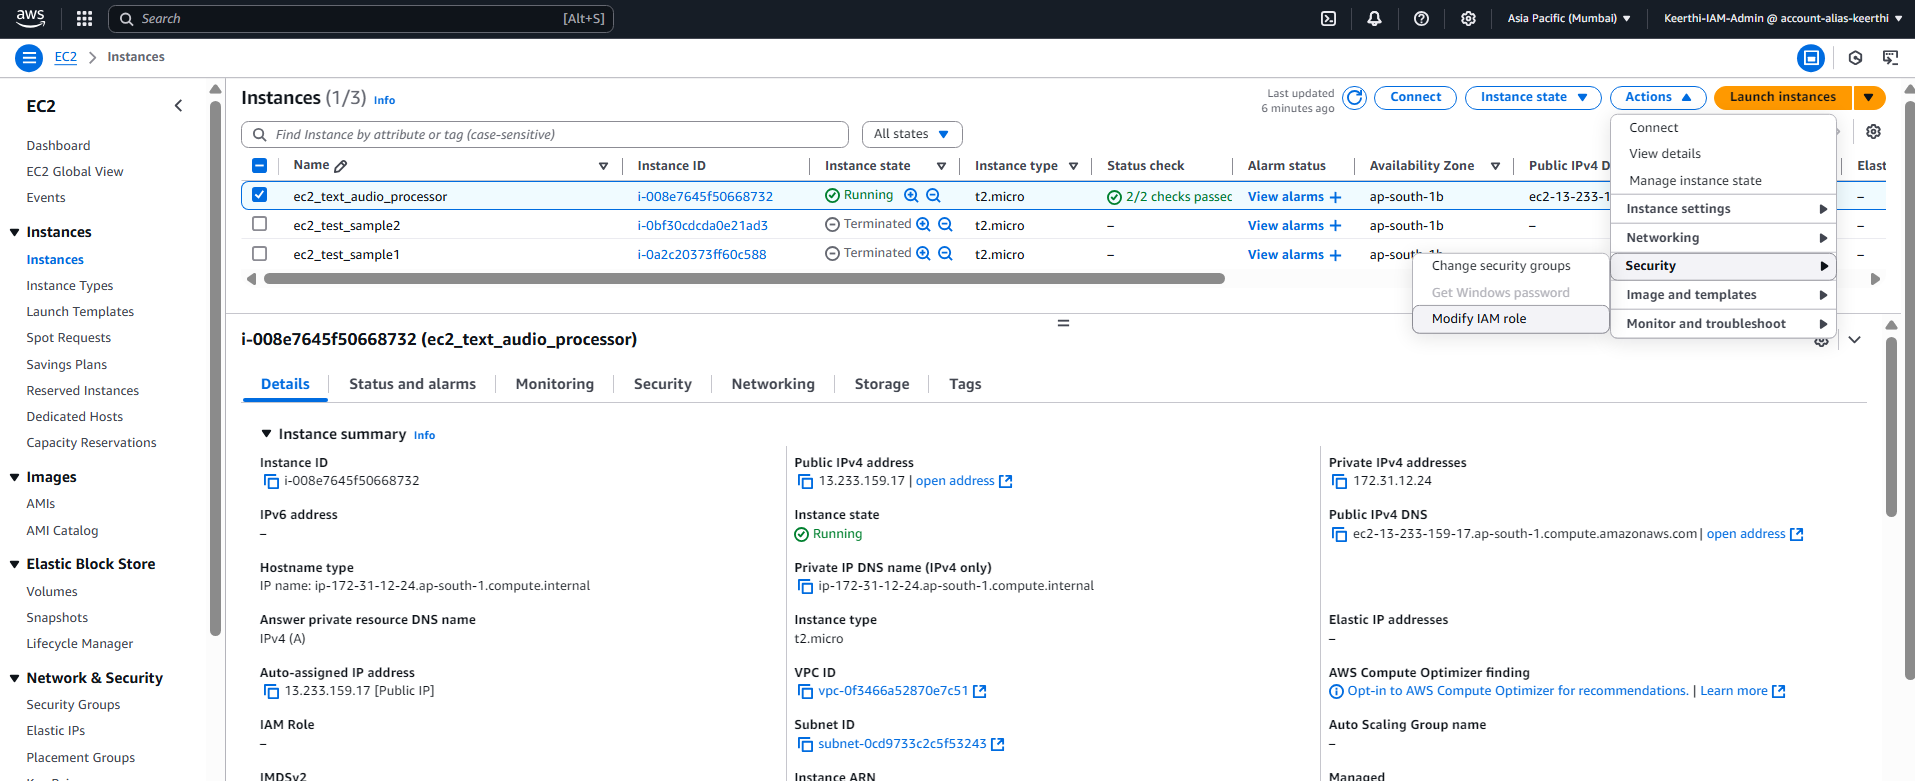
Choose the Role we created earlier and attach it.
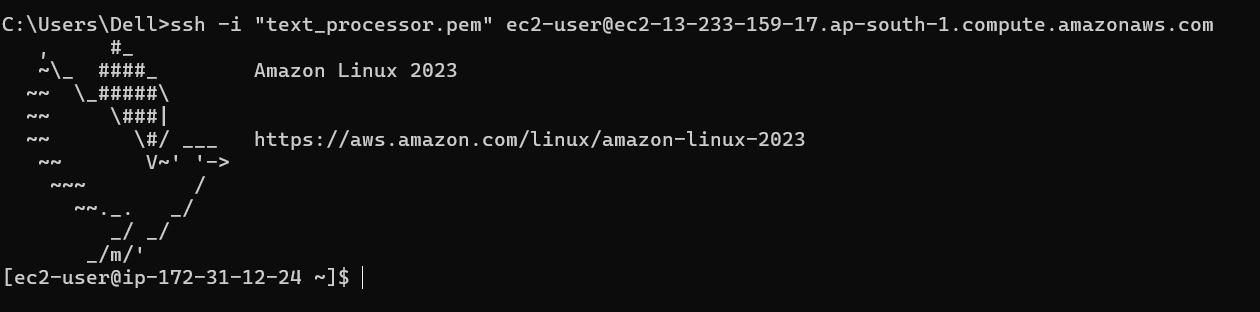
Now, Connect to your instance using the ssh. (Select your instance, choose the connect option, copy the SSH connection command, and run it in your local terminal.)
Installing and configure aws cli using below commands based on your instance type. If already configured ignore this step.
  sudo yum install aws-cli -y  # Amazon Linux
  sudo apt install awscli -y  # Ubuntu
Install python, flask and there dependencies using below commands
  sudo yum install python3 -y  # Amazon Linux
  python3 --version
  pip3 --version
  pip3 install flask # flask installation
  pip3 install boto3 flask-cors requests
Create a Lambda funtion
Navigate to the AWS lambda console, click on Create funtion.
Choose Author from scratch.
Give your lambda funtion an unique name like smartvoice_s3_trigger.
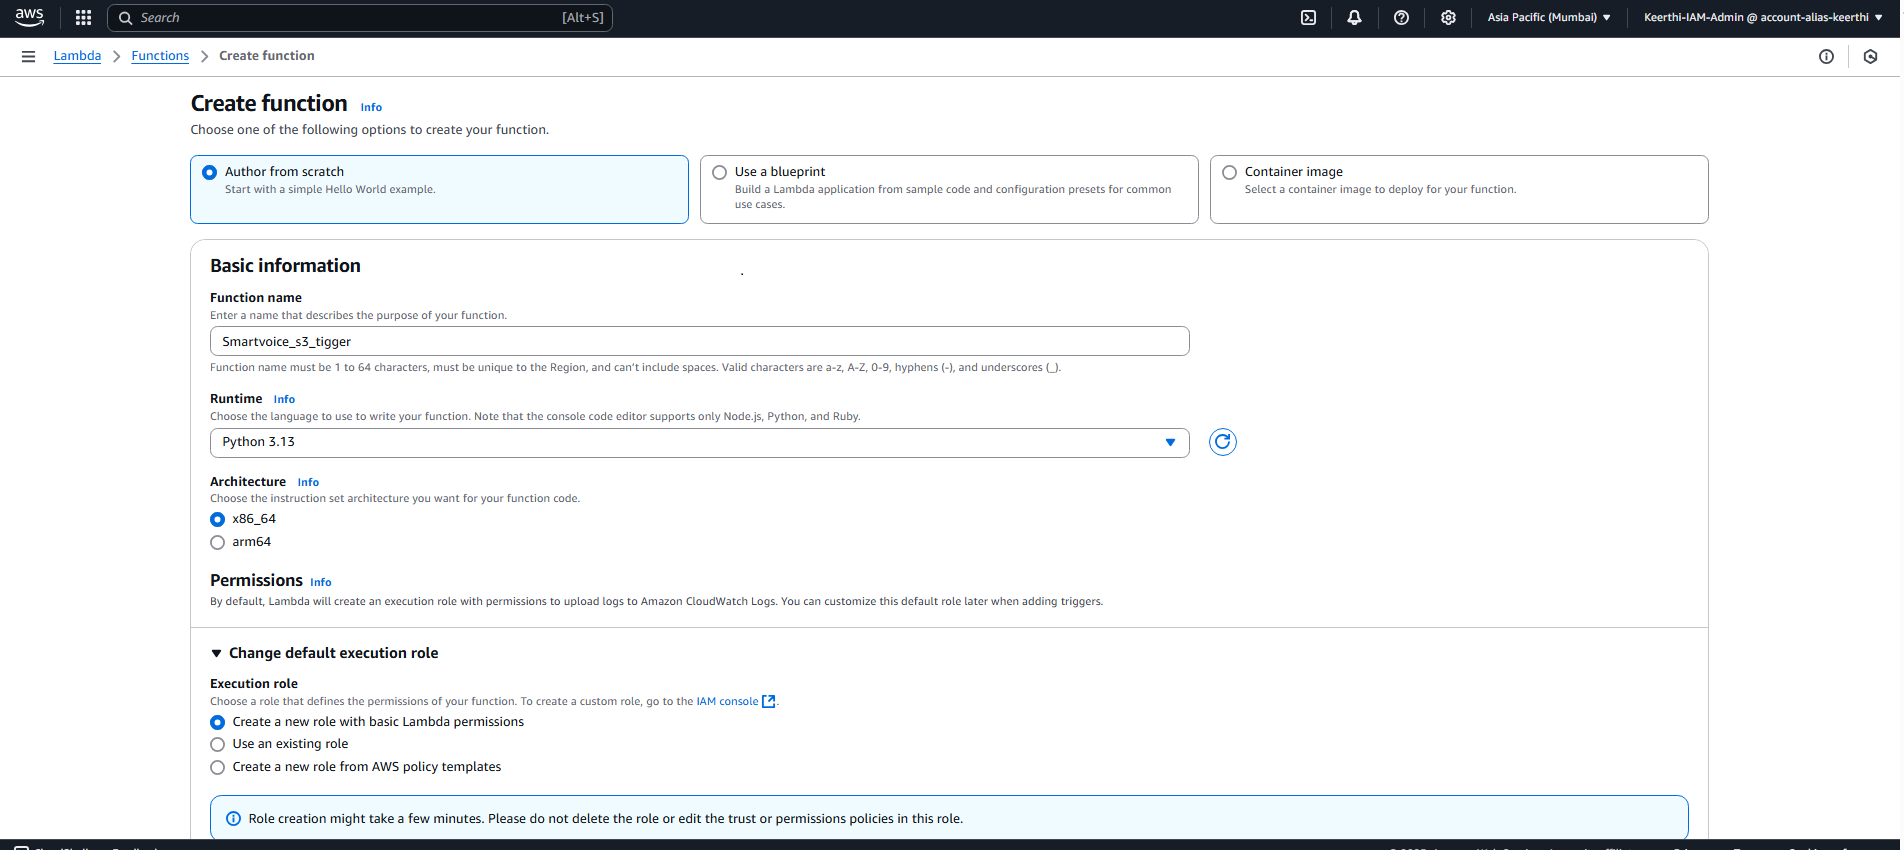
choose Python 3.13 for Run time.
Add create the funtion.
Go to the IAM console, and in roles, search for the role named after your Lambda function.
In that role, add permissions that gives for s3 bucket, transcribe and polly full access.
Create a S3 bucket
Navigate to the AWS S3 Console and create a new bucket and give it a unique name. Here I named it “text-audio-processor”.
Inside the bucket, click on create folder and make two folders named source and destination.
/source/→ For storing user-uploaded files (.mp3 or .txt)./destination/→ For storing processed output files (transcribed text or generated audio).
Go to the Properties tab and scroll down to the Event notifications section.
Click Create event notification.
Set a name to the event like “TranscribeTrigger”, and prefix to "source/" (This ensures the event triggers only for files uploaded to the
/source/folder).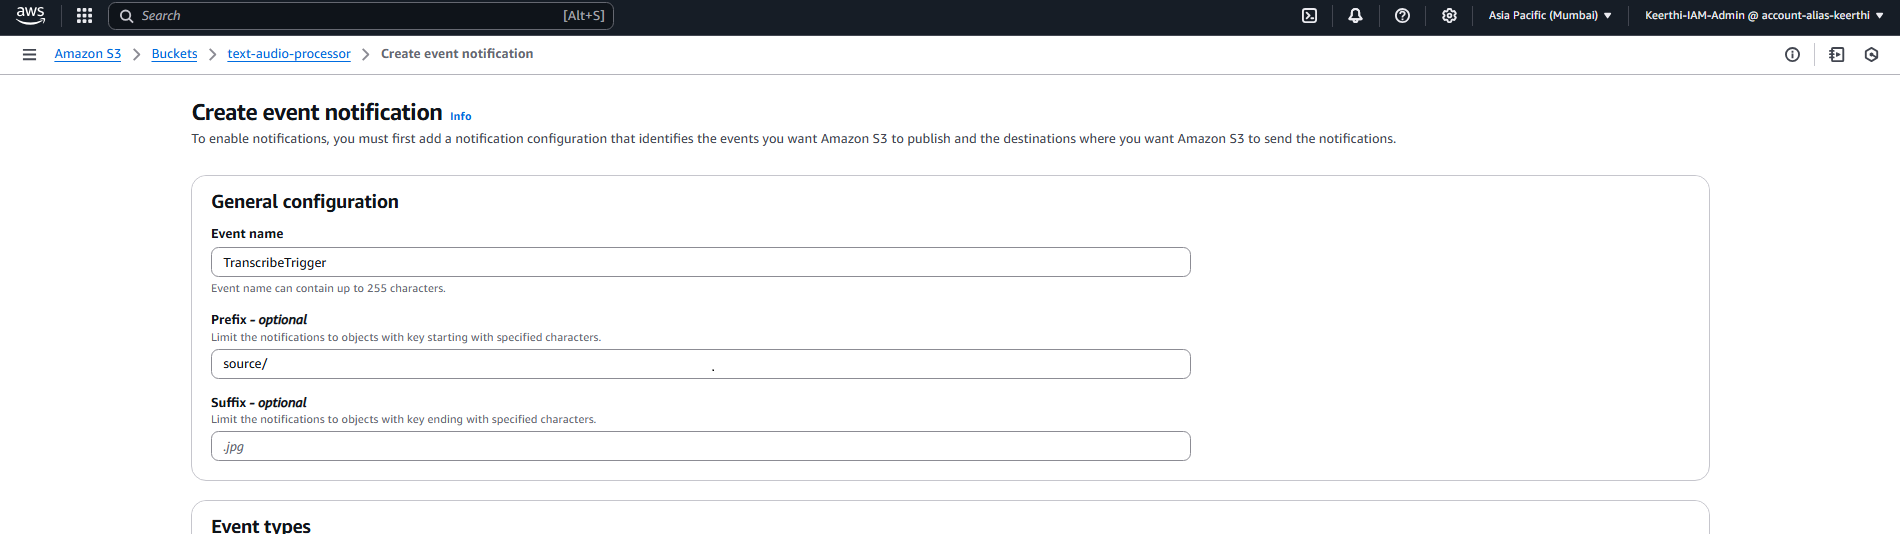
Under Event Type, Select PUT.
In Destination, select Lambda Function, and then choose the Lambda function we created earlier.
Now the s3 bucket triggers the our lambda funtion.
Step2 : Setting Up the Frontend and Backend on the EC2 Instance
Now that our AWS Lambda function is triggered by S3 events, we need to set up our backend (Flask API) and frontend (static website) on the EC2 instance to allow users to upload files and retrieve processed results.
Setting Up the Backend (Flask API)
We will use Flask to handle file uploads and interact with S3.
Connect to ec2 instance
Create a directory and change into it.
  mkdir smartvoice-project
  cd smartvoice-project
Create an
app.pyfile.Copy or clone the code from GitHub and save it.
Copy or clone the code, then edit the S3 bucket names and ports in the code, and save it.
  # AWS S3 Configuration
  S3_BUCKET = "text-audio-processor"
This code is written in Python and is used to upload files and fetch the outputs.
Setting up Frontend
The frontend we created here is a simple HTML + JavaScript interface for users to upload files and retrieve results.
In your current working directory, "smartvoice-processor," create a directory named "templates."
mkdir templatesCreate an
index.htmlfile.Copy or clone the code from GitHub and save it.
Setting up code in lambda funtion
Now we have the frontend and backend but the lambda funtion we created doesn’t do anything as of now. so let’s fix it.
Go to the Lambda console.
Choose the Lambda function you created.
Scroll down to the code section.
Copy or clone the Lambda code from GitHub.
Edit the S3 bucket name in the code under the S3 configuration.
Deploy it to save your changes.
Run the app
Open the terminal and navigate to the "smartvoice-processor" directory.
Run the app.py using this command
python3 app.pyIf you see somthing like “Running on http://127.0.0.1:8080/” means that your app is working.
If not, diagnose by checking everything from installations to permissions and access.
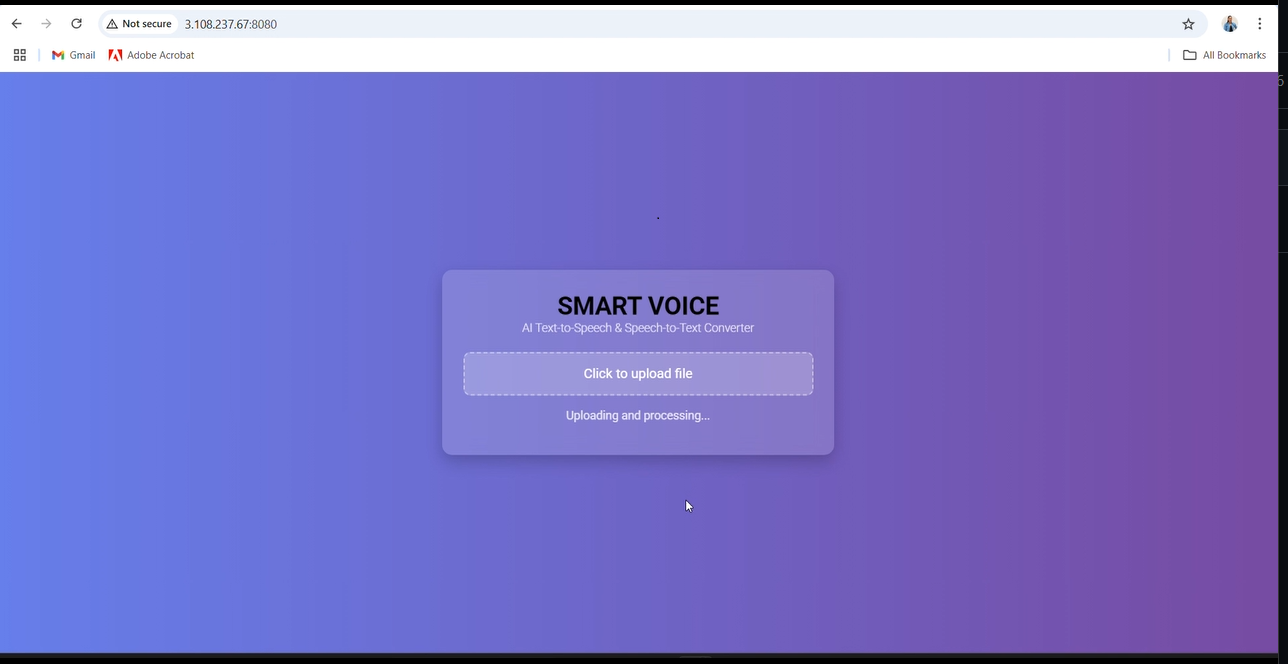
In your browser, enter:
http://<public_ip_address>:8080, replacing<public_ip_address>with your instance's public IP address.You should be able to see this page

Step 3: Test the application
Now that the backend is running, let's verify that everything works as expected.
Acess the frontend
Open the browser and go to:
http://your-ec2-public-ip:8080/If the page loads correctly, try uploading an
.mp3or.txtfile to test the flow.If there is any issuces, go to debug section in this article.
Test file upload to backend
If the UI is working, then try uploading .mp3 file.
This after uploading, it should the transcripted text as follows.
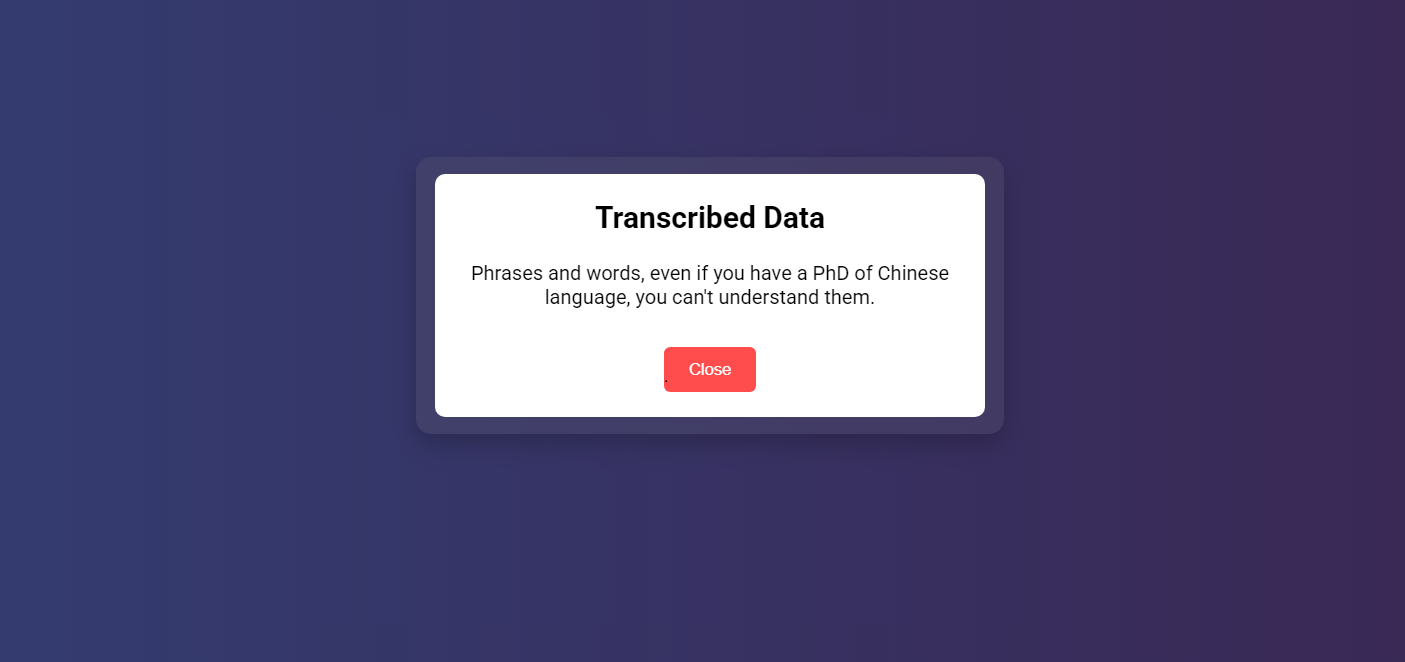
Demo link to this .mp3 to text output is here for your reference.(link)
Now, try uploading the .txt file
It should provide audio play output, like the one below.

Step 4: Debug
If you encounter any issues with the frontend, follow these steps:
Check if Flask is Running
First, make sure your Flask backend is actually running. Connect to your EC2 instance and run:
ps aux | grep app.pyIf Flask is running, you should see something like:
ec2-user 1234 0.0 1.2 123456 6789 ? S 12:34 0:01 python3 app.pyIf not running, restart it:
python3 app.pyIf you see errors, check them carefully.
Check If Port 8080 is Open
Run this following command
netstat -tulnp | grep 8080If Flask is running correctly, you should see output like:
tcp 0 0 0.0.0.0:8080 0.0.0.0:* LISTEN 1234/python3If you don’t see this, Flask is not listening on port 8080. Fix it by
Restart Flask →
python3app.pyEnsure you did not bind Flask to 127.0.0.1 (should be
0.0.0.0)- Check app.py file, it should have:
app.run(host="0.0.0.0", port=8080, debug=True)
Verify Security Group Rules
If Flask is running but you can't access it from a browser, check EC2 Security Groups.
Ensure there is rule, with protocol tcp with port range 8080 with source set to 0.0.0.0/0 is present.
If not add that rule and save it.
If the error with the frontend still exists, check the index.html file for any possible errors and fix it.
If you encounter any issues with the frontend, follow these steps:
Test Backend Manually (Without UI)
Run a direct cURL command to test the backend
curl -X GET "http://your-ec2-public-ip:8080/"If it doesn't return HTML, Flask might be failing.
check the s3 bucket, for source and destination folders.
If the destination folder, has a files then the problem is with s3 bucket policy’s.
Check the lambda funtion, for logs and see where the problem exist.
Conclusion
Congratulations! 🎉🎉,You have successfully built and deployed AWS Smart Voice, a powerful speech-to-text and text-to-speech converter using Amazon Transcribe, Amazon Polly, AWS Lambda, S3, and EC2. This solution enables users to seamlessly convert audio to text and vice versa, leveraging the scalability and automation of AWS services.
With everything set up, you now have a fully functional AI-powered voice processing system. You can further enhance it by adding real-time processing, multilingual support, or API integrations for broader applications.
Subscribe to my newsletter
Read articles from Keerthi Ravilla Subramanyam directly inside your inbox. Subscribe to the newsletter, and don't miss out.
Written by
Keerthi Ravilla Subramanyam
Keerthi Ravilla Subramanyam
Hi, I'm Keerthi Ravilla Subramanyam, a passionate tech enthusiast with a Master's in Computer Science. I love diving deep into topics like Data Structures, Algorithms, and Machine Learning. With a background in cloud engineering and experience working with AWS and Python, I enjoy solving complex problems and sharing what I learn along the way. On this blog, you’ll find articles focused on breaking down DSA concepts, exploring AI, and practical coding tips for aspiring developers. I’m also on a journey to apply my skills in real-world projects like predictive maintenance and data analysis. Follow along for insightful discussions, tutorials, and code snippets to sharpen your technical skills.