Complete Guide: NFT Marketplace Smart Contract on Rootstock
 Henry Pham
Introduction
Blockchain technology continues to revolutionize the digital economy, and NFT marketplaces have emerged as a crucial platform for creators and collectors to trade digital assets securely. Rootstock (RSK), a Bitcoin sidechain with Ethereum-compatible smart contracts, offers a robust foundation for building decentralized applications, including NFT marketplaces.
By choosing Rootstock for your NFT marketplace, you'll benefit from:
Bitcoin's robust security model through merge-mining
Full EVM compatibility for seamless Solidity development
Lower transaction fees
A growing ecosystem of Bitcoin-native DeFi and NFT projects
This guide will take you step-by-step through building a feature-complete NFT marketplace, enabling users to mint, list, and trade NFTs with built-in security measures and efficient storage management.
Part 1: Understanding the Contract Structure and Dependencies
Initial Setup and Imports
// SPDX-License-Identifier: MIT
pragma solidity ^0.8.0;

import "@openzeppelin/contracts/token/ERC721/extensions/ERC721URIStorage.sol";
import "@openzeppelin/contracts/security/ReentrancyGuard.sol";
import "@openzeppelin/contracts/utils/Counters.sol";
Let's examine each imported library and its crucial role:
ERC721URIStorage: Extends the basic ERC721 implementation with metadata storage capabilities, allowing you to associate URIs with your NFTs for storing metadata like images, descriptions, and attributes.
ReentrancyGuard: Provides protection against reentrancy attacks where malicious contracts could attempt to recursively call your contract's functions. This is especially important for marketplace functions handling currency transfers.
Counters: Offers a secure way to implement incrementing/decrementing counters, preventing overflow errors and ensuring reliable token ID generation.
Contract Declaration and State Variables
contract NFTMarketplace is ERC721URIStorage, ReentrancyGuard {
    using Counters for Counters.Counter;
    Counters.Counter private _tokenIds;
    Counters.Counter private _itemsSold;

    address payable owner;
}
Key components:
Contract inherits from ERC721 and ReentrancyGuard
_tokenIds: Tracks the total number of tokens
_itemsSold: Tracks sold items
owner: Marketplace administrator
Part 2: Data Structures
MarketItem Struct
struct MarketItem {
    uint256 tokenId;
    address payable seller;
    address payable owner;
    uint256 price;
    bool sold;
}

mapping(uint256 => MarketItem) private idToMarketItem;
Structure explanation:
tokenId: Unique identifier for the NFT
seller: Address of the person selling the NFT
owner: Current owner of the NFT
price: Price set by the seller
sold: Status of the NFT
Part 3: Core Marketplace Functions
1. Minting NFT
The minting process creates new NFTs and assigns them to their initial owners.
function createToken(string memory tokenURI) public returns (uint) {
    _tokenIds.increment();
    uint256 newTokenId = _tokenIds.current();
    _mint(msg.sender, newTokenId);
    setTokenURI(newTokenId, tokenURI);
    return newTokenId;
}
The minting process involves several important steps. Let's understand each one:
We create a unique identifier for the new NFT:
_tokenIds.increment();
uint256 newTokenId = _tokenIds.current();
We use OpenZeppelin's Counters library to generate sequential token IDs. This ensures each NFT has a unique identifier and prevents ID collisions. The counter starts at 0 and increments by 1 for each new NFT.
The actual minting happens here:
_mint(msg.sender, newTokenId);
This call creates the NFT and assigns it to the creator's address. Under the hood, it updates the contract's internal ownership mappings and emits a Transfer event from the zero address.
After minting, we set the token's metadata:
_setTokenURI(newTokenId, tokenURI);
The URI typically points to a JSON file containing the NFT's metadata - things like name, description, and image URL. This metadata makes your NFT meaningful and discoverable.
Finally, we emit an event to track the minting:
emit TokenMinted(newTokenId, msg.sender, tokenURI);
This helps external systems (like your frontend) track new NFTs as they're created.
Here's the event definition you'll need:
event TokenMinted(
    uint256 indexed tokenId,
    address creator,
    string tokenURI
);
2. Listing NFT to Marketplace
The createMarketItem function handles NFT listings in the marketplace. Here's how it works:
function createMarketItem(uint256 tokenId, uint256 price) private {
    require(price > 0, "Price must be at least 1 wei");
    require(ownerOf(tokenId) == msg.sender, "You must be the owner of the NFT to list it");

    idToMarketItem[tokenId] =  MarketItem(
        tokenId,
        payable(msg.sender),
        payable(address(this)),
        price,
        false
    );

    _transfer(msg.sender, address(this), tokenId);
    emit MarketItemCreated(tokenId, msg.sender, address(this), price, false);
}
When listing an NFT, the function performs these operations:
First, it checks two requirements:
The price must be greater than zero to prevent free listings
You must be the owner of the NFT to list it
Next, it creates a market item entry with:
Token ID for unique identification
Seller's address for payment routing
Contract address as temporary owner
Listing price
Sale status (false by default)
The NFT is then transferred to the contract. This creates an escrow system - the contract holds the NFT until someone buys it. This prevents the seller from transferring the NFT elsewhere while it's listed.
Finally, it emits an event with the listing details. Frontend applications use this to update their displays and track new listings.
event MarketItemCreated(
    uint256 indexed tokenId,
    address seller,
    address owner,
    uint256 price,
    bool sold
);

constructor() ERC721("MyNFT Marketplace", "MNFT") {
    owner = payable(msg.sender);
}
3. Market Sale Processing
The createMarketSale function handles the buying process:
The first thing we do is get all the information we need:
MarketItem storage item = idToMarketItem[tokenId];
uint256 price = item.price;
address payable seller = item.seller;
We're using storage instead of memory here because we're going to modify this item later. By getting the price and seller address right away, we save gas by not having to read from storage multiple times.
Making Sure Everything is Safe
Before we move any money or NFTs around, we need to check that everything is in order:
require(msg.value == price, "Please submit the asking price");
require(!item.sold, "Item already sold");
require(item.seller != address(0), "Item not for sale");
require(item.seller != msg.sender, "Sellers cannot buy their own items");
These checks prevent common problems:
The buyer must send the exact price - no more, no less
The item can't already be sold (prevents double-selling)
The item must actually be for sale (prevents buying unlisted items)
Sellers can't buy their own items (prevents market manipulation)
Updating the Market State
Once we know everything is okay, we update our records:
item.owner = payable(msg.sender);
item.sold = true;
item.seller = payable(address(0));
_itemsSold.increment();
This is where we record that the sale happened. We mark who the new owner is, flag the item as sold, clear out the seller (since it's no longer for sale), and update our counter of sold items.
Moving Assets Around
Now comes the important part - actually moving the NFT and money:
_transfer(address(this), msg.sender, tokenId);

payable(owner).transfer(sellerPayment);
seller.transfer(sellerPayment);
First, we transfer the NFT to its new owner. Then we handle the money:
Calculate the marketplace's fee
Figure out how much the seller should get
Send the fee to the marketplace owner
Send the rest to the seller
Keeping Everyone Informed
Finally, we let the world know what happened:
emit MarketSale(tokenId, seller, msg.sender, price);
This event helps the frontend update its display and keeps a record of the sale on the blockchain.
function createMarketSale(uint256 tokenId) public payable nonReentrant {
    MarketItem storage item = idToMarketItem[tokenId];
    uint256 price = item.price;
    address payable seller = item.seller;

    require(msg.value == price, "Please submit the asking price to complete the purchase");
    require(!item.sold, "This item is already sold");

    item.owner = payable(msg.sender);
    item.sold = true;
    item.seller = payable(address(0));
    _itemsSold.increment();
    _transfer(address(this), msg.sender, tokenId);
    seller.transfer(msg.value);
}
Part 4: View Functions
1. Fetch Market Items
function fetchMarketItems() public view returns (MarketItem[] memory) {
    uint itemCount = _tokenIds.current();
    uint unsoldItemCount = _tokenIds.current() - _itemsSold.current();
    uint currentIndex = 0;

    MarketItem[] memory items = new MarketItem[](unsoldItemCount);
    for (uint i = 0; i < itemCount; i++) {
        if (idToMarketItem[i + 1].owner == address(this)) {
            uint currentId = i + 1;
            MarketItem storage currentItem = idToMarketItem[currentId];
            items[currentIndex] = currentItem;
            currentIndex += 1;
        }
    }
    return items;
}
Function purpose:
Returns array of all unsold items
Filters items owned by marketplace contract
2. Fetch User's NFTs
function fetchMyNFTs() public view returns (MarketItem[] memory) {
    uint totalItemCount = _tokenIds.current();
    uint itemCount = 0;
    uint currentIndex = 0;

    for (uint i = 0; i < totalItemCount; i++) {
        if (idToMarketItem[i + 1].owner == msg.sender) {
            itemCount += 1;
        }
    }

    MarketItem[] memory items = new MarketItem[](itemCount);
    for (uint i = 0; i < totalItemCount; i++) {
        if (idToMarketItem[i + 1].owner == msg.sender) {
            uint currentId = i + 1;
            MarketItem storage currentItem = idToMarketItem[currentId];
            items[currentIndex] = currentItem;
            currentIndex += 1;
        }
    }
    return items;
}
Function purpose:
Returns array of NFTs owned by caller
Two-pass algorithm for efficient memory allocation
Part 5: Deployment Steps on Rootstock
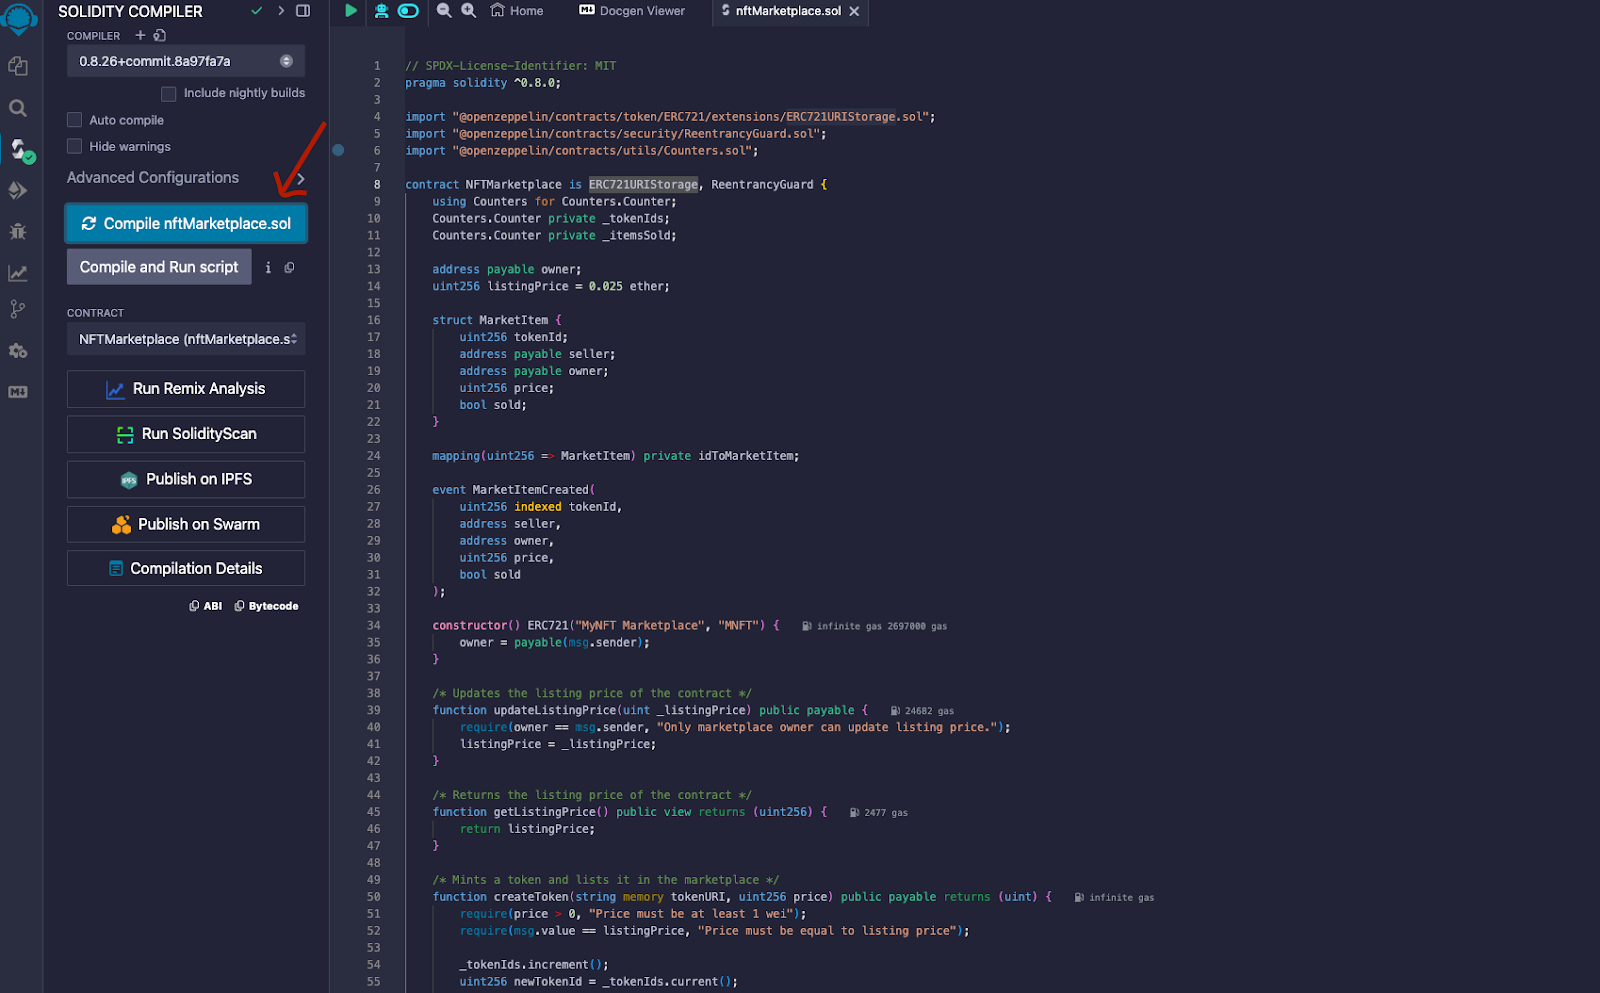
1. Remix IDE Setup:
Open Remix IDE
Create new file NFTMarketplace.sol
Paste complete code
Select Solidity compiler version 0.8.0 or higher
2. MetaMask Configuration for RSK Testnet:
Network Name: RSK Testnet
RPC URL: https://public-node.testnet.rsk.co
Chain ID: 31
Symbol: tRBTC
Get testnet RBTC from faucet
Or you can go to https://chainlist.org/?chain=919&search=rootstock&testnets=true and add Rootstock Testnet

3. Faucet some tRBTC at https://faucet.rootstock.io/
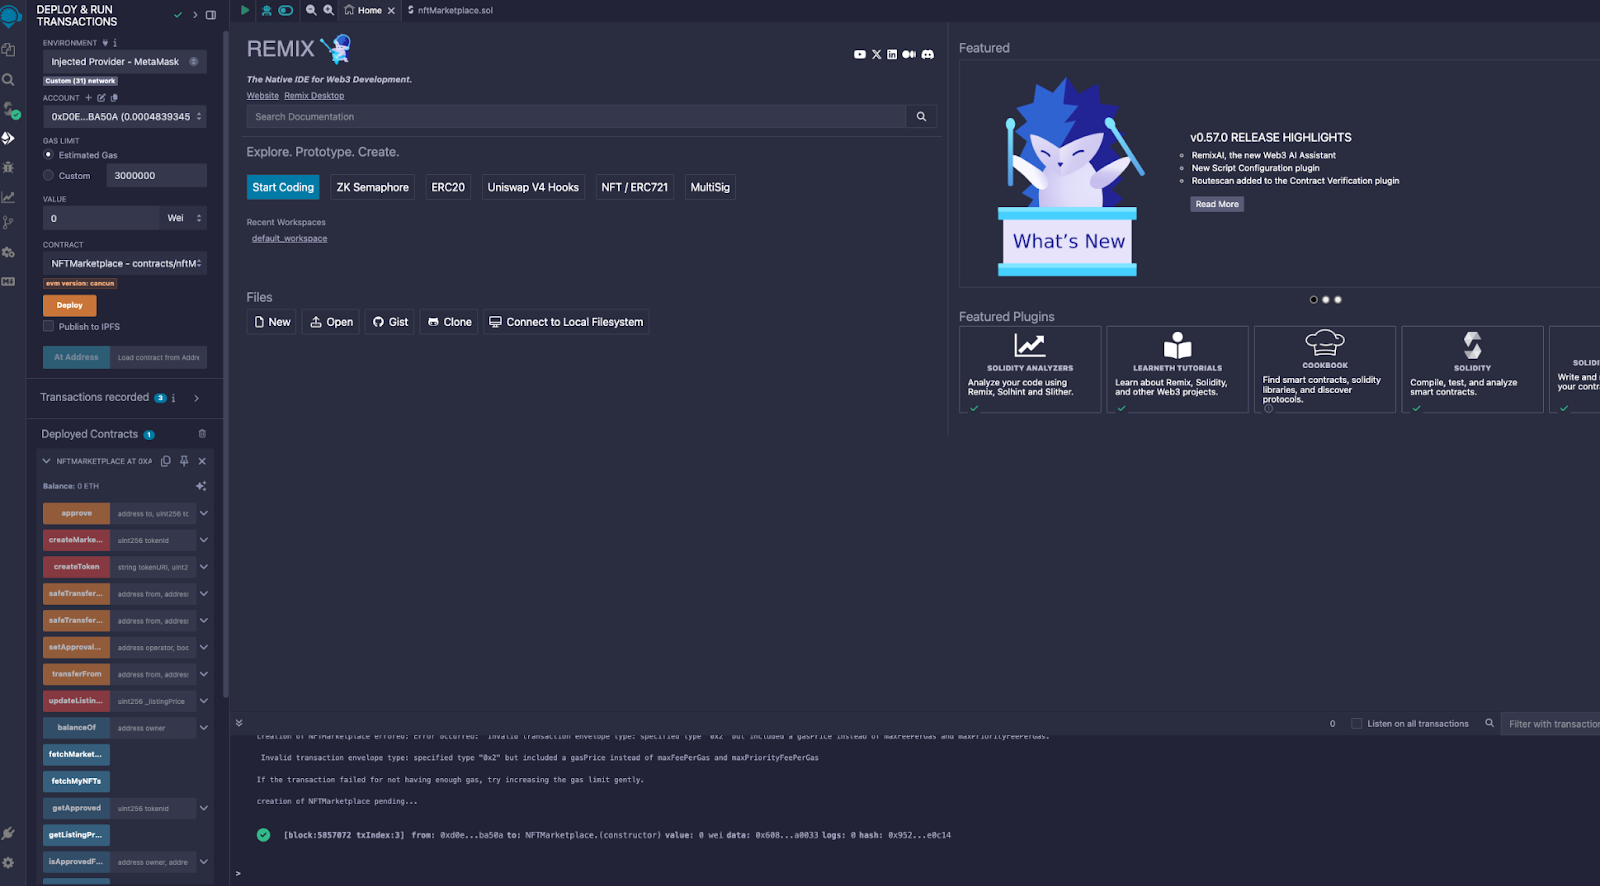
4. Contract Deployment:
Compile contract in Remix
Select "Injected Web3" environment
Connect MetaMask to RSK Testnet
Deploy contract
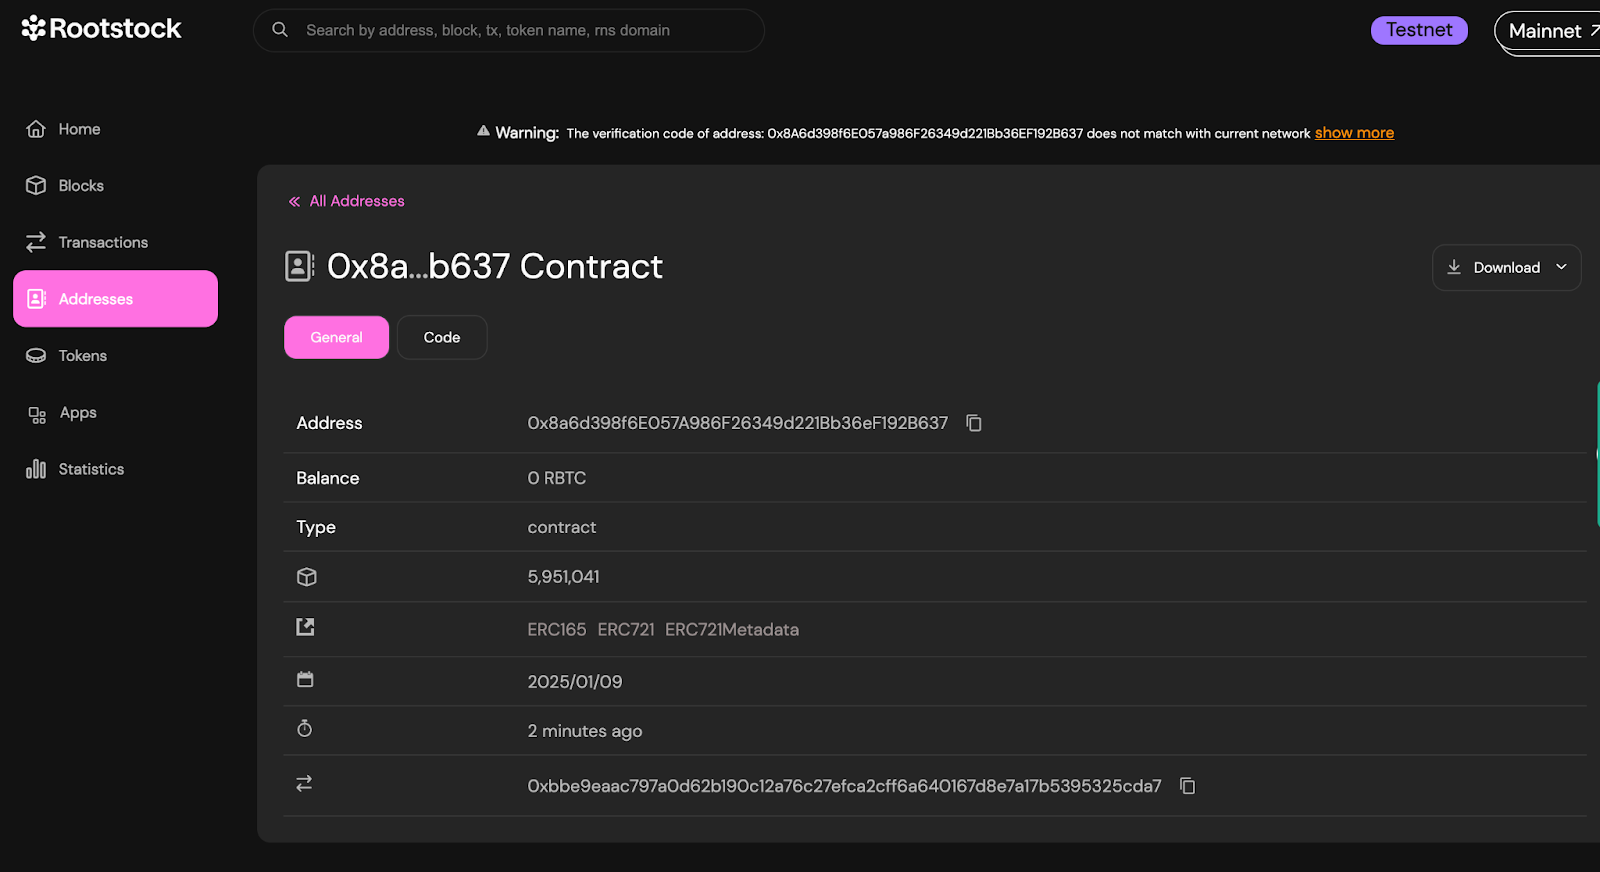
4. Checking contract
Verify the Contract on the Explorer
Locate Your Contract Address
- After deploying the contract, you'll see the contract address in Remix or MetaMask.

- Copy this address for use in the block explorer.
Visit RSK Explorer
- Navigate to the RSK Testnet Explorer: https://explorer.testnet.rsk.co
Search for Your Contract
Paste the contract address into the search bar and hit Enter.
Review details such as transaction history, contract bytecode, and any verified source code.
E.g: https://explorer.testnet.rootstock.io/address/0x8a6d398f6e057a986f26349d221bb36ef192b637
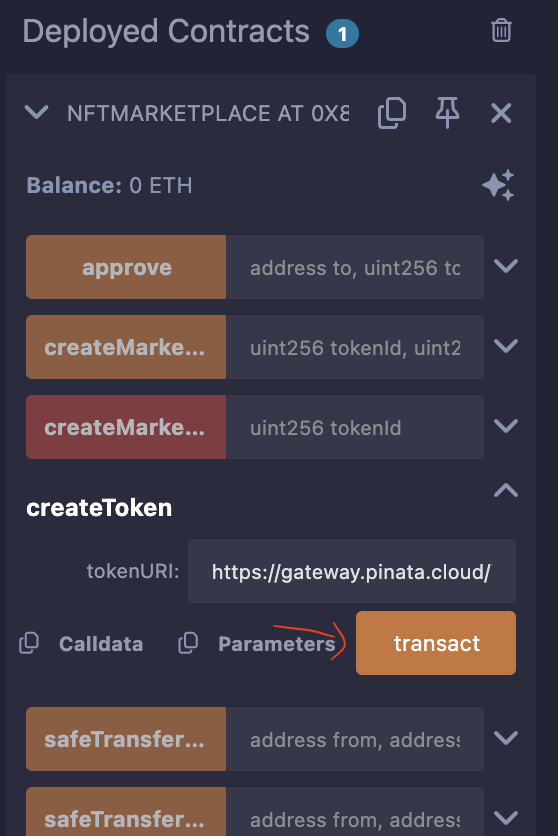
Interact with the Contract - Mint an NFT
Open Remix IDE
- Go to the “Deployed Contracts” section in Remix.
Select the createToken Function
- Input the tokenURI parameter (e.g., a link to a JSON file containing metadata).
Call the Function
Click the “transact” button.
Confirm the transaction in MetaMask.
Verify the Minted NFT
Check the transaction hash in the explorer.
Confirm that a new NFT token ID was minted and assigned to your wallet.
Interact with the Contract - List NFT on Marketplace
Select the createMarketItem Function
Input the following:
tokenId: The ID of the NFT you want to list (obtained from the minting step).
price: The sale price in wei (e.g., 1 tRBTC = 1000000000000000000 wei).
Call the Function
Click the “transact” button.
Confirm the transaction in MetaMask.
Verify the Listing
Check the transaction hash in the explorer.
Confirm that the NFT is now listed by checking the fetchMarketItems function in Remix.
Interact with the Contract - Buy an NFT
Select the createMarketSale Function
- Input the tokenId of the NFT you wish to purchase.
Send the Exact Price
Ensure that you send the exact price (in tRBTC) listed for the NFT.
Confirm the transaction in MetaMask.
Verify the Purchase
Check the transaction hash in the explorer.
Confirm that the NFT ownership has transferred to your wallet by calling the fetchMyNFTs function in Remix.
Part 6: Conclusion
You've successfully built a secure, efficient NFT marketplace on Rootstock, combining Bitcoin's security with Ethereum's functionality. This implementation provides a solid foundation for various NFT use cases while benefiting from Rootstock's advantages.
Next Steps
Frontend Development:
Create a user interface using Web3.js or Ethers.js
Implement wallet integration
Add metadata handling and IPFS integration
Feature Enhancement:
Add auction functionality
Implement royalty systems
Create collection management features
By deploying on Rootstock, you're part of a growing ecosystem that brings smart contract functionality to the Bitcoin network while maintaining high security and low costs.
For further reading and development resources, visit the Rootstock Website and Rootstock Documentation.
Subscribe to my newsletter
Read articles from Henry Pham directly inside your inbox. Subscribe to the newsletter, and don't miss out.
Written by