Namespaces in Kubernetes
 Hamza Shaukat
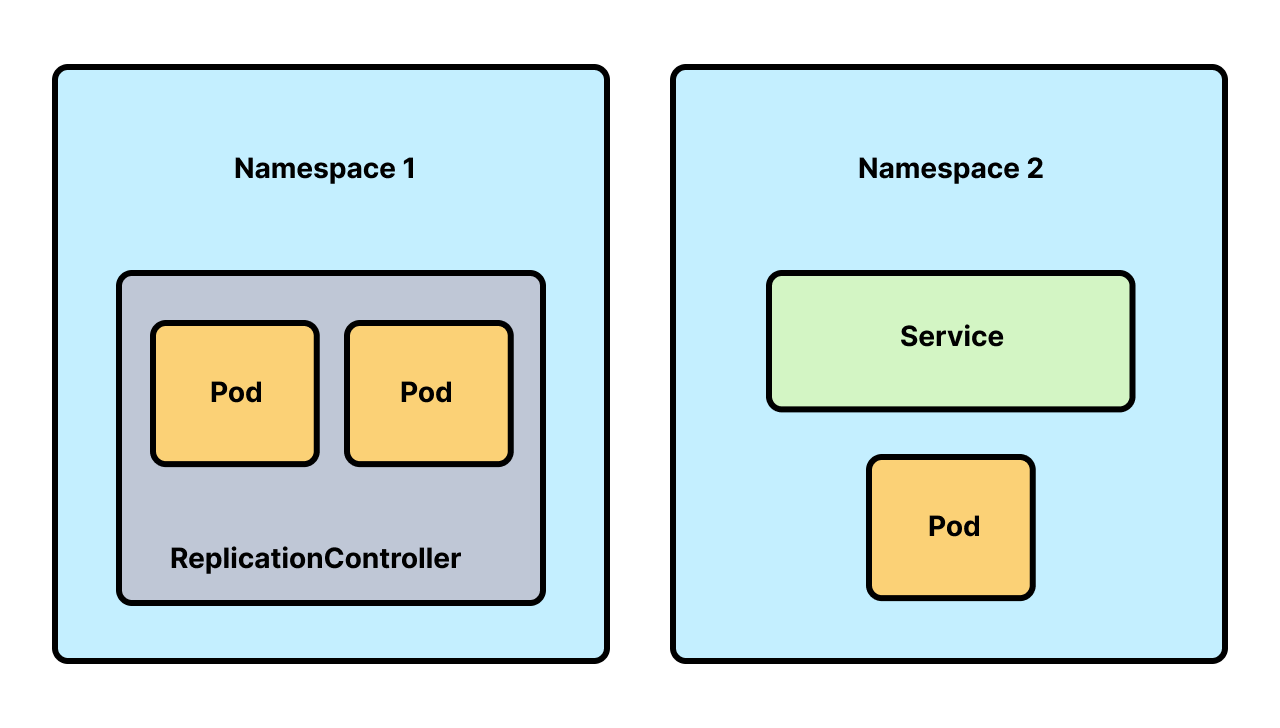
Namespaces in Kubernetes are a logical isolation mechanism that helps organize and manage resources within a cluster. They act as virtual clusters inside a physical Kubernetes cluster, enabling you to:
1. Organize Resources
Group related components: Namespaces let you segment resources (e.g., Pods, Services, Deployments) into logical groups (e.g., by team, project, or environment like
dev,staging,prod).Avoid naming collisions: Resource names must be unique within a namespace, but the same name can be reused in different namespaces.
Example: Bothdevandprodnamespaces can have a Deployment namedapi.
2. Control Access (RBAC)
- Limit permissions: Use Role-Based Access Control (RBAC) to restrict users/teams to specific namespaces.
Example: A developer can only access thedevnamespace, while a sysadmin can accessprod.
3. Enforce Resource Limits
- Set quotas: Apply
ResourceQuotasto limit compute/memory usage or the number of objects (e.g., Pods) per namespace.
Example: Prevent adevteam from consuming all cluster resources.
4. Simplify Multi-Tenancy
- Isolate tenants: In shared clusters, namespaces allow different teams, customers, or applications to coexist without interfering with each other.
5. Scope Actions
- Default context: Commands like
kubectl get podstarget the current namespace (set viakubectl config set-context).
Example: After switching to theprodnamespace,kubectl get podsonly shows Pods inprod.
6. Manage Lifecycles
- Delete all resources at once: Deleting a namespace removes all resources within it, simplifying cleanup.
Example:kubectl delete namespace devremoves everything in thedevenvironment.
Common Namespaces
default: Created automatically; used if no namespace is specified.kube-system: Reserved for Kubernetes system components (e.g.,kube-apiserver,CoreDNS).kube-public: Stores cluster-wide read-only data (rarely used directly).kube-node-lease: Holds node heartbeat/health data.
When to Use Namespaces?
Separate environments (e.g.,
dev,staging,prod).Isolate teams (e.g.,
team-a,team-b).Partition large applications into smaller components (e.g.,
frontend,backend).
Key Limitations
Not all resources are namespaced: Cluster-scoped resources (e.g., Nodes, PersistentVolumes, ClusterRoles) exist outside namespaces.
No network isolation by default: Use Network Policies to control traffic between namespaces.
Example Workflow
# Work in the 'dev' namespace
kubectl config set-context --current --namespace=dev
kubectl apply -f deployment.yaml  # Deploys to 'dev'

# Switch to 'prod'
kubectl config set-context --current --namespace=prod
kubectl get pods                  # Only shows 'prod' Pods
In short, namespaces are essential for organizing, securing, and managing resources in Kubernetes, especially in multi-team or multi-environment scenarios. 🚀
Here’s the corrected and organized version with explanations:
Why Use Namespaces?
Namespaces in Kubernetes:
Isolate resources (e.g.,
devvs.prod).Prevent naming conflicts.
Control access via RBAC.
Enforce resource limits.
1. Namespace Management
View/Set Context
# Check current context
kubectl config current-context

# Create a namespace
kubectl create ns alnafi

# Set default namespace for current context
kubectl config set-context $(kubectl config current-context) --namespace=dev

# Reset to default namespace
kubectl config set-context $(kubectl config current-context) --namespace=default
List/Delete Namespaces
# List all namespaces
kubectl get ns

# Delete a service in a namespace
kubectl -n <namespace> delete svc blue-service
2. Create a Namespace via YAML
ns.yaml:
apiVersion: v1
kind: Namespace
metadata:
  name: my-namespace
Apply:
kubectl apply -f ns.yaml
3. Pod Configuration
pod.yaml (corrected indentation and labels):
apiVersion: v1
kind: Pod
metadata:
  name: test-pod
  namespace: default  # Explicitly specify namespace
  labels:
    app: blue  # Use meaningful labels like "app"
spec:
  containers:
  - name: nginx
    image: nginx
    ports:
    - containerPort: 80  # Correct port for Nginx
Deploy:
# Deploy to default namespace
kubectl apply -f pod.yaml

# Deploy to alnafi namespace
kubectl apply -f pod.yaml -n alnafi
4. Resource Quotas
Why Use Resource Quotas?
Limit CPU/memory usage per namespace.
Restrict the number of objects (Pods, Services).
resource-quota.yaml:
apiVersion: v1
kind: ResourceQuota
metadata:
  name: dev-quota
  namespace: alnafi
spec:
  hard:
    requests.cpu: "1"
    requests.memory: "8Gi"
    limits.cpu: "1"
    limits.memory: "16Gi"
    pods: "2"  # Allow only 2 Pods in this namespace
Apply:
kubectl apply -f resource-quota.yaml
5. Service Configuration
test-service.yaml (corrected selector and ports):
apiVersion: v1
kind: Service
metadata:
  name: test-service
  namespace: default
spec:
  type: NodePort
  selector:
    app: blue  # Match Pod's label
  ports:
  - protocol: TCP
    port: 80      # Service port
    targetPort: 80  # Pod's containerPort
    nodePort: 30000  # Optional: Manually assign NodePort (30000-32767)
Deploy:
kubectl apply -f test-service.yaml
Verify:
kubectl get svc test-service
kubectl describe svc test-service
6. Database (Redis) Setup
Pod (db-pod.yaml):
apiVersion: v1
kind: Pod
metadata:
  name: redis
  namespace: dev
  labels:
    app: db  # Match Service selector
spec:
  containers:
  - name: redis
    image: redis:alpine
    ports:
    - containerPort: 6379
    command: ["redis-server", "--requirepass", "paswr"]  # Use Secrets in production!
Service (db-svc.yaml):
apiVersion: v1
kind: Service
metadata:
  name: redis
  namespace: dev
spec:
  type: NodePort
  selector:
    app: db  # Match Pod label
  ports:
  - protocol: TCP
    port: 6379      # Service port
    targetPort: 6379  # Pod's containerPort
    nodePort: 31000   # Accessible via <Node-IP>:31000
Deploy:
kubectl apply -f db-pod.yaml -f db-svc.yaml
7. Verify Connectivity
# Get Service details
kubectl get svc -n dev

# Access Redis from outside the cluster
redis-cli -h <Node-IP> -p 31000 -a paswr

# Access via Minikube
minikube service redis -n dev
Subscribe to my newsletter
Read articles from Hamza Shaukat directly inside your inbox. Subscribe to the newsletter, and don't miss out.
Written by
Hamza Shaukat
Hamza Shaukat
Greetings, This is Hamza. Linux Administration hands on experience of configuring different server ,Bash Scipting , Docker , Ansible , Python Automation ,AWS Solution Architect and other Devops tools