Networking in Docker
 Devisri
Hi everyone,
Today, we're diving into the fascinating world of networking within and outside containers! We'll explore the different types of networks available in Docker containers, uncover how they talk to each other, and discover why they're so essential in the first place! We will be creating different networks for each use case and cover some crucial commands for hands-on practices.
This is a continuation of the series on Docker containers. Be sure to check out my previous blog, where we had a detailed discussion on Docker, before reading this.
What is Networking?
Networking, in simple terms, is a group of computers connected to share resources, communicate, and exchange data. It involves a variety of components, such as IP addresses, ports, protocols, and interfaces, that facilitate communication between devices over a network. In the world of containers, networking plays a crucial role in linking lightweight, isolated environments within a single host or across multiple hosts.
IP (Internet Protocol): Each device has a unique IP address, similar to a name, which is used to identify it.
Port: A port helps determine which application should receive the data. For instance, you might have multiple tabs open in Chrome, but you want data to be sent specifically to WhatsApp…
Networking in Docker
Docker provides a powerful and flexible networking model that allows containers to communicate with each other, with the host system, and with external networks. Docker networking abstracts away complexities and provides simple ways to set up networks based on different use cases.
Why is networking needed here?
Docker networking is essential in many real-world applications, like microservices, video streaming, banking, fintech, and ride-sharing apps. But how exactly is it used?
Let’s look at what microservices vs monoliths(more on this later) are:
Monolithic: All components are tightly coupled into a single unit and hard to scale. If there is an error in a single module, then the whole app goes down.
Microservices: Each unit is divided into small services such as product,inventory,order,account services in an e-commerce application and can be written with different tech stack.This applications are loosely coupled and easier to scale, and manage as the app grows.Here if there is an err,then only that specific service goes down.
To know why networking is essential between the containers, let’s look at a real-world example first. Assume that you’re ordering a product from Amazon.
What you see as a user(Frontend):
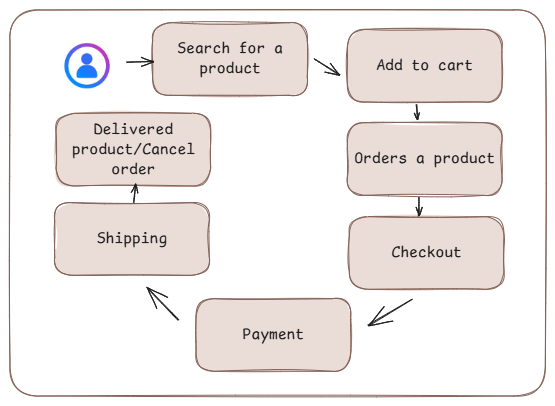
What actually happens(Backend):
Amazon is built on a microservices architecture where different services like products, homepage, account management, payments, inventory, and orders work together simultaneously. When you order a product from Amazon, a series of backend events are triggered in a microservices architecture. Each service runs in isolated Docker containers, ensuring security and smooth communication.Here,payment container service needs isolation while both the frontend and backend needs seamless communication.
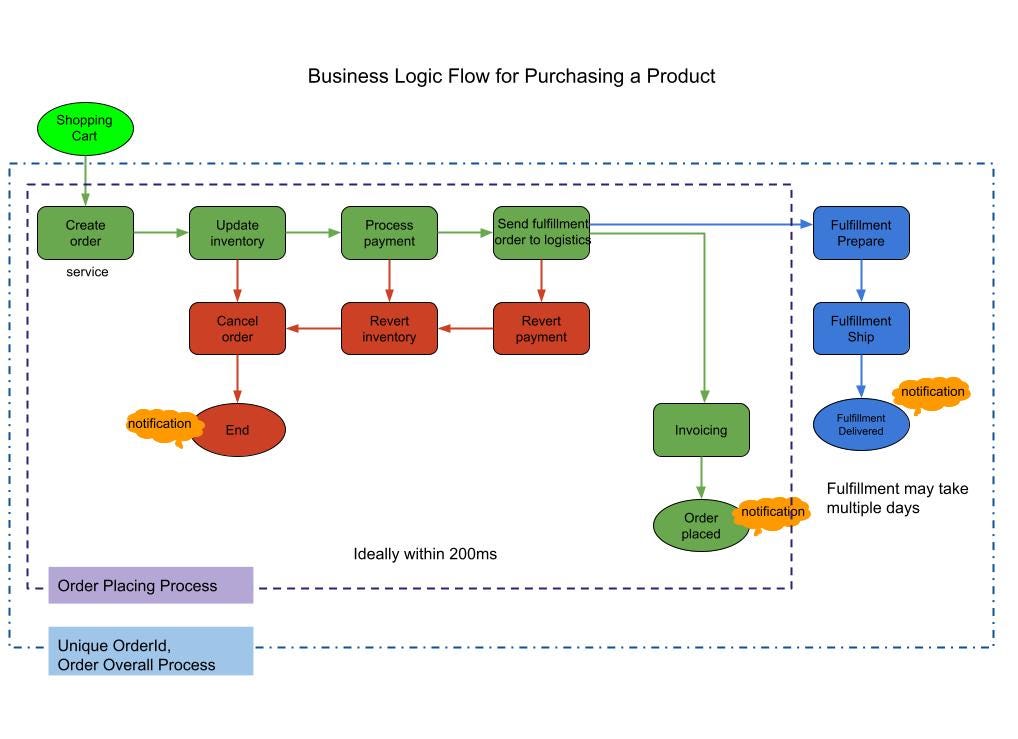
When an order is placed on Amazon, the frontend captures the order details and sends them to the backend. The backend triggers a series of microservices: inventory checks stock, payment processes the transaction securely, and order management updates the order status. Each service communicates seamlessly, ensuring a smooth transaction and timely updates to the user. From this example, we can conclude that there is a need for both:
Isolation between the containers to secure private information such as payment and finance applications.
Good communication between two containers, such as the frontend and backend, is essential for seamless communication in a real-time application used in production.
Types of Docker Networks
We discussed why and where networks are used in Docker containers. Now, let's look at how to implement them within containers for smooth communication, using the different types of Docker networks. Before that, let's look at some terms we will use in this blog:
Docker Host: A Docker host is a physical or virtual machine that runs the Docker daemon.
Docker Network Drivers: These enable us to easily use multiple types of networks for containers and hide the complexity required for network implementations.
Docker comes with several built-in networking options:
Bridge Network (Default one)
When you run a container without choosing a network, it automatically connects to the default bridge network. This setup allows containers to communicate using their names on the same network, making it perfect for standalone apps on a single host.
Think of the bridge network as a connector that links networks together. It creates a private network on the host, enabling containers to talk to each other. If you want to expose the application to the outside world, then forward it to a port number. Docker ensures that connections between different networks remain blocked to keep everything secure.
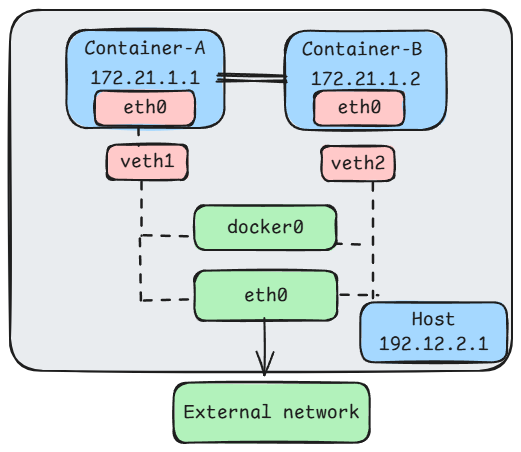
Setup:
Step 1: Create a custom bridge network
  docker network create my-bridge

  #output once you create the network
  b1a2c3d4e5f6g7h8i9j0k1l2m3n4o5p6q7r8s9t0u1v2w3x4y5z6a7b8
  #It is a unique ID created for the network
Step 2: Run two containers in the same bridge network. Here, (-dit )means to run the Ubuntu container in a detached mode in the background and interactive terminal with the name containerA and assign it to a user-defined custom network named my-bridge in the shell**.**
  docker run -dit --name containerA --network my-bridge ubuntu sh
  docker run -dit --name containerB --network my-bridge ubuntu sh

  #verify if two containers are running and it should show containerA and containerB
  docker ps
Step 3: Cross-check if they can communicate with another container using the ping command. Here, the exec cmd executes the command inside the running containerA.
  docker exec -it containerA sh
  ping containerB
  #output when you ping containerB if it tacks the data,then bridge network is implemented successfully
  root@Devisri:~# ping containerB
  PING containerB (192.168.1.3): 56 data bytes
  64 bytes from 192.168.1.3: seq=0 ttl=64 time=0.090 ms
  64 bytes from 192.168.1.3: seq=1 ttl=64 time=0.080 ms
  64 bytes from 192.168.1.3: seq=2 ttl=64 time=0.085 ms
Step 4: Listing all the networks and inspecting the network details of each network
  root@Devisri:~# docker network ls
  NETWORK ID     NAME                DRIVER    SCOPE
  b1a2c3d4e5f6   my-bridge           bridge    local
  a2b3c4d5e6f7   bridge              bridge    local

  root@Devisri:~# docker network inspect my-bridge
  [{
          "Name": "my_bridge_network",
          "Id": "b1a2c3d4e5f6g7h8i9j0k1l2m3n4o5p6q7r8s9t0u1v2w3x4y5z6a7b8",
          "Driver": "bridge",
          "Containers": {
              "c1d2e3f4g5h6i7j8k9l0m1n2o3p4q5r6s7t8u9v0w1x2y3z4a5b6c7d8": {
                  "Name": "container1",
                  "IPv4Address": "192.168.1.2/24"
              },
              "d9e8f7g6h5i4j3k2l1m0n9o8p7q6r5s4t3u2v1w0x9y8z7a6b5c4d3e2f1": {
                  "Name": "container2",
                  "IPv4Address": "192.168.1.3/24"
              }}}]
  NOTE
  #The name,Id,and each details of the network is shown in json format.For here ,the output is truncated for simplicity.
Containers in the same bridge network can communicate using container names, but they can’t reach the outside world unless explicitly configured with an IP address and Port number.
- Host Network
Removes network isolation between the container and the host. The container shares the host’s network stack directly, meaning it uses the host’s IP and ports.
Perfect for situations where you need high-performance networking.
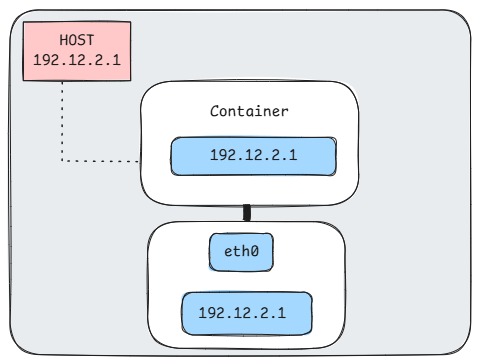
Step 1: Run a nginx container with a name host-container assigned to the network type as host in a detached mode in the terminal.
docker run -dit --name host-container --network host nginx
#verify if the container is running and it should show host-container
docker ps
#output
CONTAINER ID   IMAGE     COMMAND   CREATED        STATUS        NAMES
a1b2c3d4e5f6   nginx    "sh"      10 seconds ago Up 10 secs    host-container
root@Devisri:~ docker inspect host-container | grep '"NetworkMode"'
#output
"NetworkMode": "host",
#Okay it confirms that this container is using host networking!Good
root@Devisri:~ docker network ls
NETWORK ID     NAME                DRIVER    SCOPE
b3c4d5e6f7g8   host                host      local
Step 2: Inside the container, check the network (shares host’s IP)
curl http://localhost
#As the container directly runs on host's network,you can see that via by navigating to localhost
OUTPUT
<!DOCTYPE html><html>
<head><title>Welcome to nginx!</title></head><body>
<h1>Success! The Nginx web server is working!</h1>
</body></html>
The container runs without an isolated network. It can access the host’s ports directly, but can’t communicate via container names.
- None Network
Provides complete network isolation for the container. The container has no network access. This is super useful for security and custom networking setups. Here, no other external network can reach the containers, and even the containers cannot reach any external network.
Though much more secure, we want containers to talk with each other all the time without causing the system to crash.
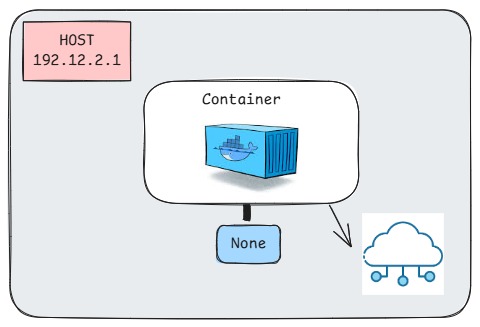
docker run -dit --name isolated-container --network none ubuntu sh
#verify if the container is running
docker ps
CONTAINER ID   IMAGE     COMMAND   CREATED        STATUS        NAMES
a1b2c3d4e5f6   ubuntu   "sh"      10 seconds ago Up 10 secs    isolated-container

#check networking mode
root@Devisri:~ docker inspect isolated-container | grep '"NetworkMode"'
#here the output should be
"NetworkMode": "none",

#list all the networks
root@Devisri:~ docker network ls
NETWORK ID     NAME                DRIVER    SCOPE
c4d5e6f7g8h9   none                null      local
Well DONE!none network exists as expected
root@Devisri:~ docker exec -it isolated-container sh
#check network interface within the container and it should show loopback interface
root@Devisri:~ ip a
1: lo: <LOOPBACK> mtu 65536 qdisc noop state DOWN group default
    link/loopback 00:00:00:00:00:00 brd 00:00:00:00:00:00
This should fail because the container is completely isolated with no internet or container-to-container communication.
Overlay Network
Used in Docker Swarm for multi-host container communication systems such as the Kubernetes cluster, the Overlay Network is your go-to for connecting containers across different hosts securely. It requires a Swarm cluster setup.
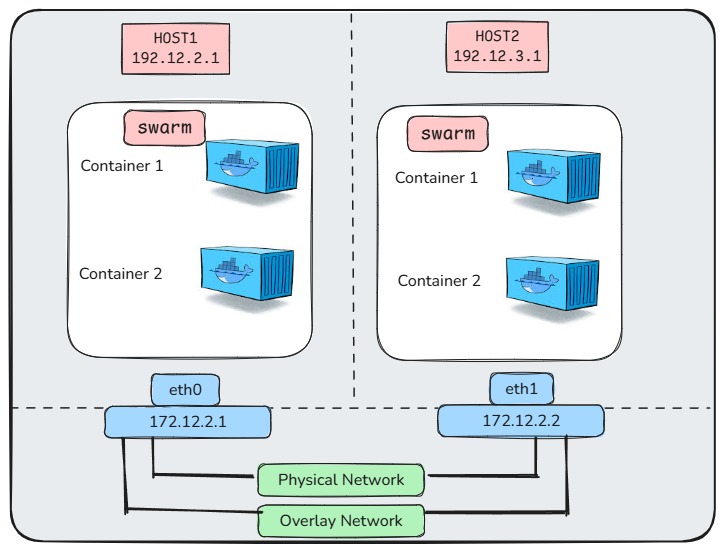
Setup:
Step 1: Initialize Docker Swarm
  docker swarm init
  #output
  Swarm initialized: current node (abcdefghijklm) is now a manager.
  SWARM MODE ON!
Step 2: Create an overlay network with the name my-overlay with overlay network assigned.
  docker network create --driver overlay my-overlay
  #verify if the network is created using
  docker network ls
  NETWORK ID     NAME                DRIVER    SCOPE
  d5e6f7g8h9i0   my-overlay  overlay   swarm
Step 3: Once the network is successfully created, Create a service using the overlay network
docker service create --name web-service --network my-overlay -p 8080:80 --replicas 2 nginx
#verify the running services and note that there are two replicas.
docker service ls
ID             NAME         MODE         REPLICAS   IMAGE
abcdefgh1234   web_service  replicated   2/2        nginx
root@Devisri:~# docker service ps web-service
ID             NAME           IMAGE  NODE        DESIRED STATE  CURRENT STATE
abcdefgh1234   web_service.1  nginx  node-1      Running        Running 1 min
ijklmnop5678   web_service.2  nginx  node-2      Running        Running 1 min
Note that here each replica runs on a different node and both are in my-overlay overlay network.
Macvlan Network
This is a little bit advanced as well as less common compared to above network types and typically used in specific networking scenarios such as IoT, telecom,and high performance network applications.
The Macvlan network driver in Docker allows containers to have their own MAC (Media Access Control) address, also known as a physical address on the network. This lets them communicate with other devices on the local network as if they were independent machines.
It bypasses the Docker bridge network for lower network overhead and works by creating a virtual network interface in the host system and mapping it to containers. It has two main modes:
Bridge mode: Containers communicate with each other and the external network through the host interface.
Passthrough mode: Containers directly use the host’s physical network interface.
Here, we create and run an Alpine image with the network assigned as my-macvlan and the name "container1".
root@Devisri:~# docker run -dit --name container1 --network my-macvlan alpine sh
Conclusion
We've reached the end of our deep dive into Docker networking, and what a journey it's been! We've explored the basics of Docker networking, from understanding different network types to using them for smooth container communication. As you continue with Docker, give these networks a try in real-world scenarios to boost your understanding. Remember, the world of containers is vast and always changing, so keep exploring and learning. See you in the next blog! 🚀
Thanks for reading!
Happy networking🎉
Subscribe to my newsletter
Read articles from Devisri directly inside your inbox. Subscribe to the newsletter, and don't miss out.
Written by

Devisri
Devisri
Hello, I'm Devisri, currently an undergraduate student working towards my degree. I have a strong interest in technology and am dedicated to sharing my learning journey and knowledge with the community. I am currently exploring web dev, and I'm actively honing my skills in data structures and algorithms using Java. Excited about Opensource Technologies and cloud-native communities!!